發佈和追蹤機器學習管線

本文將說明如何與您的同事或客戶共用機器學習管線。
機器學習管線是用於機器學習工作的可重複使用工作流程。 管線的其中一個優點是可加強共同作業。 您也設定管線的版本,讓客戶可在您使用新版本時,使用最新的模型。
必要條件
建立 Azure Machine Learning 工作區以保存您的所有管線資源
設定開發環境以安裝 Azure Machine Learning SDK,或使用已安裝 SDK 的 Azure Machine Learning Compute 執行個體
建立並執行機器學習管線,如下列教學課程:建置 Azure Machine Learning 管線進行批次評分中所述。 如需其他選項,請參閱使用 Azure Machine Learning SDK 來建立及執行機器學習管線
發佈管線
當管線啟動並執行之後,您就可以發佈管線,使其以不同的輸入執行。 若要讓已發佈管線的 REST 端點可接受參數,您必須針對可能不同的引數,將管線設定為使用 PipelineParameter 物件。
若要建立管線參數,請使用 PipelineParameter 物件搭配預設值。
from azureml.pipeline.core.graph import PipelineParameter

pipeline_param = PipelineParameter(
  name="pipeline_arg",
  default_value=10)
將這個
PipelineParameter物件以參數形式新增至管線中的任何步驟,如下所示:compareStep = PythonScriptStep( script_name="compare.py", arguments=["--comp_data1", comp_data1, "--comp_data2", comp_data2, "--output_data", out_data3, "--param1", pipeline_param], inputs=[ comp_data1, comp_data2], outputs=[out_data3], compute_target=compute_target, source_directory=project_folder)發佈這個將在被叫用時接受參數的管線。
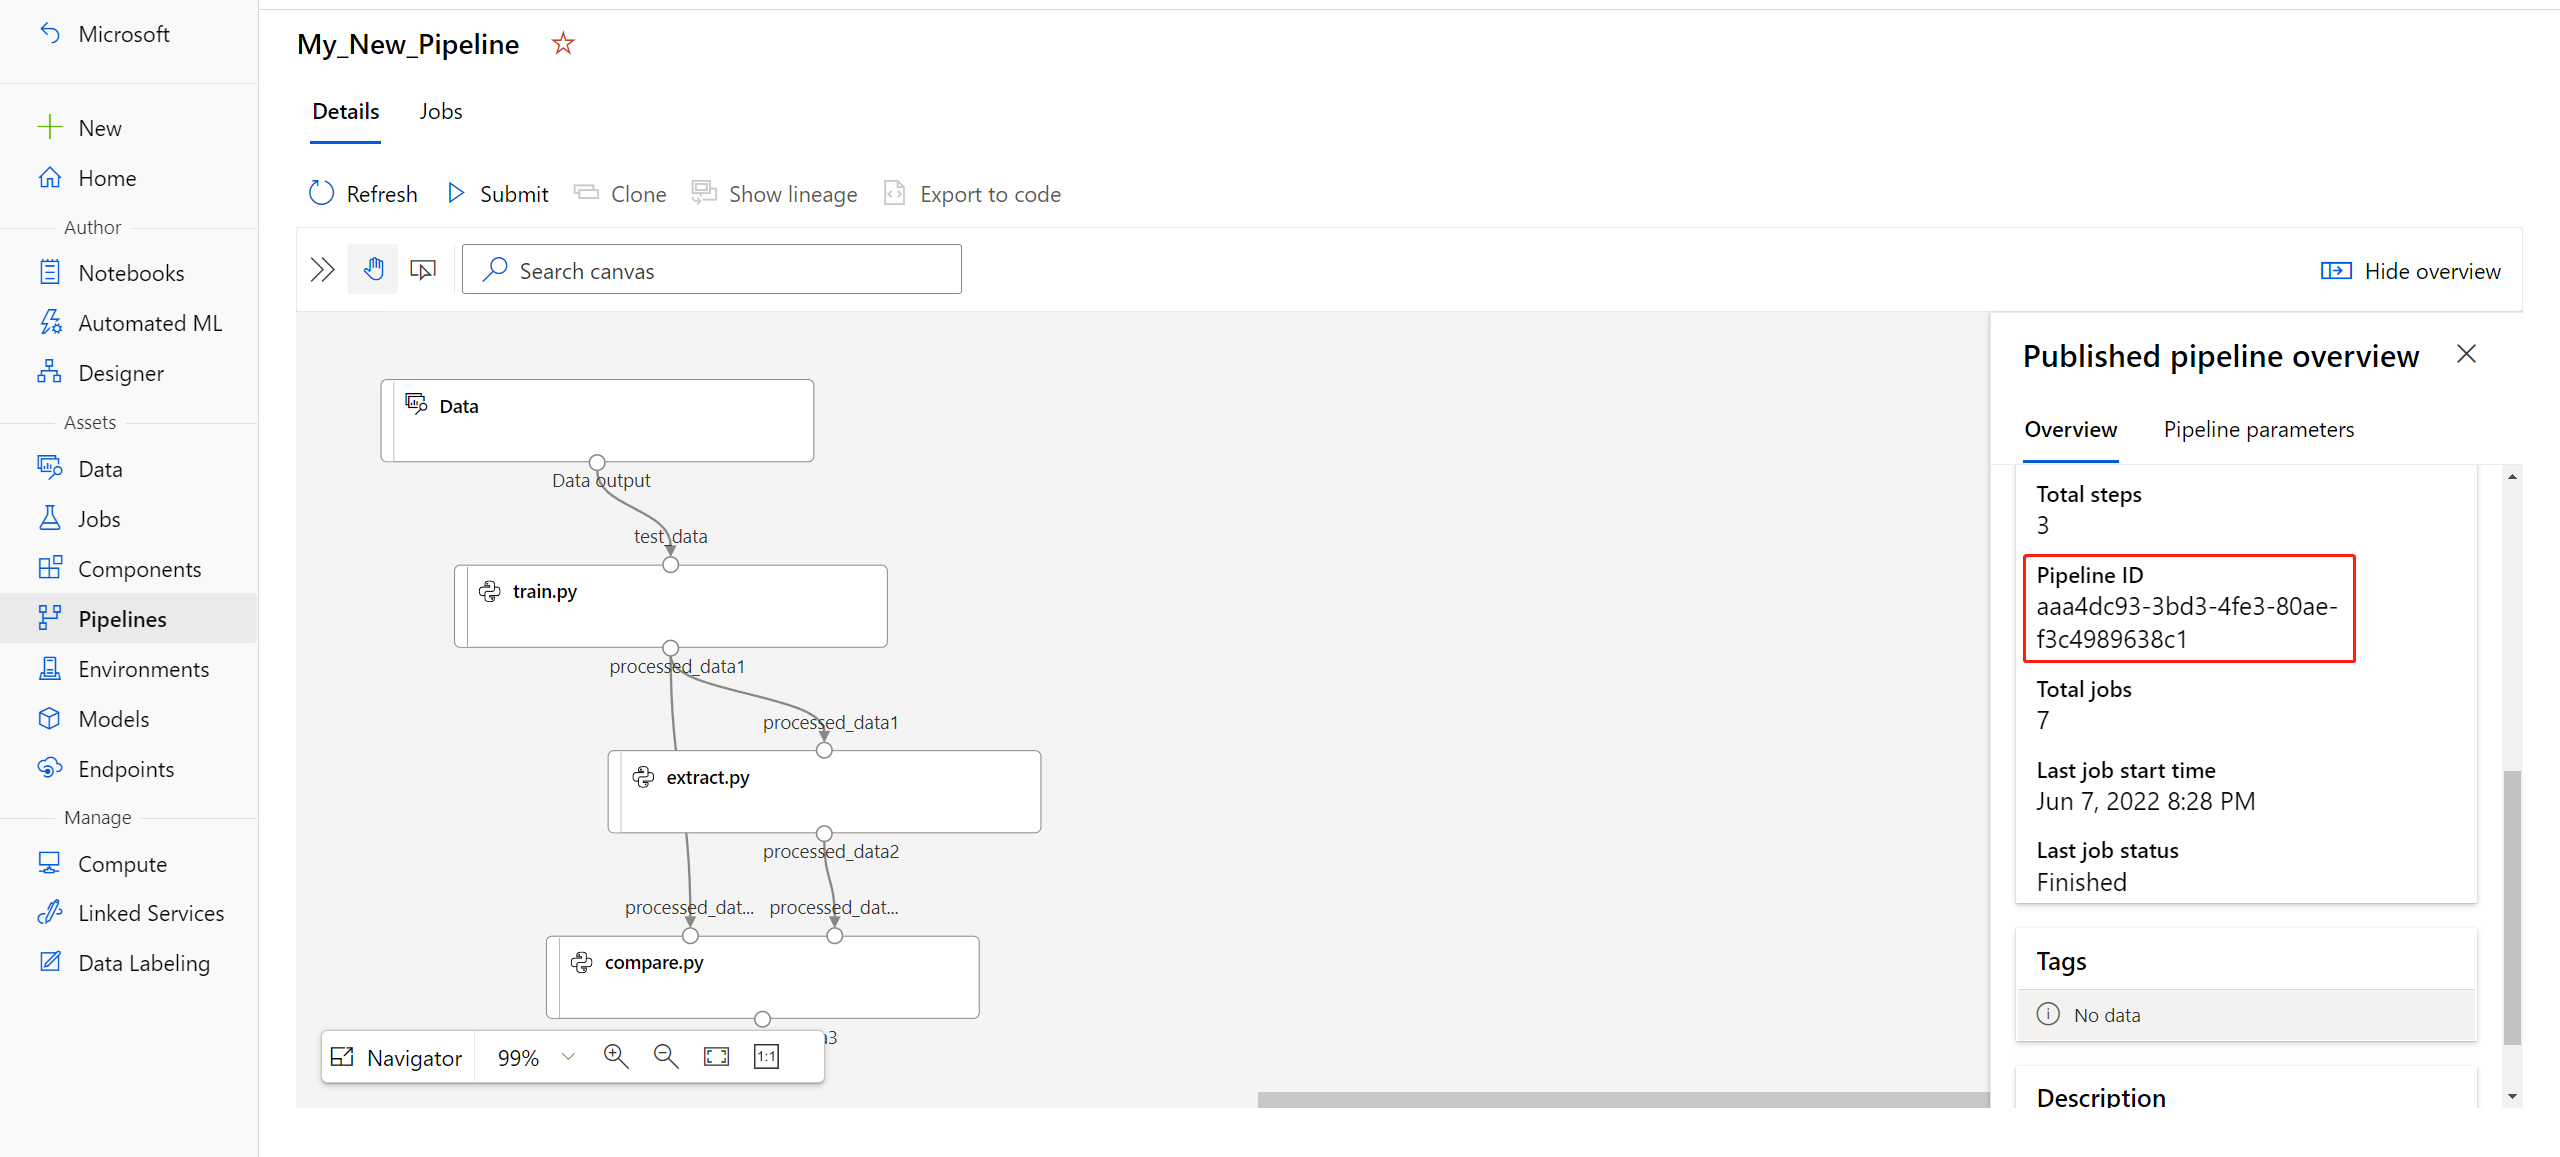
published_pipeline1 = pipeline_run1.publish_pipeline(
     name="My_Published_Pipeline",
     description="My Published Pipeline Description",
     version="1.0")
發佈管道後,即可在 UI 中加以檢查。 管線識別碼是已發佈管線的唯一識別。

執行已發佈的管線
所有已發佈的管線都有 REST 端點。 使用管線端點時,您可以從任何外部系統 (包括非 Python 用戶端) 觸發管線的執行。 此端點可在批次評分和重新訓練案例中,提供「受控的可重複性」。
重要
若您使用 Azure 角色型存取控制 (Azure RBAC) 來管理管線的存取權,請為管線案例設定權限 (訓練或評分)。
若要叫用先前的管線執行,您需要一個 Microsoft Entra 驗證標頭權杖。 取得這類權杖的說明位於 AzureCliAuthentication 類別參考和 Azure Machine Learning 中的驗證筆記本中。
from azureml.pipeline.core import PublishedPipeline
import requests

response = requests.post(published_pipeline1.endpoint,
                         headers=aad_token,
                         json={"ExperimentName": "My_Pipeline",
                               "ParameterAssignments": {"pipeline_arg": 20}})
針對 ParameterAssignments 索引鍵,POST 要求的 json 引數必須包含其中有管線參數和其值的字典。 此外,json 引數可能包含下列索引鍵:
| 關鍵 | 描述 |
|---|---|
ExperimentName |
與此端點相關聯的實驗名稱 |
Description |
描述端點的自由格式文字 |
Tags |
可以用來標記和標註要求的自由格式索引鍵/值組 |
DataSetDefinitionValueAssignments |
用於變更資料集且不需要重新訓練的字典 (請參閱下方討論) |
DataPathAssignments |
用於變更資料路徑且不需要重新訓練的字典 (請參閱下方討論) |
使用 C# 執行已發佈的管線
下列程式碼示範如何以非同步方式從 C# 呼叫管線。 部分程式碼片段只會顯示呼叫結構,而不是 Microsoft 範例的一部分。 不會顯示完整的類別或錯誤處理。
[DataContract]
public class SubmitPipelineRunRequest
{
    [DataMember]
    public string ExperimentName { get; set; }

    [DataMember]
    public string Description { get; set; }

    [DataMember(IsRequired = false)]
    public IDictionary<string, string> ParameterAssignments { get; set; }
}

// ... in its own class and method ...
const string RestEndpoint = "your-pipeline-endpoint";

using (HttpClient client = new HttpClient())
{
    var submitPipelineRunRequest = new SubmitPipelineRunRequest()
    {
        ExperimentName = "YourExperimentName",
        Description = "Asynchronous C# REST api call",
        ParameterAssignments = new Dictionary<string, string>
        {
            {
                // Replace with your pipeline parameter keys and values
                "your-pipeline-parameter", "default-value"
            }
        }
    };

    string auth_key = "your-auth-key";
    client.DefaultRequestHeaders.Authorization = new AuthenticationHeaderValue("Bearer", auth_key);

    // submit the job
    var requestPayload = JsonConvert.SerializeObject(submitPipelineRunRequest);
    var httpContent = new StringContent(requestPayload, Encoding.UTF8, "application/json");
    var submitResponse = await client.PostAsync(RestEndpoint, httpContent).ConfigureAwait(false);
    if (!submitResponse.IsSuccessStatusCode)
    {
        await WriteFailedResponse(submitResponse); // ... method not shown ...
        return;
    }

    var result = await submitResponse.Content.ReadAsStringAsync().ConfigureAwait(false);
    var obj = JObject.Parse(result);
    // ... use `obj` dictionary to access results
}
使用 Java 執行已發佈的管線
下列程式碼會顯示需要驗證的管線呼叫 (請參閱設定 Azure Machine Learning 資源和工作流程的驗證)。 如果您的管線採用公開部署,您就不需要產生 authKey 的呼叫。 部分程式碼片段不會顯示 Java 類別和例外狀況處理的樣板。 程式碼會使用 Optional.flatMap 將可能會傳回空白 Optional 的函式鏈結在一起。 使用 flatMap 可縮短並清楚說明程式碼,但請注意,getRequestBody() 會容忍例外狀況。
import java.net.URI;
import java.net.http.HttpClient;
import java.net.http.HttpRequest;
import java.net.http.HttpResponse;
import java.util.Optional;
// JSON library
import com.google.gson.Gson;

String scoringUri = "scoring-endpoint";
String tenantId = "your-tenant-id";
String clientId = "your-client-id";
String clientSecret = "your-client-secret";
String resourceManagerUrl = "https://management.azure.com";
String dataToBeScored = "{ \"ExperimentName\" : \"My_Pipeline\", \"ParameterAssignments\" : { \"pipeline_arg\" : \"20\" }}";

HttpClient client = HttpClient.newBuilder().build();
Gson gson = new Gson();

HttpRequest tokenAuthenticationRequest = tokenAuthenticationRequest(tenantId, clientId, clientSecret, resourceManagerUrl);
Optional<String> authBody = getRequestBody(client, tokenAuthenticationRequest);
Optional<String> authKey = authBody.flatMap(body -> Optional.of(gson.fromJson(body, AuthenticationBody.class).access_token);;
Optional<HttpRequest> scoringRequest = authKey.flatMap(key -> Optional.of(scoringRequest(key, scoringUri, dataToBeScored)));
Optional<String> scoringResult = scoringRequest.flatMap(req -> getRequestBody(client, req));
// ... etc (`scoringResult.orElse()`) ...

static HttpRequest tokenAuthenticationRequest(String tenantId, String clientId, String clientSecret, String resourceManagerUrl)
{
    String authUrl = String.format("https://login.microsoftonline.com/%s/oauth2/token", tenantId);
    String clientIdParam = String.format("client_id=%s", clientId);
    String resourceParam = String.format("resource=%s", resourceManagerUrl);
    String clientSecretParam = String.format("client_secret=%s", clientSecret);

    String bodyString = String.format("grant_type=client_credentials&%s&%s&%s", clientIdParam, resourceParam, clientSecretParam);

    HttpRequest request = HttpRequest.newBuilder()
        .uri(URI.create(authUrl))
        .POST(HttpRequest.BodyPublishers.ofString(bodyString))
        .build();
    return request;
}

static HttpRequest scoringRequest(String authKey, String scoringUri, String dataToBeScored)
{
    HttpRequest request = HttpRequest.newBuilder()
        .uri(URI.create(scoringUri))
        .header("Authorization", String.format("Token %s", authKey))
        .POST(HttpRequest.BodyPublishers.ofString(dataToBeScored))
        .build();
    return request;

}

static Optional<String> getRequestBody(HttpClient client, HttpRequest request) {
    try {
        HttpResponse<String> response = client.send(request, HttpResponse.BodyHandlers.ofString());
        if (response.statusCode() != 200) {
            System.out.println(String.format("Unexpected server response %d", response.statusCode()));
            return Optional.empty();
        }
        return Optional.of(response.body());
    }catch(Exception x)
    {
        System.out.println(x.toString());
        return Optional.empty();
    }
}

class AuthenticationBody {
    String access_token;
    String token_type;
    int expires_in;
    String scope;
    String refresh_token;
    String id_token;

    AuthenticationBody() {}
}
在不重新訓練的情況下變更資料集和資料路徑
您可以在不同的資料集和資料路徑上進行訓練和推斷。 例如,您可能想要針對較小的資料集進行訓練,但在整個資料集上進行推斷。 您可以在要求的 json 引數中,使用 DataSetDefinitionValueAssignments 索引鍵來切換資料集。 您可以使用 DataPathAssignments 來切換資料路徑。 兩者的技巧很類似:
在您的管線定義指令碼中,為資料集建立
PipelineParameter。 從PipelineParameter中建立DatasetConsumptionConfig或DataPath:tabular_dataset = Dataset.Tabular.from_delimited_files('https://dprepdata.blob.core.windows.net/demo/Titanic.csv') tabular_pipeline_param = PipelineParameter(name="tabular_ds_param", default_value=tabular_dataset) tabular_ds_consumption = DatasetConsumptionConfig("tabular_dataset", tabular_pipeline_param)在您的 ML 指令碼中,使用
Run.get_context().input_datasets存取動態指定的資料集:from azureml.core import Run input_tabular_ds = Run.get_context().input_datasets['tabular_dataset'] dataframe = input_tabular_ds.to_pandas_dataframe() # ... etc ...請注意,ML 指令碼會存取為
DatasetConsumptionConfig(tabular_dataset) 指定的值,而不是PipelineParameter(tabular_ds_param) 的值。在您的管線定義指令碼中,將
DatasetConsumptionConfig設定為PipelineScriptStep的參數:train_step = PythonScriptStep( name="train_step", script_name="train_with_dataset.py", arguments=["--param1", tabular_ds_consumption], inputs=[tabular_ds_consumption], compute_target=compute_target, source_directory=source_directory) pipeline = Pipeline(workspace=ws, steps=[train_step])若要在推斷 REST 呼叫中動態切換資料集,請使用
DataSetDefinitionValueAssignments:tabular_ds1 = Dataset.Tabular.from_delimited_files('path_to_training_dataset') tabular_ds2 = Dataset.Tabular.from_delimited_files('path_to_inference_dataset') ds1_id = tabular_ds1.id d22_id = tabular_ds2.id response = requests.post(rest_endpoint, headers=aad_token, json={ "ExperimentName": "MyRestPipeline", "DataSetDefinitionValueAssignments": { "tabular_ds_param": { "SavedDataSetReference": {"Id": ds1_id #or ds2_id }}}})
展示資料集和 PipelineParameter及展示資料路徑和 PipelineParameter 筆記本中都有這項技術的完整範例。
建立已設定版本的管線端點
您可以建立管線端點,並在其後方設定多個已發佈的管線。 當您逐一查看並更新 ML 管線時,此技術可提供您固定的 REST 端點。
from azureml.pipeline.core import PipelineEndpoint

published_pipeline = PublishedPipeline.get(workspace=ws, id="My_Published_Pipeline_id")
pipeline_endpoint = PipelineEndpoint.publish(workspace=ws, name="PipelineEndpointTest",
                                            pipeline=published_pipeline, description="Test description Notebook")
將作業提交至管線端點
您可以將作業提交至管線端點的預設版本:
pipeline_endpoint_by_name = PipelineEndpoint.get(workspace=ws, name="PipelineEndpointTest")
run_id = pipeline_endpoint_by_name.submit("PipelineEndpointExperiment")
print(run_id)
也可以將作業提交至特定版本:
run_id = pipeline_endpoint_by_name.submit("PipelineEndpointExperiment", pipeline_version="0")
print(run_id)
還可以使用 REST API 完成相同動作:
rest_endpoint = pipeline_endpoint_by_name.endpoint
response = requests.post(rest_endpoint,
                         headers=aad_token,
                         json={"ExperimentName": "PipelineEndpointExperiment",
                               "RunSource": "API",
                               "ParameterAssignments": {"1": "united", "2":"city"}})
在工作室中使用已發佈的管線
您也可以從工作室執行已發佈的管線:
在左側,選取 [端點]。
從頂端選取 [管線端點]。
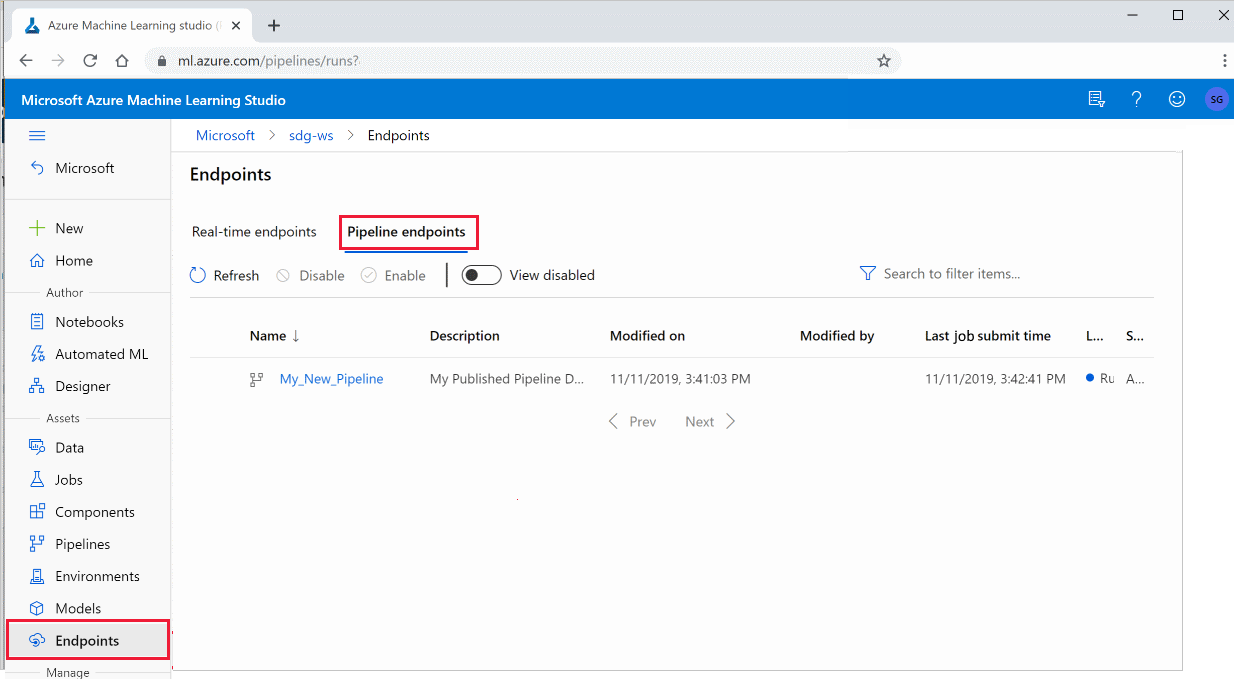
選取特定管線,以執行、取用或檢閱管線端點上先前執行的結果。
停用已發佈的管線
若要從已發佈的管線清單中隱藏管線,您可以從工作室或 SDK 中停用管線:
# Get the pipeline by using its ID from Azure Machine Learning studio
p = PublishedPipeline.get(ws, id="068f4885-7088-424b-8ce2-eeb9ba5381a6")
p.disable()
您可以使用 p.enable() 來重新啟用。 如需詳細資訊,請參閱 PublishedPipeline 類別參考。
下一步
- 使用 GitHub 上的這些 Jupyter Notebook 來進一步探索機器學習管線。
- 請參閱 azureml-pipelines-core 套件和 azureml-pipelines-steps 套件的 SDK 參考說明。
- 請參閱操作說明,以取得有關管線偵錯和疑難排解的秘訣。