Azure Machine Learning 管線支援元件和管線層級的輸入和輸出。 本文說明管線和元件輸入和輸出,以及如何管理它們。
在元件層級,輸入和輸出可定義元件介面。 您可使用一個元件的輸出作為相同父管線中另一個元件的輸入,讓資料或模型可以在元件之間傳遞。 此互連能力代表管線內的資料流程。
在管線層級,您可使用輸入和輸出來提交具有不同資料輸入或參數的管線作業,例如 learning_rate。 當您透過 REST 端點叫用管線時,輸入和輸出特別有用。 您可將不同的值指派給管線輸入,或存取不同管線作業的輸出。 如需詳細資訊,請參閱建立批次端點的作業和輸入資料。
輸入和輸出類型
支援下列類型作為元件或管線的輸入和輸出:
資料類型。 如需詳細資訊,請參閱資料類型 (部分機器翻譯)。
uri_fileuri_foldermltable
模型類型。
mlflow_modelcustom_model
只有輸入也支援下列基本類型:
- 基本類型
stringnumberintegerboolean
不支援基本類型輸出。
範例輸入和輸出
這些範例來自 Azure Machine Learning 範例 GitHub 存放庫中的 NYC 計程車資料迴歸管線:
-
定型元件具有名為
number的test_split_ratio輸入。 -
準備元件具有
uri_folder類型輸出。 此元件原始程式碼會從輸入資料夾讀取 CSV 檔案、處理這些檔案,並將已處理的 CSV 檔寫入到輸出資料夾。 -
定型元件具有
mlflow_model類型輸出。 此元件原始程式碼會使用mlflow.sklearn.save_model方法儲存定型的模型。
輸出序列化
使用資料或模型輸出可將輸出序列化,並將其儲存為儲存位置的檔案。 稍後的步驟可以在作業執行期間存取檔案,做法是掛接此儲存位置,或下載檔案或將檔案上傳至計算檔案系統。
此元件原始程式碼必須將通常儲存在儲存體的輸出物件序列化為檔案。 例如,您可以將 pandas 資料框架序列化為 CSV 檔案。 Azure Machine Learning 不會為物件序列化定義任何標準化的方法。 您可以彈性地選擇慣用的方法來將物件序列化成檔案。 在下游元件中,您可選擇如何還原序列化和讀取這些檔案。
資料類型輸入和輸出路徑
對於資料資產輸入和輸出,您必須指定指向資料位置的路徑參數。 下表顯示 Azure Machine Learning 管線輸入和輸出支援的資料位置,以及 path 參數範例:
| 地點 | 輸入 | 輸出 | 範例 |
|---|---|---|---|
| 本機電腦上的路徑 | ✓ | ./home/<username>/data/my_data |
|
| 公用 http/s 伺服器的路徑 | ✓ | https://raw.githubusercontent.com/pandas-dev/pandas/main/doc/data/titanic.csv |
|
| Azure 儲存體上的路徑 | * | wasbs://<container_name>@<account_name>.blob.core.windows.net/<path>或 abfss://<file_system>@<account_name>.dfs.core.windows.net/<path> |
|
| Azure Machine Learning 資料存放區上的路徑 | ✓ | ✓ | azureml://datastores/<data_store_name>/paths/<path> |
| 資料資產的路徑 | ✓ | ✓ | azureml:my_data:<version> |
小提示
不建議直接使用 Azure 儲存體進行輸入,因為它可能需要額外的身分識別設定才能讀取資料。 最好使用跨各種管線作業類型支援的 Azure Machine Learning 資料存放區路徑。
資料類型輸入和輸出模式
針對資料類型輸入和輸出,您可以從數個下載、上傳和掛接模式進行選擇,以定義計算目標存取資料的方式。 下表顯示不同類型的輸入和輸出支援的模式。
| 類型 | upload |
download |
ro_mount |
rw_mount |
direct |
eval_download |
eval_mount |
|---|---|---|---|---|---|---|---|
uri_folder 輸入 |
✓ | ✓ | ✓ | ||||
uri_file 輸入 |
✓ | ✓ | ✓ | ||||
mltable 輸入 |
✓ | ✓ | ✓ | ✓ | ✓ | ||
uri_folder 輸出 |
✓ | ✓ | |||||
uri_file 輸出 |
✓ | ✓ | |||||
mltable 輸出 |
✓ | ✓ | ✓ |
在大多數情況下,我們建議使用 ro_mount 或 rw_mount 模式。 如需詳細資訊,請參閱模式。
管線圖形中的輸入和輸出
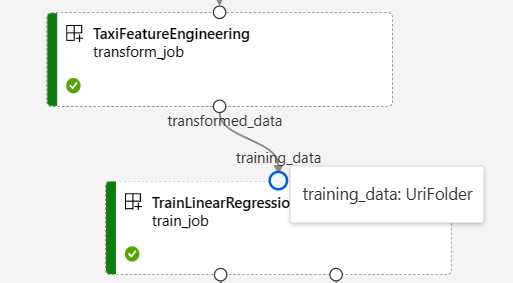
在 Azure Machine Learning 工作室的管線作業頁面上,元件輸入和輸出會顯示為稱為輸入/輸出連接埠的小圓圈。 這些連接埠代表管線中的資料流程。 管線層級輸出會顯示在紫色方塊中,以便輕易識別。
NYC 計程車資料迴歸管線圖形中的下列螢幕擷取畫面顯示許多元件和管線輸入和輸出。
當您將游標停留在輸入/輸出連接埠上方時,即會顯示類型。

管線圖形不會顯示基本類型輸入。 這些輸入會出現在管線 [作業概觀] 面板 (對於管線層級輸入) 或元件面板 (對於元件層級輸入) 的 [設定] 索引標籤上。 若要開啟元件面板,請按兩下圖形中的元件。
當您在工作室設計工具中編輯管線時,管線輸入和輸出位於 [管線介面] 面板中,而元件輸入和輸出則位於元件面板中。

將元件輸入和輸出升階至管線層級
將元件的輸入/輸出升階到管線層級可讓您在提交管線作業時覆寫元件的輸入/輸出。 這項功能特別適用於使用 REST 端點來觸發管線。
下列範例示範如何將元件層級輸入/輸出升階至管線層級輸入/輸出。
下列管線會將三個輸入和三個輸出升階為管線層級。 例如,pipeline_job_training_max_epocs 是管線層級輸入,因為它會在根層級的 inputs 區段之下宣告。
在 train_job 區段中的 jobs 之下,名為 max_epocs 的輸入被參考為 ${{parent.inputs.pipeline_job_training_max_epocs}},這表示 train_job 的 max_epocs 輸入參考了管線層級 pipeline_job_training_max_epocs 輸入。 管線輸出是使用相同的結構描述來升階。
$schema: https://azuremlschemas.azureedge.net/latest/pipelineJob.schema.json
type: pipeline
display_name: 1b_e2e_registered_components
description: E2E dummy train-score-eval pipeline with registered components

inputs:
  pipeline_job_training_max_epocs: 20
  pipeline_job_training_learning_rate: 1.8
  pipeline_job_learning_rate_schedule: 'time-based'

outputs:
  pipeline_job_trained_model:
    mode: upload
  pipeline_job_scored_data:
    mode: upload
  pipeline_job_evaluation_report:
    mode: upload

settings:
 default_compute: azureml:cpu-cluster

jobs:
  train_job:
    type: command
    component: azureml:my_train@latest
    inputs:
      training_data:
        type: uri_folder
        path: ./data
      max_epocs: ${{parent.inputs.pipeline_job_training_max_epocs}}
      learning_rate: ${{parent.inputs.pipeline_job_training_learning_rate}}
      learning_rate_schedule: ${{parent.inputs.pipeline_job_learning_rate_schedule}}
    outputs:
      model_output: ${{parent.outputs.pipeline_job_trained_model}}
    services:
      my_vscode:
        type: vs_code
      my_jupyter_lab:
        type: jupyter_lab
      my_tensorboard:
        type: tensor_board
        log_dir: "outputs/tblogs"
    #  my_ssh:
    #    type: tensor_board
    #    ssh_public_keys: <paste the entire pub key content>
    #    nodes: all # Use the `nodes` property to pick which node you want to enable interactive services on. If `nodes` are not selected, by default, interactive applications are only enabled on the head node.

  score_job:
    type: command
    component: azureml:my_score@latest
    inputs:
      model_input: ${{parent.jobs.train_job.outputs.model_output}}
      test_data:
        type: uri_folder
        path: ./data
    outputs:
      score_output: ${{parent.outputs.pipeline_job_scored_data}}

  evaluate_job:
    type: command
    component: azureml:my_eval@latest
    inputs:
      scoring_result: ${{parent.jobs.score_job.outputs.score_output}}
    outputs:
      eval_output: ${{parent.outputs.pipeline_job_evaluation_report}}
您可以在 Azure Machine Learning 範例存放庫中含已註冊元件的 train-score-eval 管線找到完整的範例。
定義選用輸入
根據預設,所有輸入都是必要的,而且每次提交管線作業時都必須有預設值或指派一個值。 不過,您可以定義選用輸入。
附註
不支援選用輸出。
設定選用輸入在兩個案例中很有用:
如果您定義選用資料/模型類型輸入,而當您提交管線作業時,不會將值指派給它,管線元件就缺少該資料相依性。 如果元件的輸入連接埠未連結至任何元件或資料/模型節點,管線會直接叫用元件,而不是等候先前的相依性。
如果您為管線設定
continue_on_step_failure = True,但node2使用來自node1的必要輸入,若node2失敗,node1就不會執行。 如果node1輸入是選擇性的,即使node2失敗,node1仍會執行。 下圖示範此案例。
下列程式碼範例示範如何定義選用輸入。 當輸入設定為 optional = true 時,您必須使用 $[[]] 來接受命令列輸入,如範例的醒目提示行所示。
$schema: https://azuremlschemas.azureedge.net/latest/commandComponent.schema.json
name: train_data_component_cli
display_name: train_data
description: A example train component
tags:
  author: azureml-sdk-team
type: command
inputs:
  training_data:
    type: uri_folder
  max_epocs:
    type: integer
    optional: true
  learning_rate:
    type: number
    default: 0.01
    optional: true
  learning_rate_schedule:
    type: string
    default: time-based
    optional: true
outputs:
  model_output:
    type: uri_folder
code: ./train_src
environment: azureml://registries/azureml/environments/sklearn-1.5/labels/latest
command: >-
  python train.py
  --training_data ${{inputs.training_data}}
  $[[--max_epocs ${{inputs.max_epocs}}]]
  $[[--learning_rate ${{inputs.learning_rate}}]]
  $[[--learning_rate_schedule ${{inputs.learning_rate_schedule}}]]
  --model_output ${{outputs.model_output}}
自訂輸出路徑
根據預設,元件輸出會儲存在您為管線設定的 {default_datastore} 中,即 azureml://datastores/${{default_datastore}}/paths/${{name}}/${{output_name}}。 如果未設定,預設值為工作區 Blob 儲存體。
作業 {name} 會在作業執行階段解析,{output_name} 是您定義於元件 YAML 的名稱。 您可藉由定義輸出路徑來自訂儲存輸出的位置。
含已註冊元件的 train-score-eval 管線範例的 pipeline.yml 檔案定義具有三個管線層級輸出的管線。 使用下列命令來設定輸出的 pipeline_job_trained_model 自訂輸出路徑:
# define the custom output path using datastore uri
# add relative path to your blob container after "azureml://datastores/<datastore_name>/paths"
output_path="azureml://datastores/{datastore_name}/paths/{relative_path_of_container}"

# create job and define path using --outputs.<outputname>
az ml job create -f ./pipeline.yml --set outputs.pipeline_job_trained_model.path=$output_path
下載輸出
您可以在管線或元件層級下載輸出。
下載管線層級輸出
您可以下載作業的所有輸出,或下載特定輸出。
# Download all the outputs of the job
az ml job download --all -n <JOB_NAME> -g <RESOURCE_GROUP_NAME> -w <WORKSPACE_NAME> --subscription <SUBSCRIPTION_ID>

# Download a specific output
az ml job download --output-name <OUTPUT_PORT_NAME> -n <JOB_NAME> -g <RESOURCE_GROUP_NAME> -w <WORKSPACE_NAME> --subscription <SUBSCRIPTION_ID>
下載元件輸出
若要下載子元件的輸出,請先列出管線作業的所有子作業,然後使用類似的程式碼來下載輸出。
# List all child jobs in the job and print job details in table format
az ml job list --parent-job-name <JOB_NAME> -g <RESOURCE_GROUP_NAME> -w <WORKSPACE_NAME> --subscription <SUBSCRIPTION_ID> -o table

# Select the desired child job name to download output
az ml job download --all -n <JOB_NAME> -g <RESOURCE_GROUP_NAME> -w <WORKSPACE_NAME> --subscription <SUBSCRIPTION_ID>
將輸出註冊為具名資產
您可將 name 和 version 指派給輸出,以將元件或管線的輸出註冊為具名資產。 已註冊的資產可透過工作室 UI、CLI 或 SDK 列在您的工作區中,而且可在未來工作區作業中參考。
註冊管線層級輸出
display_name: register_pipeline_output
type: pipeline
jobs:
  node:
    type: command
    inputs:
      component_in_path:
        type: uri_file
        path: https://dprepdata.blob.core.windows.net/demo/Titanic.csv
    component: ../components/helloworld_component.yml
    outputs:
      component_out_path: ${{parent.outputs.component_out_path}}
outputs:
  component_out_path:
    type: mltable
    name: pipeline_output  # Define name and version to register pipeline output
    version: '1'
settings:
  default_compute: azureml:cpu-cluster


