啟用流程部署的追蹤並收集意見反應 (預覽)
注意
此功能目前處於公開預覽。 此預覽版本沒有服務等級協定,不建議將其用於生產工作負載。 可能不支援特定功能,或可能已經限制功能。 如需詳細資訊,請參閱 Microsoft Azure 預覽版增補使用條款。
在生產環境中部署產生 AI 應用程式之後,應用程式開發人員會尋求增強其瞭解並優化效能。 追蹤每個要求、匯總計量和用戶意見反應的數據扮演重要角色。
在本文中,您將瞭解如何在流程部署的推斷期間啟用追蹤、收集匯總的計量和使用者意見反應。
必要條件
- Azure CLI 和適用於 Azure CLI 的 Azure Machine Learning 延伸模組。 如需詳細資訊,請參閱安裝、設定和使用 CLI (v2)。
- Azure Machine Learning 工作區。 如果您沒有工作區資源,請依快速入門:建立工作區資源一文中的步驟來建立工作區資源。
- Application Insights。 機器學習工作區通常會有默認連結的 Application Insights。 如果您想要使用新的資源,您可以 建立 Application Insights 資源。
- 了解如何在提示流程中建置和測試流程。
- 對受控線上端點有基本的了解。 受控線上端點會以可調整、完全受控的方式,使用 Azure 中強大的 CPU 和 GPU 機器,讓您省去設定和管理基礎的部署基礎結構的額外負荷。 如需受控線上端點的詳細資訊,請參閱進行即時推斷所需的線上端點和部署。
- Azure 角色型存取控制 (Azure RBAC) 可用來授與 Azure Machine Learning 作業的存取權。 若要執行本文中的步驟,您必須為使用者帳戶指派 Azure Machine Learning 工作區的擁有者或參與者角色,或允許「Microsoft.MachineLearningServices/workspaces/onlineEndpoints/」的自訂角色。 如果您使用 Studio 來建立/管理在線端點/部署,您需要資源群組擁有者的另一個許可權 “Microsoft.Resources/deployments/write”。 如需詳細資訊,請參閱管理對 Azure Machine Learning 工作區的存取。
部署流程以進行即時推斷
正確測試流程之後,您可以部署生產環境的彈性流程或 DAG 流程。 在本文中,我們會使用將流程部署至 Azure 機器學習 受控在線端點,例如。 針對彈性流程,您需要 準備 flow.flex.yaml 檔案, flow.dag.yaml而不是 。
您也可以 部署到其他平臺,例如 Docker 容器、Kubernetes 叢集等。
注意
您必須使用最新的提示流程基底映射來部署流程,以便支援追蹤和意見反應收集 API。
啟用追蹤並收集部署的系統計量
如果您使用 Studio UI 來部署,則可以在 [進階設定 -> 部署精靈] 中的部署步驟中開啟 Application Insights 診斷,以這種方式將追蹤數據和系統計量收集到連結的工作區 Application Insights。
如果您使用 SDK 或 CLI,您可以在部署 yaml 檔案中新增屬性 app_insights_enabled: true ,以收集數據至工作區連結的 Application Insights。 您也可以在部署 yaml 檔案中依環境變數 APPLICATIONINSIGHTS_CONNECTION_STRING 指定其他 Application Insights,如下所示。 您可以在 Azure 入口網站 的 [概觀] 頁面中找到 Application Insights 的 連接字串。
# below is the property in deployment yaml
# app_insights_enabled: true

# you can also use the environment variable
environment_variables:
  APPLICATIONINSIGHTS_CONNECTION_STRING: <connection_string>
注意
如果您只設定 app_insights_enabled: true ,但工作區沒有連結的 Application Insights,您的部署將不會失敗,但不會收集數據。
如果您同時指定 app_insights_enabled: true 和上述環境變數,追蹤數據和計量將會傳送至工作區連結的 Application Insights。 因此,如果您想要指定不同的 Application Insights,您只需要保留環境變數。
如果您部署到其他平臺,您也可以使用環境變數 APPLICATIONINSIGHTS_CONNECTION_STRING: <connection_string> 來收集追蹤數據和計量,以隔離 Application Insights。
在 Application Insights 中檢視追蹤數據
追蹤會在執行期間記錄應用程式的特定事件或狀態。 它可以包含函數調用、變數值、系統事件等等的相關數據。 追蹤有助於將應用程式的元件分解成離散輸入和輸出,這對偵錯和瞭解應用程式至關重要。 若要深入瞭解,請參閱 追蹤上的OpenTelemetry追蹤 。 追蹤數據遵循 OpenTelemetry 規格。
您可以在指定的 Application Insights 中檢視詳細追蹤。 下列螢幕快照顯示已部署流程的事件範例,其中包含多個節點。 在 Application Insights -> 調查 -> 交易搜尋中,您可以選取每個節點來檢視其詳細追蹤。
相 依性 類型事件會記錄來自部署的呼叫。 該事件的名稱是流程資料夾的名稱。 深入瞭解 Application Insights 中的交易搜尋和診斷。
在 Application Insights 中檢視系統計量
| 計量名稱 | 類型 | 維度 | 描述 |
|---|---|---|---|
| token_consumption | 計數器 | - flow - node - llm_engine - token_type: prompt_tokens:LLM API 輸入令牌; completion_tokens:LLM API 回應令牌; total_tokens = prompt_tokens + completion tokens |
OpenAI 令牌取用計量 |
| flow_latency | 長條圖 | flow、response_code、串流、response_type | 要求執行成本,response_type 表示其是否為 full/firstbyte/lastbyte |
| flow_request | 計數器 | flow, response_code, 例外狀況, 串流 | 流程要求計數 |
| node_latency | 長條圖 | flow、node、run_status | 節點執行成本 |
| node_request | 計數器 | flow、node、exception、run_status | 節點執行計數 |
| rpc_latency | 長條圖 | flow、node、api_call | rpc 成本 |
| rpc_request | 計數器 | flow, node, api_call, exception | rpc 計數 |
| flow_streaming_response_duration | 長條圖 | 流程 | 串流回應傳送成本,從傳送第一個位元組到傳送最後一個位元組 |
您可以在工作區概觀頁面中,於 Azure 入口網站 中找到工作區預設 Application Insights。
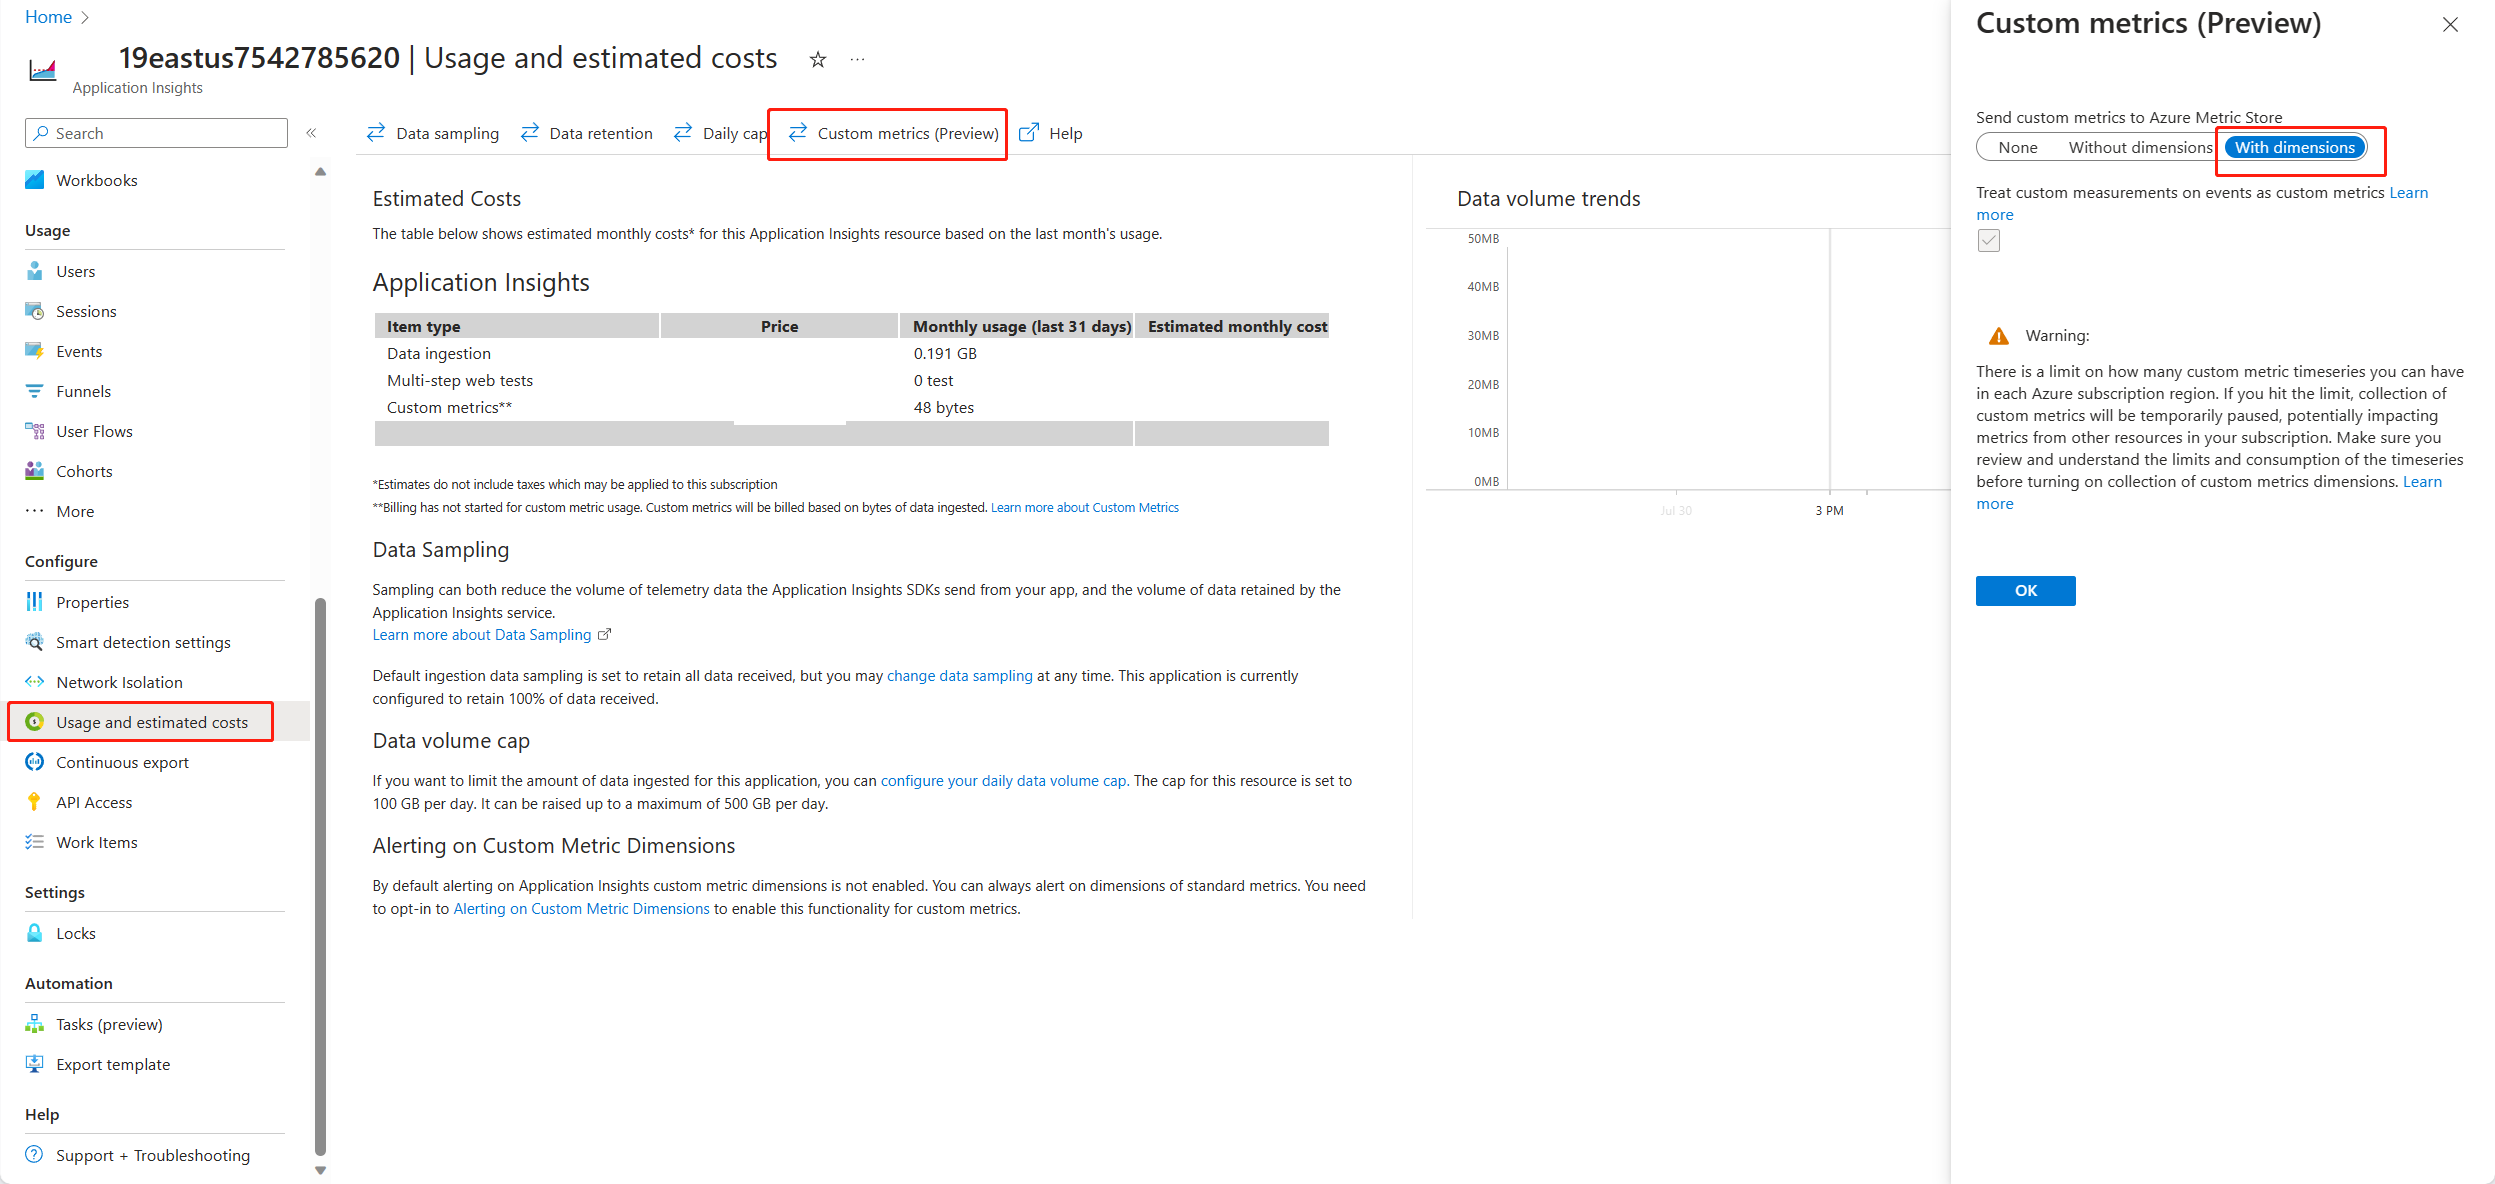
開啟 Application Insights,然後從左側導覽列中選取 [使用量和估計成本]。 選取 [自訂計量 (預覽)],然後選取 [使用維度],並儲存變更。
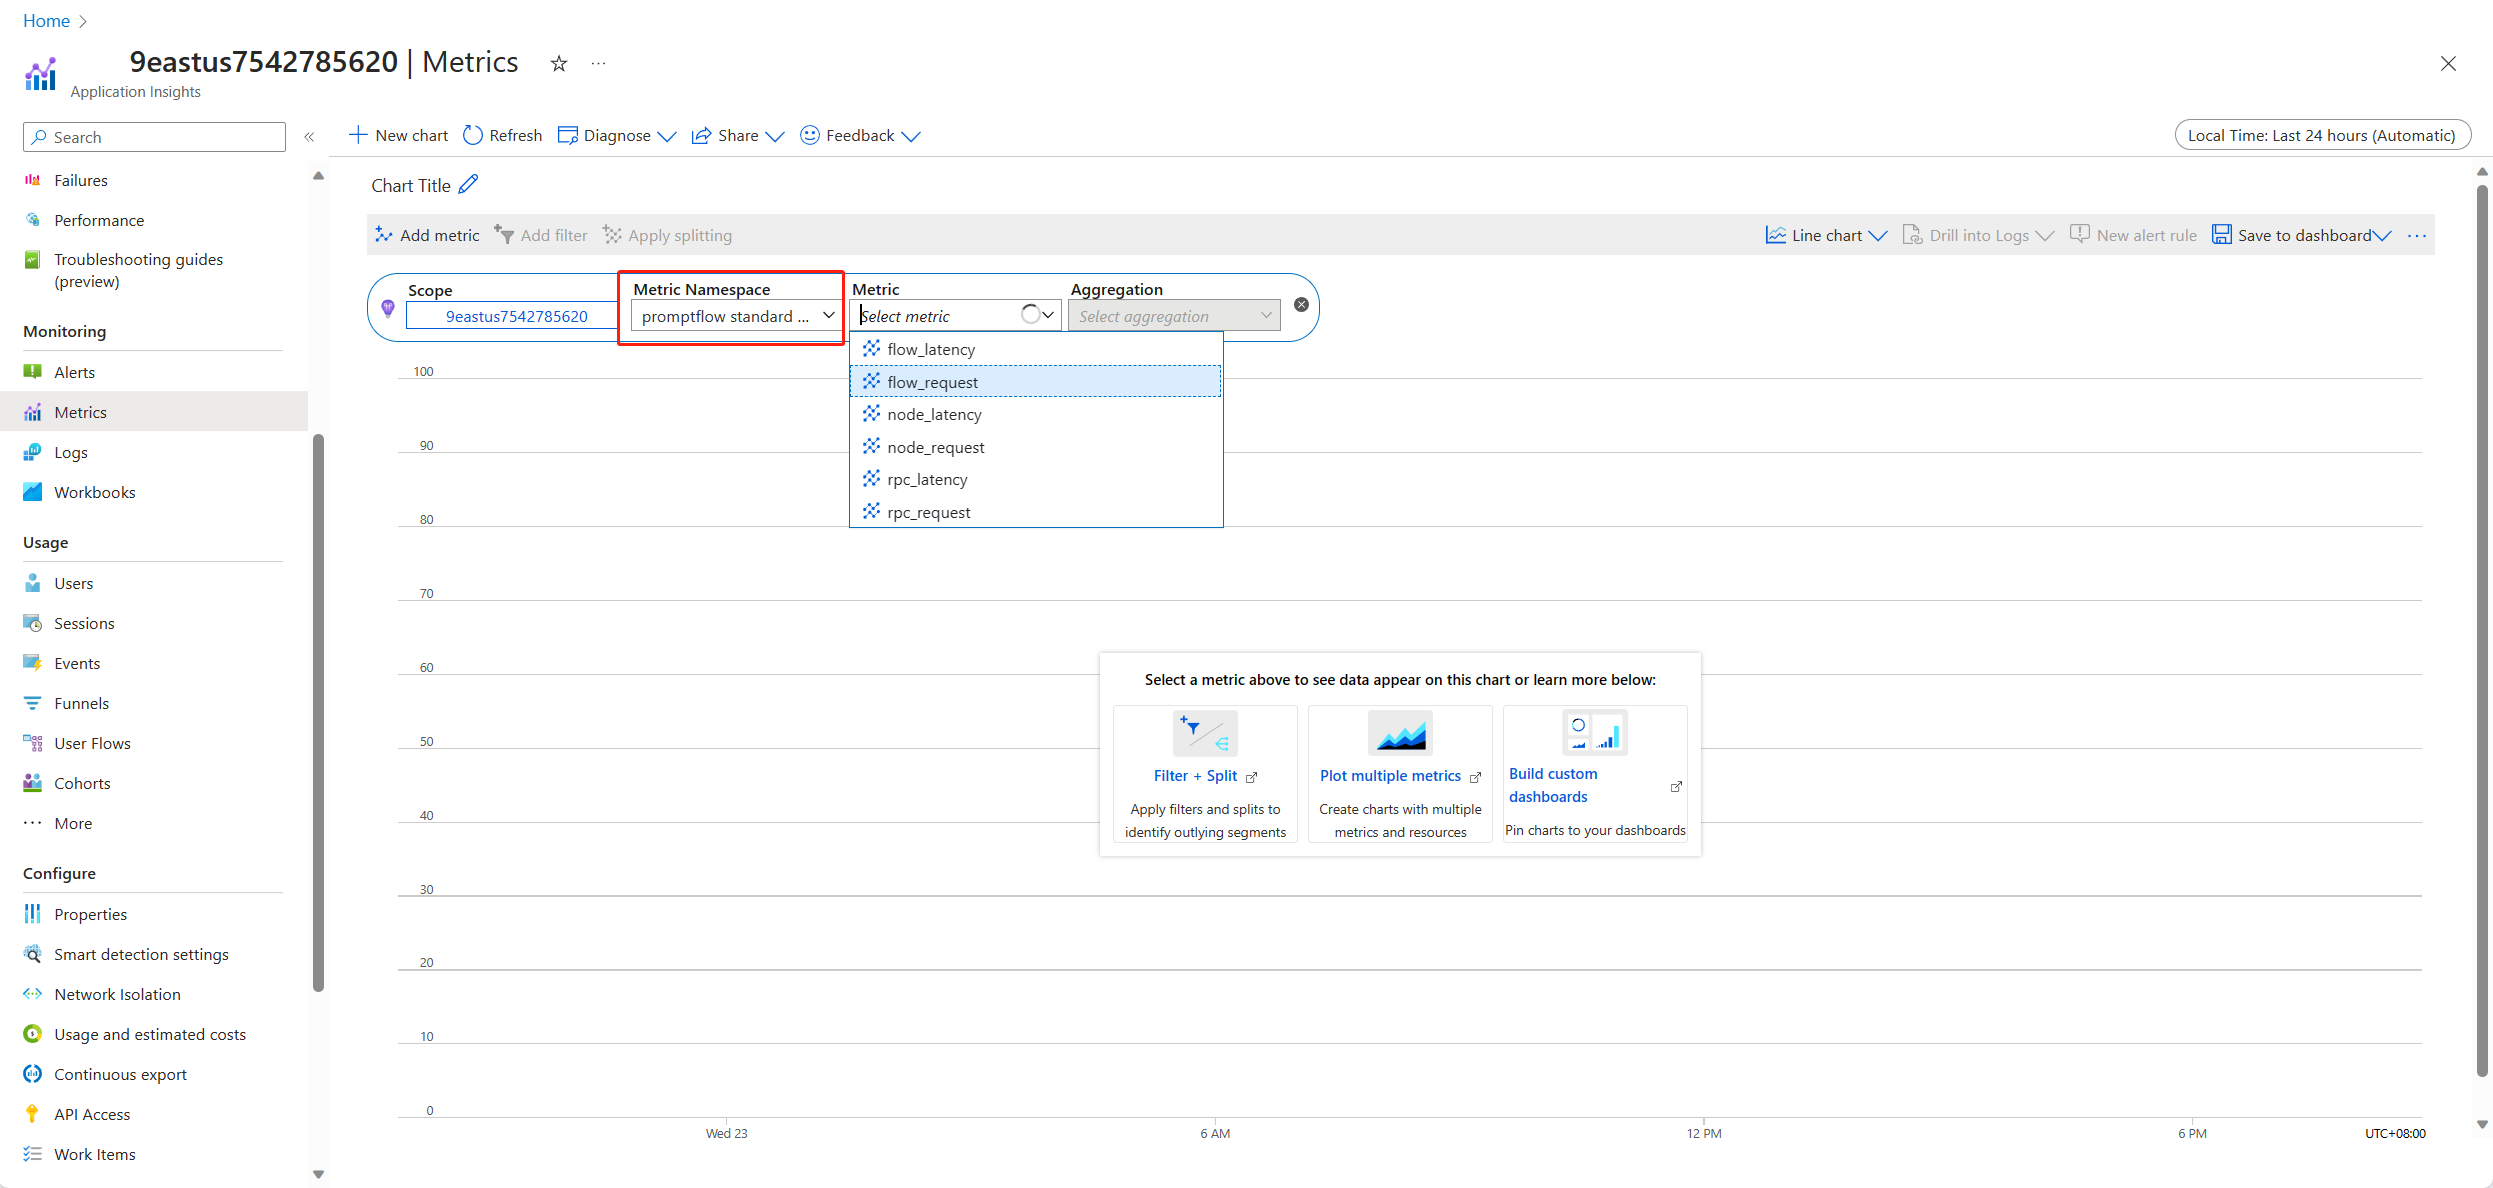
選取左側導覽列中的 [計量] 索引標籤。 從 [計量命名空間] 選取 [promptflow 標準計量],即可從 [計量] 下拉式清單中使用不同的彙總方法來探索計量。
收集意見反應並傳送至 Application Insights
提示流程服務提供新的 /feedback API 來協助客戶收集意見反應,意見反應承載可以是任何 json 格式數據,PF 服務只會協助客戶將意見反應數據儲存至追蹤範圍。 數據會儲存至已設定的追蹤匯出工具目標客戶。 它也支援 OpenTelemetry 標準追蹤內容傳播,表示它尊重要求標頭中設定的追蹤內容,並使用該內容做為要求父範圍內容。 您可以利用分散式追蹤功能,將意見反應追蹤與其聊天要求追蹤相互關聯。
下列範例程式代碼示範如何評分已啟用追蹤的流程受控端點,並將意見反應傳送至評分要求的相同追蹤範圍。 流程具有輸入與輸出 question chat_hisotryanswer。 在為端點評分之後,我們會收集意見反應,並傳送至部署流程時指定的 Application Insights。 您必須根據使用案例填入 api_key 值或修改程序代碼。
import urllib.request
import json
import os
import ssl
from opentelemetry import trace, context
from opentelemetry.baggage.propagation import W3CBaggagePropagator
from opentelemetry.trace.propagation.tracecontext import TraceContextTextMapPropagator
from opentelemetry.sdk.trace import TracerProvider

# Initialize your tracer
tracer = trace.get_tracer("my.genai.tracer")
trace.set_tracer_provider(TracerProvider())

# Request data goes here
# The example below assumes JSON formatting which may be updated
# depending on the format your endpoint expects.
# More information can be found here:
# https://docs.microsoft.com/azure/machine-learning/how-to-deploy-advanced-entry-script
data = {
    "question": "hello",
    "chat_history": []
}

body = str.encode(json.dumps(data))

url = 'https://basic-chat-endpoint.eastus.inference.ml.azure.com/score'
feedback_url = 'https://basic-chat-endpoint.eastus.inference.ml.azure.com/feedback'
# Replace this with the primary/secondary key, AMLToken, or Microsoft Entra ID token for the endpoint
api_key = ''
if not api_key:
    raise Exception("A key should be provided to invoke the endpoint")

# The azureml-model-deployment header will force the request to go to a specific deployment.
# Remove this header to have the request observe the endpoint traffic rules
headers = {'Content-Type':'application/json', 'Authorization':('Bearer '+ api_key), 'azureml-model-deployment': 'basic-chat-deployment' }

try:
    with tracer.start_as_current_span('genai-request') as span:

        ctx = context.get_current()
        TraceContextTextMapPropagator().inject(headers, ctx)
        print(headers)
        print(ctx)
        req = urllib.request.Request(url, body, headers)
        response = urllib.request.urlopen(req)

        result = response.read()
        print(result)

        # Now you can process the answer and collect feedback
        feedback = "thumbdown"  # Example feedback (modify as needed)

        # Make another request to save the feedback
        feedback_body = str.encode(json.dumps(feedback))
        feedback_req = urllib.request.Request(feedback_url, feedback_body, headers)
        urllib.request.urlopen(feedback_req)


except urllib.error.HTTPError as error:
    print("The request failed with status code: " + str(error.code))

    # Print the headers - they include the requert ID and the timestamp, which are useful for debugging the failure
    print(error.info())
    print(error.read().decode("utf8", 'ignore'))
您可以在 Application Insights 中檢視要求的追蹤以及意見反應。
進階使用方式:將追蹤匯出至自定義 OpenTelemetry 收集器服務
在某些情況下,您可能會想要將追蹤數據匯出至已部署的 OTel 收集器服務,方法是設定 「OTEL_EXPORTER_OTLP_ENDPOINT」。 當您想要自定義我們自己的範圍處理邏輯和您自己的追蹤永續性目標時,請使用此導出工具。
下一步
- 針對受控在線端點的錯誤進行疑難解答。
- 將流程部署到其他平臺,例如 Docker。
意見反應
即將登場:在 2024 年,我們將逐步淘汰 GitHub 問題作為內容的意見反應機制,並將它取代為新的意見反應系統。 如需詳細資訊,請參閱:https://aka.ms/ContentUserFeedback。
提交並檢視相關的意見反應


