適用於: Python SDK azure-ai-ml v2 (目前)
瞭解如何使用 Azure Machine Learning Python SDK v2 將模型部署至線上端點。
在本教學課程中,您會部署和使用模型,預測客戶信用卡卡費逾期未繳的可能性。
您採取的步驟如下︰
- 註冊您的模型
- 建立端點和第一個部署
- 部署試用執行
- 手動將測試資料傳送至部署
- 取得部署的詳細資料
- 建立第二個部署
- 手動縮放第二個部署
- 更新這兩個部署之間的生產流量配置
- 取得第二個部署的詳細資料
- 推出新部署並刪除第一個部署
這段影片示範如何開始使用 Azure Machine Learning 工作室,讓您可以遵循教學課程中的步驟。 此影片會示範如何建立筆記本、建立計算執行個體,以及複製筆記本。 這些步驟也會於下列各節中說明。
先決條件
-
若要使用 Azure Machine Learning,您需要工作區。 如果您沒有工作區,請完成建立要開始使用所需要的資源以建立工作區,並深入了解其使用方式。
重要事項
如果您的 Azure Machine Learning 工作區已設定有受控虛擬網路,您可能需要新增輸出規則,以允許存取公用 Python 套件存放庫。 如需詳細資訊,請參閱案例:存取公用機器學習套件。
-
登入工作室,並選取您的工作區 (如果其尚未開啟的話)。
-
在工作區開啟或建立筆記本:
檢視您的 VM 配額,並確定您有足夠的配額可供建立線上部署。 在本教學課程中,您至少需要 8 個核心的
STANDARD_DS3_v2和 12 個核心的STANDARD_F4s_v2。 若要檢視 VM 配額使用量和要求增加配額,請參閱管理資源配額。
設定您的核心並在 Visual Studio Code (VS Code) 中開啟
在開啟的筆記本上方的頂端列上,如果您還沒有計算執行個體,請建立計算執行個體。
如果計算執行個體已停止,請選取 [啟動計算],並等到其執行為止。
等候計算執行個體處於執行中狀態。 然後確定位於右上方的核心是
Python 3.10 - SDK v2。 如果沒有,請使用下拉式清單來選取此核心。如果您沒有看到此核心,請驗證您的計算執行個體是否執行中。 如果是,請選取筆記本右上方的 [重新整理] 按鈕。
如果您看到橫幅指出您需要進行驗證,請選取 [驗證]。
您可以在此執行筆記本,或在 VS Code 中予以開啟,以取得包含 Azure Machine Learning 資源強大功能的完全整合式開發環境 (IDE)。 選取 [在 VS Code 中開啟],然後選取 Web 或桌面選項。 以這種方式啟動時,VS Code 會附加至您的計算執行個體、核心和工作區檔案系統。
重要事項
本教學課程的其餘部分包含教學課程筆記本的儲存格。 複製它們並將其貼入新的筆記本中,或者如果您已複製筆記本,請立即切換至該筆記本。
附註
無伺服器 Spark 計算預設不會安裝 Python 3.10 - SDK v2。 建議您先建立計算執行個體並加以選取,再繼續進行本教學課程。
建立工作區的控制代碼
在深入研究程式碼之前,您需要一種方法來參考您的工作區。 建立 ml_client 以取得工作區的控制代碼,並使用 ml_client 來管理資源和作業。
在下一個資料格中,輸入您的訂用帳戶識別碼、資源群組名稱和工作區名稱。 若要尋找這些值:
- 在右上方的 Azure Machine Learning 工作室工具列中,選取您的工作區名稱。
- 將工作區、資源群組和訂用帳戶識別碼的值複製到程式碼。
- 您需要複製一個值,關閉該區域,粘貼,然後返回下一個值。
from azure.ai.ml import MLClient
from azure.identity import DefaultAzureCredential

# authenticate
credential = DefaultAzureCredential()

# Get a handle to the workspace
ml_client = MLClient(
    credential=credential,
    subscription_id="<SUBSCRIPTION_ID>",
    resource_group_name="<RESOURCE_GROUP>",
    workspace_name="<AML_WORKSPACE_NAME>",
)
附註
建立 MLClient 並不會連線到工作區。 用戶端初始化具有延遲性,會等到第一次需要進行呼叫時才開始 (這會在下一個程式碼儲存格發生)。
註冊模型
如果您已完成先前的定型教學課程定型模型,便已將 MLflow 模型註冊為定型指令碼的一部分,因此可跳至下一節。
如果您未完成定型教學課程,則必須註冊模型。 建議的最佳做法是先註冊模型再進行部署。
下列程式碼會指定 path (檔案上傳所在位置) 內嵌。 如果您 克隆了 tutorials 資料夾,請原樣執行下列程式碼。 否則,請從 credit_defaults_model 資料夾下載模型的檔案和中繼資料。 將您下載的檔案儲存到您電腦上的本機 credit_defaults_model 資料夾版本,並將下列程式碼中的路徑更新為所下載檔案的位置。
SDK 會自動上傳檔案,並註冊模型。
如需將模型註冊為資產的詳細資訊,請參閱使用 SDK 在 Machine Learning 中將模型註冊為資產。
# Import the necessary libraries
from azure.ai.ml.entities import Model
from azure.ai.ml.constants import AssetTypes

# Provide the model details, including the
# path to the model files, if you've stored them locally.
mlflow_model = Model(
    path="./deploy/credit_defaults_model/",
    type=AssetTypes.MLFLOW_MODEL,
    name="credit_defaults_model",
    description="MLflow Model created from local files.",
)

# Register the model
ml_client.models.create_or_update(mlflow_model)
確認模型已完成註冊
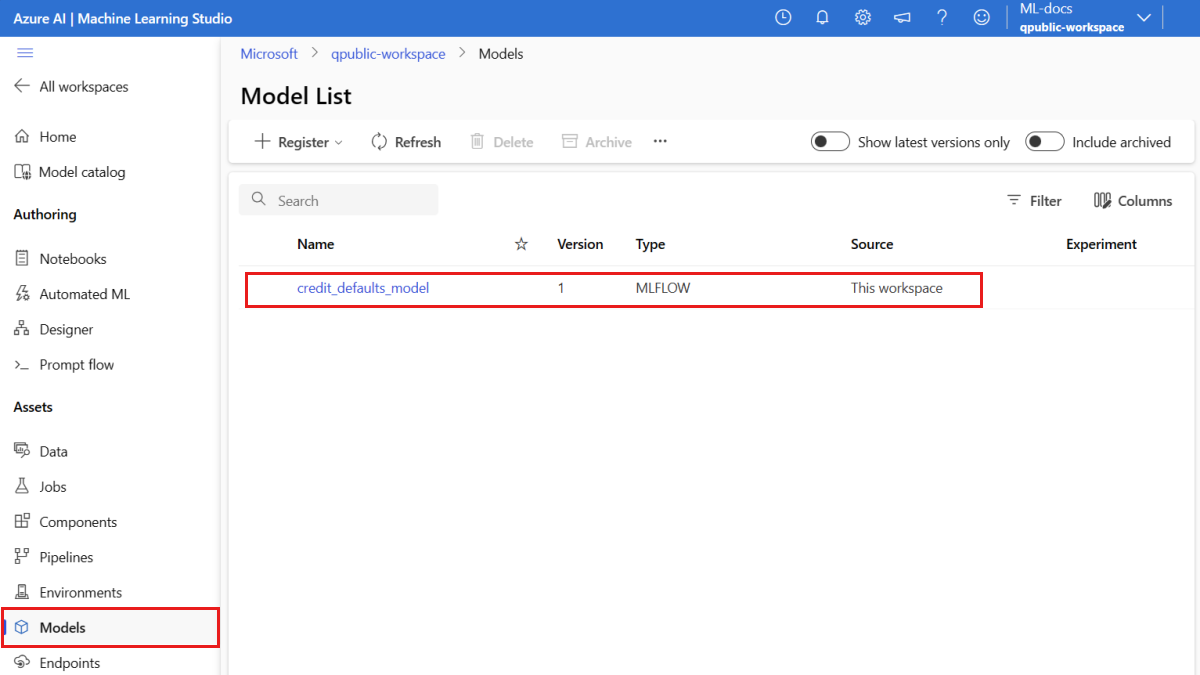
您可以在 Azure Machine Learning 工作室中查看 [模型] 頁面,以識別已註冊模型的最新版本。

或者,下列程式碼會擷取最新版本號碼,供您使用。
registered_model_name = "credit_defaults_model"

# Let's pick the latest version of the model
latest_model_version = max(
    [int(m.version) for m in ml_client.models.list(name=registered_model_name)]
)

print(latest_model_version)
現在您已有註冊好的模型,接下來您可以建立端點和部署。 下一節簡短說明有關這些主題的一些重要詳細資料。
端點和部署
定型機器學習模型之後,您必須部署它,讓其他人可以使用它進行推斷。 針對此目的,Azure Machine Learning 可讓您建立端點,並於端點中新增部署。
在此內容中,端點是一個 HTTPS 路徑,可提供介面供用戶端將要求 (輸入資料) 傳送至已定型的模型,並從模型接收推斷 (評分) 結果。 端點可提供:
- 使用「金鑰或權杖」型驗證進行驗證
- TLS(SSL) 終止
- 穩定的評分 URI (endpoint-name.region.inference.ml.azure.com)
部署是託管執行實際推斷模型所需的一組資源。
單一端點可包含多個部署。 端點和部署是顯示在 Azure 入口網站中的獨立 Azure Resource Manager 資源。
Azure Machine Learning 可讓您實作 線上端點 ,以在用戶端資料上進行即時推斷,並實作 批次端點 ,以便在一段時間內對大量資料進行推斷。
在本教學課程中,您將逐步完成實作受控線上端點的步驟。 受控線上端點會以可調整、完全受控的方式,使用 Azure 中強大的 CPU 和 GPU 機器,讓您省去設定和管理基礎的部署基礎結構的額外負荷。
建立線上端點
現在,您已有註冊的模型,接下來即可建立線上端點。 端點名稱在整個 Azure 區域中必須是唯一的。 在本教學課程中,您會使用通用唯一識別碼 UUID 建立唯一名稱。 如需端點命名規則的詳細資訊,請參閱 端點限制。
import uuid

# Create a unique name for the endpoint
online_endpoint_name = "credit-endpoint-" + str(uuid.uuid4())[:8]
首先,使用類別定義 ManagedOnlineEndpoint 端點。
秘訣
auth_mode:用於key金鑰型驗證。 使用aml_token進行 Azure Machine Learning 權杖型驗證。key不會過期,但aml_token會過期。 如需驗證的詳細資訊,請參閱驗證線上端點的用戶端。(選擇性) 您可以在端點中新增描述和標籤。
from azure.ai.ml.entities import ManagedOnlineEndpoint

# define an online endpoint
endpoint = ManagedOnlineEndpoint(
    name=online_endpoint_name,
    description="this is an online endpoint",
    auth_mode="key",
    tags={
        "training_dataset": "credit_defaults",
    },
)
使用稍早建立的 MLClient,在工作區中建立端點。 此命令會啟動端點建立,並在端點建立繼續時傳回確認回應。
附註
建立此端點約需 2 分鐘的時間。
# create the online endpoint
# expect the endpoint to take approximately 2 minutes.

endpoint = ml_client.online_endpoints.begin_create_or_update(endpoint).result()
建立端點後,您就可以擷取端點,如下所示:
endpoint = ml_client.online_endpoints.get(name=online_endpoint_name)

print(
    f'Endpoint "{endpoint.name}" with provisioning state "{endpoint.provisioning_state}" is retrieved'
)
了解線上部署
部署的主要層面包括:
-
name- 部署的名稱。 -
endpoint_name- 會包含部署的端點名稱。 -
model- 要用於部署的模型。 此值可以是工作區中現有已建立版本模型的參考,也可以是內嵌模型規格。 -
environment- 用於部署 (或用來執行模型) 的環境。 此值可以是工作區中現有已建立版本環境的參考,也可以是內嵌環境規格。 環境可以是具有 Conda 相依性的 Docker 映像,或 Dockerfile。 -
code_configuration- 原始程式碼和評分指令碼的配置。-
path- 用於對模型進行評分的原始碼目錄的路徑。 -
scoring_script- 原始程式碼目錄中評分檔案的相對路徑。 此指令碼會在指定的輸入要求上執行模型。 如需評分指令碼的範例,請參閱《使用線上端點來部署 ML 模型》一文中的了解評分指令碼。
-
-
instance_type- 要用於部署的 VM 大小。 如需支援的大小清單,請參閱受控線上端點 SKU 清單。 -
instance_count- 要用於部署的執行個體數目。
使用 MLflow 模型進行部署
Azure Machine Learning 支援以無程式碼的方式部署使用 MLflow 所建立和記錄的模型。 這表示您不需要在模型部署期間提供評分腳本或環境,因為評分腳本和環境會在定型 MLflow 模型時自動產生。 不過,如果您使用自訂模型,則必須在部署期間指定環境和評分指令碼。
重要事項
一般來說,如果您使用評分指令碼和自訂環境來部署模型,而且想要使用 MLflow 模型來達到相同的功能,則建議您閱讀部署 MLflow 模型的指導方針。
將模型部署至端點
一開始,您會建立可處理 100% 傳入流量的單一部署。 為部署選擇任意的色彩名稱 (blue)。 若要建立端點部署,請使用 ManagedOnlineDeployment 類別。
附註
您不需要指定環境或評分腳本,因為要部署的模型是 MLflow 模型。
from azure.ai.ml.entities import ManagedOnlineDeployment

# Choose the latest version of the registered model for deployment
model = ml_client.models.get(name=registered_model_name, version=latest_model_version)

# define an online deployment
# if you run into an out of quota error, change the instance_type to a comparable VM that is available.
# Learn more on https://azure.microsoft.com/en-us/pricing/details/machine-learning/.
blue_deployment = ManagedOnlineDeployment(
    name="blue",
    endpoint_name=online_endpoint_name,
    model=model,
    instance_type="Standard_DS3_v2",
    instance_count=1,
)
使用稍早建立的 MLClient 在工作區中建立部署。 此命令會啟動部署建立,並在部署建立繼續時傳回確認回應。
# create the online deployment
blue_deployment = ml_client.online_deployments.begin_create_or_update(
    blue_deployment
).result()

# blue deployment takes 100% traffic
# expect the deployment to take approximately 8 to 10 minutes.
endpoint.traffic = {"blue": 100}
ml_client.online_endpoints.begin_create_or_update(endpoint).result()
檢查端點的狀態
您可以檢查端點的狀態,以查看模型是否已部署好,且未發生錯誤:
# return an object that contains metadata for the endpoint
endpoint = ml_client.online_endpoints.get(name=online_endpoint_name)

# print a selection of the endpoint's metadata
print(
    f"Name: {endpoint.name}\nStatus: {endpoint.provisioning_state}\nDescription: {endpoint.description}"
)
# existing traffic details
print(endpoint.traffic)

# Get the scoring URI
print(endpoint.scoring_uri)
使用樣本資料測試端點
模型現已部署至端點,可用來執行推斷。 首先,建立範例要求檔案,該檔案遵循評分指令碼中找到的執行方法中預期的設計。
import os

# Create a directory to store the sample request file.
deploy_dir = "./deploy"
os.makedirs(deploy_dir, exist_ok=True)
現在在部署目錄中建立檔案。 以下程式碼單元使用 IPython 魔術將檔案寫入您建立的目錄中。
%%writefile {deploy_dir}/sample-request.json
{
  "input_data": {
    "columns": [0,1,2,3,4,5,6,7,8,9,10,11,12,13,14,15,16,17,18,19,20,21,22],
    "index": [0, 1],
    "data": [
            [20000,2,2,1,24,2,2,-1,-1,-2,-2,3913,3102,689,0,0,0,0,689,0,0,0,0],
            [10, 9, 8, 7, 6, 5, 4, 3, 2, 1, 10, 9, 8, 7, 6, 5, 4, 3, 2, 1, 10, 9, 8]
            ]
                }
}
使用稍早建立的 MLClient,取得端點的控制代碼。 您可以使用 invoke 命令搭配下列參數來叫用端點:
-
endpoint_name- 端點的名稱 -
request_file- 具有要求資料的檔案 -
deployment_name- 在端點中測試的特定部署名稱
使用範例資料來測試藍色部署。
# test the blue deployment with the sample data
ml_client.online_endpoints.invoke(
    endpoint_name=online_endpoint_name,
    deployment_name="blue",
    request_file="./deploy/sample-request.json",
)
取得部署的記錄
檢查記錄以查看端點/部署是否已成功叫用。 如果您遇到錯誤,請參閱疑難排解線上端點部署。
logs = ml_client.online_deployments.get_logs(
    name="blue", endpoint_name=online_endpoint_name, lines=50
)
print(logs)
建立第二個部署
將模型部署為名為 green 的第二個部署。 實際上,您可以建立數個部署並比較其效能。 這些部署可以使用相同模型的不同版本、不同的模型,或更強大的計算執行個體。
在此範例中,您會使用可能可以改善效能、功能更強大的計算執行個體來部署相同的模型版本。
# pick the model to deploy. Here you use the latest version of the registered model
model = ml_client.models.get(name=registered_model_name, version=latest_model_version)

# define an online deployment using a more powerful instance type
# if you run into an out of quota error, change the instance_type to a comparable VM that is available.
# Learn more on https://azure.microsoft.com/en-us/pricing/details/machine-learning/.
green_deployment = ManagedOnlineDeployment(
    name="green",
    endpoint_name=online_endpoint_name,
    model=model,
    instance_type="Standard_F4s_v2",
    instance_count=1,
)

# create the online deployment
# expect the deployment to take approximately 8 to 10 minutes
green_deployment = ml_client.online_deployments.begin_create_or_update(
    green_deployment
).result()
縮放部署以處理更多流量
使用稍早建立的 MLClient,您可以取得 green 部署的控制代碼。 然後,您可以藉由增加或減少 instance_count 來調整部署。
在下列程式碼中,您要手動增加 VM 執行個體。 不過,也可以自動調整線上端點。 自動調整會自動執行正確的資源量,以處理應用程式的負載。 受控線上端點透過與 Azure 監視器自動調整功能的整合,支援自動調整。 若要設定自動調整,請參閱自動調整線上端點。
# update definition of the deployment
green_deployment.instance_count = 2

# update the deployment
# expect the deployment to take approximately 8 to 10 minutes
ml_client.online_deployments.begin_create_or_update(green_deployment).result()
更新部署的流量配置
您可以在部署之間分割生產流量。 建議您先使用範例資料測試 green 部署,就像您針對 blue 部署所做的一樣。 測試過您的綠色部署之後,請向其配置少量的流量。
endpoint.traffic = {"blue": 80, "green": 20}
ml_client.online_endpoints.begin_create_or_update(endpoint).result()
叫用端點數次來測試流量配置:
# You can invoke the endpoint several times
for i in range(30):
    ml_client.online_endpoints.invoke(
        endpoint_name=online_endpoint_name,
        request_file="./deploy/sample-request.json",
    )
顯示來自 green 部署的記錄,以檢查是否有傳入要求,且模型已成功評分。
logs = ml_client.online_deployments.get_logs(
    name="green", endpoint_name=online_endpoint_name, lines=50
)
print(logs)
使用 Azure 監視器檢視計量
您可以檢視線上端點及其部署的各種計量 (要求數、要求延遲、網路位元組、CPU/GPU/磁碟/記憶體使用率等),方法是遵循工作室中端點的 [詳細資料] 頁面的連結。 遵循以下任一連結,前往 Azure 入口網站中端點或部署的確切計量頁面。
如果您開啟線上端點的計量,則可以設定頁面來查看計量 (例如,平均要求延遲),如下圖所示。
如需如何檢視線上端點計量的詳細資訊,請參閱監視線上端點。
將所有流量傳送給新的部署
當您覺得 green 部署完全符合要求後,請將所有流量切換至此部署。
endpoint.traffic = {"blue": 0, "green": 100}
ml_client.begin_create_or_update(endpoint).result()
刪除舊的部署
移除舊的 (藍色) 部署:
ml_client.online_deployments.begin_delete(
    name="blue", endpoint_name=online_endpoint_name
).result()
清除資源
如果您在完成本教學課程之後不打算使用端點和部署,則應該刪除它們。
附註
完整刪除約需 20 分鐘的時間。
ml_client.online_endpoints.begin_delete(name=online_endpoint_name).result()
刪除所有內容
請使用下列步驟來刪除 Azure Machine Learning 工作區和所有計算資源。
重要事項
您所建立的資源可用來作為其他 Azure Machine Learning 教學課程和操作說明文章的先決條件。
如果不打算使用您建立的任何資源,請刪除以免產生任何費用:
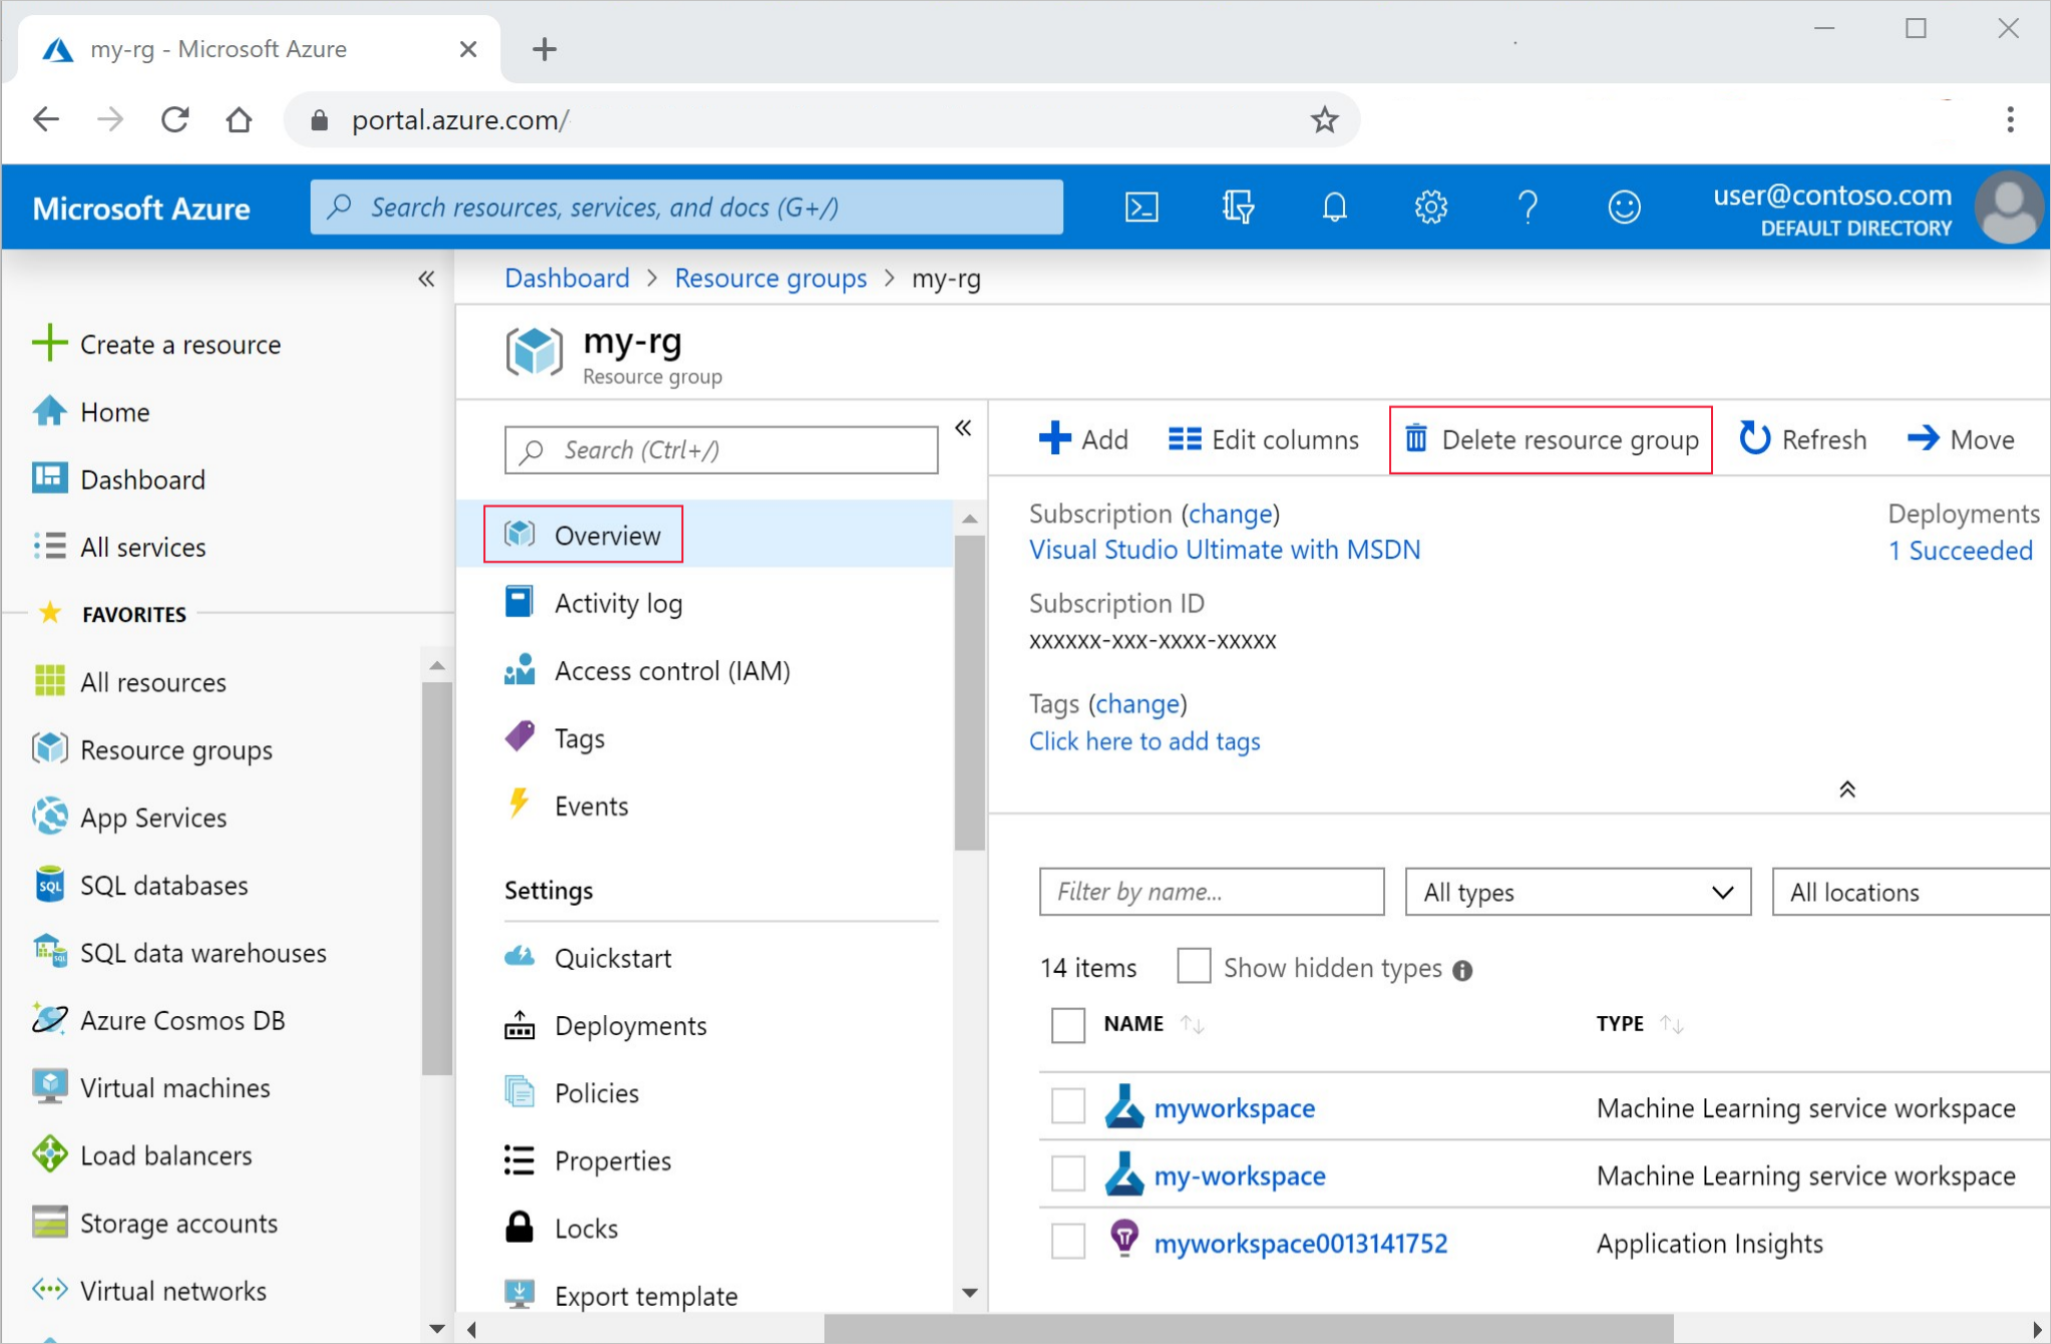
在 Azure 入口網站的搜尋方塊中,輸入 [資源群組],然後從結果中選取它。
從清單中,選取您所建立的資源群組。
在 [概觀] 頁面上,選取 [刪除資源群組]。

輸入資源群組名稱。 然後選取 [刪除]。


![此螢幕擷取畫面顯示 [端點詳細資料] 頁面上的連結,以檢視線上端點和部署計量。](media/tutorial-deploy-model/deployment-metrics-from-endpoint-details-page.png?view=azureml-api-2)
