適用於: Python SDK azure-ai-ml v2 (目前)
附註
關於使用 SDK v1 建立管線的教學,請參見 「Tutorial: Build an Azure Machine Learning pipeline for image classification」。
機器學習流程將完整的機器學習任務拆分成多步驟工作流程。 每個步驟都是可管理的組件,你可以個別開發、優化、配置和自動化。 明確的介面連接各步驟。 Azure Machine Learning pipeline 服務會協調管線步驟間的所有相依關係。
使用流程的好處包括標準化的MLOps實務、可擴展的團隊協作、訓練效率及成本降低。 若要深入了解管線的好處,請參閱什麼是 Azure Machine Learning 管線。
在本教學課程中,您會使用 Azure Machine Learning 來建立生產就緒的機器學習專案,並使用 Azure Machine Learning Python SDK v2。 完成這個教學後,你可以使用 Azure Machine Learning Python SDK 來:
- 取得 Azure Machine Learning 工作區的控制代碼
- 建立 Azure Machine Learning 資料資產
- 建立可重複使用的 Azure Machine Learning 元件
- 建立、驗證並執行 Azure Machine Learning 流程
本教學課程進行期間,您會建立 Azure Machine Learning 管線以定型用於預測信用違約的模型。 管線會處理兩個步驟:
- 資料準備
- 定型和註冊已定型的模型
下一張圖片顯示你提交後在 Azure Studio 看到的簡單管線。
這兩個步驟是資料準備與訓練。

這段影片會示範如何開始使用 Azure Machine Learning 工作室,以便遵循教學課程中的步驟。 此影片會示範如何建立筆記本、建立計算執行個體,以及複製筆記本。 以下章節也會說明這些步驟。
先決條件
-
若要使用 Azure Machine Learning,您需要工作區。 如果您沒有工作區,請完成建立要開始使用所需要的資源以建立工作區,並深入了解其使用方式。
重要事項
如果您的 Azure Machine Learning 工作區已設定有受控虛擬網路,您可能需要新增輸出規則,以允許存取公用 Python 套件存放庫。 如需詳細資訊,請參閱案例:存取公用機器學習套件。
-
登入工作室,並選取您的工作區 (如果其尚未開啟的話)。
完成上傳、存取和探索資料教學課程,以建立本教學課程所需的資料資產。 請務必執行所有程式碼以建立初始資料資產。 你可以探索並修改資料,但這個教學只需要初始資料。
-
在工作區開啟或建立筆記本:
設定您的核心並在 Visual Studio Code (VS Code) 中開啟
在開啟的筆記本上方的頂端列上,如果您還沒有計算執行個體,請建立計算執行個體。

如果計算執行個體已停止,請選取 [啟動計算],並等到其執行為止。

等候計算執行個體處於執行中狀態。 然後確定位於右上方的核心是
Python 3.10 - SDK v2。 如果沒有,請使用下拉式清單來選取此核心。
如果您沒有看到此核心,請驗證您的計算執行個體是否執行中。 如果是,請選取筆記本右上方的 [重新整理] 按鈕。
如果您看到橫幅指出您需要進行驗證,請選取 [驗證]。
您可以在此執行筆記本,或在 VS Code 中予以開啟,以取得包含 Azure Machine Learning 資源強大功能的完全整合式開發環境 (IDE)。 選取 [在 VS Code 中開啟],然後選取 Web 或桌面選項。 以這種方式啟動時,VS Code 會附加至您的計算執行個體、核心和工作區檔案系統。


重要事項
本教學課程的其餘部分包含教學課程筆記本的儲存格。 複製它們並將其貼入新的筆記本中,或者如果您已複製筆記本,請立即切換至該筆記本。
設定管線資源
你可以使用 Azure CLI、Python SDK 或 Studio 介面的 Azure Machine Learning 框架。 在此範例中,您會使用 Azure Machine Learning Python SDK 第 2 版來建立管線。
在建立管線之前,你需要以下資源:
- 用於定型的資料資產
- 要執行管線的軟體環境
- 作業執行所在的計算資源
建立工作區的控制代碼
在使用程式碼之前,你需要有一種方式來參考你的工作區。 建立 ml_client 作為工作區的控制代碼。 然後,您可以使用 ml_client 來管理資源和工作。
在下一個儲存格中,輸入您的訂用帳戶識別碼、資源群組名稱和工作區名稱。 若要尋找這些值:
- 在右上方的 Azure Machine Learning 工作室工具列中,選取您的工作區名稱。
- 將工作區、資源群組和訂用帳戶識別碼的值複製到程式碼。 你需要複製一個值,關閉該區域,貼上,然後返回下一個值。
from azure.ai.ml import MLClient
from azure.identity import DefaultAzureCredential, InteractiveBrowserCredential

# authenticate
try:
    credential = DefaultAzureCredential()
    credential.get_token("https://management.azure.com/.default")
except Exception:
    credential = InteractiveBrowserCredential()

SUBSCRIPTION = "<SUBSCRIPTION_ID>"
RESOURCE_GROUP = "<RESOURCE_GROUP>"
WS_NAME = "<AML_WORKSPACE_NAME>"
# Get a handle to the workspace
ml_client = MLClient(
    credential=credential,
    subscription_id=SUBSCRIPTION,
    resource_group_name=RESOURCE_GROUP,
    workspace_name=WS_NAME,
)
SDK參考:
附註
建立 MLClient 並不會連接到工作區。 用戶端初始化是惰性的。 它會等到第一次需要進行呼叫時才開始。 初始化會在下一個程式碼格進行。
對 ml_client 進行呼叫以驗證連線。 由於這是您第一次呼叫工作區,可能會被要求驗證身份。
# Verify that the handle works correctly.
# If you get an error here, modify your SUBSCRIPTION, RESOURCE_GROUP, and WS_NAME in the previous cell.
ws = ml_client.workspaces.get(WS_NAME)
print(ws.location, ":", ws.resource_group)
SDK參考:
存取已註冊的資料資產
首先,取得你之前在 Tutorial 中註冊的資料 :上傳、存取並探索 Azure Machine Learning 中的資料。
附註
Azure 機器學習使用 Data 物件來註冊可重複使用的資料定義,並在管線中使用資料。
# get a handle of the data asset and print the URI
credit_data = ml_client.data.get(name="credit-card", version="initial")
print(f"Data asset URI: {credit_data.path}")
SDK參考:
建立管線步驟的作業環境
到目前為止,你是在運算實例(你的開發機器)上建立了開發環境。 您也需要管線的每個步驟所使用的環境。 每個步驟都可以有本身的環境,或者您可以對多個步驟使用一些通用的環境。
在此範例中,您會使用 conda yaml 檔案為作業建立 conda 環境。 首先,建立一個用來儲存檔案的目錄。
import os

dependencies_dir = "./dependencies"
os.makedirs(dependencies_dir, exist_ok=True)
現在,在相依性目錄中建立檔案。
%%writefile {dependencies_dir}/conda.yaml
name: model-env
channels:
  - conda-forge
dependencies:
    - python=3.10
  - numpy=1.21.2
  - pip=21.2.4
  - scikit-learn=0.24.2
  - scipy=1.7.1
  - pandas>=1.1,<1.2
  - pip:
    - inference-schema[numpy-support]==1.3.0
    - xlrd==2.0.1
    - mlflow== 2.4.1
    - azureml-mlflow==1.51.0
規範包含一些你在管線中常用的套件(numpy、 pip),以及一些 Azure Machine Learning 專用的套件(azureml-mlflow)。
Azure Machine Learning 套件並非執行 Azure Machine Learning 工作所必需的。 透過新增這些套件,你可以在 Azure Machine Learning 工作中與 Azure Machine Learning 互動,進行指標記錄和模型註冊。 您會在本教學課程稍後的定型指令碼中加以使用。
使用 yaml 檔案,在您的工作區中建立和註冊此自訂環境:
from azure.ai.ml.entities import Environment

custom_env_name = "aml-scikit-learn"

pipeline_job_env = Environment(
    name=custom_env_name,
    description="Custom environment for Credit Card Defaults pipeline",
    tags={"scikit-learn": "0.24.2"},
    conda_file=os.path.join(dependencies_dir, "conda.yaml"),
    image="mcr.microsoft.com/azureml/openmpi4.1.0-ubuntu22.04:latest",
    version="0.2.0",
)
pipeline_job_env = ml_client.environments.create_or_update(pipeline_job_env)

print(
    f"Environment with name {pipeline_job_env.name} is registered to workspace, the environment version is {pipeline_job_env.version}"
)
SDK參考:
建置定型管線
既然你已經擁有運行管線所需的所有資產,就該開始建管線本身了。
Azure Machine Learning 管線是可重複使用的 ML 工作流程,通常由數個元件組成。 元件的典型生命週期為:
- 撰寫元件的 YAML 規格,或使用
ComponentMethod以程式設計方式建立。 - 可選擇性地在工作區註冊該元件,並附上名稱和版本,使其可重複使用並可分享。
- 從管線程式碼載入該元件。
- 透過元件的輸入、輸出和參數來實作管線。
- 提交管線。
你可以用兩種方式建立元件: 程式定義 和 YAML 定義。 接下來的兩個章節會引導您以這兩種方式建立元件。 你可以選擇兩種方法來組合兩個組件,或選擇你偏好的方法。
附註
在這個教學中,為了簡化起見,你對所有元件使用相同的計算方法。 不過,你可以為每個元件設定不同的運算次數。 例如,你可以增添一條這樣的train_step.compute = "cpu-cluster"。 若要檢視針對每個元件使用不同的計算來建置管線的範例,請參閱 cifar-10 管線教學課程中的基本管線作業一節。
建立元件 1:資料準備 (使用程式設計定義)
首先建立第一個元件。 此元件會處理資料的前置處理。 前置處理工作會在 data_prep.py Python 檔案中執行。
首先,建立一個data_prep元件的原始碼資料夾:
import os

data_prep_src_dir = "./components/data_prep"
os.makedirs(data_prep_src_dir, exist_ok=True)
此指令碼會執行將資料分割成定型和測試資料集的簡單工作。 Azure Machine Learning 會將資料集掛載成資料夾到運算器上。 你建立了一個輔助 select_first_file 函式來存取已掛載輸入資料夾裡的資料檔案。
MLFlow 用來記錄管線運行期間的參數和指標。
%%writefile {data_prep_src_dir}/data_prep.py
import os
import argparse
import pandas as pd
from sklearn.model_selection import train_test_split
import logging
import mlflow


def main():
    """Main function of the script."""

    # input and output arguments
    parser = argparse.ArgumentParser()
    parser.add_argument("--data", type=str, help="path to input data")
    parser.add_argument("--test_train_ratio", type=float, required=False, default=0.25)
    parser.add_argument("--train_data", type=str, help="path to train data")
    parser.add_argument("--test_data", type=str, help="path to test data")
    args = parser.parse_args()

    # Start Logging
    mlflow.start_run()

    print(" ".join(f"{k}={v}" for k, v in vars(args).items()))

    print("input data:", args.data)

    credit_df = pd.read_csv(args.data, header=1, index_col=0)

    mlflow.log_metric("num_samples", credit_df.shape[0])
    mlflow.log_metric("num_features", credit_df.shape[1] - 1)

    credit_train_df, credit_test_df = train_test_split(
        credit_df,
        test_size=args.test_train_ratio,
    )

    # output paths are mounted as folder, therefore, we are adding a filename to the path
    credit_train_df.to_csv(os.path.join(args.train_data, "data.csv"), index=False)

    credit_test_df.to_csv(os.path.join(args.test_data, "data.csv"), index=False)

    # Stop Logging
    mlflow.end_run()


if __name__ == "__main__":
    main()
現在,您已有可執行所需工作的指令碼,請從中建立 Azure Machine Learning 元件。
使用可執行命令列動作的一般用途 CommandComponent。 此命令列動作可直接呼叫系統命令或執行指令碼。 輸入與輸出透過命令列 ${{ ... }} 的符號來指定。
from azure.ai.ml import command
from azure.ai.ml import Input, Output

data_prep_component = command(
    name="data_prep_credit_defaults",
    display_name="Data preparation for training",
    description="reads a .xl input, split the input to train and test",
    inputs={
        "data": Input(type="uri_folder"),
        "test_train_ratio": Input(type="number"),
    },
    outputs=dict(
        train_data=Output(type="uri_folder", mode="rw_mount"),
        test_data=Output(type="uri_folder", mode="rw_mount"),
    ),
    # The source folder of the component
    code=data_prep_src_dir,
    command="""python data_prep.py \
            --data ${{inputs.data}} --test_train_ratio ${{inputs.test_train_ratio}} \
            --train_data ${{outputs.train_data}} --test_data ${{outputs.test_data}} \
            """,
    environment=f"{pipeline_job_env.name}:{pipeline_job_env.version}",
)
SDK參考:
(選擇性地) 在工作區中註冊元件,以供日後重複使用。
# Now register the component to the workspace
data_prep_component = ml_client.create_or_update(data_prep_component.component)

# Create and register the component in your workspace
print(
    f"Component {data_prep_component.name} with Version {data_prep_component.version} is registered"
)
SDK參考:
建立元件 2:定型 (使用 yaml 定義)
您建立的第二個元件會使用訓練和測試資料,訓練以樹狀結構為依據的模型,然後傳回輸出模型。 請使用 Azure Machine Learning 記錄功能來記錄和視覺化學習進度。
您使用 CommandComponent 類別建立了第一個元件。 這次,你用 yaml 定義來定義第二個元件。 每種方法各有優點。 可以將 yaml 定義在程式碼中查入,並提供可讀的歷史追蹤。 採用內建的類別文件和程式碼完成時,使用 CommandComponent 的程式設計方法會更容易執行。
建立此元件的目錄:
import os

train_src_dir = "./components/train"
os.makedirs(train_src_dir, exist_ok=True)
在目錄中建立定型指令碼:
%%writefile {train_src_dir}/train.py
import argparse
from sklearn.ensemble import GradientBoostingClassifier
from sklearn.metrics import classification_report
import os
import pandas as pd
import mlflow


def select_first_file(path):
    """Selects first file in folder, use under assumption there is only one file in folder
    Args:
        path (str): path to directory or file to choose
    Returns:
        str: full path of selected file
    """
    files = os.listdir(path)
    return os.path.join(path, files[0])


# Start Logging
mlflow.start_run()

# enable autologging
mlflow.sklearn.autolog()

os.makedirs("./outputs", exist_ok=True)


def main():
    """Main function of the script."""

    # input and output arguments
    parser = argparse.ArgumentParser()
    parser.add_argument("--train_data", type=str, help="path to train data")
    parser.add_argument("--test_data", type=str, help="path to test data")
    parser.add_argument("--n_estimators", required=False, default=100, type=int)
    parser.add_argument("--learning_rate", required=False, default=0.1, type=float)
    parser.add_argument("--registered_model_name", type=str, help="model name")
    parser.add_argument("--model", type=str, help="path to model file")
    args = parser.parse_args()

    # paths are mounted as folder, therefore, we are selecting the file from folder
    train_df = pd.read_csv(select_first_file(args.train_data))

    # Extracting the label column
    y_train = train_df.pop("default payment next month")

    # convert the dataframe values to array
    X_train = train_df.values

    # paths are mounted as folder, therefore, we are selecting the file from folder
    test_df = pd.read_csv(select_first_file(args.test_data))

    # Extracting the label column
    y_test = test_df.pop("default payment next month")

    # convert the dataframe values to array
    X_test = test_df.values

    print(f"Training with data of shape {X_train.shape}")

    clf = GradientBoostingClassifier(
        n_estimators=args.n_estimators, learning_rate=args.learning_rate
    )
    clf.fit(X_train, y_train)

    y_pred = clf.predict(X_test)

    print(classification_report(y_test, y_pred))

    # Registering the model to the workspace
    print("Registering the model via MLFlow")
    mlflow.sklearn.log_model(
        sk_model=clf,
        registered_model_name=args.registered_model_name,
        artifact_path=args.registered_model_name,
    )

    # Saving the model to a file
    mlflow.sklearn.save_model(
        sk_model=clf,
        path=os.path.join(args.model, "trained_model"),
    )

    # Stop Logging
    mlflow.end_run()


if __name__ == "__main__":
    main()
如你在這份訓練腳本中所見,模型訓練完成後,模型檔案會被儲存並註冊到工作區。 現在,您可以在推斷端點中使用已註冊的模型。
針對此步驟的環境,您會使用其中一個內建 (策展) Azure Machine Learning 環境。 標籤 azureml 會告訴系統在經過策劃的環境中尋找該名稱。
首先,建立描述元件的 yaml 檔案:
%%writefile {train_src_dir}/train.yml
# <component>
name: train_credit_defaults_model
display_name: Train Credit Defaults Model
# version: 1 # Not specifying a version will automatically update the version
type: command
inputs:
  train_data:
    type: uri_folder
  test_data:
    type: uri_folder
  learning_rate:
    type: number
  registered_model_name:
    type: string
outputs:
  model:
    type: uri_folder
code: .
environment:
  # for this step, we'll use an AzureML curate environment
  azureml://registries/azureml/environments/sklearn-1.0/labels/latest
command: >-
  python train.py
  --train_data ${{inputs.train_data}}
  --test_data ${{inputs.test_data}}
  --learning_rate ${{inputs.learning_rate}}
  --registered_model_name ${{inputs.registered_model_name}}
  --model ${{outputs.model}}
# </component>
接著,建立並註冊元件。 註冊它可讓您在其他管線中重複使用它。 其他有你工作空間存取權的人也可以使用註冊的元件。
# importing the Component Package
from azure.ai.ml import load_component

# Loading the component from the yml file
train_component = load_component(source=os.path.join(train_src_dir, "train.yml"))

# Now register the component to the workspace
train_component = ml_client.create_or_update(train_component)

# Create and register the component in your workspace
print(
    f"Component {train_component.name} with Version {train_component.version} is registered"
)
SDK參考:
從元件建立管線
在定義並註冊元件後,開始實作管線。
回傳的 load_component() Python 函式運作方式就像一般的 Python 函式一樣。 在流程中使用它們以依序執行每個步驟。
要編寫管線程式碼,請使用 @dsl.pipeline 特定能識別 Azure 機器學習管線的裝飾器。 在裝飾器中,指定管線描述及預設資源如計算與儲存。 如同 Python 函式,管線也可以有輸入。 你可以建立多個同一條管線的實例,使用不同的輸入。
以下範例中,輸入 資料、 分割比率與 註冊型號名稱 作為輸入變數。 接著呼叫元件,並利用它們的輸入與輸出識別碼連接它們。 透過使用屬性 .outputs 存取每一步的輸出。
# the dsl decorator tells the sdk that we are defining an Azure Machine Learning pipeline
from azure.ai.ml import dsl, Input, Output


@dsl.pipeline(
    compute="serverless",  # "serverless" value runs pipeline on serverless compute
    description="E2E data_perp-train pipeline",
)
def credit_defaults_pipeline(
    pipeline_job_data_input,
    pipeline_job_test_train_ratio,
    pipeline_job_learning_rate,
    pipeline_job_registered_model_name,
):
    # using data_prep_function like a python call with its own inputs
    data_prep_job = data_prep_component(
        data=pipeline_job_data_input,
        test_train_ratio=pipeline_job_test_train_ratio,
    )

    # using train_func like a python call with its own inputs
    train_job = train_component(
        train_data=data_prep_job.outputs.train_data,  # note: using outputs from previous step
        test_data=data_prep_job.outputs.test_data,  # note: using outputs from previous step
        learning_rate=pipeline_job_learning_rate,  # note: using a pipeline input as parameter
        registered_model_name=pipeline_job_registered_model_name,
    )

    # a pipeline returns a dictionary of outputs
    # keys will code for the pipeline output identifier
    return {
        "pipeline_job_train_data": data_prep_job.outputs.train_data,
        "pipeline_job_test_data": data_prep_job.outputs.test_data,
    }
SDK參考:
接著用你的管線定義,實例化一個包含資料集、分割速率和模型名稱的管線。
registered_model_name = "credit_defaults_model"

# Let's instantiate the pipeline with the parameters of our choice
pipeline = credit_defaults_pipeline(
    pipeline_job_data_input=Input(type="uri_file", path=credit_data.path),
    pipeline_job_test_train_ratio=0.25,
    pipeline_job_learning_rate=0.05,
    pipeline_job_registered_model_name=registered_model_name,
)
SDK參考:
提交工作
現在提交工作以在 Azure Machine Learning 中執行。 這次,請在 create_or_update 上使用 ml_client.jobs。
傳一個實驗名稱。 實驗是一個容器,承載著在某個專案上所做的所有迭代。 所有以相同實驗名稱提交的工作會在 Azure Machine Learning Studio 中並排顯示。
完成後,管線會在您的工作區中註冊模型,作為訓練結果。
# submit the pipeline job
pipeline_job = ml_client.jobs.create_or_update(
    pipeline,
    # Project's name
    experiment_name="e2e_registered_components",
)
ml_client.jobs.stream(pipeline_job.name)
SDK參考:
你可以利用前一個儲存格產生的連結來追蹤你的管線進度。 當您第一次選取此連結時,您可能會看到管線仍在執行中。 完成後,你可以檢視每個組件的結果。
按兩下 [定型信用違約模型] 元件。
您想看到關於訓練的兩個重要結果:
檢視您的記錄:
- 選取 [輸出 + 記錄] 索引標籤。
- 開啟資料夾至
user_logs>std_log.txt此區段會顯示指令碼執行 stdout。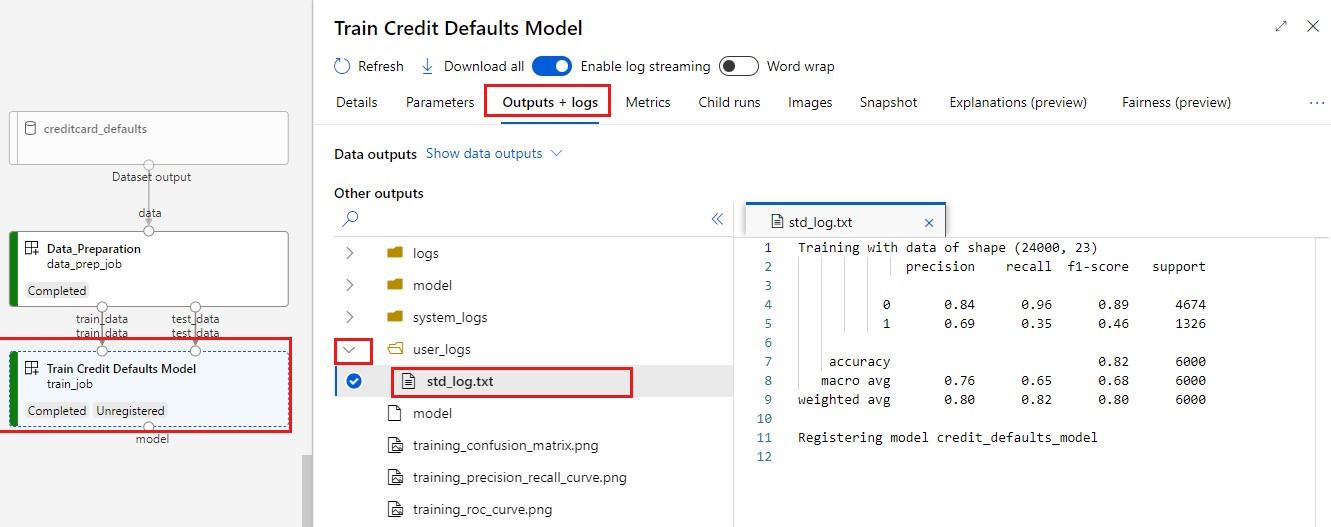
檢視您的計量:選取 [計量] 索引標籤。此區段會顯示不同的已記錄計量。 在此範例中,mlflow
autologging會自動記錄訓練指標。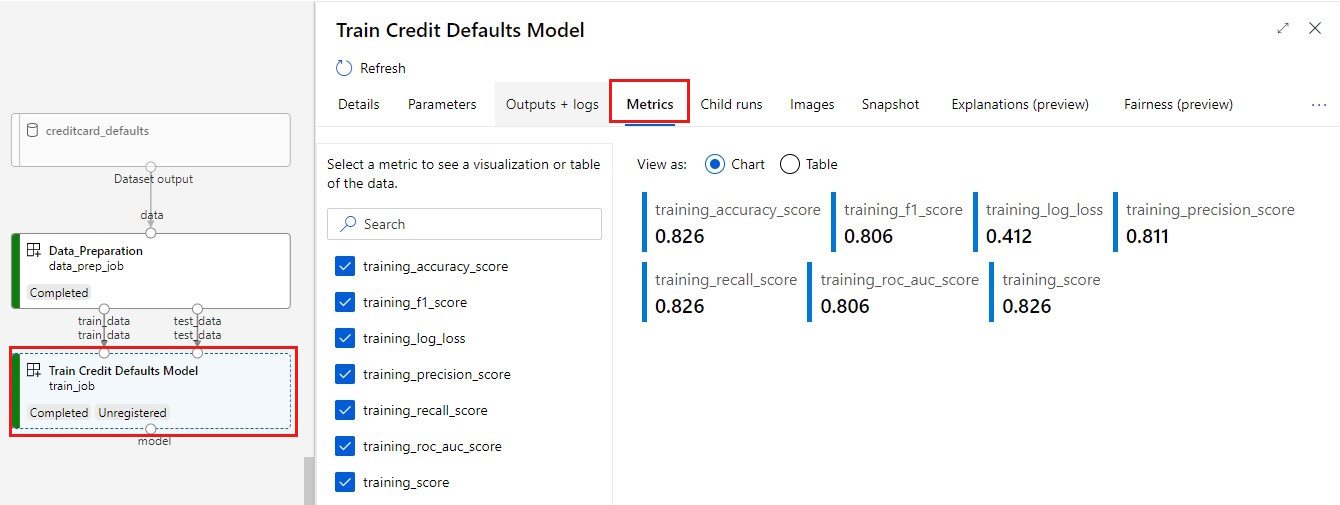


將模型部署為線上端點
欲了解更多如何將模型部署到線上端點的資訊,請參閱「 部署模型作為線上端點教學」。
清除資源
如果你打算繼續看其他教學,請跳到 下一步。
停止計算執行個體
如果你現在不打算使用運算實例,請停止:
- 在 Studio 的左窗格中,選取 [計算]。
- 在頂端索引標籤中,選取 [計算執行個體]。
- 選取清單中的計算執行個體。
- 在頂端工具列中,選取 [停止]。
刪除所有資源
重要事項
您所建立的資源可用來作為其他 Azure Machine Learning 教學課程和操作說明文章的先決條件。
如果不打算使用您建立的任何資源,請刪除以免產生任何費用:
在 Azure 入口網站的搜尋方塊中,輸入 [資源群組],然後從結果中選取它。
從清單中,選取您所建立的資源群組。
在 [概觀] 頁面上,選取 [刪除資源群組]。
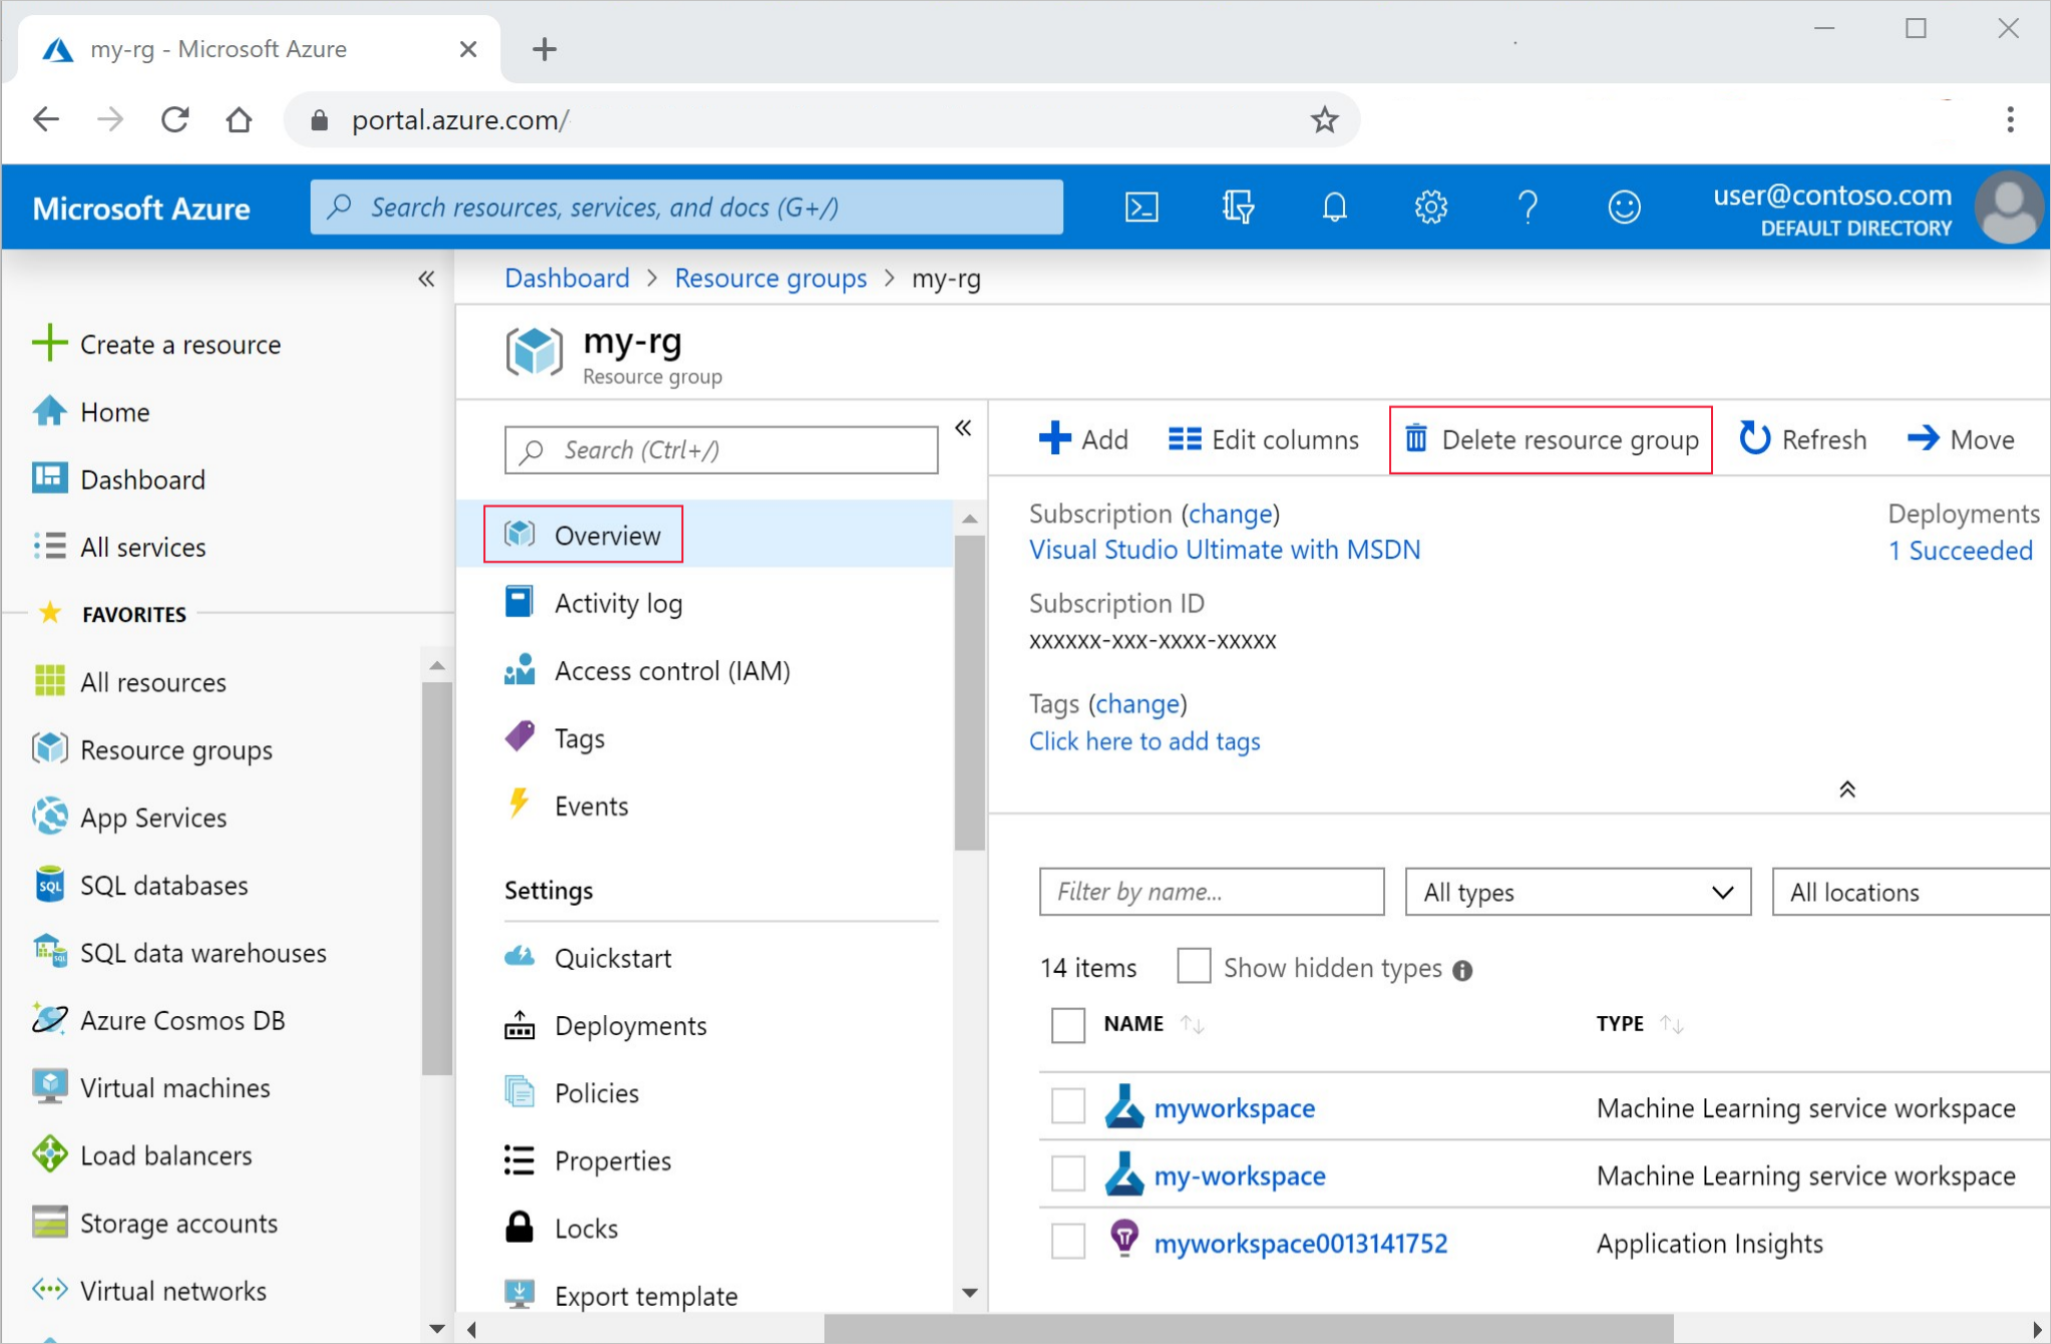
輸入資源群組名稱。 然後選取 [刪除]。