企業推播架構指引
現今的企業正逐漸走向為其終端使用者(外部)或員工(內部)建立行動應用程式。 它們現有的後端系統是大型主機或某些 LoB 應用程式,必須整合到行動應用程式架構中。 本指南將討論如何最好地執行這項整合,以建議常見案例的解決方案。
當後端系統中發生相關事件時,經常需要透過行動應用程式將推播通知傳送給使用者。 例如,在 i 上擁有銀行銀行應用程式 電話 銀行客戶想要在從帳戶或內部網路案例取得超過特定金額時收到通知,而財務部門的員工在 Windows 電話 上擁有預算核准應用程式的員工想要在收到核准要求時收到通知。
銀行帳戶或核准處理可能會在某些後端系統中完成,而後端系統必須起始推送給使用者。 可能會有多個這類後端系統,這些系統都必須在事件觸發通知時建置相同的邏輯類型來推送。 這裡的複雜性在於將數個後端系統與單一推播系統整合在一起,使用者可能已訂閱不同的通知,甚至可能會有多個行動應用程式。 例如,一個行動應用程式可能想要從多個這類後端系統接收通知的內部網路行動應用程式。 後端系統不知道或需要知道推播語意/技術,因此,這裡的常見解決方案是引進元件,該元件會輪詢後端系統是否有任何感興趣的事件,並負責將推送訊息傳送至用戶端。
更好的解決方案是使用 Azure 服務匯流排 - 主題/訂用帳戶模型,這可降低解決方案可調整的複雜度。
以下是解決方案的一般架構(使用多個行動應用程式一般化,但同樣適用於只有一個行動應用程式時)
架構
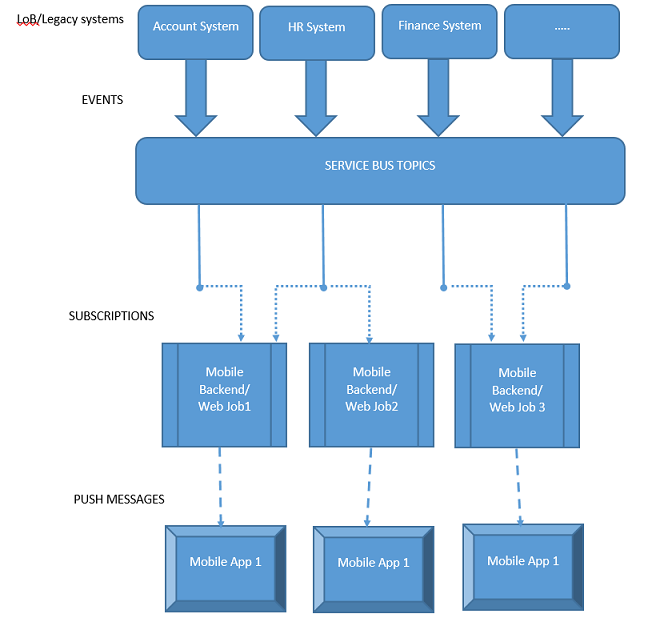
此架構圖中的關鍵部分是 Azure 服務匯流排,它提供主題/訂用帳戶程序設計模型(服務匯流排 Pub/Sub 程式設計中更多內容)。 在此情況下,接收者是行動後端(通常是起始推送至行動應用程式的 Azure 行動服務)不會直接從後端系統接收訊息,而是由 Azure 服務匯流排 提供的中繼抽象層,這可讓行動後端接收來自一或多個後端系統的訊息。 必須為每個後端系統建立 服務匯流排 主題,例如 Account、HR、Finance,這基本上是感興趣的「主題」,這會起始要作為推播通知傳送的訊息。 後端系統會將訊息傳送至這些主題。 行動後端可以藉由建立 服務匯流排 訂用帳戶來訂閱一或多個這類主題。 它可讓行動後端接收來自對應後端系統的通知。 行動後端會繼續接聽其訂用帳戶上的訊息,一旦訊息送達,就會回過身來,並將它當做通知傳送至其通知中樞。 然後通知中樞最終會將訊息傳遞至行動應用程式。 以下是主要元件清單:
- 後端系統 (LoB/舊版系統)
- 建立 服務匯流排 主題
- 傳送訊息
- 行動後端
- 建立服務訂用帳戶
- 接收訊息 (來自後端系統)
- 傳送通知給用戶端(透過 Azure 通知中樞)
- 行動應用程式
- 接收和顯示通知
福利
- 接收者(透過通知中樞的行動應用程式/服務)與傳送者(後端系統)之間的分離,可讓其他後端系統與最小的變更整合。
- 它也讓多個行動應用程式能夠接收來自一或多個後端系統的事件案例。
範例
必要條件
完成下列教學課程,以熟悉概念以及常見的建立和設定步驟:
- 服務匯流排 Pub/Sub 程式設計 - 本教學課程說明如何使用 服務匯流排 Topics/Subscriptions、如何建立包含主題/訂用帳戶的命名空間、如何從主題/訂閱傳送和接收訊息的詳細數據。
- 通知中樞 - Windows 通用教學 課程 - 本教學課程說明如何設定 Windows 市集應用程式,並使用通知中樞來註冊和接收通知。
範例指令碼
完整的範例程式代碼可在通知中樞範例取得。 它會分成三個元件:
EnterprisePushBackendSystem
a. 此專案會使用 Azure.Messaging.ServiceBus NuGet 套件,並且以 服務匯流排 Pub/Sub 程式設計為基礎。
b. 此應用程式是簡單的 C# 主控台應用程式,用來模擬 LoB 系統,它會起始要傳遞至行動應用程式的訊息。
static async Task Main(string[] args)
{
    string connectionString =
        ConfigurationManager.AppSettings.Get("Azure.ServiceBus.ConnectionString");

    // Create the topic
    await CreateTopicAsync(connectionString);

    // Send message
    await SendMessageAsync(connectionString);
}
c.
CreateTopicAsync用來建立 服務匯流排 主題。public static async Task CreateTopicAsync(string connectionString) { // Create the topic if it does not exist already ServiceBusAdministrationClient client = new ServiceBusAdministrationClient(connectionString); if (!await client.TopicExistsAsync(topicName)) { await client.CreateTopicAsync(topicName); } }d.
SendMessageAsync用來將訊息傳送至此 服務匯流排 主題。 此程式代碼只會定期將一組隨機訊息傳送至主題,以供範例使用。 通常會有後端系統,會在事件發生時傳送訊息。public static sync Task SendMessageAsync(string connectionString) { await using var client = new ServiceBusClient(connectionString); ServiceBusSender sender = client.CreateSender(topicName); // Sends random messages every 10 seconds to the topic string[] messages = { "Employee Id '{0}' has joined.", "Employee Id '{0}' has left.", "Employee Id '{0}' has switched to a different team." }; while (true) { Random rnd = new Random(); string employeeId = rnd.Next(10000, 99999).ToString(); string notification = String.Format(messages[rnd.Next(0,messages.Length)], employeeId); // Send Notification ServiceBusMessage message = new ServiceBusMessage(notification); await sender.SendMessageAsync(message); Console.WriteLine("{0} Message sent - '{1}'", DateTime.Now, notification); System.Threading.Thread.Sleep(new TimeSpan(0, 0, 10)); } }ReceiveAndSendNotification
a. 此專案會使用 Azure.Messaging.ServiceBus 和 Microsoft.Web.WebJobs.Publish NuGet 套件,並且以 pub/Sub 程式設計 服務匯流排 為基礎。
b. 下列主控台應用程式會以 Azure WebJob 的形式執行,因為它必須持續執行以接聽來自 LoB/後端系統的訊息。 此應用程式是行動後端的一部分。
static async Task Main(string[] args)
{
    string connectionString =
             ConfigurationManager.AppSettings.Get("Azure.ServiceBus.ConnectionString");

    // Create the subscription that receives messages
    await CreateSubscriptionAsync(connectionString);

    // Receive message
    await ReceiveMessageAndSendNotificationAsync(connectionString);
}
c.
CreateSubscriptionAsync用來為後端系統傳送訊息的主題建立 服務匯流排 訂用帳戶。 根據商務案例,此元件會建立一或多個對應主題的訂用帳戶(例如,有些可能是從 HR 系統接收訊息、部分來自財務系統等等)static async Task CreateSubscriptionAsync(string connectionString) { // Create the subscription if it does not exist already ServiceBusAdministrationClient client = new ServiceBusAdministrationClient(connectionString); if (!await client.SubscriptionExistsAsync(topicName, subscriptionName)) { await client.CreateSubscriptionAsync(topicName, subscriptionName); } }d.
ReceiveMessageAndSendNotificationAsync是用來使用其訂用帳戶從主題讀取訊息,如果讀取成功,則製作通知(在範例案例中為 Windows 原生快顯通知),以使用 Azure 通知中樞傳送至行動應用程式。static async Task ReceiveMessageAndSendNotificationAsync(string connectionString) { // Initialize the Notification Hub string hubConnectionString = ConfigurationManager.AppSettings.Get ("Microsoft.NotificationHub.ConnectionString"); hub = NotificationHubClient.CreateClientFromConnectionString (hubConnectionString, "enterprisepushservicehub"); ServiceBusClient Client = new ServiceBusClient(connectionString); ServiceBusReceiver receiver = Client.CreateReceiver(topicName, subscriptionName); // Continuously process messages received from the subscription while (true) { ServiceBusReceivedMessage message = await receiver.ReceiveMessageAsync(); var toastMessage = @"<toast><visual><binding template=""ToastText01""><text id=""1"">{messagepayload}</text></binding></visual></toast>"; if (message != null) { try { Console.WriteLine(message.MessageId); Console.WriteLine(message.SequenceNumber); string messageBody = message.Body.ToString(); Console.WriteLine("Body: " + messageBody + "\n"); toastMessage = toastMessage.Replace("{messagepayload}", messageBody); SendNotificationAsync(toastMessage); // Remove message from subscription await receiver.CompleteMessageAsync(message); } catch (Exception) { // Indicate a problem, unlock message in subscription await receiver.AbandonMessageAsync(message); } } } } static async void SendNotificationAsync(string message) { await hub.SendWindowsNativeNotificationAsync(message); }e. 若要將此應用程式發佈為 WebJob,請以滑鼠右鍵按兩下 Visual Studio 中的解決方案,然後選取 [發佈為 WebJob]

f. 選取您的發佈配置檔,如果尚未存在,請建立新的 Azure WebSite,其中裝載此 WebJob,並在您擁有 WebSite 之後 發布。

[發佈 Web] 對話框的螢幕快照,其中已選取 [Microsoft Azure 網站] 選項、綠色箭號,指向 [選取現有網站] 對話框,其中 [新增] 選項以紅色框線,而綠色箭號則指向 [在 Microsoft Azure 上建立網站] 對話框,其 [網站名稱] 和 [建立] 選項以紅色框線。
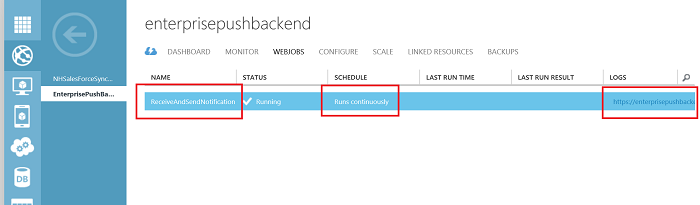
.g 將作業設定為「持續執行」,以便在登入 Azure 入口網站 時,您應該會看到類似下列內容:
EnterprisePushMobileApp
a. 此應用程式是 Windows 市集應用程式,它會從作為行動裝置後端一部分執行的 WebJob 接收快顯通知,並加以顯示。 此程序代碼是以 通知中樞 - Windows 通用教學課程為基礎。
b. 請確定您的應用程式已啟用,以接收快顯通知。
c. 請確定在應用程式啟動時呼叫下列通知中樞註冊程式代碼(取代
HubName和DefaultListenSharedAccessSignature值之後:private async void InitNotificationsAsync() { var channel = await PushNotificationChannelManager.CreatePushNotificationChannelForApplicationAsync(); var hub = new NotificationHub("[HubName]", "[DefaultListenSharedAccessSignature]"); var result = await hub.RegisterNativeAsync(channel.Uri); // Displays the registration ID so you know it was successful if (result.RegistrationId != null) { var dialog = new MessageDialog("Registration successful: " + result.RegistrationId); dialog.Commands.Add(new UICommand("OK")); await dialog.ShowAsync(); } }
執行範例
請確定您的 WebJob 已成功執行,並排程持續執行。
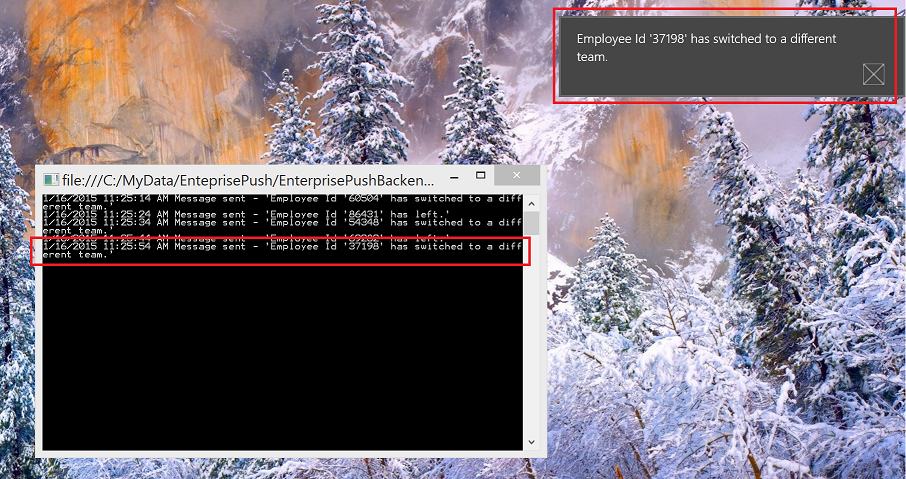
執行 EnterprisePushMobileApp,以啟動 Windows 市集應用程式。
執行 EnterprisePushBackendSystem 控制台應用程式,此應用程式會模擬 LoB 後端並開始傳送訊息,您應該會看到快顯通知如下所示:
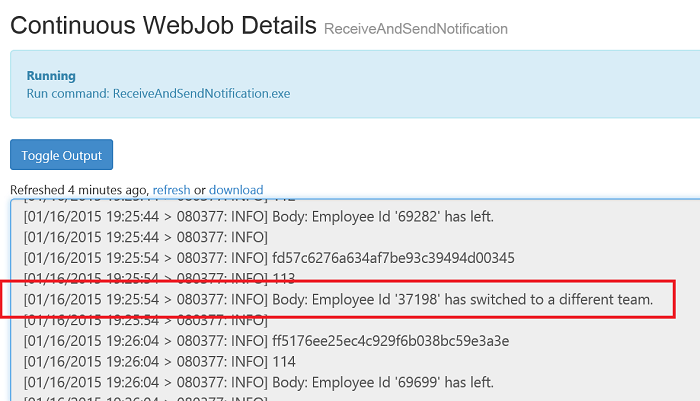
這些訊息原本會傳送至 服務匯流排 主題,而該主題是由 Web 作業中的 服務匯流排 訂用帳戶監視。 收到訊息之後,就會建立通知並傳送至行動應用程式。 您可以瀏覽 WebJob 記錄,確認當您移至 Web 作業 Azure 入口網站 中的 [記錄] 連結時,確認處理: