開始使用 Azure 服務匯流排 主題和訂用帳戶 (.NET)
本快速入門說明如何使用 Azure.Messaging.ServiceBus .NET 連結庫,將訊息傳送至 服務匯流排 主題,並從該主題的訂用帳戶接收訊息。
在本快速入門中,您將執行下列步驟:
- 使用 Azure 入口網站 建立 服務匯流排 命名空間。
- 使用 Azure 入口網站 建立 服務匯流排 主題。
- 使用 Azure 入口網站,建立該主題的 服務匯流排 訂用帳戶。
- 撰寫 .NET 控制台應用程式,以將一組訊息傳送至主題。
- 撰寫 .NET 控制台應用程式以從訂用帳戶接收這些訊息。
注意
本快速入門提供逐步指示,以實作簡單的案例,將一批訊息傳送至 服務匯流排 主題,並從主題的訂用帳戶接收這些訊息。 如需其他和進階案例的更多範例,請參閱 GitHub 上的 服務匯流排 .NET 範例。
- 本快速入門示範兩種連線到 Azure 服務匯流排 的方式:連接字串 和無密碼。 第一個選項示範如何使用 連接字串 來連線到 服務匯流排 命名空間。 第二個選項示範如何使用 Microsoft Entra ID 中的安全性主體和角色型存取控制 (RBAC) 來連線到 服務匯流排 命名空間。 您不需要擔心在程式代碼或組態檔中或 Azure 金鑰保存庫 等安全記憶體中有硬式編碼 連接字串。 如果您不熟悉 Azure,您可能會發現 連接字串 選項更容易遵循。 我們建議在真實世界應用程式和生產環境中使用無密碼選項。 如需詳細資訊,請參閱驗證與授權。
必要條件
如果您不熟悉服務,請先參閱 服務匯流排 概觀,再執行本快速入門。
- Azure 訂用帳戶。 若要使用 Azure 服務,包括 Azure 服務匯流排,您需要訂用帳戶。 如果您沒有現有的 Azure 帳戶,您可以註冊 免費試用。
- Visual Studio 2022。 範例應用程式會使用 C# 10 中引進的新功能。 您仍然可以搭配舊版 C# 語言使用 服務匯流排 客戶端連結庫,但語法可能會有所不同。 若要使用最新的語法,建議您安裝 .NET 6.0 或更高版本,並將語言版本設定為
latest。 如果您使用 Visual Studio,Visual Studio 2022 之前的版本與建置 C# 10 專案所需的工具不相容。
在 Azure 入口網站 中建立命名空間
若要開始在 Azure 中使用 服務匯流排 傳訊實體,您必須先建立命名空間,其名稱在 Azure 中是唯一的。 命名空間提供應用程式內 服務匯流排 資源(佇列、主題等)的範圍容器。
若要建立命名空間:
登入 Azure 入口網站。
流覽至 [ 所有服務] 頁面。
在左側導覽列上,從類別清單中選取 [整合],將滑鼠停留在 服務匯流排 上方,然後在 服務匯流排 磚上選取+按鈕。

在 [建立命名空間] 頁面的 [基本] 標籤中,遵循下列步驟:
針對 [ 訂用帳戶],選擇要在其中建立命名空間的 Azure 訂用帳戶。
針對 [ 資源群組],選擇命名空間將存留在其中的現有資源群組,或建立新的資源群組。
輸入命名空間的名稱。 命名空間名稱應遵守下列命名慣例:
- 名稱在整個 Azure 中必須是唯一的。 系統會立即檢查此名稱是否可用。
- 名稱長度至少為 6,最多 50 個字元。
- 名稱只能包含字母、數位、連字元 “-”。
- 名稱必須以字母開頭,並以字母或數字結尾。
- 名稱結尾不是 “-sb” 或 “-mgmt”。
針對 [ 位置],選擇您的命名空間應該裝載所在的區域。
針對 [定價層],選取命名空間的定價層 [基本]、[標準] 或 [進階版]。 在本快速入門中,選取 [ 標準]。
重要
如果您想要使用主題和訂用帳戶,請選擇 [標準] 或 [進階版]。 基本定價層不支援主題/訂用帳戶。
如果您選取 進階版 定價層,請指定傳訊單位數目。 進階層會在 CPU 和記憶體層級提供資源隔離,讓每個工作負載以隔離方式執行。 此資源容器稱為傳訊單位。 進階命名空間至少有一個傳訊單位。 您可以為每個 服務匯流排 進階版 命名空間選取 1、2、4、8 或 16 個傳訊單位。 如需詳細資訊,請參閱 服務匯流排 進階版 傳訊。
選取頁面底部的 [檢閱 + 建立] 。

在 [檢閱 + 建立] 頁面上檢閱設定,然後選取 [建立]。
部署資源成功后,請選取 部署頁面上的 [移至資源 ]。
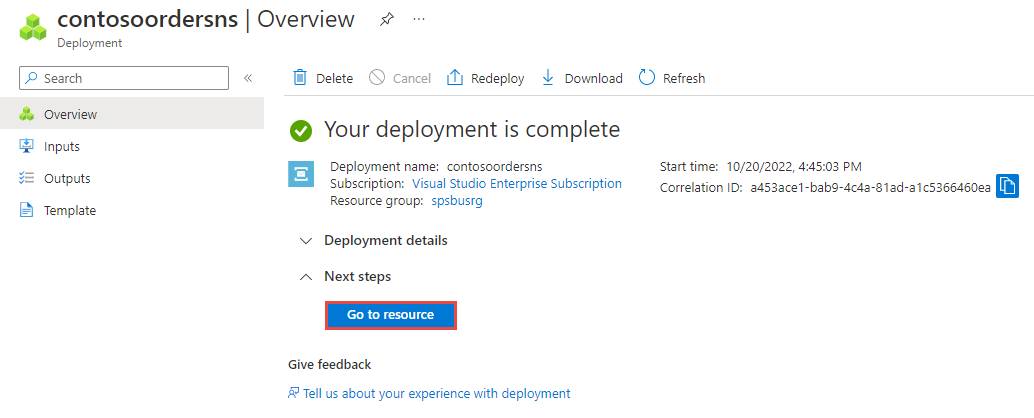
您會看到服務總線命名空間的首頁。
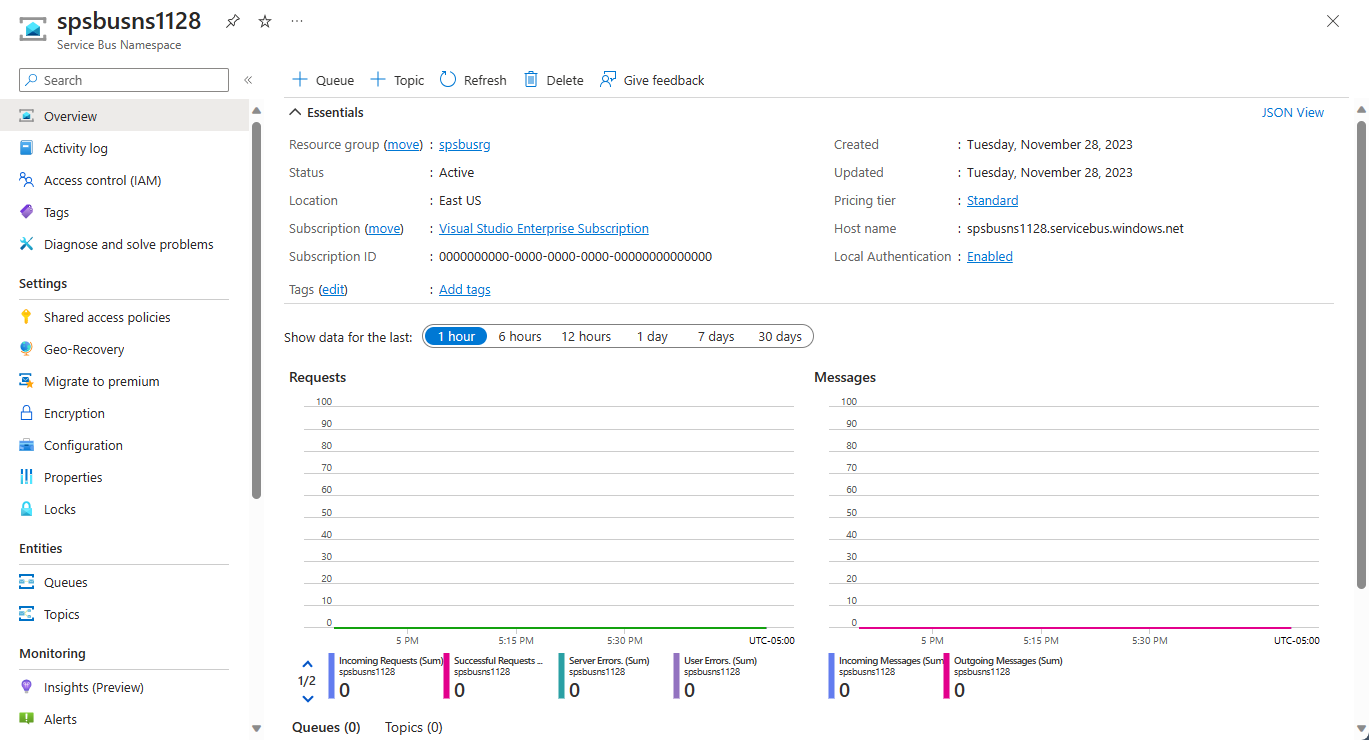

使用 Azure 入口網站 建立主題
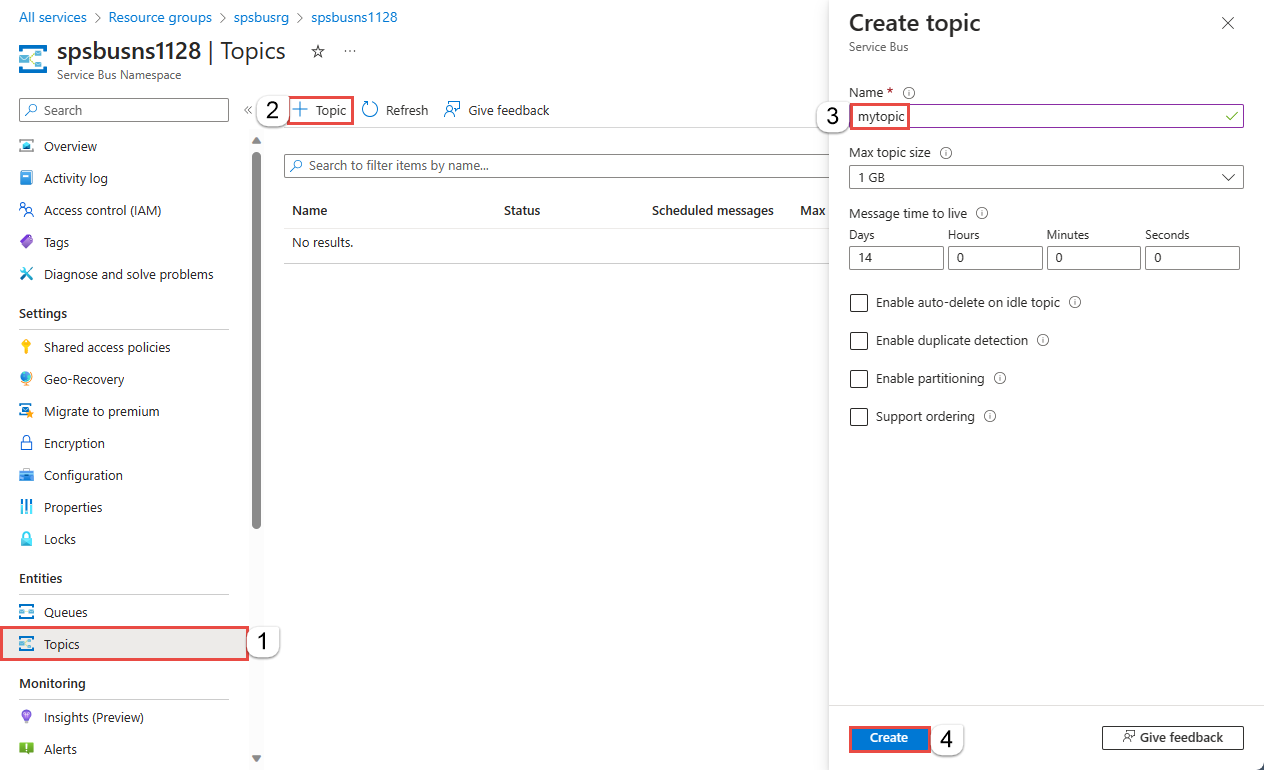
在 [服務匯流排 命名空間] 頁面上,選取左側功能表上的 [主題]。
選取 工具列上的 [+ 主題 ]。
輸入主題的名稱。 保留其他選項的預設值。
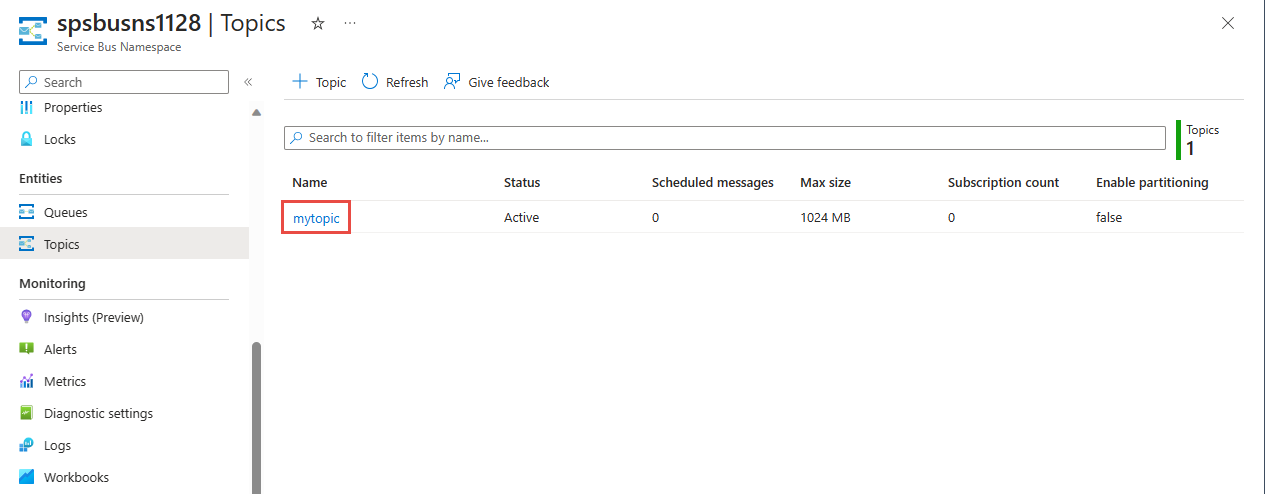
選取 建立。
建立主題的訂用帳戶
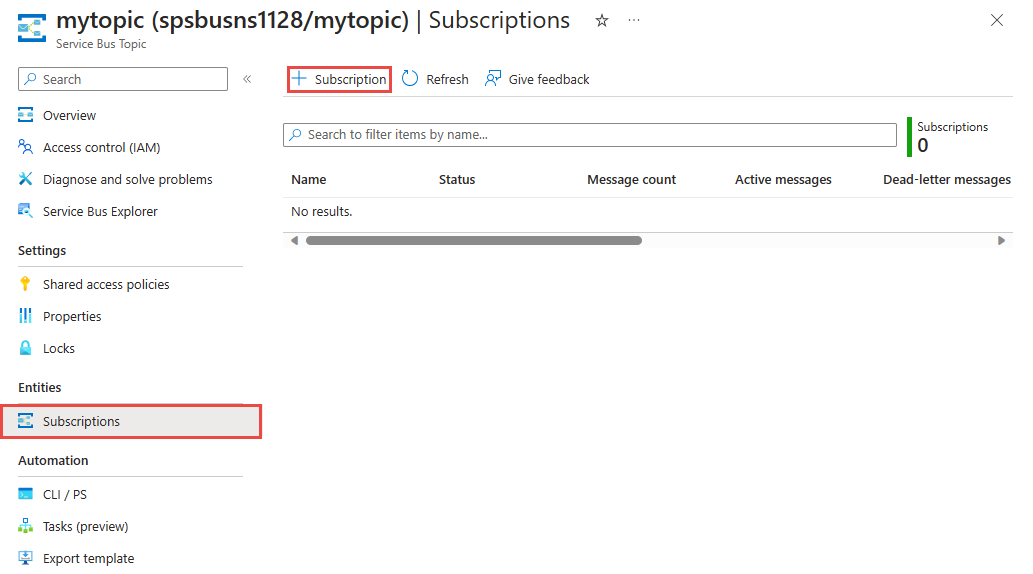
選取您在上一節中建立的主題。
在 [服務匯流排 主題] 頁面上,選取工具列上的 [+ 訂用帳戶]。
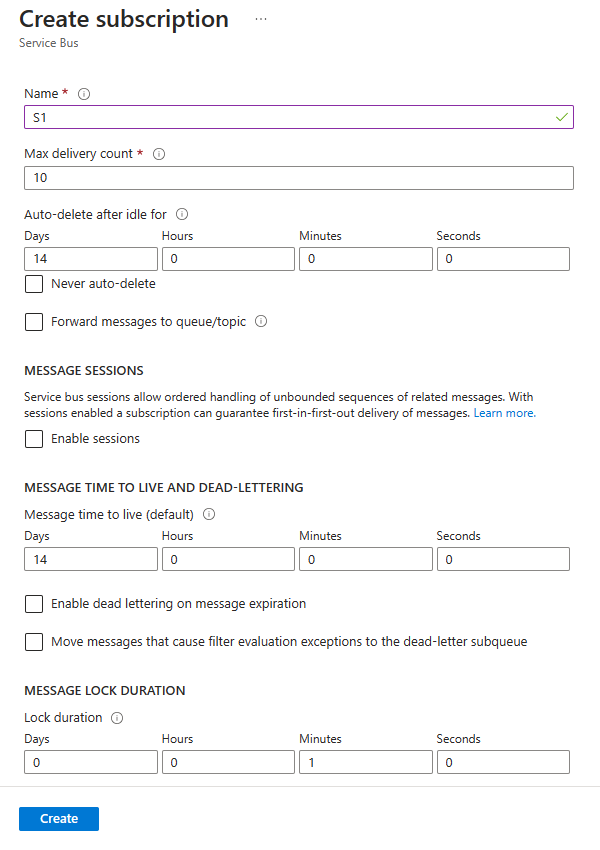
在 [ 建立訂用帳戶] 頁面上,遵循下列步驟:
輸入 S1 以取得 訂用帳戶的名稱 。
針對 [最大傳遞計數] 輸入 3。
然後,選取 [建立 ] 以建立訂用帳戶。
向 Azure 驗證應用程式
本快速入門說明連線到 Azure 服務匯流排的兩種方式:無密碼和 連接字串。
第一個選項示範如何使用 Microsoft Entra ID 和角色型存取控制 (RBAC) 中的安全性主體來連線到 服務匯流排 命名空間。 您不需要擔心在程式代碼或組態檔中,或在 Azure 金鑰保存庫 等安全記憶體中硬式編碼 連接字串。
第二個選項示範如何使用 連接字串 來連線到 服務匯流排 命名空間。 如果您不熟悉 Azure,您可能會發現 連接字串 選項更容易遵循。 我們建議在真實世界應用程式和生產環境中使用無密碼選項。 如需詳細資訊,請參閱驗證與授權。 您也可以在概 觀頁面上深入瞭解無密碼驗證。
將角色指派給 Microsoft Entra 使用者
在本機開發時,請確定連線到 Azure 服務匯流排 的用戶帳戶具有正確的許可權。 您需要 Azure 服務匯流排 數據擁有者角色,才能傳送和接收訊息。 若要指派此角色,您需要使用者存取 管理員 istrator 角色,或包含Microsoft.Authorization/roleAssignments/write動作的另一個角色。 您可以使用 Azure 入口網站、Azure CLI 或 Azure PowerShell,將 Azure RBAC 角色指派給使用者。 在範圍概觀頁面上深入瞭解角色指派的可用範圍。
下列範例會將Azure Service Bus Data Owner角色指派給您的用戶帳戶,以提供 Azure 服務匯流排 資源的完整存取權。 在實際案例中,遵循 最低許可權 原則,只為使用者提供更安全的生產環境所需的最低許可權。
適用於 Azure 服務匯流排的 Azure 內建角色
針對 Azure 服務匯流排,透過 Azure 入口網站 和 Azure 資源管理 API 的命名空間和所有相關資源的管理,已使用 Azure RBAC 模型來保護。 Azure 提供下列 Azure 內建角色,以授權存取 服務匯流排 命名空間:
- Azure 服務匯流排 數據擁有者:允許數據存取 服務匯流排 命名空間及其實體(佇列、主題、訂用帳戶和篩選)。 此角色的成員可以從佇列或主題/訂用帳戶傳送和接收訊息。
- Azure 服務匯流排資料傳送者:使用此角色來授與服務匯流排命名空間及其實體的資料傳送權限。
- Azure 服務匯流排 數據接收者:使用此角色來授與接收 服務匯流排 命名空間及其實體的存取權。
如果您想要建立自定義角色,請參閱 服務匯流排 作業所需的許可權。
將 Microsoft Entra 使用者新增至 Azure 服務匯流排 擁有者角色
將 Microsoft Entra 使用者名稱新增至 服務匯流排 命名空間層級 Azure 服務匯流排 數據擁有者角色。 它可讓在使用者帳戶內容中執行的應用程式將訊息傳送至佇列或主題,以及接收來自佇列或主題訂用帳戶的訊息。
重要
在大部分情況下,在 Azure 中傳播角色指派需要一兩分鐘的時間。 在罕見的情況下,最多可能需要 八分鐘的時間。 如果您第一次執行程式碼時收到驗證錯誤,請稍候片刻再試一次。
如果您沒有在 Azure 入口網站 中開啟 [服務匯流排 命名空間] 頁面,請使用主要搜尋列或左側導覽來尋找您的 服務匯流排 命名空間。
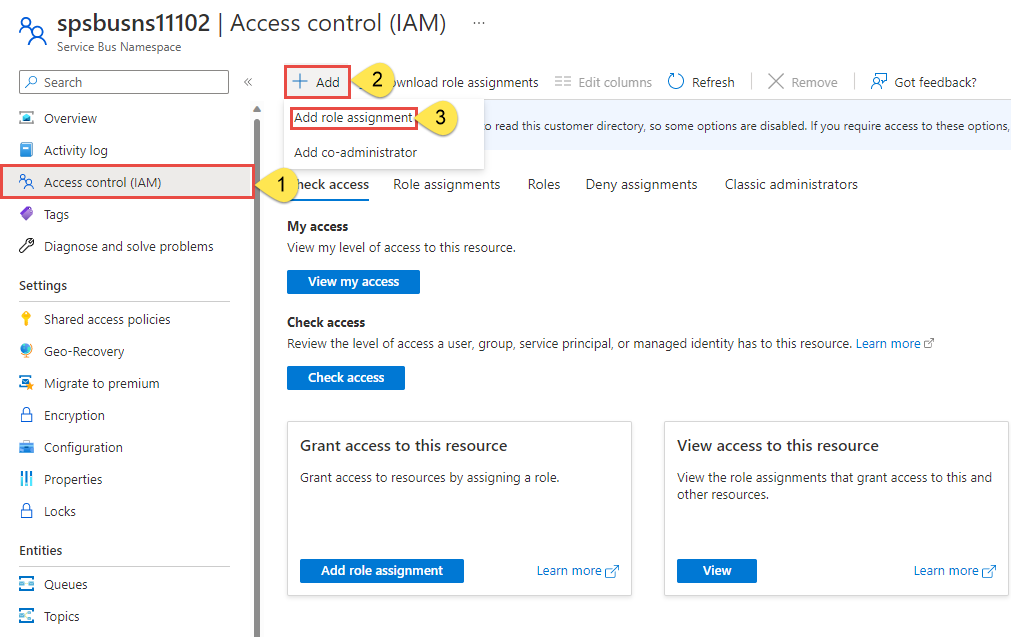
在 [概觀] 頁面上,從左側功能表中選取 [訪問控制][IAM ]。
在 [存取控制 (IAM)] 頁面上,選取 [角色指派] 索引標籤。
從頂端功能表選取 [+ 新增],然後從產生的下拉功能表中選取 [新增角色指派]。
使用搜尋方塊,從結果篩選出所需的角色。 在此範例中,搜尋
Azure Service Bus Data Owner並選取相符的結果。 接著,選擇 [下一步]。在 [存取權指派對象為] 下,選取 [使用者、群組或服務主體],然後選擇 [+ 選取成員]。
在對話方塊中,搜尋 Microsoft Entra 使用者名稱 (通常是您的 user@domain 電子郵件地址),然後在對話方塊底部選擇 [選取]。
選取 [檢閱 + 指派] 以移至最終頁面,然後再次選取 [檢閱 + 指派] 以完成此程序。

啟動 Visual Studio 並登入 Azure
您可以使用下列步驟來授權服務總線命名空間的存取權:
啟動 Visual Studio。 如果您看到 [ 開始使用] 視窗,請選取右窗格中的 [繼續但不開啟程式代碼 ] 連結。
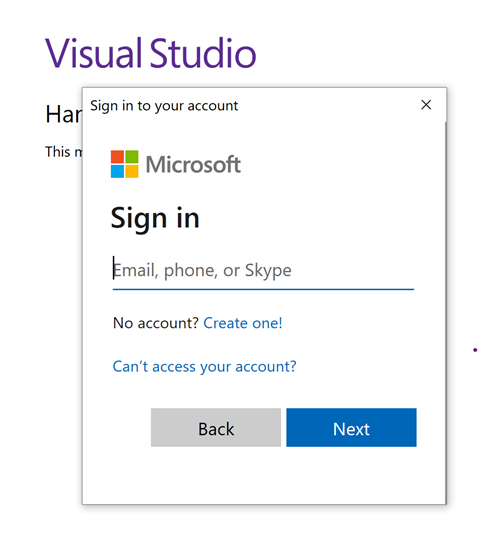
選取 Visual Studio 右上方的 [登入] 按鈕。

使用您先前指派角色的 Microsoft Entra 帳戶來登入。
將訊息傳送至主題
本節說明如何建立 .NET 控制台應用程式,以將訊息傳送至 服務匯流排 主題。
注意
本快速入門提供逐步指示,以實作簡單的案例,將一批訊息傳送至 服務匯流排 主題,並從主題的訂用帳戶接收這些訊息。 如需其他和進階案例的更多範例,請參閱 GitHub 上的 服務匯流排 .NET 範例。
建立主控台應用程式
- 在 Visual Studio 中,選取 [ 檔案 -> 新增 -> 專案 ] 選單。
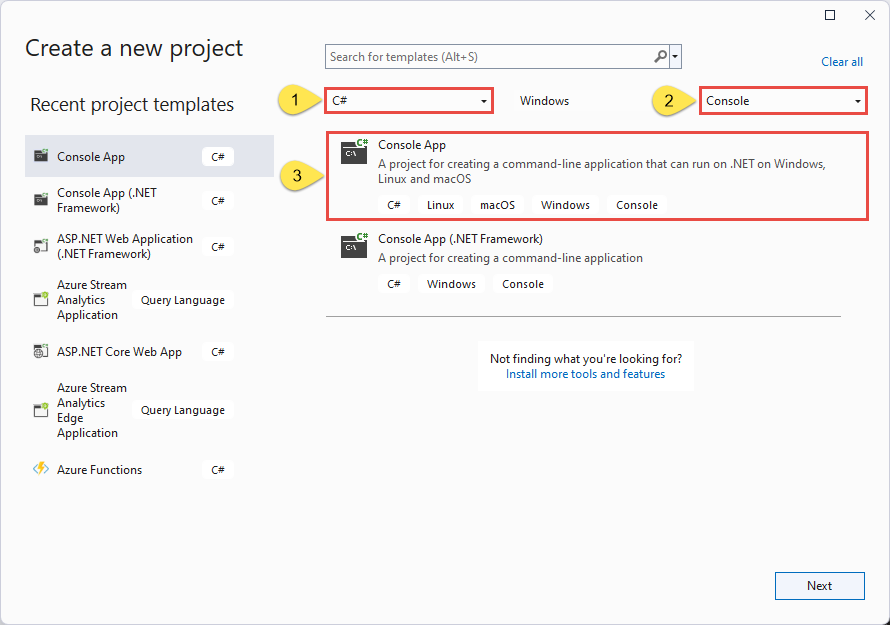
- 在 [ 建立新專案 ] 對話框中,執行下列步驟:如果您沒有看到此對話框,請選取 功能表上的 [檔案 ],選取 [新增],然後選取 [ 專案]。
針對程式設計語言選擇 C# 。
針對應用程式類型選取 [ 主控台 ]。
從結果清單中選取 [主控台應用程式 ]。
然後選取下一步。
- 針對專案名稱輸入 TopicSender,針對方案名稱輸入 ServiceBusTopicQuickStart,然後選取 [下一步]。
- 在 [ 其他資訊] 頁面上,選取 [建立 ] 以建立方案和專案。
將 NuGet 套件新增至專案
從功能表中選取 [工具>NuGet 封裝管理員> 封裝管理員 控制台]。
執行下列命令以安裝 Azure.Messaging.ServiceBus NuGet 套件。
Install-Package Azure.Messaging.ServiceBus執行下列命令以安裝 Azure.Identity NuGet 套件。
Install-Package Azure.Identity
新增程式代碼以將訊息傳送至主題
將 Program.cs 的內容取代為下列程式碼。 本節概述重要步驟,其中包含程序代碼批注中的其他資訊。
- 使用
DefaultAzureCredential物件建立 ServiceBusClient 物件。DefaultAzureCredential會自動探索並使用 Visual Studio 登入的認證來驗證 Azure 服務匯流排。 - 在物件上
ServiceBusClient叫用 CreateSender 方法,以針對特定 服務匯流排 主題建立 ServiceBusSender 物件。 - 使用 ServiceBusSender.CreateMessageBatchAsync 建立 ServiceBusMessageBatch物件。
- 使用 ServiceBusMessageBatch.TryAddMessage 將訊息新增至批次。
- 使用 ServiceBusSender.SendMessagesAsync 方法,將訊息批次傳送至 服務匯流排 主題。
重要
使用 服務匯流排 命名空間和主題的名稱,更新代碼段中的佔位元值 (
<NAMESPACE-NAME>和<TOPIC-NAME>) 。using System.Threading.Tasks; using Azure.Messaging.ServiceBus; using Azure.Identity; // the client that owns the connection and can be used to create senders and receivers ServiceBusClient client; // the sender used to publish messages to the topic ServiceBusSender sender; // number of messages to be sent to the topic const int numOfMessages = 3; // The Service Bus client types are safe to cache and use as a singleton for the lifetime // of the application, which is best practice when messages are being published or read // regularly. //TODO: Replace the "<NAMESPACE-NAME>" and "<TOPIC-NAME>" placeholders. client = new ServiceBusClient( "<NAMESPACE-NAME>.servicebus.windows.net", new DefaultAzureCredential()); sender = client.CreateSender("<TOPIC-NAME>"); // create a batch using ServiceBusMessageBatch messageBatch = await sender.CreateMessageBatchAsync(); for (int i = 1; i <= numOfMessages; i++) { // try adding a message to the batch if (!messageBatch.TryAddMessage(new ServiceBusMessage($"Message {i}"))) { // if it is too large for the batch throw new Exception($"The message {i} is too large to fit in the batch."); } } try { // Use the producer client to send the batch of messages to the Service Bus topic await sender.SendMessagesAsync(messageBatch); Console.WriteLine($"A batch of {numOfMessages} messages has been published to the topic."); } finally { // Calling DisposeAsync on client types is required to ensure that network // resources and other unmanaged objects are properly cleaned up. await sender.DisposeAsync(); await client.DisposeAsync(); } Console.WriteLine("Press any key to end the application"); Console.ReadKey();- 使用
建置專案,並確定沒有任何錯誤。
執行程式,並等待確認訊息。
A batch of 3 messages has been published to the topic重要
在大部分情況下,在 Azure 中傳播角色指派需要一兩分鐘的時間。 在罕見的情況下,最多可能需要 八分鐘的時間。 如果您第一次執行程式碼時收到驗證錯誤,請稍候片刻再試一次。
在 Azure 入口網站 中,遵循下列步驟:
流覽至您的 服務匯流排 命名空間。
在 [概觀] 頁面上的中間窗格中,切換至 [主題] 索引標籤,然後選取 服務匯流排 主題。 在下列範例中,它是
mytopic。
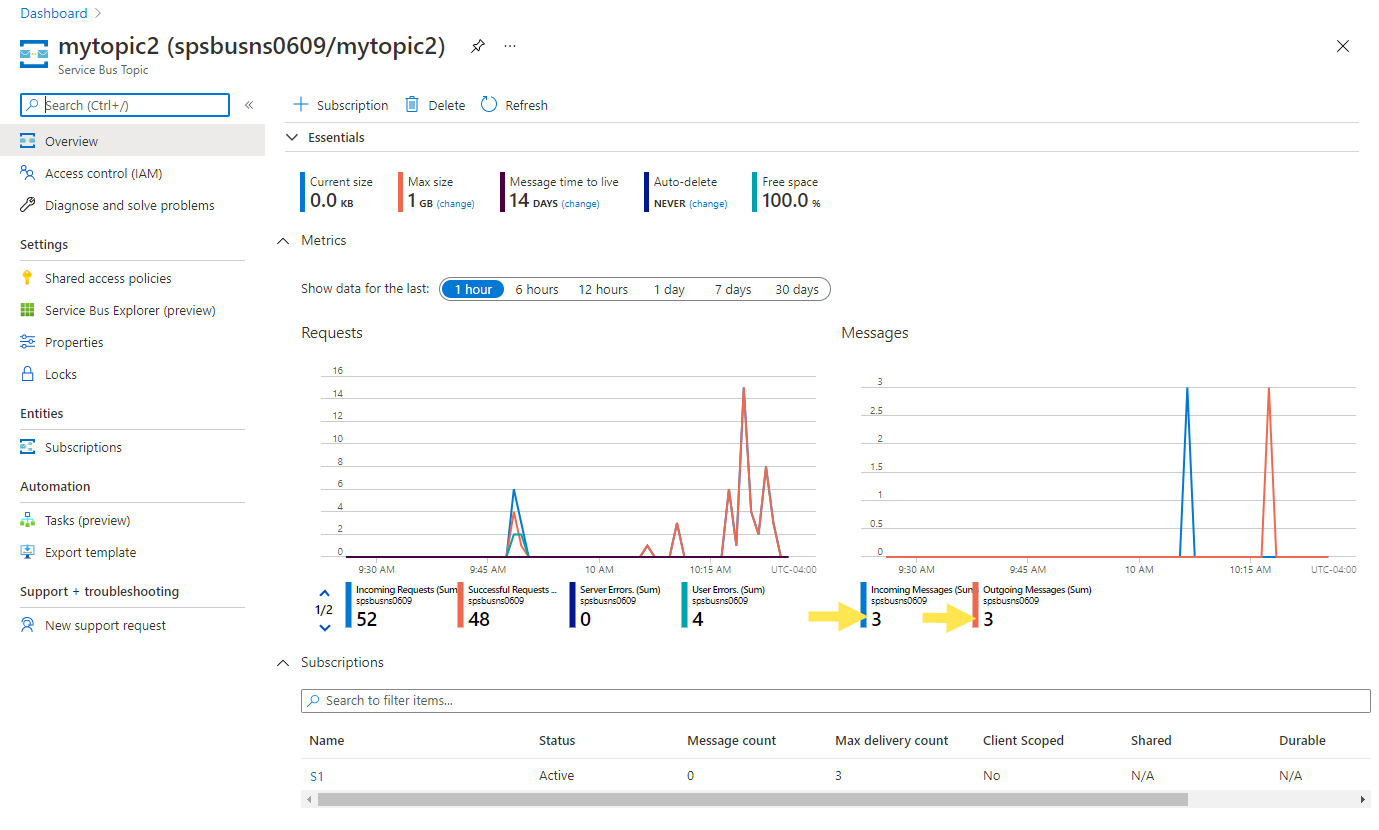
在 [服務匯流排 主題] 頁面上,在底部 [計量] 區段中的 [訊息] 圖表中,您可以看到主題有三個傳入訊息。 如果您沒有看到此值,請等候幾分鐘,然後重新整理頁面以查看更新的圖表。

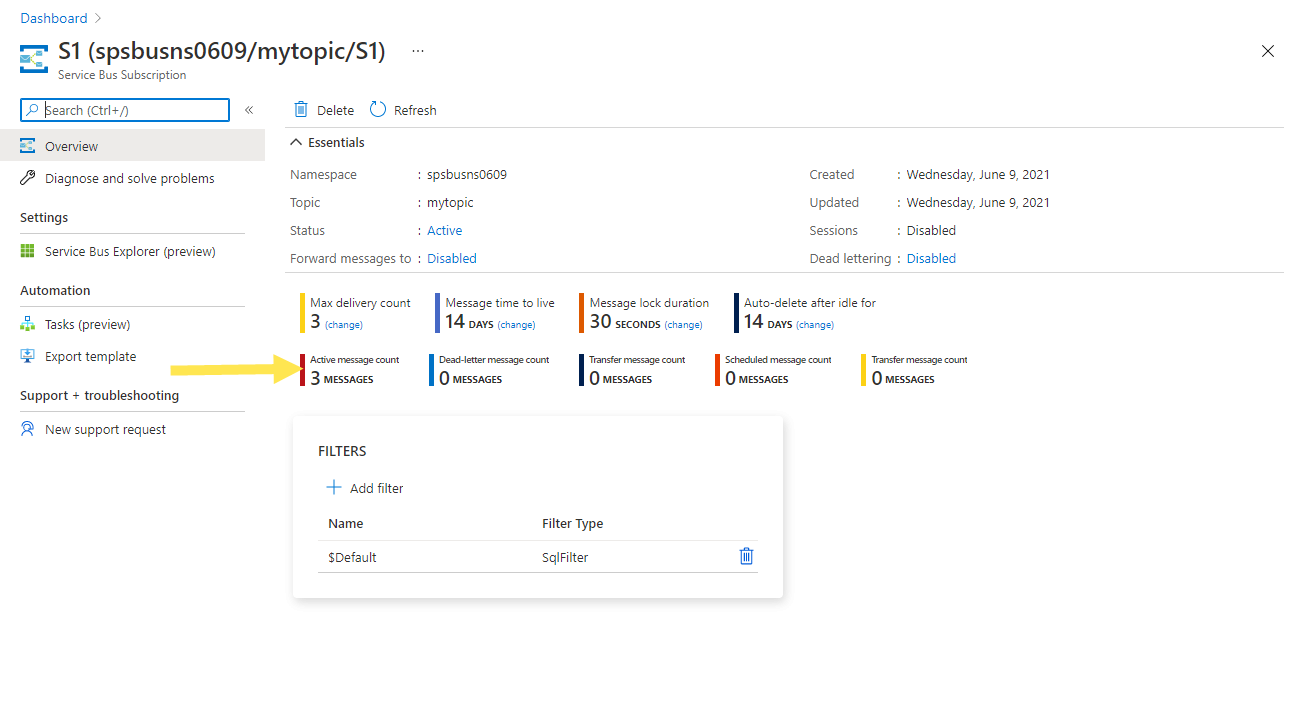
選取底部窗格中的訂用帳戶。 在下列範例中,它是 S1。 在 [服務匯流排 訂閱] 頁面上,您會看到 [使用中] 訊息計數為 3。 訂用帳戶已收到您傳送至主題的三則訊息,但尚未挑選接收者。


從訂用帳戶接收訊息
在本節中,您會建立 .NET 控制台應用程式,以接收來自訂用帳戶至 服務匯流排 主題的訊息。
注意
本快速入門提供逐步指示,以實作簡單的案例,將一批訊息傳送至 服務匯流排 主題,並從主題的訂用帳戶接收這些訊息。 如需其他和進階案例的詳細資訊,請參閱 GitHub 上的 服務匯流排 .NET 範例。
建立接收者的專案
- 在 [方案總管] 視窗中,以滑鼠右鍵按兩下 ServiceBusTopicQuickStart 解決方案,指向 [新增],然後選取 [新增專案]。
- 選取 [ 主控台應用程式],然後選取 [ 下一步]。
- 針對 [項目名稱] 輸入 SubscriptionReceiver,然後選取 [下一步]。
- 在 [ 其他資訊] 頁面上,選取 [ 建立]。
- 在 [方案總管] 視窗中,以滑鼠右鍵按兩下 [SubscriptionReceiver],然後選取 [設定為啟始專案]。
將 NuGet 套件新增至專案
從功能表中選取 [工具>][NuGet 封裝管理員> 封裝管理員 控制台]。
針對 [默認專案] 下拉式清單選取 [訂用帳戶][回復]。
執行下列命令以安裝 Azure.Messaging.ServiceBus NuGet 套件。
Install-Package Azure.Messaging.ServiceBus執行下列命令以安裝 Azure.Identity NuGet 套件。
Install-Package Azure.Identity
新增程式代碼以接收來自訂用帳戶的訊息
在本節中,您會新增程序代碼以從訂用帳戶擷取訊息。
將 的現有內容
Program.cs取代為下列屬性和方法:using System.Threading.Tasks; using Azure.Messaging.ServiceBus; using Azure.Identity; // the client that owns the connection and can be used to create senders and receivers ServiceBusClient client; // the processor that reads and processes messages from the subscription ServiceBusProcessor processor; // handle received messages async Task MessageHandler(ProcessMessageEventArgs args) { string body = args.Message.Body.ToString(); Console.WriteLine($"Received: {body} from subscription."); // complete the message. messages is deleted from the subscription. await args.CompleteMessageAsync(args.Message); } // handle any errors when receiving messages Task ErrorHandler(ProcessErrorEventArgs args) { Console.WriteLine(args.Exception.ToString()); return Task.CompletedTask; }將下列程式代碼附加至 的
Program.cs結尾。- 使用
DefaultAzureCredential物件建立 ServiceBusClient 物件。DefaultAzureCredential會自動探索並使用 Visual Studio 登入的認證來驗證以 Azure 服務匯流排。 - 在物件上
ServiceBusClient叫用 CreateProcessor 方法,為指定的 服務匯流排 主題建立 ServiceBusProcessor 物件。 - 指定物件的 ProcessMessageAsync 和 ProcessErrorAsync 事件的
ServiceBusProcessor處理程式。 - 在物件上
ServiceBusProcessor叫用 StartProcessingAsync 開始處理訊息。 - 當使用者按下按鍵以結束處理時,在物件上
ServiceBusProcessor叫用StopProcessingAsync。
重要
使用您 服務匯流排 命名空間、主題和訂用帳戶的名稱,更新代碼段中的佔位元元值 (
<NAMESPACE-NAME>、<TOPIC-NAME>、<SUBSCRIPTION-NAME>) 。如需詳細資訊,請參閱程式代碼批注。
// The Service Bus client types are safe to cache and use as a singleton for the lifetime // of the application, which is best practice when messages are being published or read // regularly. // // Create the clients that we'll use for sending and processing messages. // TODO: Replace the <NAMESPACE-NAME> placeholder client = new ServiceBusClient( "<NAMESPACE-NAME>.servicebus.windows.net", new DefaultAzureCredential()); // create a processor that we can use to process the messages // TODO: Replace the <TOPIC-NAME> and <SUBSCRIPTION-NAME> placeholders processor = client.CreateProcessor("<TOPIC-NAME>", "<SUBSCRIPTION-NAME>", new ServiceBusProcessorOptions()); try { // add handler to process messages processor.ProcessMessageAsync += MessageHandler; // add handler to process any errors processor.ProcessErrorAsync += ErrorHandler; // start processing await processor.StartProcessingAsync(); Console.WriteLine("Wait for a minute and then press any key to end the processing"); Console.ReadKey(); // stop processing Console.WriteLine("\nStopping the receiver..."); await processor.StopProcessingAsync(); Console.WriteLine("Stopped receiving messages"); } finally { // Calling DisposeAsync on client types is required to ensure that network // resources and other unmanaged objects are properly cleaned up. await processor.DisposeAsync(); await client.DisposeAsync(); }- 使用
以下是您的
Program.cs外觀:using System; using System.Threading.Tasks; using Azure.Messaging.ServiceBus; using Azure.Identity; // the client that owns the connection and can be used to create senders and receivers ServiceBusClient client; // the processor that reads and processes messages from the subscription ServiceBusProcessor processor; // handle received messages async Task MessageHandler(ProcessMessageEventArgs args) { string body = args.Message.Body.ToString(); Console.WriteLine($"Received: {body} from subscription."); // complete the message. messages is deleted from the subscription. await args.CompleteMessageAsync(args.Message); } // handle any errors when receiving messages Task ErrorHandler(ProcessErrorEventArgs args) { Console.WriteLine(args.Exception.ToString()); return Task.CompletedTask; } // The Service Bus client types are safe to cache and use as a singleton for the lifetime // of the application, which is best practice when messages are being published or read // regularly. // // Create the clients that we'll use for sending and processing messages. // TODO: Replace the <NAMESPACE-NAME> placeholder client = new ServiceBusClient( "<NAMESPACE-NAME>.servicebus.windows.net", new DefaultAzureCredential()); // create a processor that we can use to process the messages // TODO: Replace the <TOPIC-NAME> and <SUBSCRIPTION-NAME> placeholders processor = client.CreateProcessor("<TOPIC-NAME>", "<SUBSCRIPTION-NAME>", new ServiceBusProcessorOptions()); try { // add handler to process messages processor.ProcessMessageAsync += MessageHandler; // add handler to process any errors processor.ProcessErrorAsync += ErrorHandler; // start processing await processor.StartProcessingAsync(); Console.WriteLine("Wait for a minute and then press any key to end the processing"); Console.ReadKey(); // stop processing Console.WriteLine("\nStopping the receiver..."); await processor.StopProcessingAsync(); Console.WriteLine("Stopped receiving messages"); } finally { // Calling DisposeAsync on client types is required to ensure that network // resources and other unmanaged objects are properly cleaned up. await processor.DisposeAsync(); await client.DisposeAsync(); }建置專案,並確定沒有任何錯誤。
執行接收者應用程式。 您應該會看到收到的訊息。 按任意鍵可停止接收者和應用程式。
Wait for a minute and then press any key to end the processing
Received: Message 1 from subscription: S1
Received: Message 2 from subscription: S1
Received: Message 3 from subscription: S1

Stopping the receiver...
Stopped receiving messages
再次查看入口網站。
在 [服務匯流排 主題] 頁面上的 [訊息] 圖表中,您會看到三個傳入訊息和三個傳出訊息。 如果您沒有看到這些數位,請等候幾分鐘,然後重新整理頁面以查看更新的圖表。
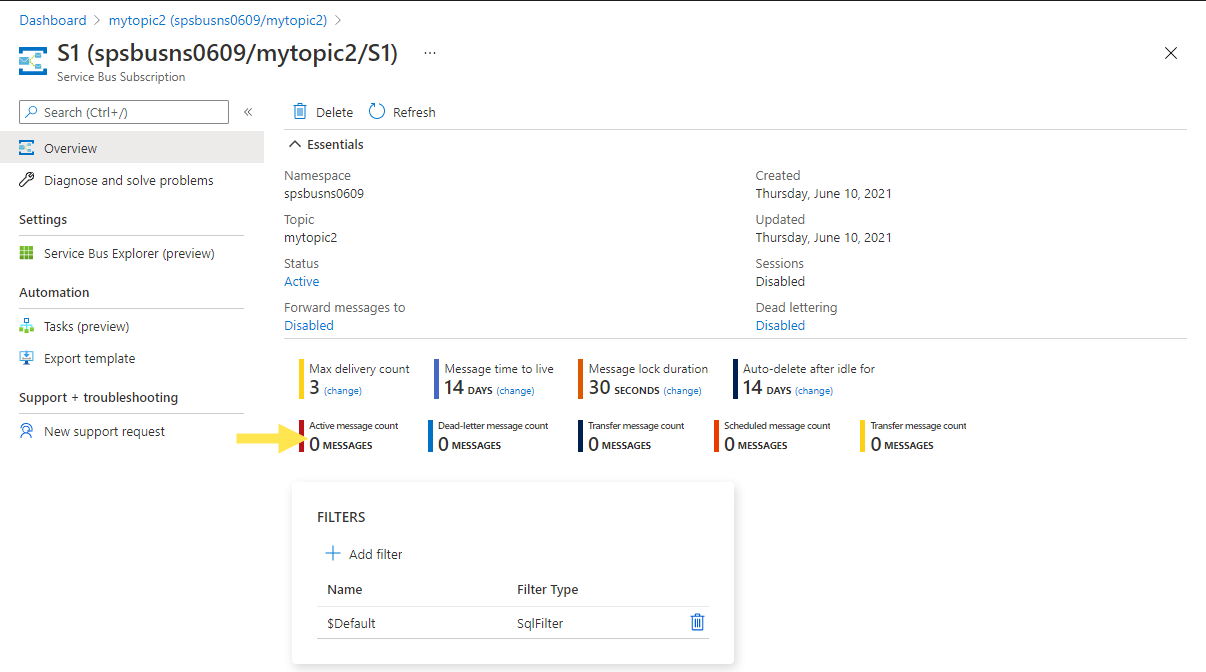
在 [服務匯流排 訂閱] 頁面上,您會看到 [使用中] 訊息計數為零。 這是因為接收者已從這個訂用帳戶接收訊息,並完成訊息。


下一步
請參閱下列檔和範例:
意見反應
即將登場:在 2024 年,我們將逐步淘汰 GitHub 問題作為內容的意見反應機制,並將它取代為新的意見反應系統。 如需詳細資訊,請參閱:https://aka.ms/ContentUserFeedback。
提交並檢視相關的意見反應