使用 ASP.NET 來註冊目前使用者以取得推播通知
概觀
本主題將說明以 ASP.NET Web API 執行註冊時,應如何向 Azure 通知中心要求推播通知註冊。 這是 使用通知中心來通知使用者教學課程的延伸主題。 您必須已完成該教學課程中的必要步驟,才能建立已驗證的行動服務。 如需通知使用者案例的詳細資訊,請參閱 使用通知中心來通知使用者。
更新應用程式
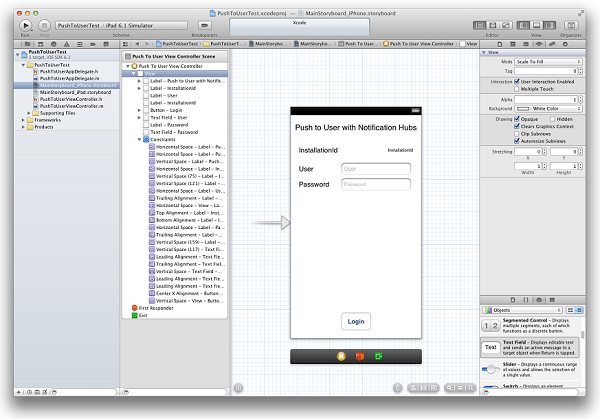
在您的 MainStoryboard_iPhone.storyboard 中,從物件程式庫新增下列元件:
標籤:「使用通知中樞推播給使用者」
標籤:「安裝 ID」
標籤:「使用者」
文字欄位:「使用者」
標籤:「密碼」
文字欄位:「密碼」
按鈕:「登入」
此時,您的腳本如下所示:
在輔助編輯器中,為所有切換的控制項建立出口並加以呼叫、使用檢視控制器 (委派) 連接文字欄位,然後為 [登入] 按鈕建立 [動作]。
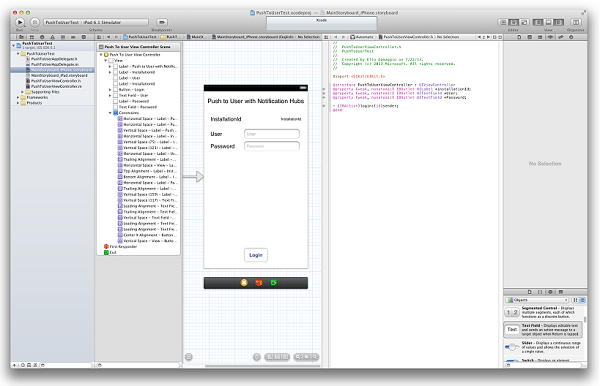
Your BreakingNewsViewController.h file should now contain the following code:
@property (weak, nonatomic) IBOutlet UILabel *installationId;
@property (weak, nonatomic) IBOutlet UITextField *User;
@property (weak, nonatomic) IBOutlet UITextField *Password;

- (IBAction)login:(id)sender;
建立名為
DeviceInfo的類別,然後將下列程式碼複製到 DeviceInfo.h 檔案的介面區段中:@property (readonly, nonatomic) NSString* installationId; @property (nonatomic) NSData* deviceToken;在 DeviceInfo.m 檔案的實作區段中複製下列程式碼:
@synthesize installationId = _installationId;

- (id)init {
    if (!(self = [super init]))
        return nil;

    NSUserDefaults *defaults = [NSUserDefaults standardUserDefaults];
    _installationId = [defaults stringForKey:@"PushToUserInstallationId"];
    if(!_installationId) {
        CFUUIDRef newUUID = CFUUIDCreate(kCFAllocatorDefault);
        _installationId = (__bridge_transfer NSString *)CFUUIDCreateString(kCFAllocatorDefault, newUUID);
        CFRelease(newUUID);

        //store the install ID so we don't generate a new one next time
        [defaults setObject:_installationId forKey:@"PushToUserInstallationId"];
        [defaults synchronize];
    }

    return self;
}

- (NSString*)getDeviceTokenInHex {
    const unsigned *tokenBytes = [[self deviceToken] bytes];
    NSString *hexToken = [NSString stringWithFormat:@"%08X%08X%08X%08X%08X%08X%08X%08X",
                            ntohl(tokenBytes[0]), ntohl(tokenBytes[1]), ntohl(tokenBytes[2]),
                            ntohl(tokenBytes[3]), ntohl(tokenBytes[4]), ntohl(tokenBytes[5]),
                            ntohl(tokenBytes[6]), ntohl(tokenBytes[7])];
    return hexToken;
}
在 PushToUserAppDelegate.h 中,新增下列屬性 singleton:
@property (strong, nonatomic) DeviceInfo* deviceInfo;在 PushToUserAppDelegate.m 中的
didFinishLaunchingWithOptions方法內,新增下列程式碼:self.deviceInfo = [[DeviceInfo alloc] init]; [[UIApplication sharedApplication] registerForRemoteNotificationTypes: UIRemoteNotificationTypeAlert | UIRemoteNotificationTypeBadge | UIRemoteNotificationTypeSound];第一行會初始化
DeviceInfoSingleton。 第二行會啟動推播通知的註冊;如果您已完成 開始使用通知中心 教學課程,則會有此註冊存在。在 PushToUserAppDelegate.m 中,於您的 AppDelegate 內實作方法
didRegisterForRemoteNotificationsWithDeviceToken,並新增下列程式碼:self.deviceInfo.deviceToken = deviceToken;這會設定要求的裝置權杖。
注意
此時,此方法中不應有任何其他程式碼。 您在完成使用 Azure 通知中樞將推播通知傳送至 iOS 應用程式教學課程時新增了
registerNativeWithDeviceToken方法,如果您已呼叫此方法,必須取消註解或移除該呼叫。在
PushToUserAppDelegate.m檔案中,新增下列處理常式方法:* (void) application:(UIApplication *) application didReceiveRemoteNotification:(NSDictionary *)userInfo { NSLog(@"%@", userInfo); UIAlertView *alert = [[UIAlertView alloc] initWithTitle:@"Notification" message: [userInfo objectForKey:@"inAppMessage"] delegate:nil cancelButtonTitle: @"OK" otherButtonTitles:nil, nil]; [alert show]; }此方法會在您執行中的應用程式接收到通知時,在 UI 中顯示警示。
開啟
PushToUserViewController.m檔案,並在下列實作中傳回鍵盤:- (BOOL)textFieldShouldReturn:(UITextField *)theTextField { if (theTextField == self.User || theTextField == self.Password) { [theTextField resignFirstResponder]; } return YES; }在
PushToUserViewController.m檔案的viewDidLoad方法中,初始化installationId標籤,如下所示:DeviceInfo* deviceInfo = [(PushToUserAppDelegate*)[[UIApplication sharedApplication]delegate] deviceInfo]; Self.installationId.text = deviceInfo.installationId;在
PushToUserViewController.m中的介面內新增下列屬性:@property (readonly) NSOperationQueue* downloadQueue; - (NSString*)base64forData:(NSData*)theData;然後,新增下列實作:
- (NSOperationQueue *)downloadQueue {
    if (!_downloadQueue) {
        _downloadQueue = [[NSOperationQueue alloc] init];
        _downloadQueue.name = @"Download Queue";
        _downloadQueue.maxConcurrentOperationCount = 1;
    }
    return _downloadQueue;
}

// base64 encoding
- (NSString*)base64forData:(NSData*)theData
{
    const uint8_t* input = (const uint8_t*)[theData bytes];
    NSInteger length = [theData length];

    static char table[] = "ABCDEFGHIJKLMNOPQRSTUVWXYZabcdefghijklmnopqrstuvwxyz0123456789+/=";

    NSMutableData* data = [NSMutableData dataWithLength:((length + 2) / 3) * 4];
    uint8_t* output = (uint8_t*)data.mutableBytes;

    NSInteger i;
    for (i=0; i < length; i += 3) {
        NSInteger value = 0;
        NSInteger j;
        for (j = i; j < (i + 3); j++) {
            value <<= 8;

            if (j < length) {
                value |= (0xFF & input[j]);
            }
        }

        NSInteger theIndex = (i / 3) * 4;
        output[theIndex + 0] =                    table[(value >> 18) & 0x3F];
        output[theIndex + 1] =                    table[(value >> 12) & 0x3F];
        output[theIndex + 2] = (i + 1) < length ? table[(value >> 6)  & 0x3F] : '=';
        output[theIndex + 3] = (i + 2) < length ? table[(value >> 0)  & 0x3F] : '=';
    }

    return [[NSString alloc] initWithData:data encoding:NSASCIIStringEncoding];
}
將下列程式碼複製到 XCode 所建立的
login處理常式方法中:DeviceInfo* deviceInfo = [(PushToUserAppDelegate*)[[UIApplication sharedApplication]delegate] deviceInfo]; // build JSON NSString* json = [NSString stringWithFormat:@"{\"platform\":\"ios\", \"instId\":\"%@\", \"deviceToken\":\"%@\"}", deviceInfo.installationId, [deviceInfo getDeviceTokenInHex]]; // build auth string NSString* authString = [NSString stringWithFormat:@"%@:%@", self.User.text, self.Password.text]; NSMutableURLRequest* request = [NSMutableURLRequest requestWithURL:[NSURL URLWithString:@"http://nhnotifyuser.azurewebsites.net/api/register"]]; [request setHTTPMethod:@"POST"]; [request setHTTPBody:[json dataUsingEncoding:NSUTF8StringEncoding]]; [request addValue:[@([json lengthOfBytesUsingEncoding:NSUTF8StringEncoding]) description] forHTTPHeaderField:@"Content-Length"]; [request addValue:@"application/json" forHTTPHeaderField:@"Content-Type"]; [request addValue:[NSString stringWithFormat:@"Basic %@",[self base64forData:[authString dataUsingEncoding:NSUTF8StringEncoding]]] forHTTPHeaderField:@"Authorization"]; // connect with POST [NSURLConnection sendAsynchronousRequest:request queue:[self downloadQueue] completionHandler:^(NSURLResponse* response, NSData* data, NSError* error) { // add UIAlert depending on response. if (error != nil) { NSHTTPURLResponse* httpResponse = (NSHTTPURLResponse*)response; if ([httpResponse statusCode] == 200) { UIAlertView *alert = [[UIAlertView alloc] initWithTitle:@"Back-end registration" message:@"Registration successful" delegate:nil cancelButtonTitle: @"OK" otherButtonTitles:nil, nil]; [alert show]; } else { NSLog(@"status: %ld", (long)[httpResponse statusCode]); } } else { NSLog(@"error: %@", error); } }];This method gets both an installation ID and channel for push notifications and sends it, along with the device type, to the authenticated Web API method that creates a registration in Notification Hubs. 此 Web API 定義於使用通知中心來通知使用者中。
現在,用戶端應用程式已更新,請回到 使用通知中心來通知使用者 ,並更新行動服務,以使用通知中心傳送通知。