注意
如需 Firebase 雲端傳訊取代和移轉步驟的相關信息,請參閱 Google Firebase 雲端傳訊移轉。
本教學課程將向您說明如何使用 Azure 通知中樞將推播通知傳送至特定裝置上的特定應用程式使用者。 ASP.NET WebAPI 後端可用來驗證客戶端並產生通知,如從應用程式後端註冊的指引文章所示。 本教學課程是以您在教學課程:使用 Azure 通知中樞和 Firebase 雲端通訊將通知推送至 Android 裝置所建立的通知中樞為基礎。
在本教學課程中,您會採取下列步驟:
- 建立可驗證使用者的後端 Web API 專案。
- 更新Android應用程式。
- 測試應用程式
必要條件
完成教學 課程:使用 Azure 通知中樞和 Firebase 雲端通訊 將通知推送至 Android 裝置,再執行本教學課程。
建立 WebAPI 專案
下列各節將討論如何建立新的 ASP.NET WebAPI 後端。 此程式有三個主要用途:
- 驗證用戶端:新增訊息處理程式來驗證用戶端要求,並將使用者與要求產生關聯。
- 使用 WebAPI 後端註冊通知:您可以新增控制器來處理用戶端裝置接收通知的新註冊。 已驗證的使用者名稱會自動新增至註冊作為 標記。
- 將通知傳送給用戶端:您可以新增控制器,讓使用者觸發與標籤相關聯的裝置和用戶端的安全推播。
執行下列動作,以建立新的 ASP.NET Core 6.0 Web API 後端:
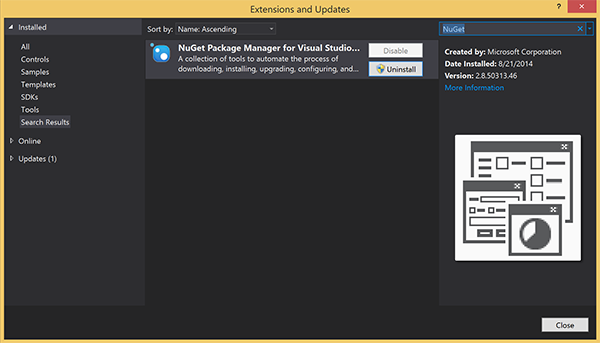
若要檢查,請啟動 Visual Studio。 在 [工具] 功能表上,選取 [擴充功能和 更新]。 在 Visual Studio 版本中搜尋 NuGet 封裝管理員,並確定您有最新版本。 如果您的版本不是最新版本,請將其卸載,然後重新安裝 NuGet 封裝管理員。
注意
請確定您已安裝適用於網站部署的 Visual Studio Azure SDK 。
啟動 Visual Studio 或 Visual Studio Express。
選取 [伺服器總管],然後登入您的 Azure 帳戶。 若要在您的帳戶上建立網站資源,您必須登入。
在 Visual Studio 的 [檔案] 功能表中,選取 [新增>專案]。
在搜尋方塊中輸入 Web API。
選取 [ASP.NET Core Web API 專案範本],然後選取 [下一步]。
在 [設定新專案] 對話框中,將專案命名為AppBackend,然後選取 [下一步]。
在 [其他資訊] 對話方塊中:
- 確認 Framework 為 .NET 6.0 (長期支援)。
- 確認已核取 [使用控制器 (取消核取以使用最小 API)] 核取方塊。
- 取消核取 [啟用 OpenAPI 支援]。
- 選取 建立。
移除 WeatherForecast 範本檔案
- 從新的 AppBackend 專案中移除WeatherForecast.cs和 Controllers/WeatherForecastController.cs範例檔案。
- 開啟 Properties\launchSettings.json。
- 將 launchUrl 屬性從 weatherforcast 變更為 appbackend。
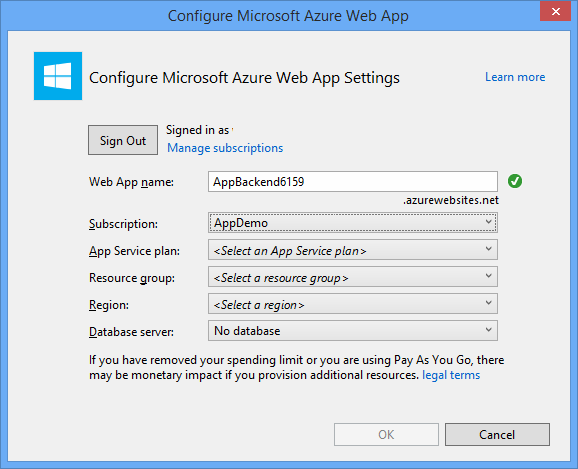
在 [ 設定 Microsoft Azure Web 應用程式 ] 視窗中,選取訂用帳戶, 然後在 [App Service 方案] 列表中執行下列其中一項動作:
- 選取您已建立的 Azure App 服務 方案。
- 選取 [建立新的 App Service 方案],然後建立一個方案。
您不需要本教學課程的資料庫。 選取 App Service 方案之後,請選取 [ 確定 ] 以建立專案。
如果您沒有看到此頁面來設定 App Service 方案,請繼續進行本教學課程。 您可以在稍後發佈應用程式時進行設定。
向 WebAPI 後端驗證用戶端
在本節中,您會為新的後端建立名為 AuthenticationTestHandler 的新訊息處理程序類別。 這個類別衍生自 DelegatingHandler ,並新增為訊息處理程式,以便處理進入後端的所有要求。
在 方案總管 中,以滑鼠右鍵按兩下 AppBackend 專案,選取 [新增],然後選取 [類別]。
將新類別 命名為AuthenticationTestHandler.cs,然後選取 [新增 ] 以產生類別。 為了簡單起見,此類別會使用 基本身份驗證 來驗證使用者。 您的應用程式可以使用任何驗證配置。
在 AuthenticationTestHandler.cs 中,新增下列
using語句:using System.Net.Http; using System.Threading; using System.Security.Principal; using System.Net; using System.Text; using System.Threading.Tasks;在 AuthenticationTestHandler.cs 中,以下列程式代碼取代
AuthenticationTestHandler類別定義:當下列三個條件成立時,處理程式會授權要求:
- 要求包含 授權 標頭。
- 要求會使用 基本 身份驗證。
- 用戶名稱字串和密碼字串是相同的字串。
否則,會拒絕要求。 此驗證不是真正的驗證和授權方法。 這隻是本教學課程的簡單範例。
如果要求訊息由 驗證並授權
AuthenticationTestHandler,則基本身份驗證使用者會附加至 HttpContext 上的目前要求。 HttpContext 中的使用者資訊稍後會由另一個控制器 (RegisterController) 用來將標籤新增至通知註冊要求。public class AuthenticationTestHandler : DelegatingHandler { protected override Task<HttpResponseMessage> SendAsync( HttpRequestMessage request, CancellationToken cancellationToken) { var authorizationHeader = request.Headers.GetValues("Authorization").First(); if (authorizationHeader != null && authorizationHeader .StartsWith("Basic ", StringComparison.InvariantCultureIgnoreCase)) { string authorizationUserAndPwdBase64 = authorizationHeader.Substring("Basic ".Length); string authorizationUserAndPwd = Encoding.Default .GetString(Convert.FromBase64String(authorizationUserAndPwdBase64)); string user = authorizationUserAndPwd.Split(':')[0]; string password = authorizationUserAndPwd.Split(':')[1]; if (VerifyUserAndPwd(user, password)) { // Attach the new principal object to the current HttpContext object HttpContext.Current.User = new GenericPrincipal(new GenericIdentity(user), new string[0]); System.Threading.Thread.CurrentPrincipal = System.Web.HttpContext.Current.User; } else return Unauthorized(); } else return Unauthorized(); return base.SendAsync(request, cancellationToken); } private bool VerifyUserAndPwd(string user, string password) { // This is not a real authentication scheme. return user == password; } private Task<HttpResponseMessage> Unauthorized() { var response = new HttpResponseMessage(HttpStatusCode.Forbidden); var tsc = new TaskCompletionSource<HttpResponseMessage>(); tsc.SetResult(response); return tsc.Task; } }注意
安全性注意事項:類別
AuthenticationTestHandler不提供真正的驗證。 它只會用來模擬基本身份驗證,而且不安全。 您必須在生產應用程式和服務中實作安全驗證機制。若要註冊訊息處理程式,請在 Program.cs 檔案中的 方法結尾
Register新增下列程式代碼:config.MessageHandlers.Add(new AuthenticationTestHandler());儲存您的變更。
使用 WebAPI 後端註冊通知
在本節中,您會將新的控制器新增至 WebAPI 後端,以處理使用用戶端連結庫註冊通知中樞來註冊用戶和裝置的要求。 控制器會為已驗證並附加至 HttpContext AuthenticationTestHandler的使用者新增使用者標籤。 標籤的字串格式為 "username:<actual username>"。
在 方案總管 中,以滑鼠右鍵按兩下 AppBackend 專案,然後選取 [管理 NuGet 套件]。
在左窗格中,選取 [在線],然後在 [搜尋] 方塊中輸入 Microsoft.Azure.NotificationHubs。
在結果清單中,選取 [Microsoft Azure 通知中樞],然後選取 [ 安裝]。 完成安裝,然後關閉 [NuGet 封裝管理員] 視窗。
此動作會使用 Microsoft.Azure.Notification Hubs NuGet 套件,新增 Azure 通知中樞 SDK 的參考。
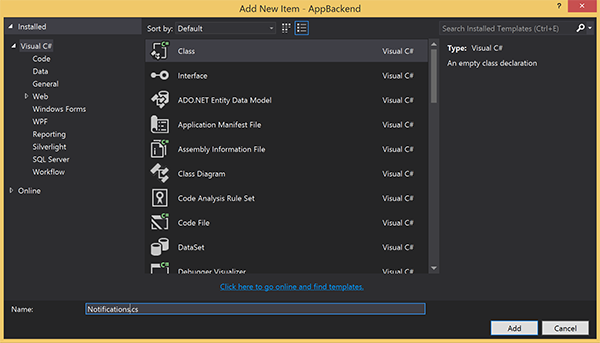
建立新的類別檔案,代表用來傳送通知的通知中樞連線。 在 [方案總管] 中,以滑鼠右鍵按兩下 Models 資料夾,選取 [新增],然後選取 [類別]。 將新類別 命名為Notifications.cs,然後選取 [新增 ] 以產生類別。
在 Notifications.cs 中,在檔案頂端新增下列
using語句:using Microsoft.Azure.NotificationHubs;將
Notifications類別定義取代為下列程序代碼,並將這兩個佔位元取代為通知中樞和中樞名稱的 連接字串(具有完整存取權)(可在 Azure 入口網站 取得):public class Notifications { public static Notifications Instance = new Notifications(); public NotificationHubClient Hub { get; set; } private Notifications() { Hub = NotificationHubClient.CreateClientFromConnectionString("<your hub's DefaultFullSharedAccessSignature>", "<hub name>"); } }重要
輸入 中樞的名稱 和 DefaultFullSharedAccessSignature ,再繼續進行。
接下來,建立名為 RegisterController 的新控制器。 在 方案總管 中,以滑鼠右鍵按兩下 [控制器] 資料夾,選取 [新增],然後選取 [控制器]。
選取 [API 控制器 - 空白],然後選取 [ 新增]。
在 [ 控制器名稱] 方塊中,輸入 RegisterController 以命名新類別,然後選取 [ 新增]。

在 RegisterController.cs 中,新增下列
using語句:using Microsoft.Azure.NotificationHubs; using Microsoft.Azure.NotificationHubs.Messaging; using AppBackend.Models; using System.Threading.Tasks; using System.Web;在類別定義內
RegisterController新增下列程序代碼。 在此程式代碼中,您會為附加至 HttpContext 的使用者新增使用者標籤。 使用者已由您新增AuthenticationTestHandler的訊息篩選器驗證並附加至 HttpContext。 您也可以新增選擇性檢查,以確認用戶有權註冊要求的標籤。private NotificationHubClient hub; public RegisterController() { hub = Notifications.Instance.Hub; } public class DeviceRegistration { public string Platform { get; set; } public string Handle { get; set; } public string[] Tags { get; set; } } // POST api/register // This creates a registration id public async Task<string> Post(string handle = null) { string newRegistrationId = null; // make sure there are no existing registrations for this push handle (used for iOS and Android) if (handle != null) { var registrations = await hub.GetRegistrationsByChannelAsync(handle, 100); foreach (RegistrationDescription registration in registrations) { if (newRegistrationId == null) { newRegistrationId = registration.RegistrationId; } else { await hub.DeleteRegistrationAsync(registration); } } } if (newRegistrationId == null) newRegistrationId = await hub.CreateRegistrationIdAsync(); return newRegistrationId; } // PUT api/register/5 // This creates or updates a registration (with provided channelURI) at the specified id public async Task<HttpResponseMessage> Put(string id, DeviceRegistration deviceUpdate) { RegistrationDescription registration = null; switch (deviceUpdate.Platform) { case "mpns": registration = new MpnsRegistrationDescription(deviceUpdate.Handle); break; case "wns": registration = new WindowsRegistrationDescription(deviceUpdate.Handle); break; case "apns": registration = new AppleRegistrationDescription(deviceUpdate.Handle); break; case "fcm": registration = new FcmRegistrationDescription(deviceUpdate.Handle); break; default: throw new HttpResponseException(HttpStatusCode.BadRequest); } registration.RegistrationId = id; var username = HttpContext.Current.User.Identity.Name; // add check if user is allowed to add these tags registration.Tags = new HashSet<string>(deviceUpdate.Tags); registration.Tags.Add("username:" + username); try { await hub.CreateOrUpdateRegistrationAsync(registration); } catch (MessagingException e) { ReturnGoneIfHubResponseIsGone(e); } return Request.CreateResponse(HttpStatusCode.OK); } // DELETE api/register/5 public async Task<HttpResponseMessage> Delete(string id) { await hub.DeleteRegistrationAsync(id); return Request.CreateResponse(HttpStatusCode.OK); } private static void ReturnGoneIfHubResponseIsGone(MessagingException e) { var webex = e.InnerException as WebException; if (webex.Status == WebExceptionStatus.ProtocolError) { var response = (HttpWebResponse)webex.Response; if (response.StatusCode == HttpStatusCode.Gone) throw new HttpRequestException(HttpStatusCode.Gone.ToString()); } }儲存您的變更。

從 WebAPI 後端傳送通知
在本節中,您會新增控制器,以公開用戶端裝置傳送通知的方式。 通知是以在 ASP.NET WebAPI 後端中使用 Azure 通知中樞 .NET 連結庫的使用者名稱標籤為基礎。
使用您在上一節中建立 RegisterController 的方式,建立另一個名為 NotificationsController 的新控制器。
在 NotificationsController.cs 中,新增下列
using語句:using AppBackend.Models; using System.Threading.Tasks; using System.Web;將下列方法新增至 NotificationsController 類別:
此程式代碼會傳送以平臺通知服務 (PNS)
pns參數為基礎的通知類型。 的值to_tag是用來在訊息上設定 使用者名稱 標記。 此標籤必須符合作用中通知中樞註冊的使用者名稱標記。 通知訊息會從 POST 要求的本文提取,並針對目標 PNS 格式化。視您支持的裝置用來接收通知的 PNS 而定,各種格式都支援通知。 例如,在 Windows 裝置上,您可以使用快顯通知搭配另一個 PNS 未直接支援的 WNS 。 在這種情況下,後端必須將通知格式化為您計劃支援的裝置 PNS 支援的通知。 然後在 NotificationHubClient 類別上使用適當的傳送 API。
public async Task<HttpResponseMessage> Post(string pns, [FromBody]string message, string to_tag)
{
    var user = HttpContext.Current.User.Identity.Name;
    string[] userTag = new string[2];
    userTag[0] = "username:" + to_tag;
    userTag[1] = "from:" + user;

    Microsoft.Azure.NotificationHubs.NotificationOutcome outcome = null;
    HttpStatusCode ret = HttpStatusCode.InternalServerError;

    switch (pns.ToLower())
    {
        case "wns":
            // Windows 8.1 / Windows Phone 8.1
            var toast = @"<toast><visual><binding template=""ToastText01""><text id=""1"">" +
                        "From " + user + ": " + message + "</text></binding></visual></toast>";
            outcome = await Notifications.Instance.Hub.SendWindowsNativeNotificationAsync(toast, userTag);
            break;
        case "apns":
            // iOS
            var alert = "{\"aps\":{\"alert\":\"" + "From " + user + ": " + message + "\"}}";
            outcome = await Notifications.Instance.Hub.SendAppleNativeNotificationAsync(alert, userTag);
            break;
        case "fcm":
            // Android
            var notif = "{ \"data\" : {\"message\":\"" + "From " + user + ": " + message + "\"}}";
            outcome = await Notifications.Instance.Hub.SendFcmNativeNotificationAsync(notif, userTag);
            break;
    }

    if (outcome != null)
    {
        if (!((outcome.State == Microsoft.Azure.NotificationHubs.NotificationOutcomeState.Abandoned) ||
            (outcome.State == Microsoft.Azure.NotificationHubs.NotificationOutcomeState.Unknown)))
        {
            ret = HttpStatusCode.OK;
        }
    }

    return Request.CreateResponse(ret);
}
若要執行應用程式並確保到目前為止工作的正確性,請選取 F5 鍵。 應用程式會開啟網頁瀏覽器,並顯示在 ASP.NET 首頁上。
發佈新的 WebAPI 後端
接下來,您會將應用程式部署至 Azure 網站,使其可從所有裝置存取。
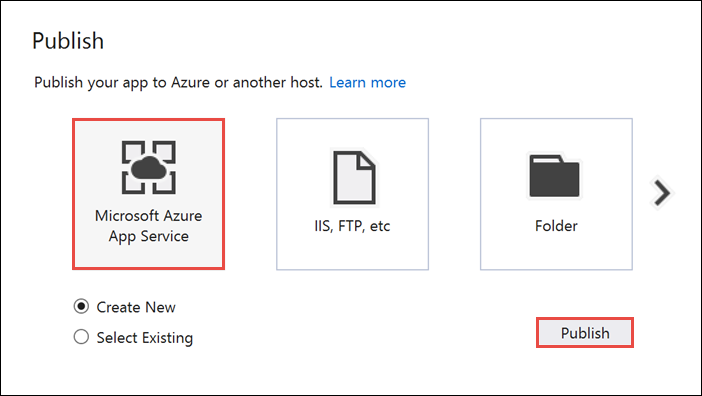
以滑鼠右鍵按兩下 AppBackend 項目,然後選取 [ 發佈]。
選取 [Microsoft Azure App 服務] 作為您的發佈目標,然後選取 [發佈]。 [建立 App Service] 視窗隨即開啟。 您可以在這裡建立所有必要的 Azure 資源,以在 Azure 中執行 ASP.NET Web 應用程式。
在 [ 建立 App Service ] 視窗中,選取您的 Azure 帳戶。 選取 [變更類型>Web 應用程式]。 保留預設 的 Web 應用程式名稱,然後選取 [訂用帳戶]、 [資源群組] 和 [App Service 方案]。
選取 建立。
記下 [摘要] 區段中的 [網站 URL] 屬性。 本教學課程稍後的後端端點是 您的後端端點 。
選取發行。
完成精靈之後,它會將 ASP.NET Web 應用程式發佈至 Azure,然後在預設瀏覽器中開啟應用程式。 您的應用程式可在 Azure App 服務 中檢視。
URL 會使用您稍早指定的 Web 應用程式名稱,格式為 http://< app_name.azurewebsites.net>。
建立Android專案
下一個步驟是更新教學課程:使用 Azure 通知中樞和 Firebase 雲端通訊將通知推送至 Android 裝置所建立的 Android 應用程式。
開啟您的
res/layout/activity_main.xml檔案,取代下列內容定義:它會新增 EditText 控制件,以使用者身分登入。 此外,也會新增使用者名稱標籤的欄位,而該標籤將會是您傳送通知的一部分:
<RelativeLayout xmlns:android="http://schemas.android.com/apk/res/android"
xmlns:tools="http://schemas.android.com/tools" android:layout_width="match_parent"
android:layout_height="match_parent"
tools:context=".MainActivity">

<EditText
    android:id="@+id/usernameText"
    android:layout_width="match_parent"
    android:layout_height="wrap_content"
    android:ems="10"
    android:hint="@string/usernameHint"
    android:layout_above="@+id/passwordText"
    android:layout_alignParentEnd="true" />
<EditText
    android:id="@+id/passwordText"
    android:layout_width="match_parent"
    android:layout_height="wrap_content"
    android:ems="10"
    android:hint="@string/passwordHint"
    android:inputType="textPassword"
    android:layout_above="@+id/buttonLogin"
    android:layout_alignParentEnd="true" />
<Button
    android:id="@+id/buttonLogin"
    android:layout_width="wrap_content"
    android:layout_height="wrap_content"
    android:text="@string/loginButton"
    android:onClick="login"
    android:layout_above="@+id/toggleButtonFCM"
    android:layout_centerHorizontal="true"
    android:layout_marginBottom="24dp" />
<ToggleButton
    android:layout_width="wrap_content"
    android:layout_height="wrap_content"
    android:textOn="WNS on"
    android:textOff="WNS off"
    android:id="@+id/toggleButtonWNS"
    android:layout_toLeftOf="@id/toggleButtonFCM"
    android:layout_centerVertical="true" />
<ToggleButton
    android:layout_width="wrap_content"
    android:layout_height="wrap_content"
    android:textOn="FCM on"
    android:textOff="FCM off"
    android:id="@+id/toggleButtonFCM"
    android:checked="true"
    android:layout_centerHorizontal="true"
    android:layout_centerVertical="true" />
<ToggleButton
    android:layout_width="wrap_content"
    android:layout_height="wrap_content"
    android:textOn="APNS on"
    android:textOff="APNS off"
    android:id="@+id/toggleButtonAPNS"
    android:layout_toRightOf="@id/toggleButtonFCM"
    android:layout_centerVertical="true" />
<EditText
    android:layout_width="match_parent"
    android:layout_height="wrap_content"
    android:id="@+id/editTextNotificationMessageTag"
    android:layout_below="@id/toggleButtonFCM"
    android:layout_centerHorizontal="true"
    android:hint="@string/notification_message_tag_hint" />
<EditText
    android:layout_width="match_parent"
    android:layout_height="wrap_content"
    android:id="@+id/editTextNotificationMessage"
    android:layout_below="@+id/editTextNotificationMessageTag"
    android:layout_centerHorizontal="true"
    android:hint="@string/notification_message_hint" />
<Button
    android:layout_width="wrap_content"
    android:layout_height="wrap_content"
    android:text="@string/send_button"
    android:id="@+id/sendbutton"
    android:onClick="sendNotificationButtonOnClick"
    android:layout_below="@+id/editTextNotificationMessage"
    android:layout_centerHorizontal="true" />
<TextView
    android:layout_width="wrap_content"
    android:layout_height="wrap_content"
    android:text="Hello World!"
    android:id="@+id/text_hello"
    />
</RelativeLayout>
開啟檔案
res/values/strings.xml,send_button並以下列幾行取代定義,以重新定義 的send_button字串,並新增其他控制項的字串:<string name="usernameHint">Username</string> <string name="passwordHint">Password</string> <string name="loginButton">1. Sign in</string> <string name="send_button">2. Send Notification</string> <string name="notification_message_hint">Notification message</string> <string name="notification_message_tag_hint">Recipient username</string>圖形
main_activity.xml化版面配置現在看起來應該像下圖: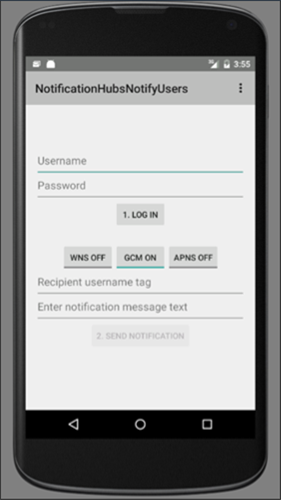
在與類別
MainActivity相同的套件中建立名為RegisterClient的新類別。 針對新的類別檔案,請使用下列程序代碼。import java.io.IOException; import java.io.UnsupportedEncodingException; import java.util.Set; import org.apache.http.HttpResponse; import org.apache.http.HttpStatus; import org.apache.http.client.ClientProtocolException; import org.apache.http.client.HttpClient; import org.apache.http.client.methods.HttpPost; import org.apache.http.client.methods.HttpPut; import org.apache.http.client.methods.HttpUriRequest; import org.apache.http.entity.StringEntity; import org.apache.http.impl.client.DefaultHttpClient; import org.apache.http.util.EntityUtils; import org.json.JSONArray; import org.json.JSONException; import org.json.JSONObject; import android.content.Context; import android.content.SharedPreferences; import android.util.Log; public class RegisterClient { private static final String PREFS_NAME = "ANHSettings"; private static final String REGID_SETTING_NAME = "ANHRegistrationId"; private String Backend_Endpoint; SharedPreferences settings; protected HttpClient httpClient; private String authorizationHeader; public RegisterClient(Context context, String backendEndpoint) { super(); this.settings = context.getSharedPreferences(PREFS_NAME, 0); httpClient = new DefaultHttpClient(); Backend_Endpoint = backendEndpoint + "/api/register"; } public String getAuthorizationHeader() { return authorizationHeader; } public void setAuthorizationHeader(String authorizationHeader) { this.authorizationHeader = authorizationHeader; } public void register(String handle, Set<String> tags) throws ClientProtocolException, IOException, JSONException { String registrationId = retrieveRegistrationIdOrRequestNewOne(handle); JSONObject deviceInfo = new JSONObject(); deviceInfo.put("Platform", "fcm"); deviceInfo.put("Handle", handle); deviceInfo.put("Tags", new JSONArray(tags)); int statusCode = upsertRegistration(registrationId, deviceInfo); if (statusCode == HttpStatus.SC_OK) { return; } else if (statusCode == HttpStatus.SC_GONE){ settings.edit().remove(REGID_SETTING_NAME).commit(); registrationId = retrieveRegistrationIdOrRequestNewOne(handle); statusCode = upsertRegistration(registrationId, deviceInfo); if (statusCode != HttpStatus.SC_OK) { Log.e("RegisterClient", "Error upserting registration: " + statusCode); throw new RuntimeException("Error upserting registration"); } } else { Log.e("RegisterClient", "Error upserting registration: " + statusCode); throw new RuntimeException("Error upserting registration"); } } private int upsertRegistration(String registrationId, JSONObject deviceInfo) throws UnsupportedEncodingException, IOException, ClientProtocolException { HttpPut request = new HttpPut(Backend_Endpoint+"/"+registrationId); request.setEntity(new StringEntity(deviceInfo.toString())); request.addHeader("Authorization", "Basic "+authorizationHeader); request.addHeader("Content-Type", "application/json"); HttpResponse response = httpClient.execute(request); int statusCode = response.getStatusLine().getStatusCode(); return statusCode; } private String retrieveRegistrationIdOrRequestNewOne(String handle) throws ClientProtocolException, IOException { if (settings.contains(REGID_SETTING_NAME)) return settings.getString(REGID_SETTING_NAME, null); HttpUriRequest request = new HttpPost(Backend_Endpoint+"?handle="+handle); request.addHeader("Authorization", "Basic "+authorizationHeader); HttpResponse response = httpClient.execute(request); if (response.getStatusLine().getStatusCode() != HttpStatus.SC_OK) { Log.e("RegisterClient", "Error creating registrationId: " + response.getStatusLine().getStatusCode()); throw new RuntimeException("Error creating Notification Hubs registrationId"); } String registrationId = EntityUtils.toString(response.getEntity()); registrationId = registrationId.substring(1, registrationId.length()-1); settings.edit().putString(REGID_SETTING_NAME, registrationId).commit(); return registrationId; } }此元件會實作連絡應用程式後端以註冊推播通知所需的 REST 呼叫。 它也會在本機儲存通知中樞所建立的 registrationId,如從應用程式後端註冊中所述。 當您按下 [登入] 按鈕時,它會使用儲存在本機記憶體中的授權令牌。
在您的
MainActivity類別中RegisterClient,新增 類別的欄位,以及 ASP.NET 後端端點的字串。 請務必將 取代<Enter Your Backend Endpoint>為您先前取得的實際後端端點。 例如:http://mybackend.azurewebsites.net。private RegisterClient registerClient; private static final String BACKEND_ENDPOINT = "<Enter Your Backend Endpoint>"; FirebaseInstanceId fcm; String FCM_token = null;在您的
MainActivity類別中,在方法中onCreate,移除或批注化欄位的hub初始化,以及對方法的registerWithNotificationHubs呼叫。 然後新增程式代碼來初始化 類別的RegisterClient實例。 方法應該包含下列幾行:@Override protected void onCreate(Bundle savedInstanceState) { super.onCreate(savedInstanceState); mainActivity = this; FirebaseService.createChannelAndHandleNotifications(getApplicationContext()); fcm = FirebaseInstanceId.getInstance(); registerClient = new RegisterClient(this, BACKEND_ENDPOINT); setContentView(R.layout.activity_main); }將下列
import語句新增至您的MainActivity.java檔案。import android.util.Base64; import android.view.View; import android.widget.EditText; import android.widget.Button; import android.widget.ToggleButton; import java.io.UnsupportedEncodingException; import android.content.Context; import java.util.HashSet; import android.widget.Toast; import org.apache.http.client.ClientProtocolException; import java.io.IOException; import org.apache.http.HttpStatus; import android.os.AsyncTask; import org.apache.http.HttpResponse; import org.apache.http.client.methods.HttpPost; import org.apache.http.entity.StringEntity; import org.apache.http.impl.client.DefaultHttpClient; import android.app.AlertDialog; import android.content.DialogInterface; import com.google.firebase.iid.FirebaseInstanceId; import com.google.firebase.iid.InstanceIdResult; import com.google.android.gms.tasks.OnSuccessListener; import java.util.concurrent.TimeUnit;以下列程序代碼取代 onStart 方法上的程式代碼:
super.onStart();
Button sendPush = (Button) findViewById(R.id.sendbutton);
sendPush.setEnabled(false);
然後,新增下列方法來處理 [登入 ] 按鈕按下事件,並傳送推播通知。
public void login(View view) throws UnsupportedEncodingException {
    this.registerClient.setAuthorizationHeader(getAuthorizationHeader());

    final Context context = this;
    new AsyncTask<Object, Object, Object>() {
        @Override
        protected Object doInBackground(Object... params) {
            try {

                FirebaseInstanceId.getInstance().getInstanceId().addOnSuccessListener(new OnSuccessListener<InstanceIdResult>() {
                    @Override
                    public void onSuccess(InstanceIdResult instanceIdResult) {
                        FCM_token = instanceIdResult.getToken();
                        Log.d(TAG, "FCM Registration Token: " + FCM_token);
                    }
                });
                TimeUnit.SECONDS.sleep(1);
                registerClient.register(FCM_token, new HashSet<String>());
            } catch (Exception e) {
                DialogNotify("MainActivity - Failed to register", e.getMessage());
                return e;
            }
            return null;
        }

        protected void onPostExecute(Object result) {
            Button sendPush = (Button) findViewById(R.id.sendbutton);
            sendPush.setEnabled(true);
            Toast.makeText(context, "Signed in and registered.",
                    Toast.LENGTH_LONG).show();
        }
    }.execute(null, null, null);
}

private String getAuthorizationHeader() throws UnsupportedEncodingException {
    EditText username = (EditText) findViewById(R.id.usernameText);
    EditText password = (EditText) findViewById(R.id.passwordText);
    String basicAuthHeader = username.getText().toString()+":"+password.getText().toString();
    basicAuthHeader = Base64.encodeToString(basicAuthHeader.getBytes("UTF-8"), Base64.NO_WRAP);
    return basicAuthHeader;
}

/**
    * This method calls the ASP.NET WebAPI backend to send the notification message
    * to the platform notification service based on the pns parameter.
    *
    * @param pns     The platform notification service to send the notification message to. Must
    *                be one of the following ("wns", "fcm", "apns").
    * @param userTag The tag for the user who will receive the notification message. This string
    *                must not contain spaces or special characters.
    * @param message The notification message string. This string must include the double quotes
    *                to be used as JSON content.
    */
public void sendPush(final String pns, final String userTag, final String message)
        throws ClientProtocolException, IOException {
    new AsyncTask<Object, Object, Object>() {
        @Override
        protected Object doInBackground(Object... params) {
            try {

                String uri = BACKEND_ENDPOINT + "/api/notifications";
                uri += "?pns=" + pns;
                uri += "&to_tag=" + userTag;

                HttpPost request = new HttpPost(uri);
                request.addHeader("Authorization", "Basic "+ getAuthorizationHeader());
                request.setEntity(new StringEntity(message));
                request.addHeader("Content-Type", "application/json");

                HttpResponse response = new DefaultHttpClient().execute(request);

                if (response.getStatusLine().getStatusCode() != HttpStatus.SC_OK) {
                    DialogNotify("MainActivity - Error sending " + pns + " notification",
                            response.getStatusLine().toString());
                    throw new RuntimeException("Error sending notification");
                }
            } catch (Exception e) {
                DialogNotify("MainActivity - Failed to send " + pns + " notification ", e.getMessage());
                return e;
            }

            return null;
        }
    }.execute(null, null, null);
}
[
login登入] 按鈕的處理程式會在輸入使用者名稱和密碼上產生基本身份驗證令牌(它代表驗證配置所使用的任何令牌),然後使用RegisterClient來呼叫後端進行註冊。方法
sendPush會呼叫後端,以根據使用者標籤觸發對使用者的安全通知。 以 為目標的平臺通知服務sendPush取決於傳入的pns字串。將下列
DialogNotify方法新增至MainActivity類別。protected void DialogNotify(String title, String message) { AlertDialog alertDialog = new AlertDialog.Builder(MainActivity.this).create(); alertDialog.setTitle(title); alertDialog.setMessage(message); alertDialog.setButton(AlertDialog.BUTTON_NEUTRAL, "OK", new DialogInterface.OnClickListener() { public void onClick(DialogInterface dialog, int which) { dialog.dismiss(); } }); alertDialog.show(); }在您的
MainActivity類別中sendNotificationButtonOnClick,更新 方法,以使用用戶選取的平臺通知服務呼叫sendPush方法,如下所示。/** * Send Notification button click handler. This method sends the push notification * message to each platform selected. * * @param v The view */ public void sendNotificationButtonOnClick(View v) throws ClientProtocolException, IOException { String nhMessageTag = ((EditText) findViewById(R.id.editTextNotificationMessageTag)) .getText().toString(); String nhMessage = ((EditText) findViewById(R.id.editTextNotificationMessage)) .getText().toString(); // JSON String nhMessage = "\"" + nhMessage + "\""; if (((ToggleButton)findViewById(R.id.toggleButtonWNS)).isChecked()) { sendPush("wns", nhMessageTag, nhMessage); } if (((ToggleButton)findViewById(R.id.toggleButtonFCM)).isChecked()) { sendPush("fcm", nhMessageTag, nhMessage); } if (((ToggleButton)findViewById(R.id.toggleButtonAPNS)).isChecked()) { sendPush("apns", nhMessageTag, nhMessage); } }在 檔案中
build.gradle,將下行新增至android區段後面的buildTypes區段。useLibrary 'org.apache.http.legacy'如果您的應用程式是以 API 層級 28 (Android 9.0) 或更新版本為目標,請在 的
AndroidManifest.xml元素中包含<application>下列宣告。<uses-library android:name="org.apache.http.legacy" android:required="false" />組建專案。
測試應用程式
使用 Android Studio 在裝置或模擬器上執行應用程式。
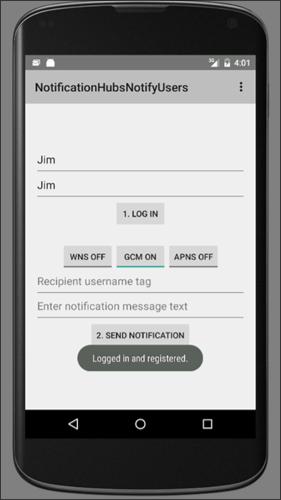
在 Android 應用程式中,輸入使用者名稱和密碼。 兩者都必須是相同的字串值,而且不能包含空格或特殊字元。
在Android應用程式中,按兩下 [ 登入]。 等候指出 已登入並註冊的快顯通知訊息。 它會啟用 [ 傳送通知] 按鈕。
按兩下切換按鈕,以啟用您執行應用程式並註冊使用者的所有平臺。
輸入接收通知訊息的用戶名稱。 該用戶必須註冊目標裝置上的通知。
輸入要接收為推播通知訊息的使用者訊息。
按兩下 [ 傳送通知]。 具有相符使用者名稱標籤註冊的每個裝置都會接收推播通知。
下一步
在本教學課程中,您已瞭解如何將通知推播給具有與其註冊相關聯標籤的特定使用者。 若要瞭解如何推送以位置為基礎的通知,請繼續進行下列教學課程: