教學課程:使用 Azure 通知中樞將通知傳送給特定使用者
概觀
本教學課程說明如何使用 Azure 通知中樞,來將推播通知傳送到特定裝置上的特定應用程式使用者。 ASP.NET WebAPI 後端是用來驗證用戶端。 後端在驗證用戶端應用程式使用者時,會自動將標記新增至通知登錄。 後端會使用此標記將通知傳送給特定使用者。
注意
您可以在 GitHub 上找到本教學課程的完整程式碼。
在本教學課程中,您會執行下列步驟:
- 建立 WebAPI 專案
- 對 WebAPI 後端驗證用戶端
- 使用 WebAPI 後端來註冊通知
- 從 WebAPI 後端傳送通知
- 發佈新的 WebAPI 後端
- 更新用戶端專案的程式碼
- 測試應用程式
必要條件
本教學課程以您在以下教學課程中建立的通知中樞和 Visual Studio 專案為基礎:教學課程:使用 Azure 通知中樞將通知傳送至通用 Windows 平台應用程式。 因此,請先加以完成,再開始進行本教學課程。
注意
如果您使用 Azure App Service 中的 Mobile Apps 作為後端服務,請參閱本教學課程的 Mobile Apps 版本 。
建立 WebAPI 專案
下列各節討論如何建立新的 ASP.NET WebAPI 後端。 此程序有三個主要用途:
- 驗證用戶端:您可以新增訊息處理常式來驗證用戶端要求,並將使用者與要求建立關聯。
- 使用 WebAPI 後端註冊通知:您可新增一個控制器來處理新的註冊,以便用戶端裝置接收通知。 經過驗證的使用者名稱會自動新增至註冊作為 標記。
- 傳送通知給用戶端:您可新增一個控制器,以便使用者對與標籤建立關聯的裝置和用戶端觸發安全的推送。
執行下列動作,建立新的 ASP.NET Core 6.0 Web API 後端:
若要檢查版本,請啟動 Visual Studio。 在 [工具] 功能表上,選取 [擴充功能和更新] 。 搜尋您的 Visual Studio 版本中的 NuGet Package Manager,然後確定您已安裝最新版本。 如果您的版本不是最新版本,請將它解除安裝,然後重新安裝 NuGet 套件管理員。
![[擴充功能和更新] 對話方塊的螢幕擷取畫面,其中已醒目提示適用於 Visual Studios 套件的 NuGet 套件管理。](../includes/media/notification-hubs-aspnet-backend-notifyusers/notification-hubs-secure-push4.png)
注意
確定您已安裝 Visual Studio Azure SDK 以供網站部署。
啟動 Visual Studio 或 Visual Studio Express。
選取 [伺服器總管] ,然後登入您的 Azure 帳戶。 若要在您的帳戶上建立網站資源,您必須登入。
在 Visual Studio 的 [檔案] 功能表上選取 [新增]>[專案]。
在 [搜尋] 方塊中,輸入 Web API。
選取 ASP.NET Core Web API 專案範本並選取 [下一步]。
在 [設定新專案] 對話方塊中,將專案命名為 AppBackend,然後選取 [下一步]。
在 [其他資訊] 對話方塊中:
- 確認架構為 .NET 6.0 (長期支援)。
- 確認勾選 [使用控制器 (取消勾選以使用最小 API)] 的核取方塊。
- 取消勾選 [啟用 OpenAPI 支援]。
- 選取 [建立]。
移除 WeatherForecast 範本檔案
- 從新的 AppBackend 專案中移除 WeatherForecast.cs 和 Controllers/WeatherForecastController.cs 範例檔案。
- 開啟 Properties\launchSettings.json。
- 將 launchUrl 屬性從 weatherforcast 變更為 appbackend。
在 [設定 Microsoft Azure Web 應用程式] 視窗中,選取訂用帳戶,然後在 [App Service 方案] 清單中,執行下列其中一個動作:
- 選取您已建立的 Azure App Service 方案。
- 選取 [建立新的 App Service 方案],然後建立一個新方案。
在此教學課程中您不需要資料庫。 在您選取 App Service 方案之後,選取 [確定] 來建立專案。
![[定 Microsoft Azure Web 應用程式] 視窗](../includes/media/notification-hubs-aspnet-backend-notifyusers/notification-hubs-secure-push5.png)
如果您沒有看到這個用於設定 App Service 方案的頁面,請繼續進行本教學課程。 您可以在稍後發佈應用程式時再進行設定。
對 WebAPI 後端驗證用戶端
在本節中,您會為新的後端建立名為 AuthenticationTestHandler 的新訊息處理常式類別。 這個類別衍生自 DelegatingHandler 並新增為訊息處理常式,以便處理進入後端的所有要求。
在 [方案總管] 中,以滑鼠右鍵按一下 [AppBackend] 專案,然後依序選取 [新增] 和 [類別]。
將新類別命名為 AuthenticationTestHandler.cs,然後選取 [新增] 以產生類別。 為了簡單起見,此類別使用「基本驗證」來驗證使用者。 您的應用程式可以使用任何驗證結構描述。
在 AuthenticationTestHandler.cs 中,加入下列
using陳述式:using System.Net.Http; using System.Threading; using System.Security.Principal; using System.Net; using System.Text; using System.Threading.Tasks;在 AuthenticationTestHandler.cs 中,以下列程式碼取代
AuthenticationTestHandler類別定義:下列三個條件都成立時,此處理常式會授權要求:
- 要求包含「授權」標頭。
- 要求使用 基本 驗證。
- 使用者名稱字串和密碼字串是相同的字串。
否則,會拒絕此要求。 此驗證不是真正的驗證和授權方法。 這只是本教學課程的簡單範例。
如果要求訊息已經由
AuthenticationTestHandler驗證及授權,則基本驗證使用者會附加至 HttpContext 上的目前要求。 稍後另一個控制器 (RegisterController) 會使用 HttpContext 中的使用者資訊,將 標記 新增至通知註冊要求。public class AuthenticationTestHandler : DelegatingHandler { protected override Task<HttpResponseMessage> SendAsync( HttpRequestMessage request, CancellationToken cancellationToken) { var authorizationHeader = request.Headers.GetValues("Authorization").First(); if (authorizationHeader != null && authorizationHeader .StartsWith("Basic ", StringComparison.InvariantCultureIgnoreCase)) { string authorizationUserAndPwdBase64 = authorizationHeader.Substring("Basic ".Length); string authorizationUserAndPwd = Encoding.Default .GetString(Convert.FromBase64String(authorizationUserAndPwdBase64)); string user = authorizationUserAndPwd.Split(':')[0]; string password = authorizationUserAndPwd.Split(':')[1]; if (VerifyUserAndPwd(user, password)) { // Attach the new principal object to the current HttpContext object HttpContext.Current.User = new GenericPrincipal(new GenericIdentity(user), new string[0]); System.Threading.Thread.CurrentPrincipal = System.Web.HttpContext.Current.User; } else return Unauthorized(); } else return Unauthorized(); return base.SendAsync(request, cancellationToken); } private bool VerifyUserAndPwd(string user, string password) { // This is not a real authentication scheme. return user == password; } private Task<HttpResponseMessage> Unauthorized() { var response = new HttpResponseMessage(HttpStatusCode.Forbidden); var tsc = new TaskCompletionSource<HttpResponseMessage>(); tsc.SetResult(response); return tsc.Task; } }注意
安全性注意事項:
AuthenticationTestHandler類別未提供真正的驗證。 它僅可用於模仿基本驗證而且並不安全。 您必須在生產應用程式和服務中實作安全的驗證機制。若要註冊訊息處理常式,請在 Program.cs 檔案中
Register方法的結尾新增下列程式碼:config.MessageHandlers.Add(new AuthenticationTestHandler());儲存您的變更。
使用 WebAPI 後端來註冊通知
在本節中,您會將新的控制器新增至 WebAPI 後端來處理要求,以使用通知中樞的用戶端程式庫為使用者和裝置註冊通知。 控制器會對已由 AuthenticationTestHandler 驗證並附加至 HttpContext 的使用者,新增使用者標記。 此標籤具有以下字串格式:"username:<actual username>"。
在 [方案總管] 中,以滑鼠右鍵按一下 [AppBackend] 專案,然後選取 [管理 NuGet 套件]。
在左窗格中,選取 [線上],然後在 [搜尋] 方塊中輸入 Microsoft.Azure.NotificationHubs。
選取結果清單中的 [Microsoft Azure 通知中樞],然後選取 [安裝]。 請完成安裝,然後關閉 [NuGet Package Manager] 視窗。
此動作會使用 Microsoft.Azure.Notification Hubs NuGet 套件來新增對 Azure 通知中樞 SDK 的參考。
建立新的類別檔案,代表與用來傳送通知的通知中樞間的連線。 在 [方案總管] 中,以滑鼠右鍵按一下 Models 資料夾,選取 [新增],然後選取 [類別]。 將新類別命名為 Notifications.cs,然後選取 [新增] 以產生類別。
![[新增項目] 視窗](../includes/media/notification-hubs-aspnet-backend-notifyusers/notification-hubs-secure-push6.png)
在 Notifications.cs 中,將下列
using陳述式新增在檔案頂端:using Microsoft.Azure.NotificationHubs;以下列程式碼取代
Notifications類別定義,並以通知中樞的連接字串 (含完整存取權) 和中心名稱 (可在 Azure 入口網站取代) 取代兩個預留位置:public class Notifications { public static Notifications Instance = new Notifications(); public NotificationHubClient Hub { get; set; } private Notifications() { Hub = NotificationHubClient.CreateClientFromConnectionString("<your hub's DefaultFullSharedAccessSignature>", "<hub name>"); } }重要
請輸入中樞的名稱和 DefaultFullSharedAccessSignature,再繼續進行。
接下來,建立名為 RegisterController 的新控制器。 在 [方案總管] 中,以滑鼠右鍵按一下 Controllers 資料夾,選取 [新增],然後選取 [控制器]。
選取 [API 控制器 - 空的],然後選取 [新增]。
在 [控制器名稱] 方塊中,輸入 RegisterController 為新的類別命名,然後選取 [新增]。
![[新增控制器] 視窗。](../includes/media/notification-hubs-aspnet-backend-notifyusers/notification-hubs-secure-push8.png)
在 RegisterController.cs 中,加入下列
using陳述式:using Microsoft.Azure.NotificationHubs; using Microsoft.Azure.NotificationHubs.Messaging; using AppBackend.Models; using System.Threading.Tasks; using System.Web;在
RegisterController類別定義中加入下列程式碼。 在此程式碼中,您會為已附加至 HttpContext 的使用者新增使用者標籤。 您新增的訊息篩選AuthenticationTestHandler會驗證此使用者並附加至 HttpContext。 您也可以新增選擇性檢查,以驗證使用者是否有權註冊所要求的標籤。private NotificationHubClient hub; public RegisterController() { hub = Notifications.Instance.Hub; } public class DeviceRegistration { public string Platform { get; set; } public string Handle { get; set; } public string[] Tags { get; set; } } // POST api/register // This creates a registration id public async Task<string> Post(string handle = null) { string newRegistrationId = null; // make sure there are no existing registrations for this push handle (used for iOS and Android) if (handle != null) { var registrations = await hub.GetRegistrationsByChannelAsync(handle, 100); foreach (RegistrationDescription registration in registrations) { if (newRegistrationId == null) { newRegistrationId = registration.RegistrationId; } else { await hub.DeleteRegistrationAsync(registration); } } } if (newRegistrationId == null) newRegistrationId = await hub.CreateRegistrationIdAsync(); return newRegistrationId; } // PUT api/register/5 // This creates or updates a registration (with provided channelURI) at the specified id public async Task<HttpResponseMessage> Put(string id, DeviceRegistration deviceUpdate) { RegistrationDescription registration = null; switch (deviceUpdate.Platform) { case "mpns": registration = new MpnsRegistrationDescription(deviceUpdate.Handle); break; case "wns": registration = new WindowsRegistrationDescription(deviceUpdate.Handle); break; case "apns": registration = new AppleRegistrationDescription(deviceUpdate.Handle); break; case "fcm": registration = new FcmRegistrationDescription(deviceUpdate.Handle); break; default: throw new HttpResponseException(HttpStatusCode.BadRequest); } registration.RegistrationId = id; var username = HttpContext.Current.User.Identity.Name; // add check if user is allowed to add these tags registration.Tags = new HashSet<string>(deviceUpdate.Tags); registration.Tags.Add("username:" + username); try { await hub.CreateOrUpdateRegistrationAsync(registration); } catch (MessagingException e) { ReturnGoneIfHubResponseIsGone(e); } return Request.CreateResponse(HttpStatusCode.OK); } // DELETE api/register/5 public async Task<HttpResponseMessage> Delete(string id) { await hub.DeleteRegistrationAsync(id); return Request.CreateResponse(HttpStatusCode.OK); } private static void ReturnGoneIfHubResponseIsGone(MessagingException e) { var webex = e.InnerException as WebException; if (webex.Status == WebExceptionStatus.ProtocolError) { var response = (HttpWebResponse)webex.Response; if (response.StatusCode == HttpStatusCode.Gone) throw new HttpRequestException(HttpStatusCode.Gone.ToString()); } }儲存您的變更。
![[新增控制器] 視窗。](../includes/media/notification-hubs-aspnet-backend-notifyusers/notification-hubs-secure-push8.png#lightbox)
從 WebAPI 後端傳送通知
在本節中,您會新增控制器,以便用戶端裝置傳送通知。 此通知是以使用者名稱標籤為基礎,其使用 ASP.NET WebAPI 後端中的 Azure 通知中樞 .NET 程式庫。
以您在上一節中建立 RegisterController 的相同方式,建立另一個名為 NotificationsController的新控制器。
在 NotificationsController.cs 中,加入下列
using陳述式:using AppBackend.Models; using System.Threading.Tasks; using System.Web;在 NotificationsController 類別中新增下列方法:
此程式碼會傳送以平台通知服務 (PNS)
pns參數為基礎的通知類型。to_tag的值用來設定訊息上的 username 標記。 此標記必須符合作用中通知中樞註冊的使用者名稱標記。 通知訊息是取自 POST 要求主體,並針對目標 PNS 格式化。視您的支援裝置用來接收通知的 PNS 而言,可支援各種格式的通知。 例如在 Windows 裝置上,您可以搭配 WNS 使用不受其他 PNS 直接支援的快顯通知。 在這類情況下,您的後端必須針對您打算支援的裝置 PNS,將通知格式化為支援的通知。 然後在 NotificationHubClient 類別 上使用適當的傳送 API。
public async Task<HttpResponseMessage> Post(string pns, [FromBody]string message, string to_tag)
{
    var user = HttpContext.Current.User.Identity.Name;
    string[] userTag = new string[2];
    userTag[0] = "username:" + to_tag;
    userTag[1] = "from:" + user;

    Microsoft.Azure.NotificationHubs.NotificationOutcome outcome = null;
    HttpStatusCode ret = HttpStatusCode.InternalServerError;

    switch (pns.ToLower())
    {
        case "wns":
            // Windows 8.1 / Windows Phone 8.1
            var toast = @"<toast><visual><binding template=""ToastText01""><text id=""1"">" +
                        "From " + user + ": " + message + "</text></binding></visual></toast>";
            outcome = await Notifications.Instance.Hub.SendWindowsNativeNotificationAsync(toast, userTag);
            break;
        case "apns":
            // iOS
            var alert = "{\"aps\":{\"alert\":\"" + "From " + user + ": " + message + "\"}}";
            outcome = await Notifications.Instance.Hub.SendAppleNativeNotificationAsync(alert, userTag);
            break;
        case "fcm":
            // Android
            var notif = "{ \"data\" : {\"message\":\"" + "From " + user + ": " + message + "\"}}";
            outcome = await Notifications.Instance.Hub.SendFcmNativeNotificationAsync(notif, userTag);
            break;
    }

    if (outcome != null)
    {
        if (!((outcome.State == Microsoft.Azure.NotificationHubs.NotificationOutcomeState.Abandoned) ||
            (outcome.State == Microsoft.Azure.NotificationHubs.NotificationOutcomeState.Unknown)))
        {
            ret = HttpStatusCode.OK;
        }
    }

    return Request.CreateResponse(ret);
}
若要執行應用程式並確保工作到目前為止的準確性,請選取 F5 鍵。 應用程式會開啟網頁瀏覽器並顯示於 ASP.NET 首頁上。
發佈新的 WebAPI 後端
接下來,您可將應用程式部署到 Azure 網站,讓它得以從所有裝置存取。
以滑鼠右鍵按一下 AppBackend 專案,然後選取 [發佈]。
選取 [Microsoft Azure App Service] 作為發佈目標,然後選取 [發佈]。 [建立 App Service] 視窗隨即開啟。 您可以在此建立在 Azure 中執行 ASP.NET Web 應用程式所需的所有 Azure 資源。
![[Microsoft Azure App Service] 圖格](../includes/media/notification-hubs-aspnet-backend-notifyusers/publish-to-app-service.png)
在 [建立 App Service] 視窗中,選取您的 Azure 帳戶。 選取 [變更類型]>[Web 應用程式]。 保留預設 [Web 應用程式名稱],然後選取 [訂用帳戶]、[資源群組] 和 [App Service 方案]。
選取 [建立]。
記下 [摘要] 區段中的 [網站 URL] 屬性。 此 URL 是您在本教學課程中稍後使用的「後端端點」。
選取 [發佈] 。
精靈完成後,它會將 ASP.NET Web 應用程式發佈至 Azure,然後在預設瀏覽器中開啟應用程式。 您的應用程式可在 Azure App Service 中檢視。
URL 會使用您稍早指定的 Web 應用程式名稱,其格式為 http://<app_name>.azurewebsites.net。
更新 UWP 用戶端的程式碼
在本節中,您會更新已針對以下教學課程完成之專案中的程式碼:教學課程:使用 Azure 通知中樞將通知傳送至通用 Windows 平台應用程式。 此專案應已與 Windows 市集產生關聯。 此外它也應設定成使用您的通知中樞。 在本節中,您會新增程式碼以呼叫新的 WebAPI 後端,並使用它來註冊和傳送通知。
在 Visual Studio 中,開啟您為以下教學課程所建立的方案:教學課程:使用 Azure 通知中樞將通知傳送至通用 Windows 平台應用程式。
在 [方案總管] 中,以滑鼠右鍵按一下 [通用 Windows 平台 (UWP)] 專案,然後按一下 [管理 NuGet 套件]。
選取左邊的 [瀏覽]。
在 [搜尋] 方塊中,輸入 Http Client。
在 [結果] 清單中按一下 System.Net.Http,然後按一下 [安裝]。 完成安裝。
回到 NuGet [搜尋] 方塊,輸入 Json.net。 安裝 Newtonsoft.json 套件,然後關閉 [NuGet 套件管理員] 視窗。
在方案總管的 WindowsApp 專案中按兩下 MainPage.xaml,在 Visual Studio 編輯器中開啟該檔案。
在
MainPage.xaml檔案中,以下列程式碼取代<Grid>區段:此程式碼會新增使用者用來進行驗證的使用者名稱和密碼文字方塊。 它也會新增通知訊息的文字方塊,以及應接收通知的使用者名稱標記:<Grid> <Grid.RowDefinitions> <RowDefinition Height="Auto"/> <RowDefinition Height="*"/> </Grid.RowDefinitions> <TextBlock Grid.Row="0" Text="Notify Users" HorizontalAlignment="Center" FontSize="48"/> <StackPanel Grid.Row="1" VerticalAlignment="Center"> <Grid> <Grid.RowDefinitions> <RowDefinition Height="Auto"/> <RowDefinition Height="Auto"/> <RowDefinition Height="Auto"/> <RowDefinition Height="Auto"/> <RowDefinition Height="Auto"/> <RowDefinition Height="Auto"/> <RowDefinition Height="Auto"/> <RowDefinition Height="Auto"/> <RowDefinition Height="Auto"/> <RowDefinition Height="Auto"/> <RowDefinition Height="Auto"/> </Grid.RowDefinitions> <Grid.ColumnDefinitions> <ColumnDefinition></ColumnDefinition> <ColumnDefinition></ColumnDefinition> <ColumnDefinition></ColumnDefinition> </Grid.ColumnDefinitions> <TextBlock Grid.Row="0" Grid.ColumnSpan="3" Text="Username" FontSize="24" Margin="20,0,20,0"/> <TextBox Name="UsernameTextBox" Grid.Row="1" Grid.ColumnSpan="3" Margin="20,0,20,0"/> <TextBlock Grid.Row="2" Grid.ColumnSpan="3" Text="Password" FontSize="24" Margin="20,0,20,0" /> <PasswordBox Name="PasswordTextBox" Grid.Row="3" Grid.ColumnSpan="3" Margin="20,0,20,0"/> <Button Grid.Row="4" Grid.ColumnSpan="3" HorizontalAlignment="Center" VerticalAlignment="Center" Content="1. Login and register" Click="LoginAndRegisterClick" Margin="0,0,0,20"/> <ToggleButton Name="toggleWNS" Grid.Row="5" Grid.Column="0" HorizontalAlignment="Right" Content="WNS" IsChecked="True" /> <ToggleButton Name="toggleFCM" Grid.Row="5" Grid.Column="1" HorizontalAlignment="Center" Content="FCM" /> <ToggleButton Name="toggleAPNS" Grid.Row="5" Grid.Column="2" HorizontalAlignment="Left" Content="APNS" /> <TextBlock Grid.Row="6" Grid.ColumnSpan="3" Text="Username Tag To Send To" FontSize="24" Margin="20,0,20,0"/> <TextBox Name="ToUserTagTextBox" Grid.Row="7" Grid.ColumnSpan="3" Margin="20,0,20,0" TextWrapping="Wrap" /> <TextBlock Grid.Row="8" Grid.ColumnSpan="3" Text="Enter Notification Message" FontSize="24" Margin="20,0,20,0"/> <TextBox Name="NotificationMessageTextBox" Grid.Row="9" Grid.ColumnSpan="3" Margin="20,0,20,0" TextWrapping="Wrap" /> <Button Grid.Row="10" Grid.ColumnSpan="3" HorizontalAlignment="Center" Content="2. Send push" Click="PushClick" Name="SendPushButton" /> </Grid> </StackPanel> </Grid>在 [方案總管] 中,開啟 [(Windows 8.1)] 和 [(Windows Phone 8.1)] 專案的
MainPage.xaml.cs檔案。 在這兩個檔案頂端加入下列using陳述式:using System.Net.Http; using Windows.Storage; using System.Net.Http.Headers; using Windows.Networking.PushNotifications; using Windows.UI.Popups; using System.Threading.Tasks;在 WindowsApp
MainPage專案的MainPage.xaml.cs中,將下列成員新增至 類別。 請務必將<Enter Your Backend Endpoint>取代為您先前取得的實際後端端點。 例如:http://mybackend.azurewebsites.net。private static string BACKEND_ENDPOINT = "<Enter Your Backend Endpoint>";將下面的程式碼新增到 [(Windows 8.1)] 和 [(Windows Phone 8.1)] 專案之
MainPage.xaml.cs中的 MainPage 類別。PushClick方法是 [傳送推播] 按鈕的 click 處理常式。 它會呼叫後端以觸發所有裝置的通知,而所有裝置都具有符合to_tag參數的使用者名稱標記。 通知訊息會以要求主體的 JSON 內容形式傳送。LoginAndRegisterClick方法是 [登入並註冊] 按鈕的 click 處理常式。 它會在本機儲存體中儲存基本驗證權杖 (代表驗證配置使用的任何權杖),然後使用RegisterClient來註冊使用後端的通知。private async void PushClick(object sender, RoutedEventArgs e) { if (toggleWNS.IsChecked.Value) { await sendPush("wns", ToUserTagTextBox.Text, this.NotificationMessageTextBox.Text); } if (toggleFCM.IsChecked.Value) { await sendPush("fcm", ToUserTagTextBox.Text, this.NotificationMessageTextBox.Text); } if (toggleAPNS.IsChecked.Value) { await sendPush("apns", ToUserTagTextBox.Text, this.NotificationMessageTextBox.Text); } } private async Task sendPush(string pns, string userTag, string message) { var POST_URL = BACKEND_ENDPOINT + "/api/notifications?pns=" + pns + "&to_tag=" + userTag; using (var httpClient = new HttpClient()) { var settings = ApplicationData.Current.LocalSettings.Values; httpClient.DefaultRequestHeaders.Authorization = new AuthenticationHeaderValue("Basic", (string)settings["AuthenticationToken"]); try { await httpClient.PostAsync(POST_URL, new StringContent("\"" + message + "\"", System.Text.Encoding.UTF8, "application/json")); } catch (Exception ex) { MessageDialog alert = new MessageDialog(ex.Message, "Failed to send " + pns + " message"); alert.ShowAsync(); } } } private async void LoginAndRegisterClick(object sender, RoutedEventArgs e) { SetAuthenticationTokenInLocalStorage(); var channel = await PushNotificationChannelManager.CreatePushNotificationChannelForApplicationAsync(); // The "username:<user name>" tag gets automatically added by the message handler in the backend. // The tag passed here can be whatever other tags you may want to use. try { // The device handle used is different depending on the device and PNS. // Windows devices use the channel uri as the PNS handle. await new RegisterClient(BACKEND_ENDPOINT).RegisterAsync(channel.Uri, new string[] { "myTag" }); var dialog = new MessageDialog("Registered as: " + UsernameTextBox.Text); dialog.Commands.Add(new UICommand("OK")); await dialog.ShowAsync(); SendPushButton.IsEnabled = true; } catch (Exception ex) { MessageDialog alert = new MessageDialog(ex.Message, "Failed to register with RegisterClient"); alert.ShowAsync(); } } private void SetAuthenticationTokenInLocalStorage() { string username = UsernameTextBox.Text; string password = PasswordTextBox.Password; var token = Convert.ToBase64String(System.Text.Encoding.UTF8.GetBytes(username + ":" + password)); ApplicationData.Current.LocalSettings.Values["AuthenticationToken"] = token; }開啟
App.xaml.cs並且在OnLaunched()事件處理常式中尋找對InitNotificationsAsync()的呼叫。 取消註解或刪除對InitNotificationsAsync()的呼叫。 此按鈕處理常式會初始化通知註冊:protected override void OnLaunched(LaunchActivatedEventArgs e) { //InitNotificationsAsync();以滑鼠右鍵按一下 WindowsApp 專案、按一下 [新增],然後按一下 [類別]。 將類別命名為
RegisterClient.cs,然後按一下 [確定] 以產生類別。為了註冊推播通知,此類別會包裝連絡應用程式後端所需的 REST 呼叫。 它也會在本機儲存通知中心所建立的 registrationIds ,如 從您的應用程式後端註冊中的詳細說明。 當您按一下 [登入並註冊] 按鈕時,系統會使用儲存在本機儲存體中的授權權杖。
在 RegisterClient.cs 檔案開頭加入下列
using陳述式:using Windows.Storage; using System.Net; using System.Net.Http; using System.Net.Http.Headers; using Newtonsoft.Json; using System.Threading.Tasks; using System.Linq;在
RegisterClient類別定義中新增下列程式碼:private string POST_URL; private class DeviceRegistration { public string Platform { get; set; } public string Handle { get; set; } public string[] Tags { get; set; } } public RegisterClient(string backendEndpoint) { POST_URL = backendEndpoint + "/api/register"; } public async Task RegisterAsync(string handle, IEnumerable<string> tags) { var regId = await RetrieveRegistrationIdOrRequestNewOneAsync(); var deviceRegistration = new DeviceRegistration { Platform = "wns", Handle = handle, Tags = tags.ToArray<string>() }; var statusCode = await UpdateRegistrationAsync(regId, deviceRegistration); if (statusCode == HttpStatusCode.Gone) { // regId is expired, deleting from local storage & recreating var settings = ApplicationData.Current.LocalSettings.Values; settings.Remove("__NHRegistrationId"); regId = await RetrieveRegistrationIdOrRequestNewOneAsync(); statusCode = await UpdateRegistrationAsync(regId, deviceRegistration); } if (statusCode != HttpStatusCode.Accepted && statusCode != HttpStatusCode.OK) { // log or throw throw new System.Net.WebException(statusCode.ToString()); } } private async Task<HttpStatusCode> UpdateRegistrationAsync(string regId, DeviceRegistration deviceRegistration) { using (var httpClient = new HttpClient()) { var settings = ApplicationData.Current.LocalSettings.Values; httpClient.DefaultRequestHeaders.Authorization = new AuthenticationHeaderValue("Basic", (string) settings["AuthenticationToken"]); var putUri = POST_URL + "/" + regId; string json = JsonConvert.SerializeObject(deviceRegistration); var response = await httpClient.PutAsync(putUri, new StringContent(json, Encoding.UTF8, "application/json")); return response.StatusCode; } } private async Task<string> RetrieveRegistrationIdOrRequestNewOneAsync() { var settings = ApplicationData.Current.LocalSettings.Values; if (!settings.ContainsKey("__NHRegistrationId")) { using (var httpClient = new HttpClient()) { httpClient.DefaultRequestHeaders.Authorization = new AuthenticationHeaderValue("Basic", (string)settings["AuthenticationToken"]); var response = await httpClient.PostAsync(POST_URL, new StringContent("")); if (response.IsSuccessStatusCode) { string regId = await response.Content.ReadAsStringAsync(); regId = regId.Substring(1, regId.Length - 2); settings.Add("__NHRegistrationId", regId); } else { throw new System.Net.WebException(response.StatusCode.ToString()); } } } return (string)settings["__NHRegistrationId"]; }儲存您的所有變更。
測試應用程式
在這兩種 Windows 系統上啟動應用程式。
輸入 [使用者名稱]和 [密碼],如下列畫面所示。 它應該與您在 Windows Phone 上輸入的使用者名稱和密碼不同。
按一下 [登入並註冊] ,並確認顯示您已登入的對話方塊。 此程式碼也會啟用 [傳送推播] 按鈕。
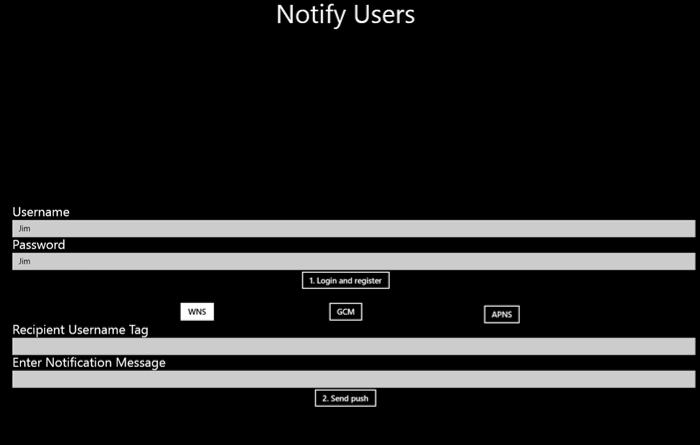
然後,在 [收件者使用者名稱標記] 欄位中,輸入已註冊的使用者名稱。 輸入通知訊息,然後按一下 [傳送推播] 。
只有已經使用相符使用者名稱標記所註冊的裝置才會收到通知訊息。

後續步驟
在本教學課程中,您已學會如何針對具有與其註冊相關聯標記的使用者,將通知推送至這些特定使用者。 若要了解如何推送以位置為基礎的通知,請繼續進行下列教學課程: