適用於:✔️ Linux 虛擬機 ✔️ 彈性規模設定
本文說明如何透過 Azure 入口網站將新的和現有的磁碟連結至 Linux 虛擬機。 您也可以 將數據磁碟連結至 Azure 入口網站中的 Windows VM。
必要條件
將磁碟連結至 Azure 虛擬機 (VM) 之前,請先檢閱下列秘訣:
虛擬機器的大小會控制您可以連接的資料磁碟數目。 如需詳細資訊,請參閱 虛擬機的大小。
尋找虛擬機
請遵循下列步驟:
移至 Azure 入口網站 以尋找 VM。 搜尋並選取 [虛擬機器]。
從清單中選取您想要將磁碟連結至的 VM。
在 [ 虛擬機] 頁面的 [ 設定] 下,選取 [ 磁盘]。
連結新的磁碟
請遵循下列步驟:
在 [ 磁碟 ] 窗格的 [ 數據磁碟] 底下,選取 [ 建立並連結新磁碟]。
輸入受控磁碟的名稱。 檢視預設設定,並視需要更新 記憶體類型、 大小(GiB)、 加密 和 主機快 取。

完成時,請選取頁面頂端的 [ 儲存 ],以建立受控磁碟並更新 VM 組態。

連結現有的磁碟
請遵循下列步驟:
在 [ 磁碟 ] 窗格的 [ 數據磁碟] 底下,選取 [ 鏈接現有的磁碟]。
選取 [ 磁碟名稱 ] 的下拉功能表,然後從可用的受控磁碟清單中選取磁碟。
選取 [儲存 ] 以連結現有的受控磁碟並更新 VM 組態:
連線到Linux VM以掛接新的磁碟
若要分割、格式化和掛接新磁碟以供 Linux VM 使用,請使用 SSH 登入您的 VM。 如需詳細資訊,請參閱如何在 Azure 上搭配使用 SSH 與 Linux。 下列的範例連線至了一個公用 IP 位址為 10.123.123.25,使用者名稱為 azureuser 的 VM:
ssh azureuser@10.123.123.25
尋找磁碟
連線到 VM 之後,您需要尋找磁碟。 在此範例中,我們會使用 lsblk 來列出磁碟。
lsblk -o NAME,HCTL,SIZE,MOUNTPOINT | grep -i "sd"
輸出類似於下列範例:
sda     0:0:0:0      30G
├─sda1             29.9G /
├─sda14               4M
└─sda15             106M /boot/efi
sdb     1:0:1:0      14G
└─sdb1               14G /mnt
sdc     3:0:0:0       4G
在這裡範例中,新增的磁碟是 sdc。 它是 LUN 0,且為 4GB。
如需更複雜的範例,以下是入口網站中多個數據磁碟的外觀:
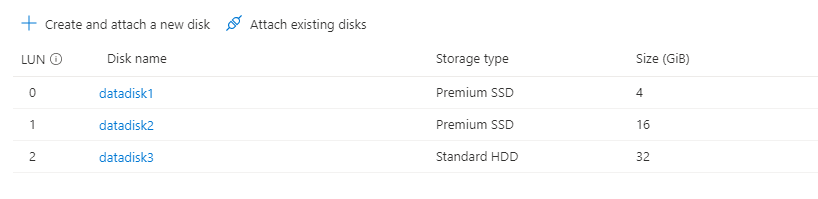
在映射中,您可以看到有三個數據磁碟:LUN 0 上的 4 GB、LUN 1 的 16 GB,以及 LUN 2 的 32G。
從 的 lsblk輸出中,您可以看到 LUN 0 的 4GB 磁碟是 sdc、LUN 1 的 16GB 磁碟是 sdd,而 LUN 2 的 32G 磁碟是 sde。
sda     0:0:0:0      30G
├─sda1             29.9G /
├─sda14               4M
└─sda15             106M /boot/efi
sdb     1:0:1:0      14G
└─sdb1               14G /mnt
sdc     3:0:0:0       4G
sdd     3:0:0:1      16G
sde     3:0:0:2      32G
準備新的空白磁碟
這很重要
如果您使用包含數據的現有磁碟,請跳到 掛接磁碟。 下列指示會刪除磁碟上的數據。
如果您要連結新的磁碟,則需要分割磁碟。
parted公用程式可用來分割和格式化數據磁碟。
- 使用您散發版本可用的最新版本
parted。 - 若磁碟大小為 2 TiB 或以上,您必須使用 GTP 分割。 如果磁碟大小低於 2 TiB,您就能使用 MBR 或 GPT 磁碟分割。
下列範例在 parted 上使用了 /dev/sdc,也就是第一個資料磁碟在大部分 VM 上的位置。 以磁碟的正確選項取代 sdc。 我們也會使用 XFS 檔案系統將它格式化。
使用 partprobe 公用程式以確保核心能夠感知新的磁碟分割和檔案系統。
partprobe無法使用可能會導致 blkid 或 lslbk 命令無法立即傳回新文件系統的 UUID。
sudo parted /dev/sdc --script mklabel gpt mkpart xfspart xfs 0% 100%
sudo mkfs.xfs /dev/sdc1
sudo partprobe /dev/sdc1
掛接磁碟
建立目錄以使用 mkdir掛接文件系統,然後使用 mount 掛接文件系統。 之後,將磁碟驅動器新增至 /etc/fstab 檔案,以確保磁碟驅動器會在重新啟動後自動新增。
確定 /etc/fstab 中使用 UUID (通用唯一標識符)來參考磁碟驅動器,而不只是裝置名稱(例如 /dev/sdc1)。 如果作業系統在開機期間偵測到磁碟錯誤,使用 UUID 可避免將不正確的磁碟掛接到指定的位置。 其餘的資料磁碟則會被指派這些相同的裝置識別碼。 若要尋找新磁碟驅動器的 UUID,請使用 blkid 公用程式。
sudo mkdir /datadrive
sudo mount /dev/sdc1 /datadrive
sudo blkid
/dev/sda1: LABEL="cloudimg-rootfs" UUID="11111111-1b1b-1c1c-1d1d-1e1e1e1e1e1e" TYPE="ext4" PARTUUID="1a1b1c1d-11aa-1234-1a1a1a1a1a1a"
/dev/sda15: LABEL="UEFI" UUID="BCD7-96A6" TYPE="vfat" PARTUUID="1e1g1cg1h-11aa-1234-1u1u1a1a1u1u"
/dev/sdb1: UUID="22222222-2b2b-2c2c-2d2d-2e2e2e2e2e2e" TYPE="ext4" TYPE="ext4" PARTUUID="1a2b3c4d-01"
/dev/sda14: PARTUUID="2e2g2cg2h-11aa-1234-1u1u1a1a1u1u"
/dev/sdc1: UUID="33333333-3b3b-3c3c-3d3d-3e3e3e3e3e3e" TYPE="xfs" PARTLABEL="xfspart" PARTUUID="c1c2c3c4-1234-cdef-asdf3456ghjk"
編輯 fstab 檔案
備註
不當編輯 /etc/fstab 檔案會導致系統無法開機。 如果不確定,請參閱散發套件的文件,以取得如何適當編輯此檔案的相關資訊。 您應該先建立 /etc/fstab 檔案的備份,再編輯。
接下來,在文本編輯器中開啟 /etc/fstab 檔案。 使用先前步驟中所建立 /dev/sdc1 裝置的 UUID 值以及 /datadrive 的掛接點,在檔案結尾新增一行。 如果您使用本文中的範例,新行看起來會像下列範例。
完成檔案編輯時,請儲存並關閉編輯器。
備註
稍後移除資料磁碟而不編輯 fstab,可能會造成 VM 無法開機。 大多數的發行版本會提供 nofail 和 (或) nobootwait fstab 選項。 即使磁碟在開機時無法掛接,這些選項也能讓系統開機。 請查閱發行版的文件,以取得這些參數的相關資訊。
nofail 選項可確保即使文件系統損毀或磁碟在開機時不存在,VM 仍會啟動。 若不使用此選項,您可能會遇到因為 FSTAB 錯誤所以無法 SSH 到 Linux VM 中所述的行為
UUID=33333333-3b3b-3c3c-3d3d-3e3e3e3e3e3e /datadrive xfs defaults,nofail 1 2
確認磁碟
您現在可以再次使用 lsblk 來查看磁碟和裝入點。 然後輸出看起來應該像範例一樣。
在下列範例輸出中 sdc ,您可以看到現在已掛接在 /datadrive。
lsblk -o NAME,HCTL,SIZE,MOUNTPOINT | grep -i "sd"
sda     0:0:0:0      30G
├─sda1             29.9G /
├─sda14               4M
└─sda15             106M /boot/efi
sdb     1:0:1:0      14G
└─sdb1               14G /mnt
sdc     3:0:0:0       4G
└─sdc1                4G /datadrive
Azure 中 Linux 的 TRIM/UNMAP 支援
有些 Linux 核心會支援 TRIM/UNMAP 作業以捨棄磁碟上未使用的區塊。 此功能主要用於通知 Azure 已刪除的頁面已不再有效且可予以捨棄。 此功能可節省根據已取用儲存體數目計費的磁碟費用,例如非受控標準磁碟和磁碟快照集。
有兩種方式可在 Linux VM 中啟用 TRIM 支援。 像往常一樣,請參考您所使用的發行版本以了解建議的方法︰
discard使用 /etc/fstab 中的掛接選項,例如:```config UUID=33333333-3b3b-3c3c-3d3d-3e3e3e3e3e3e /datadrive xfs defaults,discard 1 2 ```在某些情況下,
discard選項可能會影響效能。 或者,您也可以從命令列手動執行fstrim命令,或將它新增到 crontab 來定期執行︰Ubuntu
sudo apt-get install util-linux
sudo fstrim /datadrive
RHEL
sudo yum install util-linux
sudo fstrim /datadrive
SUSE
sudo zypper install util-linux
sudo fstrim /datadrive