適用於:✔️ Linux VM
Azure 虛擬機器 (VM) 提供完全可設定且彈性的計算環境。 本教學課程涵蓋基本的 Azure 虛擬機器部署,並結合 Oracle 自動儲存體管理 (ASM) 的安裝和設定。 您將學習如何:
- 建立和連線至 Oracle 資料庫 VM
- 安裝和設定 Oracle 自動儲存體管理
- 安裝和設定 Oracle Grid Infrastructure
- 初始化 Oracle ASM 安裝
- 建立受 ASM 管理的 Oracle DB
如需 ASM 價值主張的概觀,請參閱 Oracle 文件。
如果您選擇在本機安裝和使用 CLI,本教學課程會要求您執行 Azure CLI 2.0.4 版或更新版本。 若要尋找版本,請執行 az --version。 如果您需要安裝或升級,請參閱安裝 Azure CLI。
準備環境
此實驗室會在 Azure 上使用兩部 VM:asmXServer 執行用於執行格線設定的 X Windows 伺服器,asmVM 裝載 Oracle Database 和 ASM 安裝。 用於建立這些虛擬機器的 Marketplace 如下
- asmVM:Oracle:oracle-database-19-3:oracle-database-19-0904:19.3.1
- asmXServer:MicrosoftWindowsDesktop:Windows-10:win10-22h2-pro-g2:19045.2604.230207
您也需要熟悉 Unix 編輯器 vi,並且對 X Server 有基本了解。
登入 Azure
在 Windows、Linux 或 Azure Shell 上開啟您慣用的殼層。
使用 az login 命令登入您的 Azure 訂用帳戶。 然後,遵循螢幕上的指示來進行。
$ az login請驗證訂用帳戶名稱和/或識別碼,確保您已連線到正確的訂用帳戶。
$ az account show{ "environmentName": "XXXXX", "homeTenantId": "XXXXXXXX-XXXX-XXXX-XXXX-XXXXXXXXXXXX", "id": "<SUBSCRIPTION_ID>", "isDefault": true, "managedByTenants": [], "name": "<SUBSCRIPTION_NAME>", "state": "Enabled", "tenantId": XXXXXXXX-XXXX-XXXX-XXXX-XXXXXXXXXXXX", "user": { "cloudShellID": true, "name": "aaaaa@bbbbb.com", "type": "user" } }
產生驗證金鑰
我們透過 SSH 使用以 keyfile 為基礎的驗證,並連線至 Oracle Database VM。 請確保您已在殼層上建立私人 (名為 id_rsa) 和公用 (名為 id_rsa.pub) 金鑰檔案。
金鑰檔案的位置取決於您的來源系統。
Windows:%USERPROFILE%.ssh Linux:~/.ssh
如果不存在,您可以建立新的索引鍵檔組。
$ ssh-keygen -m PEM -t rsa -b 4096
.ssh 目錄和金鑰檔案已建立。 如需詳細資訊,請參閱 在 Azure 中建立和管理 SSH 金鑰以驗證 Linux VM
建立資源群組
若要建立資源群組,請使用 az group create 命令。 Azure 資源群組是在其中部署與管理 Azure 資源的邏輯容器。
$ az group create --name ASMOnAzureLab --location westus
建立和設定網路
建立虛擬網路
使用下列命令以建立虛擬網路來裝載此實驗室中建立的資源。
$ az network vnet create \
  --name asmVnet \
  --resource-group ASMOnAzureLab \
  --address-prefixes "10.0.0.0/16" \
  --subnet-name asmSubnet1 \
  --subnet-prefixes "10.0.0.0/24"
建立網路安全性群組 (NSG)
建立網路安全組 (NSG) 以鎖定您的虛擬網路。
$ az network nsg create \
  --resource-group ASMOnAzureLab \
  --name asmVnetNSG
建立 NSG 規則以允許虛擬網路內的通訊。
$ az network nsg rule create  --resource-group ASMOnAzureLab --nsg-name asmVnetNSG \
    --name asmAllowVnet \
    --protocol '*' --direction inbound --priority 3400 \
    --source-address-prefix 'VirtualNetwork' --source-port-range '*' \
    --destination-address-prefix 'VirtualNetwork' --destination-port-range '*' --access allow
建立 NSG 規則以拒絕全部輸入連線
$ az network nsg rule create \
  --resource-group ASMOnAzureLab \
  --nsg-name asmVnetNSG \
  --name asmDenyAllInBound \
  --protocol '*' --direction inbound --priority 3500 \
  --source-address-prefix '*' --source-port-range '*' \
  --destination-address-prefix '*' --destination-port-range '*' --access deny
將 NSG 指派給裝載伺服器的子網路。
$ az network vnet subnet update --resource-group ASMOnAzureLab --vnet-name asmVNet --name asmSubnet1 --network-security-group asmVnetNSG
建立 Bastion 網路
建立 Bastion 子網路。 子網路的名稱必須為 AzureBastionSubnet
$ az network vnet subnet create  \
    --resource-group ASMOnAzureLab \
    --name AzureBastionSubnet \
    --vnet-name asmVnet \
    --address-prefixes 10.0.1.0/24
建立 Bastion 的公用 IP
$ az network public-ip create \
    --resource-group ASMOnAzureLab \
    --name asmBastionIP \
    --sku Standard
建立 Azure Bastion 資源。 部署資源需要大約 10 分鐘的時間。
$ az network bastion create \
    --resource-group ASMOnAzureLab \
    --name asmBastion \
    --public-ip-address asmBastionIP \
    --vnet-name asmVnet \
    --sku Standard \
    --enable-tunneling \
    --enable-ip-connect true
建立 X Server VM (asmXServer)
取代您的密碼,並執行命令以建立部署 X Server 的 Windows 工作站 VM。
$ az vm create \
    --resource-group ASMOnAzureLab \
    --name asmXServer \
    --image MicrosoftWindowsDesktop:Windows-10:win10-22h2-pro-g2:19045.2604.230207 \
    --size Standard_DS1_v2  \
    --vnet-name asmVnet \
    --subnet asmSubnet1 \
    --public-ip-sku Standard \
    --nsg "" \
    --data-disk-delete-option Delete \
    --os-disk-delete-option Delete \
    --nic-delete-option Delete \
    --admin-username azureuser \
    --admin-password <ENTER_YOUR_PASSWORD_HERE>
連線到 asmXServer
使用 Bastion 連線到 asmXServer。
- 從 Azure 入口網站 流覽至 asmXServer
- 在左側導覽中找出 [概觀 ]
- 依序選取上方功能表的 [連線]>[Bastion]
- 選取 [Bastion] 索引標籤
- 選取 [使用 Bastion]
準備 asmXServer 以執行 X Server
此實驗室的後續步驟需要 X Server。 執行下列步驟來安裝和啟動 X Server。
將適用於 Windows 的 Xming X Server 下載至 ggXServer, 並使用所有預設選項安裝
確認您確定在安裝結束時選取 [ 啟動 ]
從 [開始] 選單啟動 「XLAUNCH」 應用程式
選取 [多個視窗]
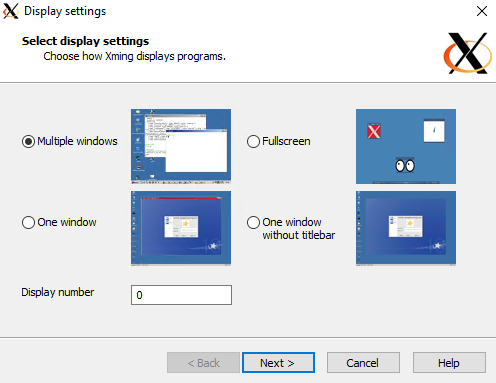 XLaunch 精靈步驟 1 的螢幕快照。
選取 [啟動無用戶端]
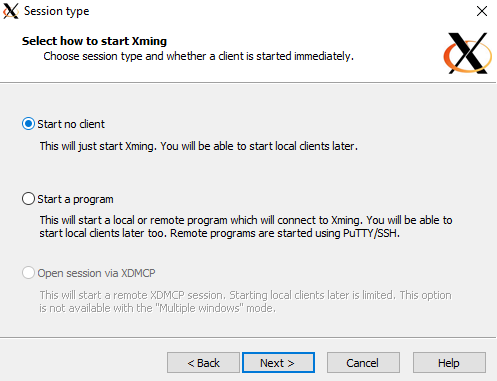 XLaunch 精靈步驟 2 的螢幕快照。
選取 [沒有存取控制]
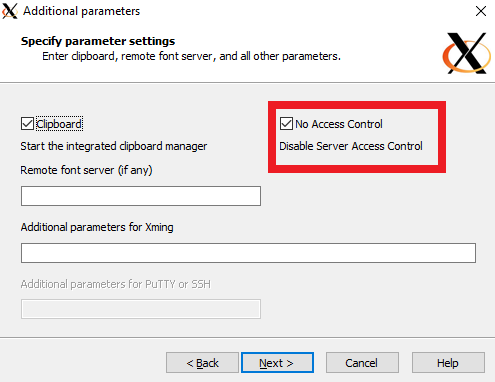 XLaunch 精靈步驟 3 的螢幕快照。
選取 [允許存取] 以允許 X Server 通過 Windows 防火牆
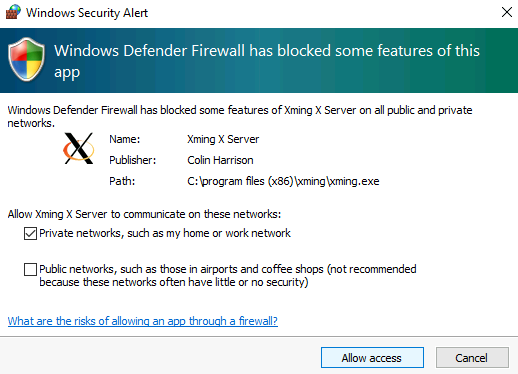 XLaunch 精靈步驟 4 的螢幕快照。
如果您重新啟動 asmXServer VM,請遵循上述步驟 2-6 以重新啟動 X Server 應用程式。
建立 Oracle Database VM
針對此實驗室,我們從 Oracle Database 19c 映像建立虛擬機器 asmVM。 執行下列命令以建立連結多個資料磁碟的 asmVM。 如果預設金鑰位置沒有金鑰,此命令也會建立 SSH 金鑰。 若要使用一組特定金鑰,請使用 --ssh-key-value 選項。 如果您已在 [ 產生驗證金鑰] 區段中建立 SSH 金鑰 ,則會使用這些金鑰。
當您建立新的虛擬機時, size 參數會指出所建立虛擬機的大小和類型。 根據您選取的 Azure 區域來建立虛擬機和訂用帳戶設定,某些虛擬機大小和類型可能無法供您使用。 下列命令使用此實驗室最低需求大小 Standard_D4_v5。 如果您要變更虛擬機器的規格,請從 Azure VM 大小選取其中一個可用的大小。 基於測試目的,您可以選擇 [一般用途] (D 系列) 虛擬機類型。 針對生產或試驗部署,記憶體最佳化 (E 系列或 M 系列) 更為適用。
az vm create --resource-group ASMOnAzureLab \
   --name asmVM \
   --image Oracle:oracle-database-19-3:oracle-database-19-0904:19.3.1 \
   --size Standard_D4_v5 \
   --generate-ssh-keys \
   --os-disk-size-gb 30 \
   --data-disk-sizes-gb 20 40 40 \
   --admin-username azureuser \
   --vnet-name asmVnet \
   --subnet asmSubnet1 \
   --public-ip-sku Basic \
   --nsg ""
連線到 asmVM
使用 Bastion 連線到 asmVM。
- 從 Azure 入口網站 流覽至 asmVM
- 在左側導覽中找出 [概觀 ]
- 依序選取上方功能表的 [連線]>[Bastion]
- 選取 [Bastion] 索引標籤
- 選取 [使用 Bastion]
建立分頁檔
此實驗室在實驗室虛擬機器上需要分頁檔。 完成下列步驟以建立分頁檔。
準備磁碟和掛接點
稍早建立虛擬機器 (asmVM) 時,我們包含 20GB 資料磁碟以放置分頁檔。 執行下列命令以找出此 20GB 磁碟的名稱。 大部分時間都是 /dev/sdb ,但萬一出現不同的情況,請確定您記下 20G 磁碟的名稱,並在下列步驟中使用 。 同樣地,我們稍後會使用 40G 磁碟的名稱 (在下列輸出中名為 /dev/sdc 和 /dev/sdd)。
$ sudo su -
$ lsblk
NAME MAJ:MIN RM SIZE RO TYPE MOUNTPOINT sdd 8:48 0 40G 0 disk ====> Data disk 2 (40GB) sdb 8:16 0 20G 0 disk ====> Swap file disk (20GB) sr0 11:0 1 628K 0 rom fd0 2:0 1 4K 0 disk sdc 8:32 0 40G 0 disk ====> Data disk 1 (40GB) sda 8:0 0 30G 0 disk ├─sda2 8:2 0 29G 0 part / ├─sda14 8:14 0 4M 0 part ├─sda15 8:15 0 495M 0 part /boot/efi └─sda1 8:1 0 500M 0 part /boot執行下列命令以在交換檔磁碟上建立分割區,並視需要修改磁碟名稱 (/dev/sdb)。
$ parted /dev/sdb --script mklabel gpt mkpart xfspart xfs 0% 100%檢查建立的磁碟分割名稱。 以下顯示其建立為 sdb1。
$ lsblkNAME MAJ:MIN RM SIZE RO TYPE MOUNTPOINT sdd 8:48 0 40G 0 disk sdb 8:16 0 20G 0 disk └─sdb1 8:17 0 20G 0 part ====> Newly created partition sr0 11:0 1 628K 0 rom fd0 2:0 1 4K 0 disk sdc 8:32 0 40G 0 disk sda 8:0 0 30G 0 disk ├─sda2 8:2 0 29G 0 part / ├─sda14 8:14 0 4M 0 part ├─sda15 8:15 0 495M 0 part /boot/efi └─sda1 8:1 0 500M 0 part /boot執行下列命令來初始化文件系統 (xfs),並將磁碟驅動器掛接為 /swap。
$ mkfs.xfs /dev/sdb1
$ partprobe /dev/sdb1
$ mkdir /swap
$ mount /dev/sdb1 /swap
執行以下命令:
$ blkid在輸出中,您會看到分頁檔磁碟分割 /dev/sdb1 行,請記下 UUID。
/dev/sdb1: UUID="00000000-0000-0000-0000-000000000000" TYPE="xfs" PARTLABEL="xfspart" PARTUUID="...."將上一步驟的 UUID 貼至下列命令並執行。 此命令可確保每次系統重新啟動時正確掛接磁碟機。
$ echo "UUID=00000000-0000-0000-0000-000000000000 /swap xfs defaults,nofail 1 2" >> /etc/fstab
設定分頁檔
建立和配置分頁檔 (16GB)。 此命令需要幾分鐘的時間執行。
$ dd if=/dev/zero of=/swap/swapfile bs=1M count=16384修改許可權並指派交換檔案。
$ chmod 600 /swap/swapfile
$ mkswap /swap/swapfile
$ swapon /swap/swapfile
確認已建立交換檔案。
$ cat /proc/swapsFilename Type Size Used Priority /swap/swapfile file 16777212 0 -2確認交換檔案設定會在重新啟動時保留。
$ echo "/swap/swapfile none swap sw 0 0" >> /etc/fstab
安裝 Oracle ASM
若要安裝 Oracle ASM,請完成下列步驟。
如需關於安裝 Oracle ASM 的詳細資訊,請參閱 Oracle ASMLib Downloads for Oracle Linux 7。
如果您尚未登入,請以 root 身分登入以繼續進行 ASM 安裝。
$ sudo su -執行下列命令以安裝 Oracle ASM 元件:
$ yum list | grep oracleasm命令輸出如下所示:
kmod-oracleasm.x86_64                    2.0.8-28.0.1.el7            ol7_latest
oracleasm-support.x86_64                 2.1.11-2.el7                ol7_latest
執行下列命令以繼續安裝:
$ yum -y install kmod-oracleasm.x86_64
$ yum -y install oracleasm-support.x86_64
$ wget https://download.oracle.com/otn_software/asmlib/oracleasmlib-2.0.15-1.el7.x86_64.rpm
$ yum -y install oracleasmlib-2.0.15-1.el7.x86_64.rpm
$ rm -f oracleasmlib-2.0.15-1.el7.x86_64.rpm
確認您已安裝 Oracle ASM:
$ rpm -qa |grep oracleasm此命令的輸出會列出下列元件:
oracleasm-support-2.1.11-2.el7.x86_64
oracleasmlib-2.0.15-1.el7.x86_64
kmod-oracleasm-2.0.8-28.0.1.el7.x86_64
ASM 需要特定使用者和角色才能正常運作。 下列命令會建立必要使用者帳戶和群組:
$ groupadd -g 54345 asmadmin
$ groupadd -g 54346 asmdba
$ groupadd -g 54347 asmoper
$ usermod -a -g oinstall -G oinstall,dba,asmdba,asmadmin,asmoper oracle
確認已正確建立使用者和群組。
$ grep oracle /etc/group此命令的輸出會列出下列使用者和群組。
 oinstall:x:54321:oracle
 dba:x:54322:oracle
 oper:x:54323:oracle
 backupdba:x:54324:oracle
 dgdba:x:54325:oracle
 kmdba:x:54326:oracle
 racdba:x:54330:oracle
 asmadmin:x:54345:oracle
 asmdba:x:54346:oracle
 asmoper:x:54347:oracle
建立應用程式擁有者並變更擁有者。
$ mkdir /u01/app/grid
$ chown oracle:oinstall /u01/app/grid
設定 Oracle ASM
針對此教學課程,預設使用者是 oracle,預設群組是 asmadmin。 確定 oracle 使用者屬於 asmadmin 群組。
$ groups oracle
命令輸出應如下所示
oracle : oinstall dba oper backupdba dgdba kmdba racdba asmadmin asmdba asmoper
若要設定 Oracle ASM,請完成下列步驟:
使用下列命令設定 Oracle ASM 程式庫磁碟機,並提供下列提示的解答。
$ /usr/sbin/oracleasm configure -i此命令的輸出應類似下列結果,並停止於要回答的提示。
Configuring the Oracle ASM library driver.

This will configure the on-boot properties of the Oracle ASM library
driver. The following questions will determine whether the driver is
loaded on boot and what permissions it will have. The current values
will be shown in brackets ('[]'). Hitting <ENTER> without typing an
answer will keep that current value. Ctrl-C will abort.

Default user to own the driver interface []: oracle
Default group to own the driver interface []: asmadmin
Start Oracle ASM library driver on boot (y/n) [n]: y
Scan for Oracle ASM disks on boot (y/n) [y]: y
Writing Oracle ASM library driver configuration: done
注意
/usr/sbin/oracleasm configure -i命令要求預設擁有 ASM 驅動程式存取點的使用者和群組。 資料庫將會以oracle使用者和asmadmin群組的形式執行。 選取 [開機時啟動 Oracle ASM 程式庫驅動程式 = 'y'],系統一律會載入模組,並在開機時掛接檔案系統。 選取 [在開機時掃描 Oracle ASM 磁碟 = 'y'],系統一律會在開機時掃描 Oracle ASM 磁碟。 最後兩項設定非常重要,否則您將遇到磁碟重新開機問題。檢視磁碟組態︰
$ cat /proc/partitions此命令的輸出應類似下列可用磁碟清單
 major minor  #blocks  name
    8       16   20971520 sdb
    8       17   20969472 sdb1
    8       32   41943040 sdc
    8       48   41943040 sdd
    8        0   31457280 sda
    8        1     512000 sda1
    8        2   30431232 sda2
    8       14       4096 sda14
    8       15     506880 sda15
   11        0        628 sr0
    2        0          4 fd0
透過執行下列命令格式化磁碟 /dev/sdc,並透過下列項目回答提示:
- n 適用於新的磁碟分割
- p 為主要磁碟分割
- 1 以選取第一個磁碟分割
- 按下 enter 取得預設第一個磁區
- 按下 enter 取得預設最後一個磁區
- 按 w 將變更寫入磁碟分割表格Azure Resource Manager
$ fdisk /dev/sdcfdisk命令的輸出如下列輸出所示:Welcome to fdisk (util-linux 2.23.2). Changes will remain in memory only, until you decide to write them. Be careful before using the write command. Device does not contain a recognized partition table Building a new DOS disklabel with disk identifier 0x947f0a91. The device presents a logical sector size that is smaller than the physical sector size. Aligning to a physical sector (or optimal I/O) size boundary is recommended, or performance can be impacted. Command (m for help): n Partition type: p primary (0 primary, 0 extended, 4 free) e extended Select (default p): p Partition number (1-4, default 1): 1 First sector (2048-104857599, default 2048): Using default value 2048 Last sector, +sectors or +size{K,M,G} (2048-104857599, default 104857599): Using default value 104857599 Partition 1 of type Linux and of size 50 GiB is set Command (m for help): w The partition table has been altered! Calling ioctl() to re-read partition table. Syncing disks.針對重複上述
fdisk命令/dev/sdd$ fdisk /dev/sdd檢查磁碟組態︰
$ cat /proc/partitions命令的輸出應如下列輸出所示:
 major minor  #blocks  name
    8       16   20971520 sdb
    8       17   20969472 sdb1
    8       32   41943040 sdc
    8       33   41942016 sdc1
    8       48   41943040 sdd
    8       49   41942016 sdd1
    8        0   31457280 sda
    8        1     512000 sda1
    8        2   30431232 sda2
    8       14       4096 sda14
    8       15     506880 sda15
   11        0        628 sr0
    2        0          4 fd0
注意
請注意,在下列組態中,請使用如本文件所示的確切命令。
檢查 Oracle ASM 服務狀態,並啟動 Oracle ASM 服務:
$ oracleasm statusChecking if ASM is loaded: no Checking if /dev/oracleasm is mounted: no$ oracleasm initCreating /dev/oracleasm mount point: /dev/oracleasm Loading module "oracleasm": oracleasm Configuring "oracleasm" to use device physical block size Mounting ASMlib driver filesystem: /dev/oracleasm建立 Oracle ASM 磁碟
建立第一個磁碟
$ oracleasm createdisk VOL1 /dev/sdc1命令輸出應如下所示
 Writing disk header: done
 Instantiating disk: done
建立剩餘磁碟
$ oracleasm createdisk VOL2 /dev/sdd1
注意
磁碟會使用 ASMLib 安裝中所述的程序來標示用於 ASMLib。 ASMLib 了解在稱為磁碟掃描的程序期間會標示哪些磁碟。 ASMLib 會在每次啟動時執行此掃描。 系統管理員也可以透過
oracleasm scandisks命令強制掃描。 ASMLib 會檢查系統中的每個磁碟。 其會檢查磁碟是否已標示用於 ASMLib。 任何已標示的磁碟都可供 ASMLib 使用。 如需詳細資訊,您可以造訪使用 Oracle ASMLIB 設定儲存體裝置路徑持續性和在多路徑磁碟上設定 Oracle ASMLib文件。列出 Oracle ASM 磁碟
$ oracleasm scandisks
$ oracleasm listdisks
此命令的輸出會列出下列 Oracle ASM 磁碟:
 VOL1
 VOL2
變更根和 oracle 使用者的密碼。 由於您稍後會在安裝期間使用這些新密碼,因此請將其記下。
$ passwd oracle
$ passwd root
變更資料夾權限
$ chmod -R 775 /opt
$ chown oracle:oinstall /opt
$ chown oracle:oinstall /dev/sdc1
$ chown oracle:oinstall /dev/sdd1
$ chmod 600 /dev/sdc1
$ chmod 600 /dev/sdd1
下載並準備 Oracle Grid Infrastructure
若要下載並準備 Oracle Grid Infrastructure 軟體,請完成下列步驟︰
從 Oracle ASM 下載頁面下載 Oracle Grid Infrastructure。 您的下載位置應已安裝 Azure CLI,因為我們使用 Bastion 將這些檔案複製到 asmVM。 因為它使用通道,所以此步驟無法透過 Azure Cloud Shell 運作,因此必須在工作站上執行。
在 Oracle Database 19c Grid Infrastructure (19.3) for Linux x86-64 的下載標題下,下載 .zip 檔案。
將 .zip 檔下載到用戶端電腦之後,您可以使用「安全複製通訊協定 (SCP)」,將這些檔案複製到 VM。 確保
scp命令指向正確的 .zip 檔案路徑。視登入 Azure 中所述,登入並確認您使用正確的訂用帳戶。
使用下列 PowerShell 命令開啟目標 VM 的通道:
$asmVMid=$(az vm show --resource-group ASMOnAzureLab --name asmVM --query 'id' --output tsv)

az network bastion tunnel --name asmBastion --resource-group ASMOnAzureLab --target-resource-id $asmVMid --resource-port 22 --port 57500
將第一個命令提示保持執行,並開啟第二個命令提示字元,即可透過通道連線到您的目標 VM。 在此第二個命令提示字元視窗中,您可以使用下列命令,將檔案從本機電腦上傳至目標 VM。 請注意,存取 asmVM 的正確
id_rsakeyfile 必須位於.ssh目錄中,或者您可以使用 參數 toscp命令指向不同的密鑰檔案-i。scp -P 57500 "LINUX.X64_193000_grid_home.zip" azureuser@127.0.0.1:.
當完成上傳時,使用 Bastion 將 SSH 傳回 Azure 中的 asmVM,以將 .zip 檔案移至 /opt 資料夾並變更檔案擁有者。
$ sudo su -
$ mv /home/azureuser/*.zip /opt
$ cd /opt
$ chown oracle:oinstall LINUX.X64_193000_grid_home.zip
將檔案解壓縮(如果尚未安裝 Linux 解壓縮工具,請將其解壓縮)。
$ yum install unzip
$ unzip LINUX.X64_193000_grid_home.zip -d grid
變更權限
$ chown -R oracle:oinstall /opt/grid清理
$ rm -f LINUX.X64_193000_grid_home.zip結束根
$ exit
安裝 Oracle Grid Infrastructure
若要安裝 Oracle Grid Infrastructure,請完成下列步驟:
以 oracle 的身分登入。 (您應該能夠順利登入,而不會收到需要輸入密碼的提示)。
注意
開始安裝之前,請確定您已啟動 X Server。
$ sudo su - oracle
$ export DISPLAY=10.0.0.4:0.0
$ cd /opt/grid
$ ./gridSetup.sh
Oracle Grid Infrastructure 19c 安裝程式會在 asmXServer VM 上開啟。 (安裝程式可能需要幾分鐘的時間才會啟動)。
在 [選取設定選項] 頁面上,選取 [為獨立伺服器設定 Oracle Grid Infrastructure (Oracle 重新啟動)]。
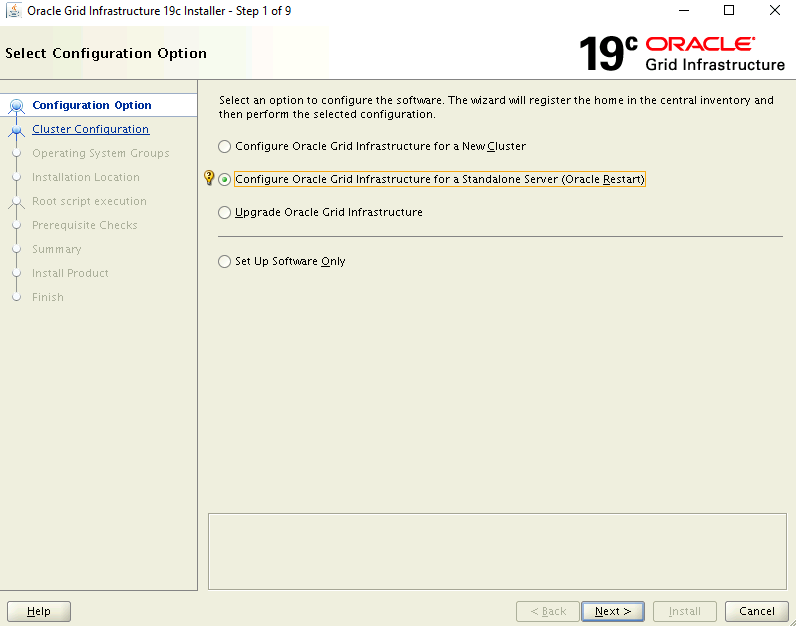 安裝程式 [選取組態選項] 頁面的螢幕快照。
在 [建立 ASM 磁碟群組] 頁面上︰
- 選取 變更探索路徑
- 將探索路徑變更為 /dev/oracleasm/disks/
- 輸入磁碟群組的名稱 DATA
- 在 [備援] 底下,選取 [外部]
- 在 [配置單位大小] 底下,選取 [4]
- 在 [選取磁碟] 下,選取 /dev/oracleasm/disks/VOL1
- 選取下一個
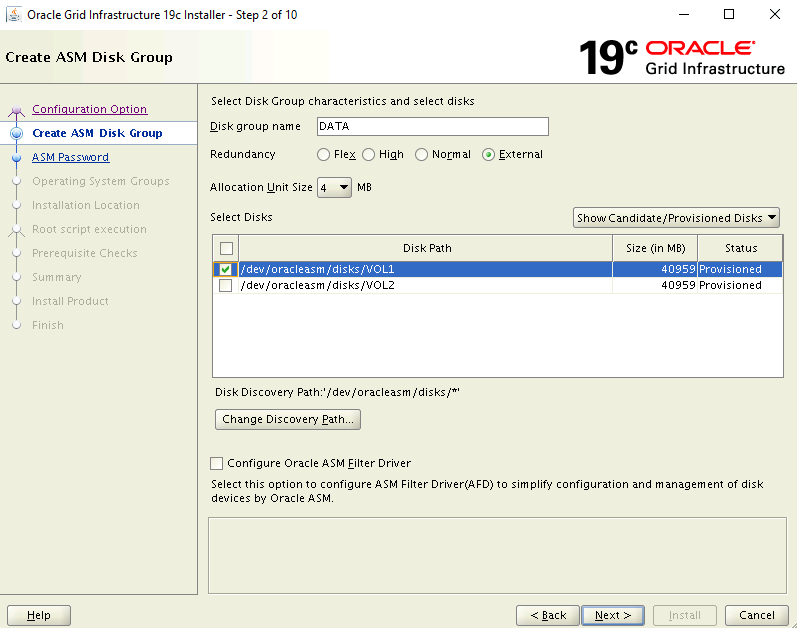 安裝程式 [建立 ASM 磁碟群組] 頁面的螢幕快照。
在 [ 指定 ASM 密碼 ] 頁面上,選取 [ 針對這些帳戶 使用相同的密碼] 選項,然後輸入密碼。
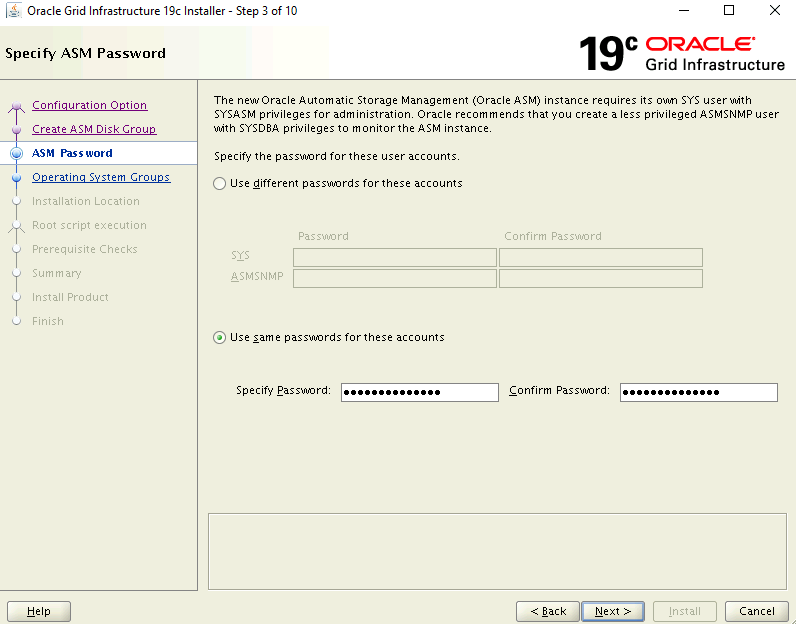 安裝程式 [指定 ASM 密碼] 頁面的螢幕快照。
在 [ 指定管理選項 ] 頁面上,確認未選取設定 EM Cloud Control 的選項。 選取下一步以繼續。
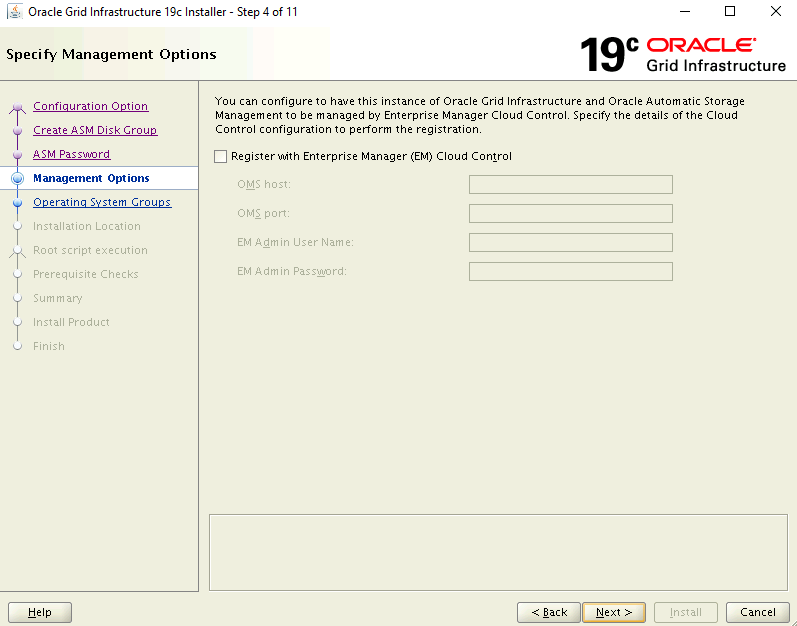 安裝程式 [指定管理選項] 頁面的螢幕快照。
在 [特殊權限作業系統群組] 頁面上使用預設設定。 選取下一步以繼續。
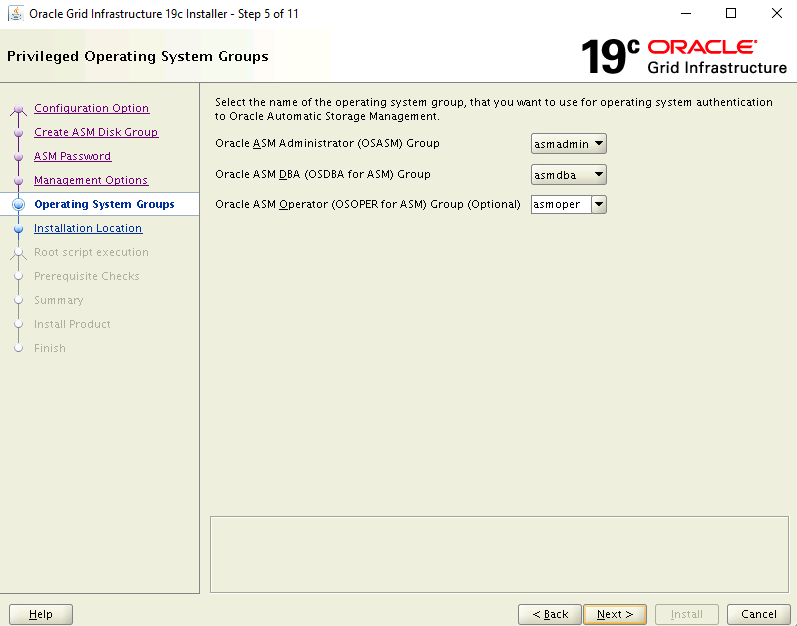 安裝程式 [特殊許可權作業系統群組] 頁面的螢幕快照。
在 [指定安裝位置] 頁面上,使用預設設定。 選取下一步以繼續。
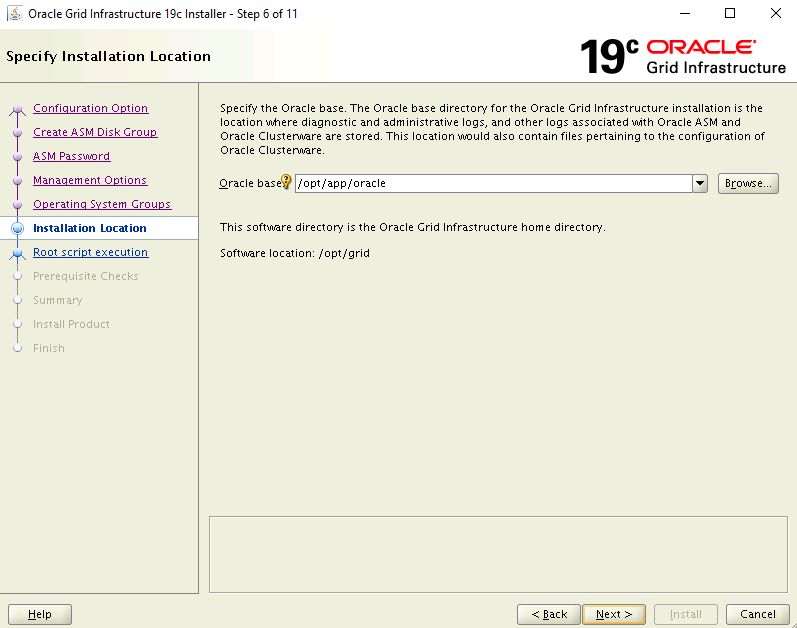 安裝程式 [指定安裝位置] 頁面的螢幕快照。
在 [Root 指令碼執行組態] 頁面上,選取 [自動執行組態指令碼] 核取方塊。 接著,選取 [使用 root 使用者認證] 選項,然後輸入 root 使用者密碼。
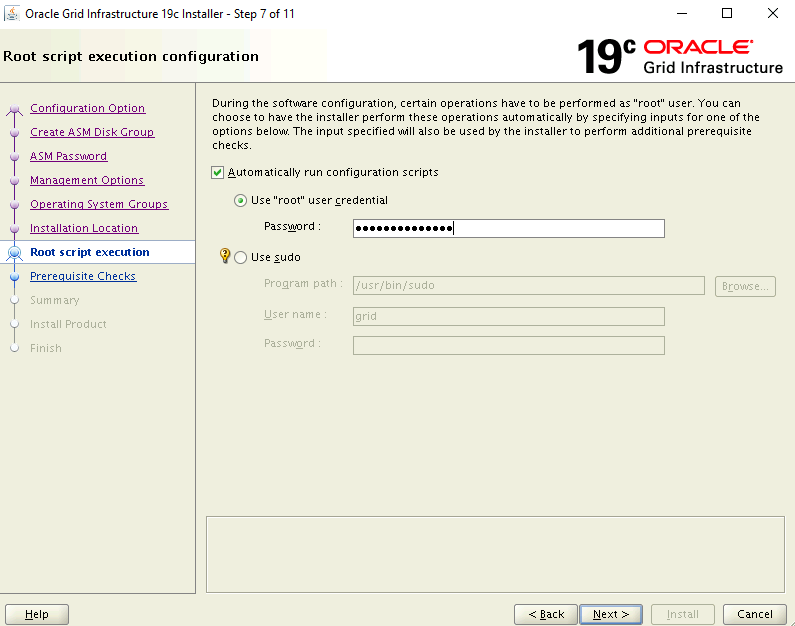 安裝程式根腳本執行組態頁面的螢幕快照。
在 [執行必要條件檢查] 頁面上,目前的設定會失敗並顯示錯誤。 選取 [修正並再檢查一次]。
在 [ 修正腳本] 對話框中,選取 [ 確定]。
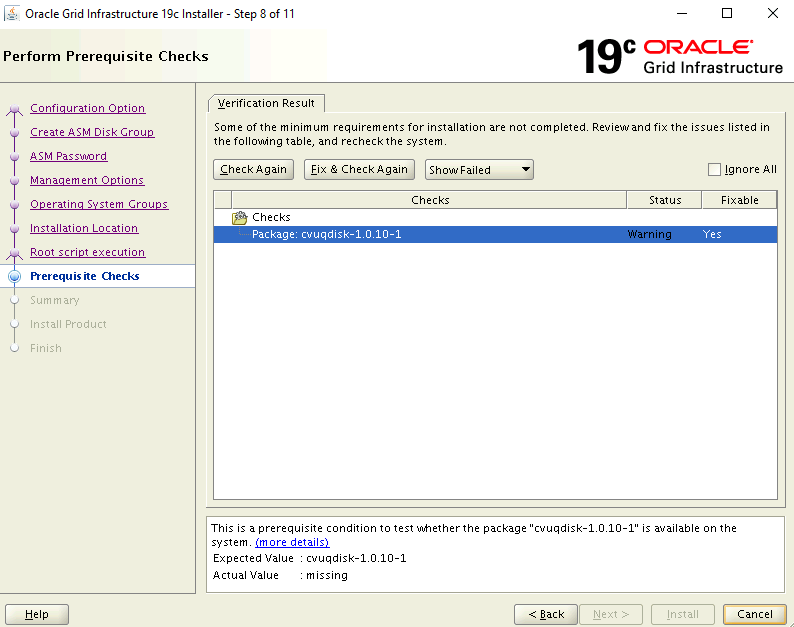 安裝程式 [執行必要條件檢查] 頁面的螢幕快照。
在 [ 摘要] 頁面上,檢閱您選擇的設定,然後選取
Install。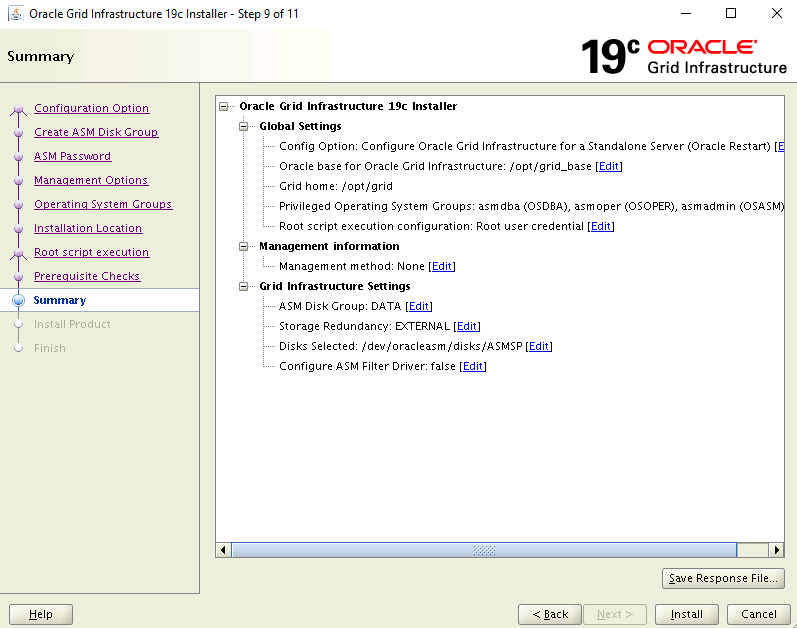 安裝程式 [摘要] 頁面的螢幕快照。
隨即顯示警告對話方塊,通知您必須以特殊權限使用者身分執行組態指令碼。 選取是 以繼續。
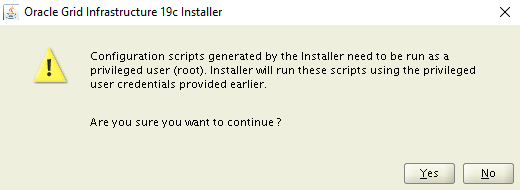 安裝程式警告頁面的螢幕快照。
在 [ 完成] 頁面上,選取 [ 關閉 ] 以完成安裝。
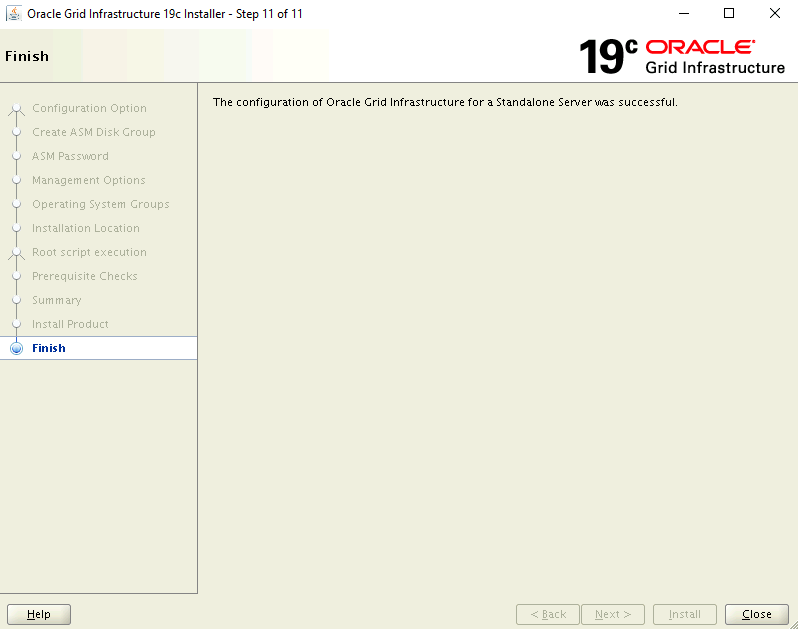 安裝程式 [完成] 頁面的螢幕快照。
設定 Oracle ASM
完成下列步驟來設定 Oracle ASM。
確認您已以 oracle 身分登入,從 Bastion ssh 會話登入 asmVM。
執行下列命令以設定內容。 如果您仍然從上一個命令開啟殼層,您可以略過此步驟。
$ sudo su - oracle
$ export DISPLAY=10.0.0.4:0.0
啟動 Oracle Automatic Storage Management Configuration Assistant
$ cd /opt/grid/bin $ ./asmca在幾分鐘內,asmXServer VM 上隨即開啟 Oracle ASM Automatic Storage Management Configuration Assistant 視窗。
在樹狀目錄中的 [磁碟群組] 下選取 [數據],然後選取底部的 [建立] 按鈕。
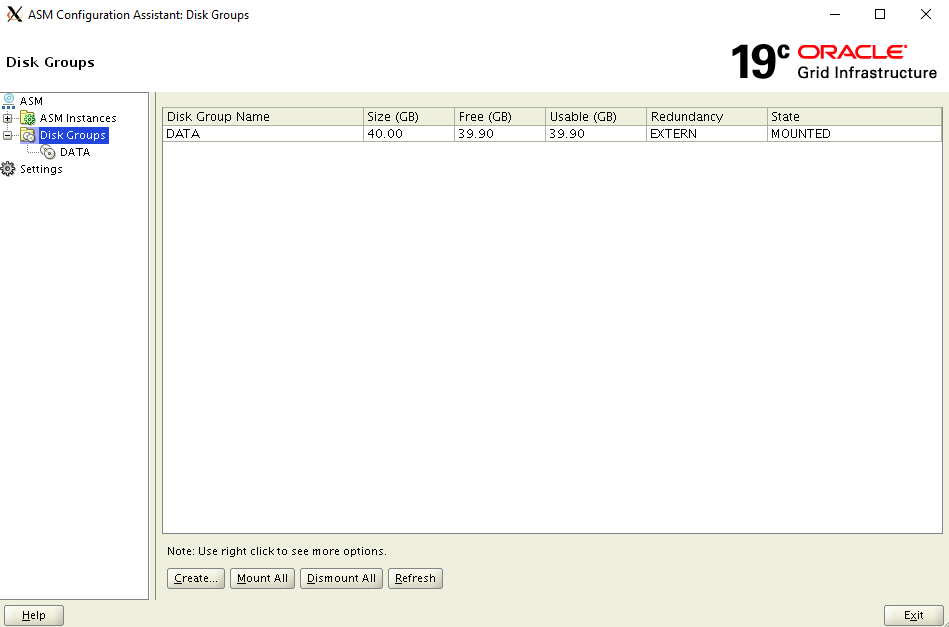 ASM 組態助理的螢幕快照。
在 [建立磁碟群組] 對話方塊中:
- 輸入磁碟組名 FRA
- 針對 [備援] 選項,選取 [外部] (無)
- 在 [選取成員磁碟] 下,選取 [/dev/oracleasm/disks/VOL2]
- 在 [配置單位大小] 底下,選取 [4]
- 選取 [ 確定 ] 以建立磁碟群組
- 選取 [確定 ] 以關閉確認視窗
 [建立磁碟群組] 對話框的螢幕快照。
選取 [結束] 以關閉 ASM Configuration Assistant。
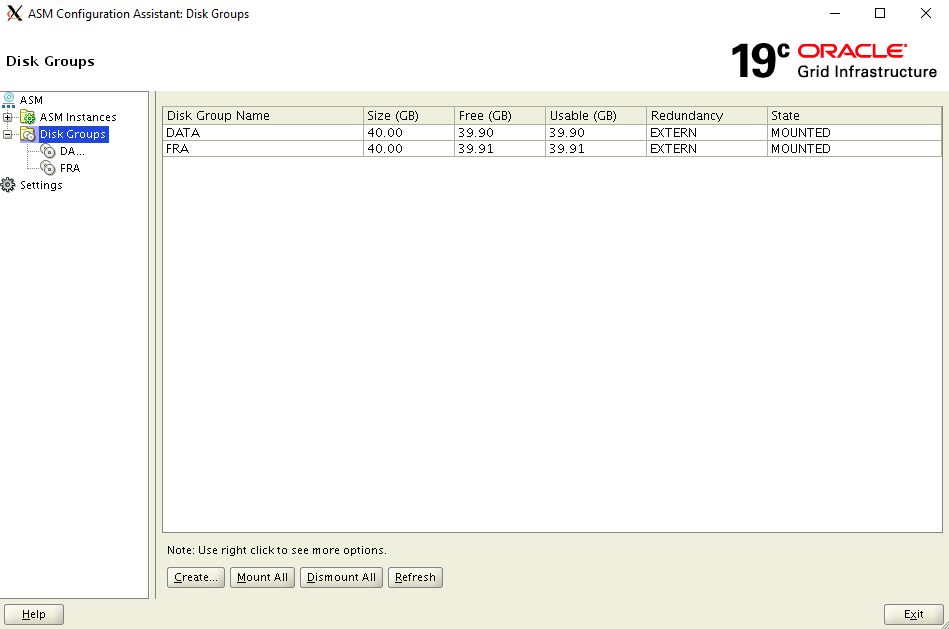 [設定 ASM: 磁碟群組] 對話框的螢幕快照,其中含有 [結束] 按鈕。
建立資料庫
Azure Marketplace 映像上已安裝 Oracle 資料庫軟體。 若要建立資料庫,請完成下列步驟:
確定內容已設定為 oracle 使用者。
- 執行下列命令以設定內容。 如果您已從上一個命令開啟殼層,可能不需要此步驟。
$ sudo su - oracle
$ export DISPLAY=10.0.0.4:0.0
執行 Database Configuration Assistant
$ cd /u01/app/oracle/product/19.0.0/dbhome_1/bin $ ./dbca在幾分鐘內,asmXServer VM 上隨即開啟 Database Configuration Assistant 視窗。
在 [ 資料庫作業] 頁面上,選取 [ 建立資料庫]。
 [資料庫作業] 頁面的螢幕快照。
在 [建立模式] 頁面上︰
- 確定 已選取 [一般設定 ]
- 輸入資料庫名稱:asmdb
- 針對 [記憶體類型],請確定已選取 [自動儲存管理] (ASM)
- 針對 [資料庫檔案位置],流覽並選取 [數據位置]
- 針對 [ 快速復原區域],流覽並選取 FRA 位置
- 輸入系統 管理密碼 並 確認密碼
- 確定 已選取 [建立為容器資料庫 ]
- 輸入 [插入式資料庫名稱] 值:pasmdb
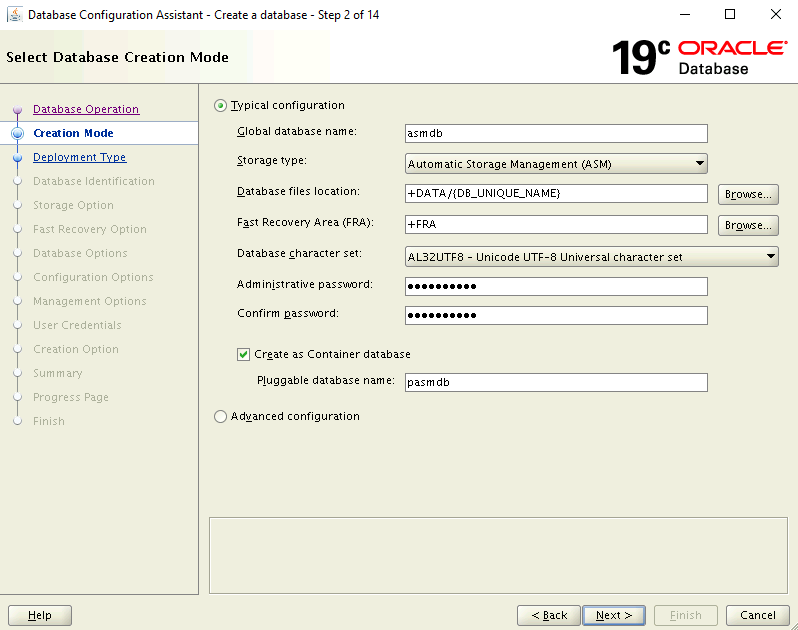 [資料庫建立] 頁面的螢幕快照。
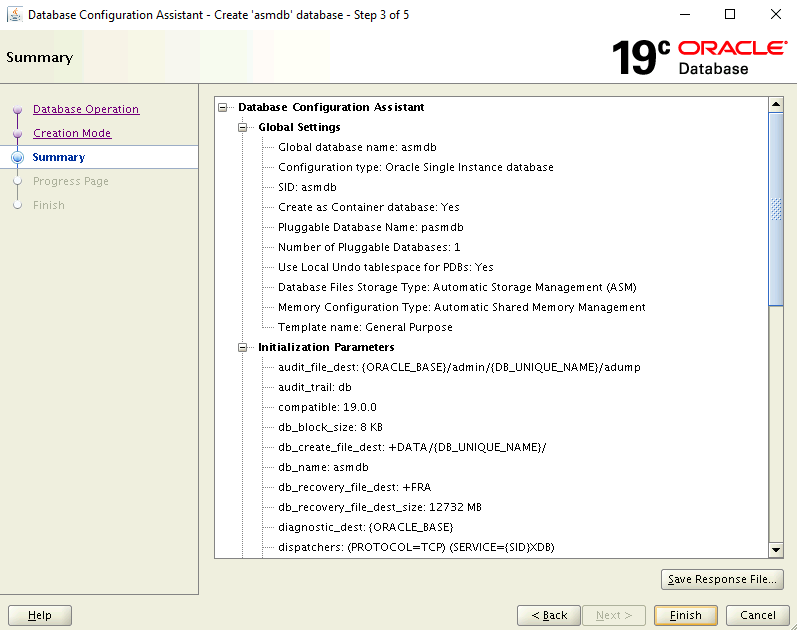
在 [ 摘要] 頁面上,檢閱您選擇的設定,然後選取 [ 完成 ] 以建立資料庫。 資料庫建立可能需要超過10分鐘的時間。
 [摘要] 頁面的螢幕擷取畫面。
現在已建立資料庫。 在 [ 完成] 頁面上,您可以選擇解除鎖定更多帳戶以使用此資料庫並變更密碼。 如果您想要這樣做,請選取 [密碼管理 ] -否則請選取 [ 關閉]。
刪除 asmXServer VM
asmXServer VM 僅在安裝期間使用。 您可以在完成此實驗室文件後安全刪除,但仍保持 Azure 實驗室設定上的 ASM 完整不變。
$ az vm delete --resource-group ASMOnAzureLab --name asmXServer --force-deletion yes

$ az network public-ip delete --resource-group ASMOnAzureLab --name asmXServerPublicIP
刪除 Azure 實驗室設定上的 ASM
您已成功從 Azure Marketplace 在 Oracle DB 映像上設定 Oracle 自動記憶體管理。 如果您不再需要此環境,則可以使用下列命令移除資源群組和所有相關資源:
$ az group delete --name ASMOnAzureLab
下一步
請檢閱建置 Oracle DB