在這個快速入門中,你使用 C# SDK for MCP 建立一個最小化的模型情境協定(MCP)伺服器,使用 GitHub Copilot 連接,然後發佈到 NuGet(僅限 stdio 傳輸)。 MCP 伺服器是透過模型內容通訊協定 (MCP) 向客戶端公開功能的服務。
備註
Microsoft.McpServer.ProjectTemplates範本套件目前還在預覽階段。
先決條件
- .NET 10.0 SDK
- Visual Studio Code (選用)
- C# 開發套件擴充功能
- 適用於 Visual Studio Code 的 GitHub Copilot 擴充功能
- NuGet.org 帳戶
- .NET 10.0 SDK
- Visual Studio Code (選用)
- Visual Studio (選用)
- GitHub Copilot / GitHub Copilot 擴充功能 用於 Visual Studio Code
- NuGet.org 帳戶
建立專案
在終端機視窗中,安裝 MCP 伺服器範本:
dotnet new install Microsoft.McpServer.ProjectTemplates備註
安裝
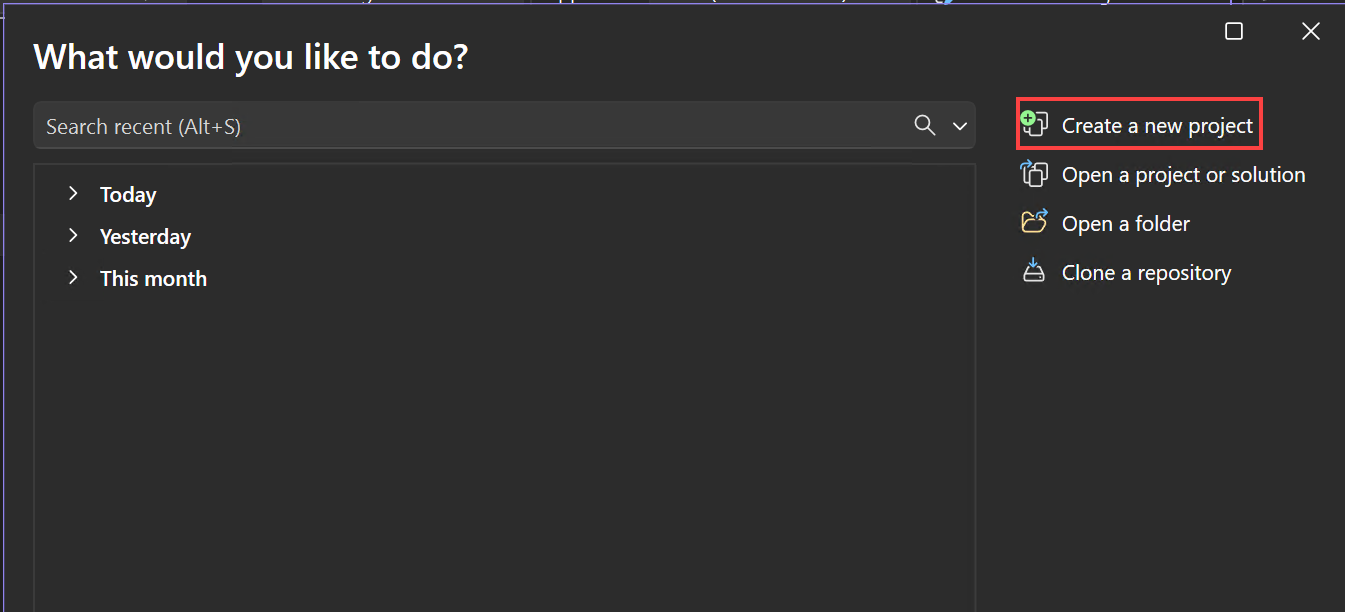
需要 .NET 10.0 SDK 或更新版本。 打開 Visual Studio,在開始視窗選擇 「建立新專案 」(或在 Visual Studio 內選擇 「檔案>新>專案/解決方案 」)。
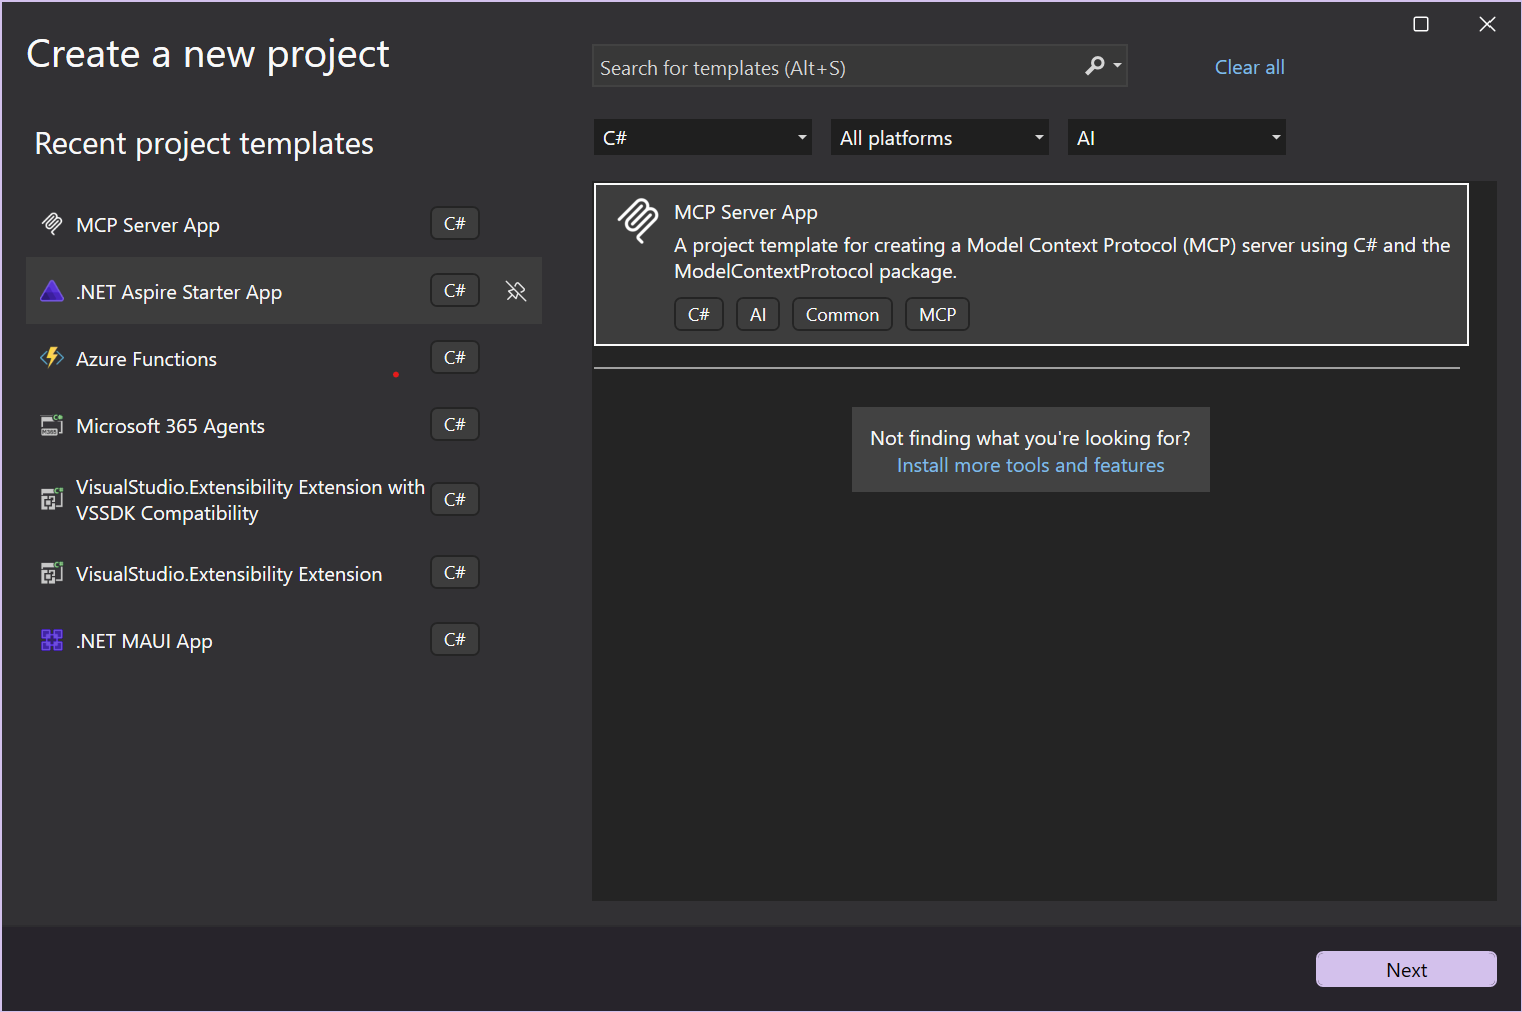
在「建立新專案」視窗中,從語言清單中選擇 C#,從「所有專案類型」列表中選擇 AI。 套用語言和專案類型篩選後,選擇 MCP Server 應用程式 範本,然後選擇 下一步。
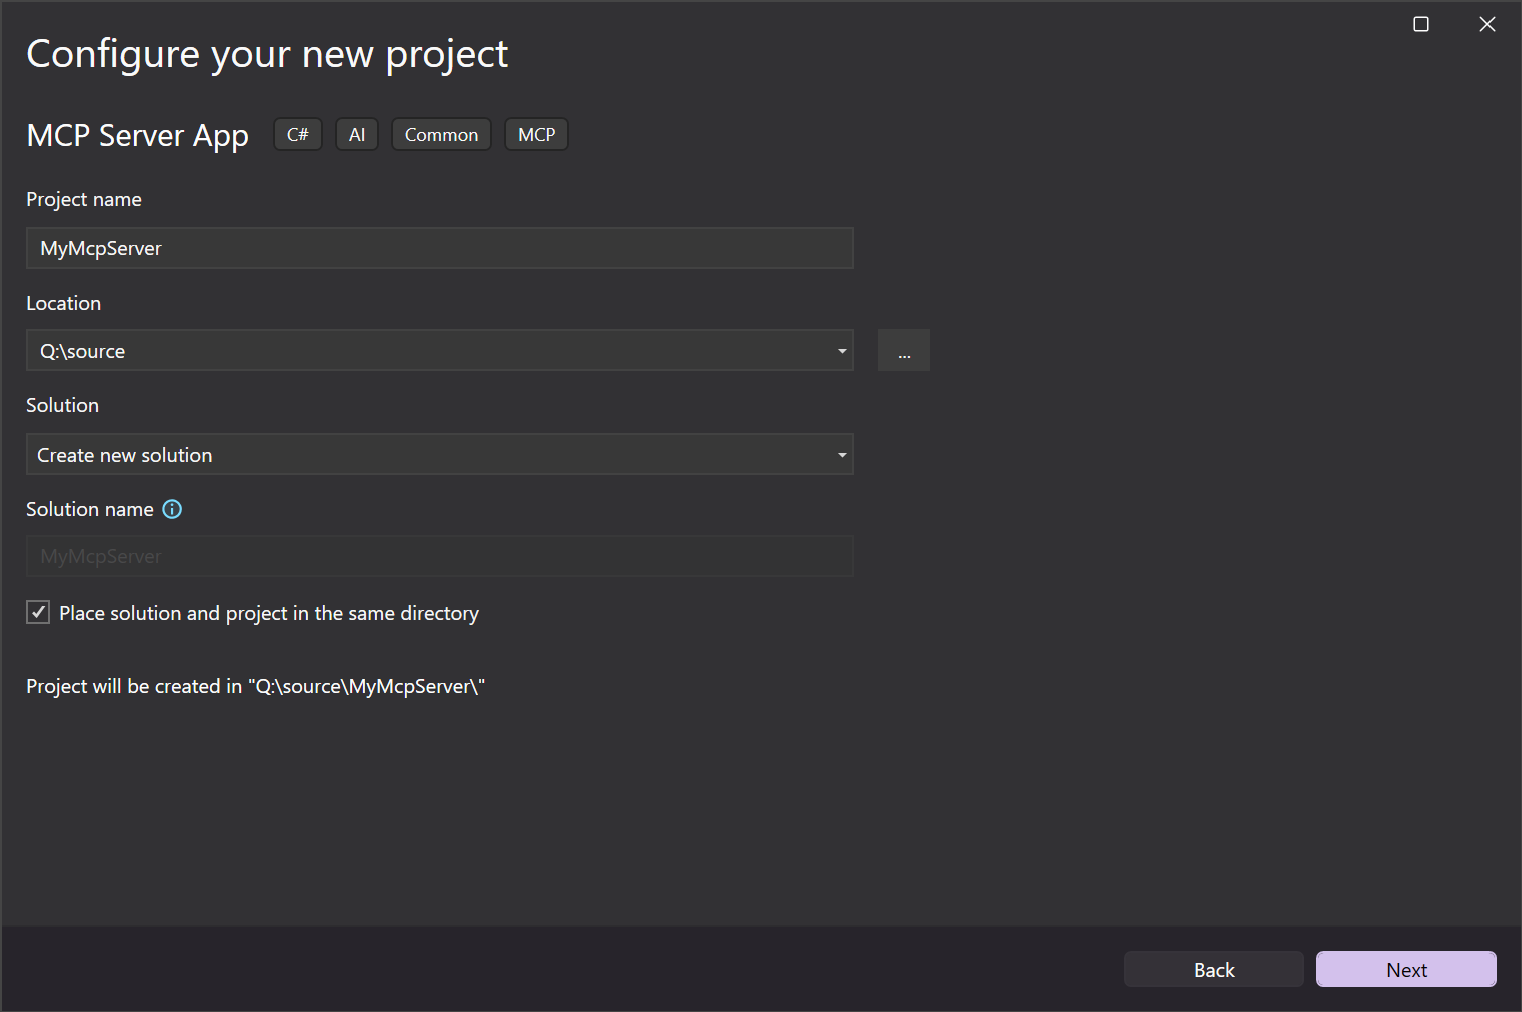
在「配置您的新專案」視窗中,請在專案名稱欄位輸入 MyMcpServer。 然後選取下一步。
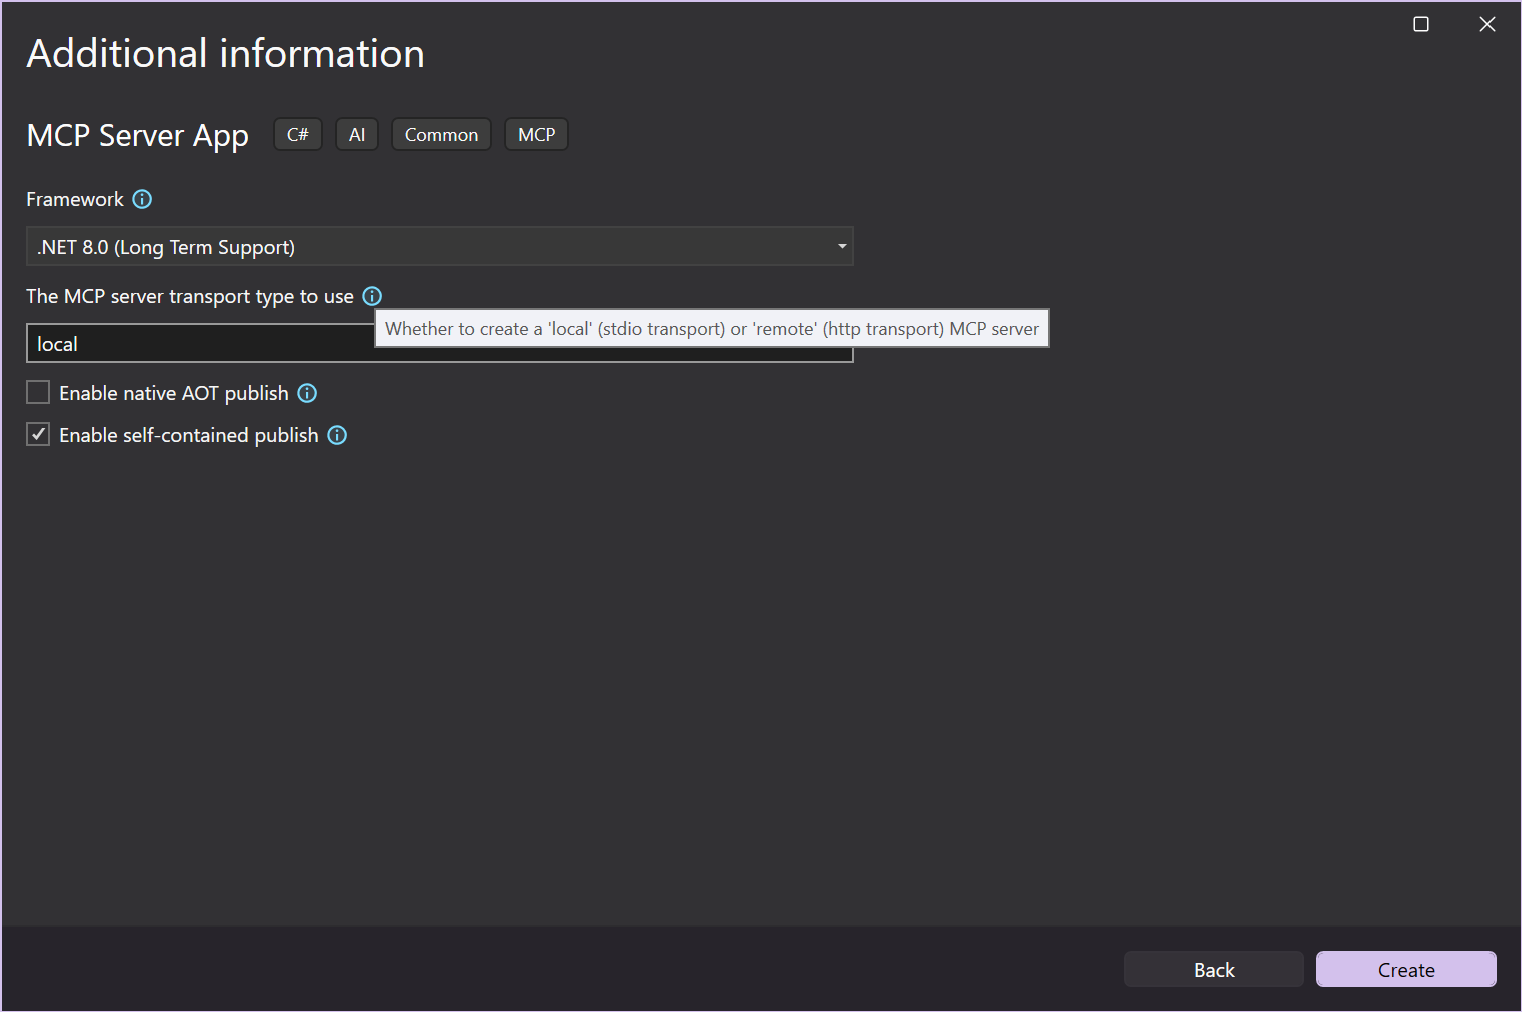
在 「附加資訊 」視窗中,您可以設定以下選項:
- 框架:選擇目標的 .NET 框架。
- MCP 伺服器傳輸類型:選擇建立 本地 (stdio)或 遠端 (http)MCP 伺服器。
- 啟用原生 AOT(Ahead-Of-Time)發佈:啟用 MCP 伺服器自包含並編譯成原生程式碼。 欲了解更多資訊,請參閱 Native AOT 部署指南。
- 啟用自包含發佈:啟用你的 MCP 伺服器作為自包含的可執行檔發佈。 欲了解更多資訊,請參閱 .NET 應用程式發佈指南中的自包含部署章節。
選擇你偏好的選項,或保留預設選項,然後選擇 「建立」。
Visual Studio 會開啟您的新專案。
將
<PackageId>更新為在 NuGet.org 上唯一的,例如位於.csproj檔案中的<NuGet.org username>.SampleMcpServer。
在終端機視窗中,安裝 MCP 伺服器範本:
dotnet new install Microsoft.McpServer.ProjectTemplates備註
要安裝
Microsoft.McpServer.ProjectTemplates,需要 .NET 10.0 SDK 或更新版本。開啟 Visual Studio Code。
到 檔案總管 檢視,選擇 建立 .NET 專案。 或者,你也可以用 Ctrl+Shift+P (MacOS上的 Command+Shift+P )開啟指令面板,然後輸入「.NET」來找到並選擇 .NET: New Project 指令。
此操作會彈出一個 .NET 專案的下拉選單。
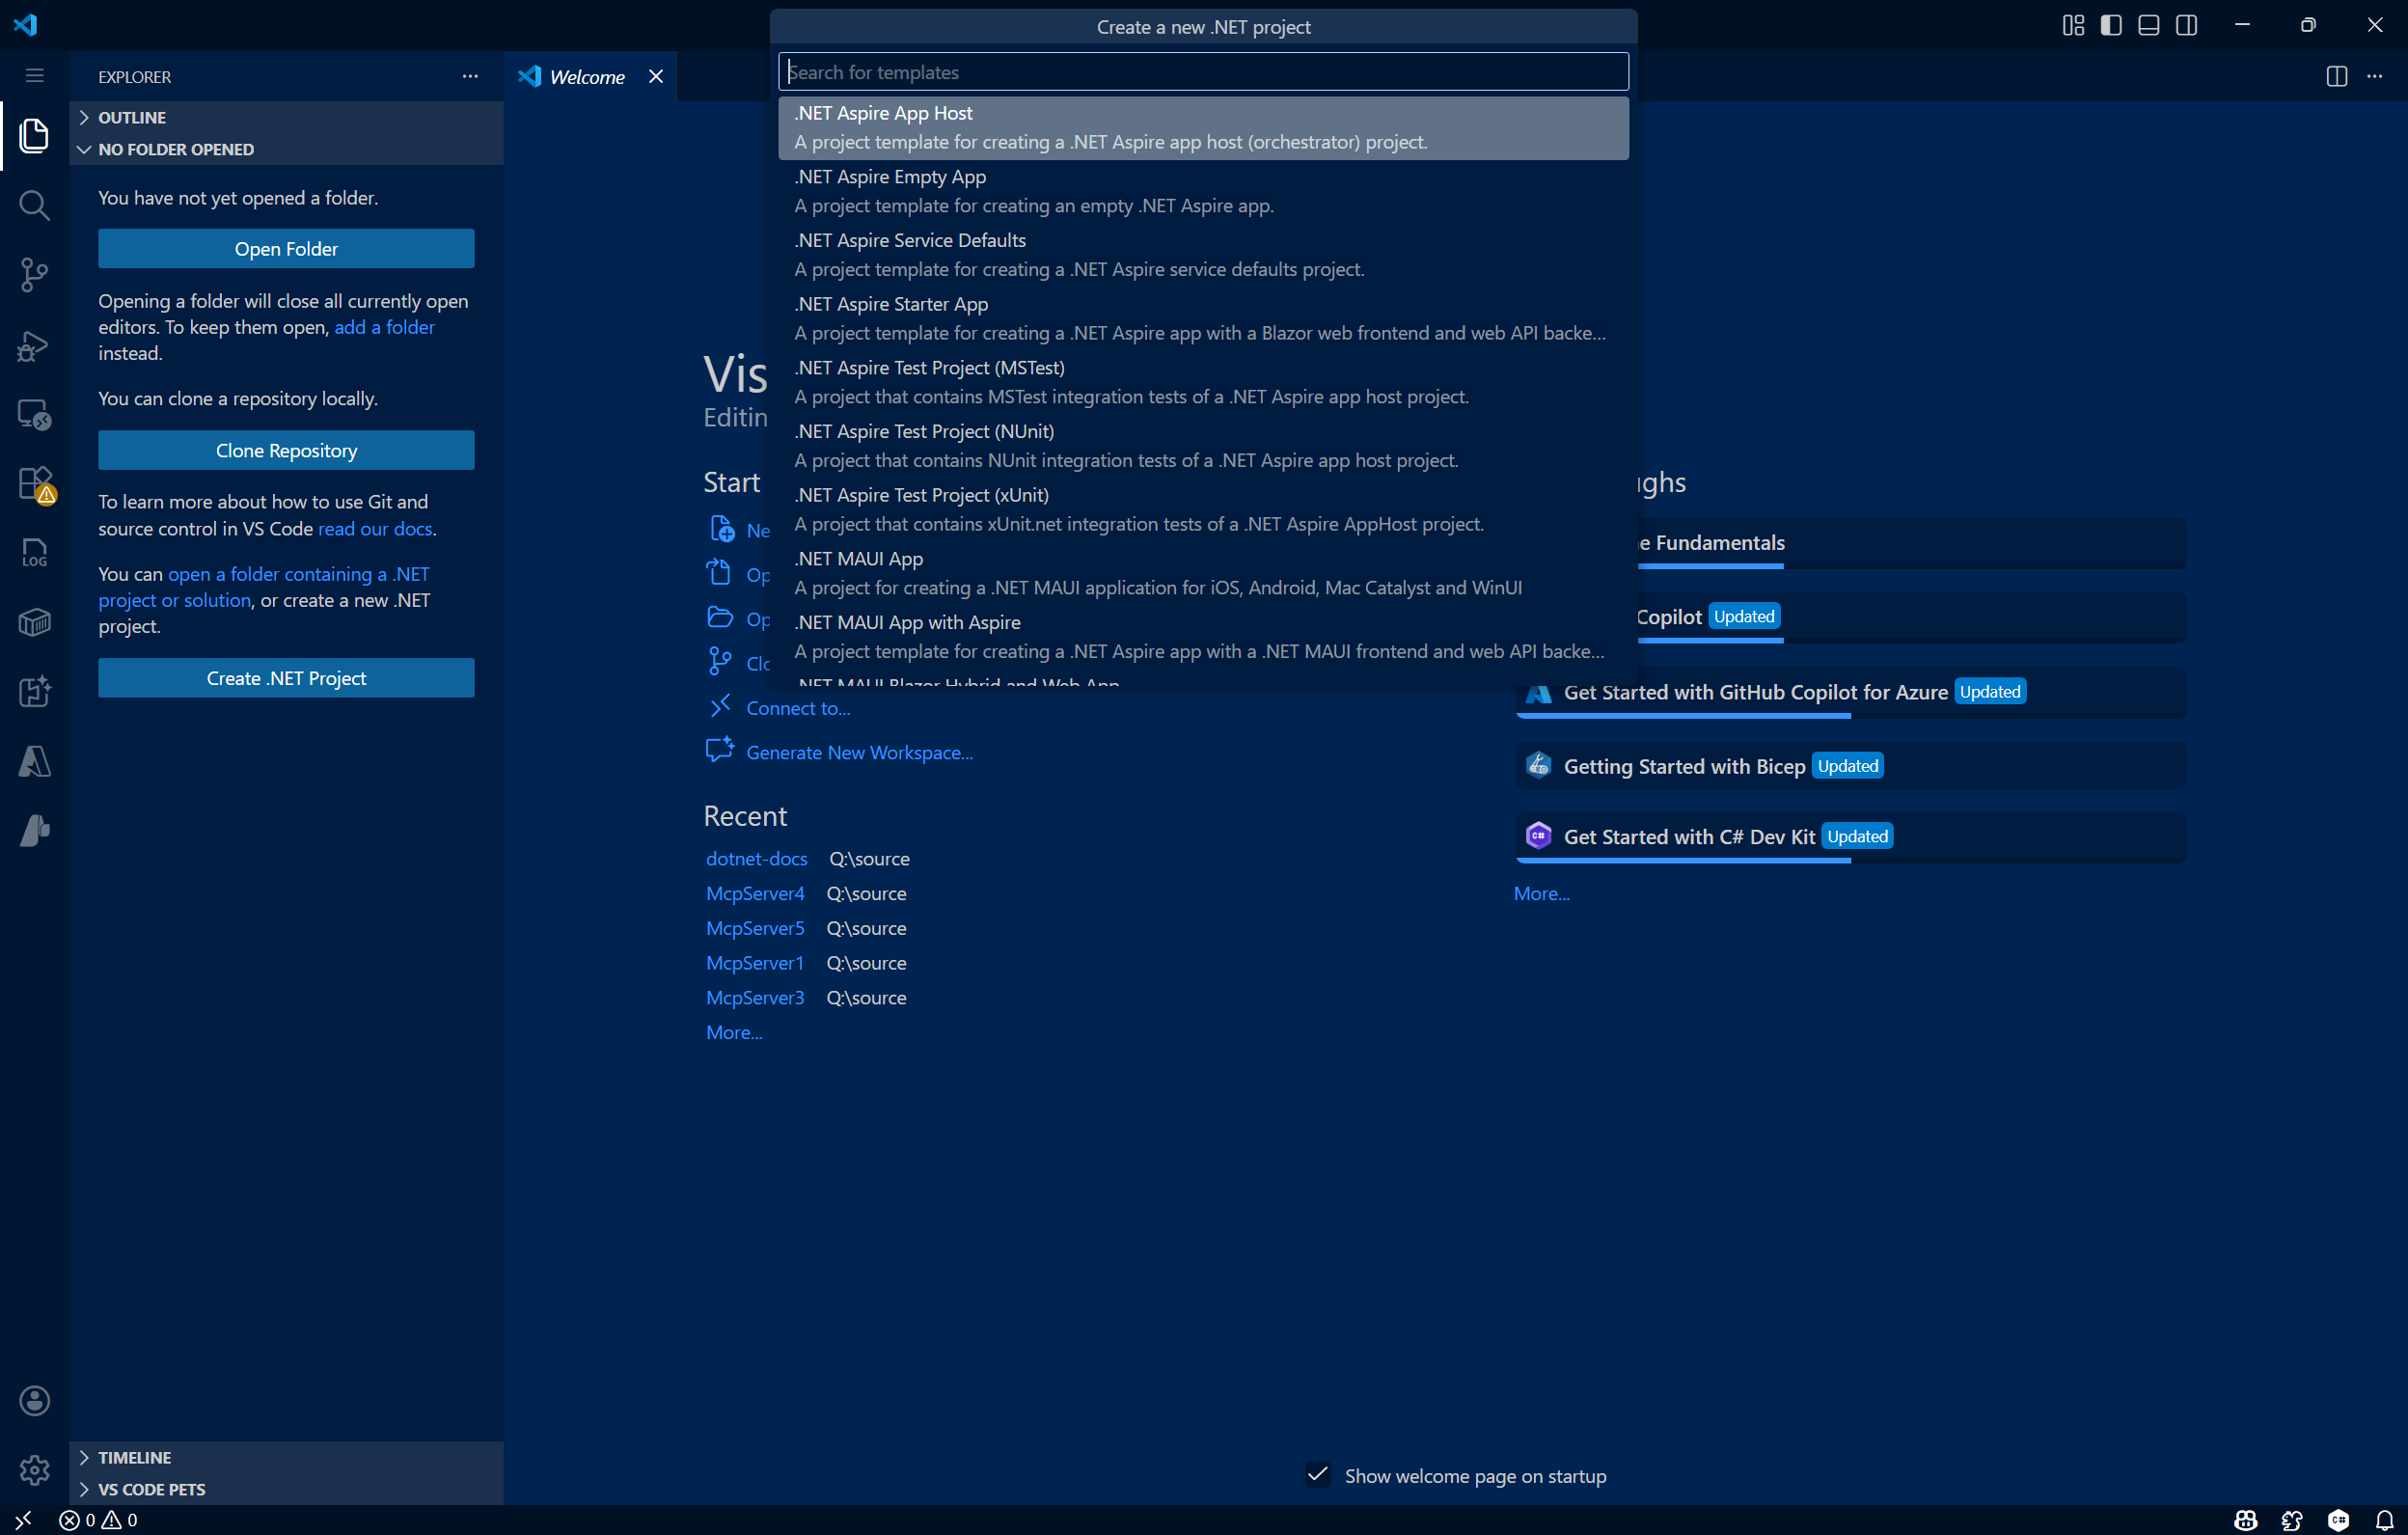
選擇指令後,使用指令面板中的搜尋列或向下捲動找到 MCP Server 應用程式 範本。

選擇你希望建立新專案的位置。
給你的新專案取個名字,叫做 MyMCPServer。 按 Enter 鍵。

選擇你的解決方案檔案格式(
.sln或.slnx)。選擇 範本選項。 在這裡,你可以設定以下選項:
- 框架:選擇目標的 .NET 框架。
- MCP 伺服器傳輸類型:選擇建立 本地 (stdio)或 遠端 (http)MCP 伺服器。
- 啟用原生 AOT(Ahead-Of-Time)發佈:啟用 MCP 伺服器自包含並編譯成原生程式碼。 欲了解更多資訊,請參閱 Native AOT 部署指南。
- 啟用自包含發佈:啟用你的 MCP 伺服器作為自包含的可執行檔發佈。 欲了解更多資訊,請參閱 .NET 應用程式發佈指南中的自包含部署章節。
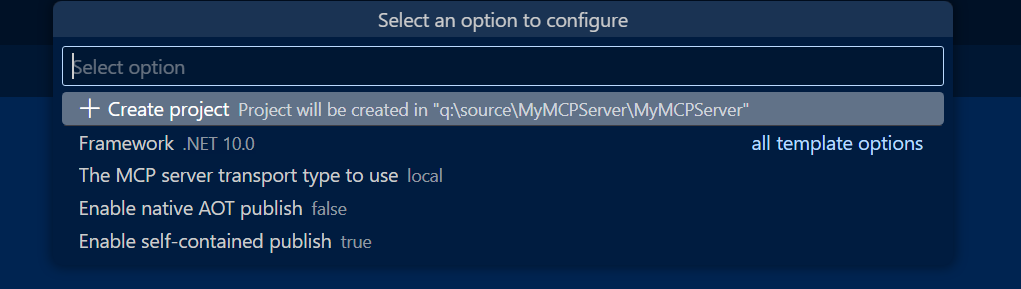
選擇你偏好的選項,或保留預設選項,然後選擇 建立專案。
VS Code 會開啟你的新專案。
將
<PackageId>更新為在 NuGet.org 上唯一的,例如位於.csproj檔案中的<NuGet.org username>.SampleMcpServer。
使用
dotnet new mcpserver指令建立新的 MCP 伺服器應用程式:dotnet new mcpserver -n SampleMcpServer根據預設,此命令會建立獨立的工具套件,以支援 .NET 的所有最常見平臺為目標。 若要查看更多選項,請使用
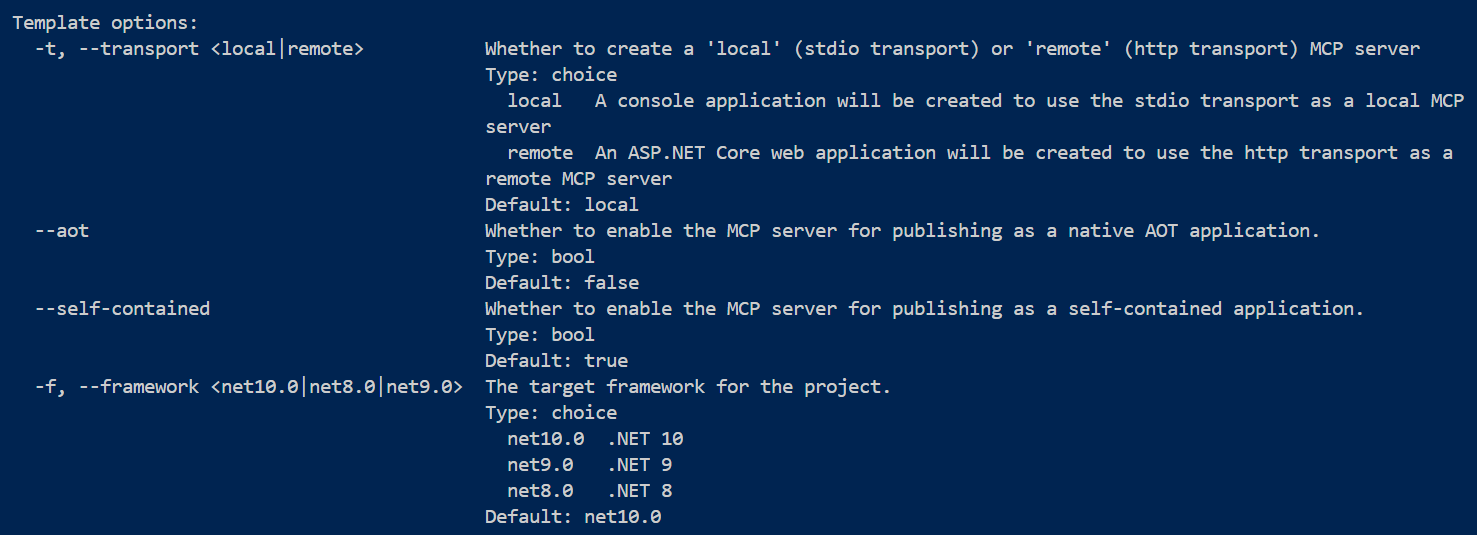
dotnet new mcpserver --help。使用這個
dotnet new mcpserver --help指令時,你可以在建立新 MCP 伺服器時新增幾個範本選項:- 框架:選擇目標的 .NET 框架。
- MCP 伺服器傳輸類型:選擇建立 本地 (stdio)或 遠端 (http)MCP 伺服器。
- 啟用原生 AOT(Ahead-Of-Time)發佈:啟用 MCP 伺服器自包含並編譯成原生程式碼。 欲了解更多資訊,請參閱 Native AOT 部署指南。
- 啟用自包含發佈:啟用你的 MCP 伺服器作為自包含的可執行檔發佈。 欲了解更多資訊,請參閱 .NET 應用程式發佈指南中的自包含部署章節。
瀏覽至
SampleMcpServer目錄:cd SampleMcpServer建置專案:
dotnet build將
<PackageId>更新為在 NuGet.org 上唯一的,例如位於.csproj檔案中的<NuGet.org username>.SampleMcpServer。
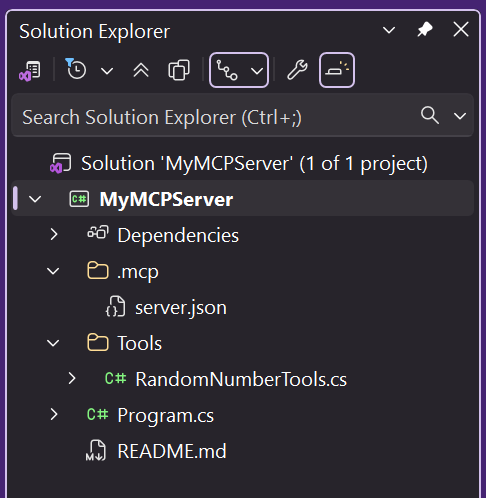
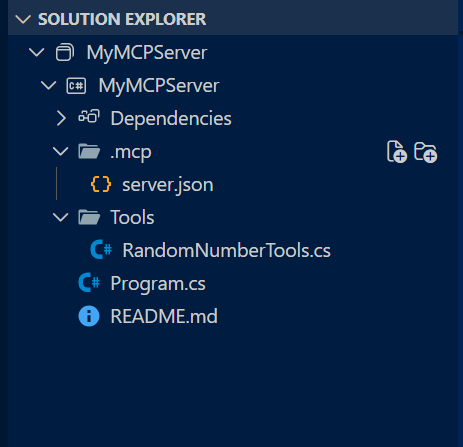
參觀MCP伺服器專案
透過範本建立 MCP 伺服器專案,會獲得以下主要檔案:
-
Program.cs: 一個定義應用程式為 MCP 伺服器並登錄 MCP 服務(如傳輸類型與 MCP 工具)的檔案。- 在創建專案時選擇(預設的)stdio 傳輸選項,這個檔案將會被設定以定義 MCP 伺服器為本地的(即
.withStdioServerTransport())。 - 選擇 http 傳輸選項後,將將此檔案設定為包含遠端傳輸專用定義(即
.withHttpServerTransport(),MapMcp(), )。
- 在創建專案時選擇(預設的)stdio 傳輸選項,這個檔案將會被設定以定義 MCP 伺服器為本地的(即
-
RandomNumberTools.cs: 一個定義範例 MCP 伺服器工具的類別,該工具會在使用者指定的最小值/最大值之間回傳一個隨機數。 -
[僅 HTTP 傳輸]
[MCPServerName].http:定義 HTTP MCP 伺服器預設主機位址及 JSON-RPC 通訊的檔案。 -
server.json: 一個檔案,用於定義如何以及在哪裡發佈 MCP 伺服器。
配置 MCP 伺服器
將 GitHub Copilot 配置為 Visual Studio 使用你自訂的 MCP 伺服器。
在 Visual Studio 中,選擇右上角的 GitHub Copilot 圖示,並選擇 開啟聊天視窗。
在 GitHub Copilot 聊天視窗中,點選「 選擇工具 」扳手圖示,接著點擊右上角的加號圖示。

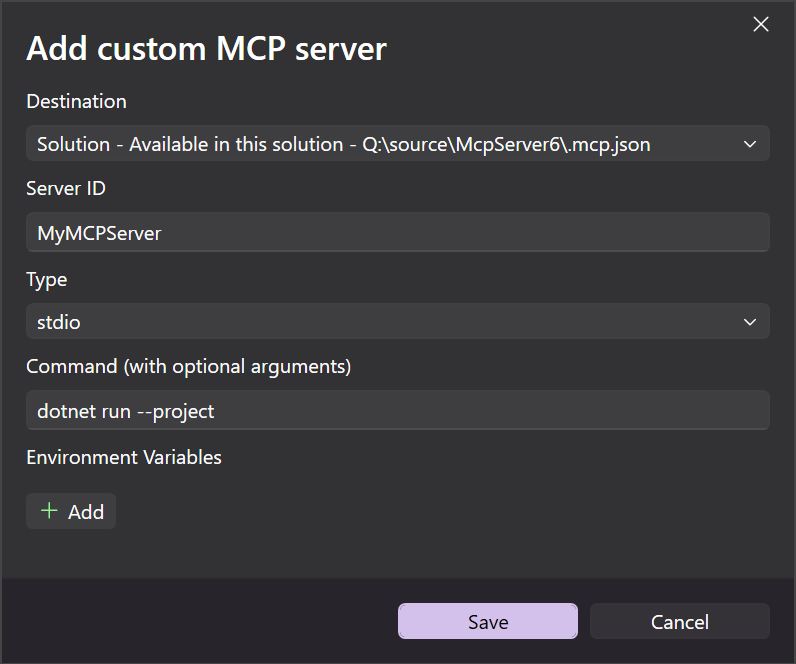
在 「新增自訂 MCP 伺服器 」對話視窗中,請輸入以下資訊:
-
目的地:選擇 MCP 伺服器的配置範圍:
- 解決方案 - MCP 伺服器僅在活動解決方案中可用。
- Global - MCP 伺服器在所有解決方案中皆可使用。
- 伺服器 ID:你 MCP 伺服器的唯一名稱/識別碼。
- 類型:你 MCP 伺服器的傳輸類型(stdio 或 HTTP)。
-
命令(僅限 Stdio 傳輸):執行 Stdio MCP 伺服器的命令(即
dotnet run --project [relative path to .csproj file]) - URL(僅限 HTTP 傳輸):您的 HTTP MCP 伺服器地址
- 環境變數(可選)
-
目的地:選擇 MCP 伺服器的配置範圍:
選取 [儲存]。
.mcp.json檔案會被加入指定的目的地。
Stdio傳輸 .mcp.json
在「args」欄位下,將檔案的 .csproj 相對路徑加入。
{
  "inputs": [],
  "servers": {
    "MyMcpServer": {
      "type": "stdio",
      "command": "dotnet",
      "args": [
        "run",
        "--project",
        "<relative-path-to-project-file>"
      ]
    }
  }
}
HTTP 傳輸 .mcp.json
{
 "inputs": [],
  "servers": {
    "MyMCPServer": {
      "url": "http://localhost:6278",
      "type": "http",
      "headers": {}
    }
  }
}
將 GitHub Copilot for Visual Studio Code 設定為使用你自訂的 MCP 伺服器,無論是透過 VS Code 指令面板或手動。
命令面板配置
使用 Ctrl+Shift+P (macOS 為 Command+Shift+P )開啟指令面板。 搜尋「mcp」即可找到指令。
MCP: Add Server選擇要新增的 MCP 伺服器類型(通常是你在專案建立時選擇的傳輸類型)。

若新增 標準 MCP 伺服器,請輸入指令及可選參數。 此例中,使用
dotnet run --project。若新增 HTTP MCP 伺服器,請輸入 localhost 或網頁位址。
輸入一個獨特的伺服器 ID(例如:「MyMCPServer」)。
選擇配置目標:
全球:讓 MCP 伺服器在所有工作空間中都能使用。 產生
mcp.json的檔案會出現在您的全域使用者設定中。工作區:讓 MCP 伺服器只能從目前工作區內使用。 產生的
mcp.json檔案會出現在你的工作區中,位於.vscode資料夾下方。

完成前幾步後,會在設定目標指定的位置建立一個
.mcp.json檔案。
Stdio Transportmcp.json
在「args」欄位下,將檔案的 .csproj 相對路徑加入。
{
  "servers": {
    "MyMcpServer": {
      "type": "stdio",
      "command": "dotnet",
      "args": [
        "run",
        "--project",
        "<relative-path-to-project-file>"
      ]
    }
  }
}
HTTP 傳輸 mcp.json
{
  "servers": {
    "MyMCPServer": {
      "url": "http://localhost:6278",
      "type": "http"
    }
  },
  "inputs": []
}
手動設定
在
.vscode專案的根目錄建立資料夾。在
mcp.json資料夾中新增一個.vscode檔案,包含以下內容:{ "servers": { "SampleMcpServer": { "type": "stdio", "command": "dotnet", "args": [ "run", "--project", "<relative-path-to-project-file>" ] } } }備註
VS Code 會從工作區根目錄執行 MCP 伺服器。 預留位置
<relative-path-to-project-file>應指向您的 .NET 專案檔案。 例如,此 SampleMcpServer 應用程式的值會是SampleMcpServer.csproj。儲存檔案。
測試 MCP 伺服器
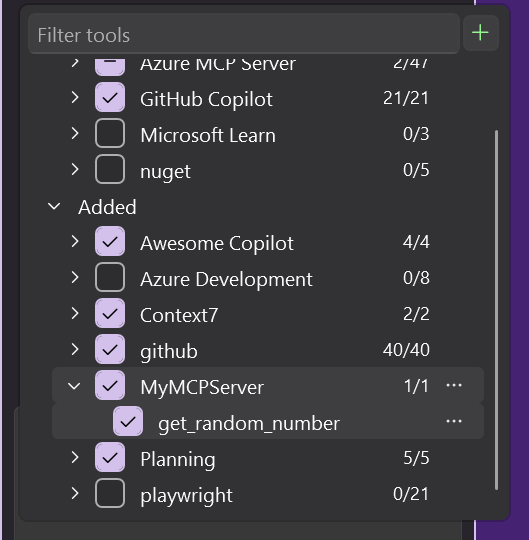
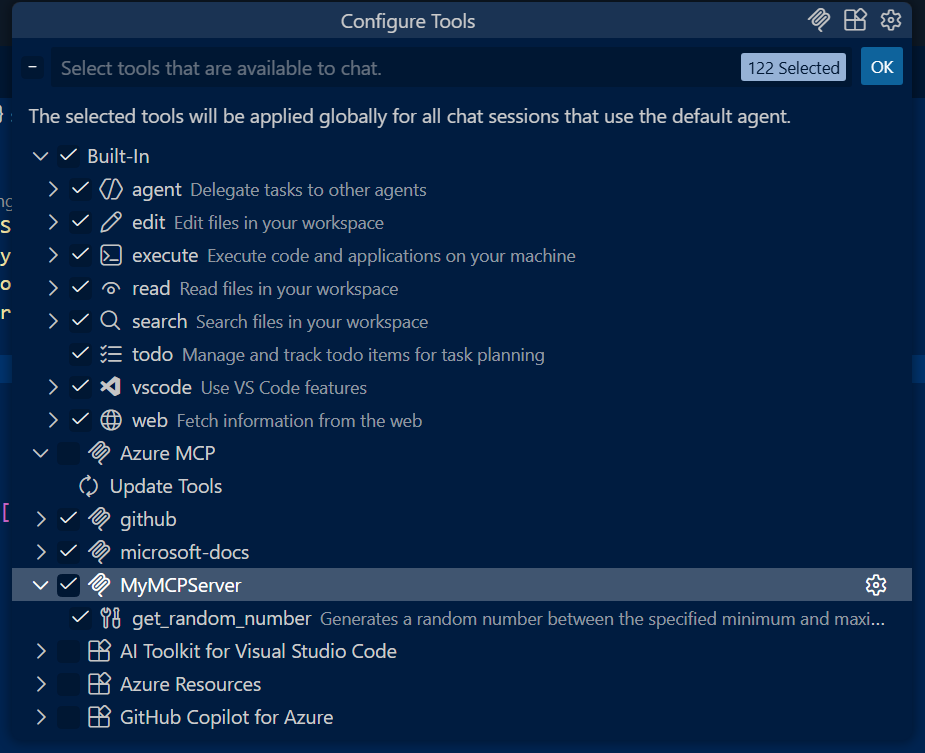
MCP 伺服器範本包含一個稱為 get_random_number 的工具,可用來進行測試,並作為開發的起點。
在 Visual Studio 開啟 GitHub Copilot 聊天,並切換到 Agent 模式。
選擇 「選擇工具 」圖示以確認您的 MyMCPServer 是否已與所列範例工具一起使用。
輸入提示以執行 get_random_number 工具:
Give me a random number between 1 and 100.GitHub Copilot 會要求許可權,以執行提示 get_random_number 工具。 選取 [繼續 ] 或使用箭號來選取更特定的行為:
- 目前的會話 一律會在目前的 GitHub Copilot 代理程式模式會話中執行作業。
- 目前的解決方案 總是執行目前 VS 解決方案的指令。
- Always allow 會將操作設置為在任何 GitHub Copilot 代理模式會話中自動運行。
確認伺服器是否回應了一個隨機數字。
Your random number is 42.
MCP 伺服器範本包含一個稱為 get_random_number 的工具,可用來進行測試,並作為開發的起點。
用 VS Code 開啟 GitHub Copilot 聊天,切換到 Agent 模式。
選擇 「選擇工具 」圖示以確認您的 MyMCPServer 是否已與所列範例工具一起使用。
輸入提示以執行 get_random_number 工具:
Give me a random number between 1 and 100.GitHub Copilot 會要求許可權,以執行提示 get_random_number 工具。 選取 [繼續 ] 或使用箭號來選取更特定的行為:
- 目前的會話 一律會在目前的 GitHub Copilot 代理程式模式會話中執行作業。
- 目前的工作區 總是執行當前 VS Code 工作區的指令。
- Always allow 會將操作設定為可在任何 GitHub Copilot Agent 模式會話內持續運行。
確認伺服器是否回應了一個隨機數字。
Your random number is 42.
新增輸入和組態選項
在此範例中,您會增強 MCP 伺服器,以使用環境變數中設定的組態值。 這可能是 MCP 伺服器運作所需的設定,例如 API 金鑰、要連線的端點,或本機目錄路徑。
在
GetRandomNumber中的Tools/RandomNumberTools.cs方法之後,新增另一個工具方法。 更新工具程式代碼以使用環境變數。[McpServerTool] [Description("Describes random weather in the provided city.")] public string GetCityWeather( [Description("Name of the city to return weather for")] string city) { // Read the environment variable during tool execution. // Alternatively, this could be read during startup and passed via IOptions dependency injection var weather = Environment.GetEnvironmentVariable("WEATHER_CHOICES"); if (string.IsNullOrWhiteSpace(weather)) { weather = "balmy,rainy,stormy"; } var weatherChoices = weather.Split(","); var selectedWeatherIndex = Random.Shared.Next(0, weatherChoices.Length); return $"The weather in {city} is {weatherChoices[selectedWeatherIndex]}."; }更新
.vscode/mcp.json以設定要測試的WEATHER_CHOICES環境變數。{ "servers": { "SampleMcpServer": { "type": "stdio", "command": "dotnet", "args": [ "run", "--project", "<relative-path-to-project-file>" ], "env": { "WEATHER_CHOICES": "sunny,humid,freezing" } } } }在 VS Code 中使用 Copilot 嘗試另一個提示,例如:
What is the weather in Redmond, Washington?VS Code 應該會傳回隨機天氣描述。
將
.mcp/server.json更新為宣告您的環境變數輸入。 檔案server.json架構是由 MCP登錄專案 所定義,並由 NuGet.org 用來產生 VS Code MCP 組態。environmentVariables使用 屬性來宣告應用程式所使用的環境變數,這些環境變數將由用戶端使用 MCP 伺服器設定(例如 VS Code)。packageArguments使用屬性來定義將傳遞至應用程式的 CLI 自變數。 如需更多範例,請參閱 MCP登錄專案。
{
  "$schema": "https://static.modelcontextprotocol.io/schemas/2025-10-17/server.schema.json",
  "description": "<your description here>",
  "name": "io.github.<your GitHub username here>/<your repo name>",
  "version": "<your package version here>",
  "packages": [
    {
      "registryType": "nuget",
      "registryBaseUrl": "https://api.nuget.org",
      "identifier": "<your package ID here>",
      "version": "<your package version here>",
      "transport": {
        "type": "stdio"
      },
      "packageArguments": [],
      "environmentVariables": [
        {
          "name": "WEATHER_CHOICES",
          "value": "{weather_choices}",
          "variables": {
            "weather_choices": {
              "description": "Comma separated list of weather descriptions to randomly select.",
              "isRequired": true,
              "isSecret": false
            }
          }
        }
      ]
    }
  ],
  "repository": {
    "url": "https://github.com/<your GitHub username here>/<your repo name>",
    "source": "github"
  }
}
NuGet.org 在
server.json中唯一使用的資訊是第一個packages陣列專案,其registryType值符合nuget。 除了packages屬性之外,其他最上層屬性目前未使用,並且會用於即將推出的中央 MCP 登錄。 您可以保留佔位值,直到 MCP 註冊表上線並準備好接受 MCP 伺服器項目為止。
您可以 再次測試 MCP 伺服器 ,再繼續進行。
封裝併發佈至 NuGet
封裝專案:
dotnet pack -c Release此指令會根據 中的
<RuntimeIdentifiers>清單產生SampleMcpServer.csproj一個工具套件和數個平台特定套件。將套件發佈至 NuGet:
dotnet nuget push bin/Release/*.nupkg --api-key <your-api-key> --source https://api.nuget.org/v3/index.json請務必發佈所有
.nupkg檔案,以確保每個支援的平台都可以執行 MCP 伺服器。如果您想要在發佈至 NuGet.org 之前先測試發佈流程,您可以在 NuGet 資源庫整合環境中註冊帳戶: https://int.nugettest.org。命令
push會修改為:dotnet nuget push bin/Release/*.nupkg --api-key <your-api-key> --source https://apiint.nugettest.org/v3/index.json
如需詳細資訊,請參閱 發佈套件。
探索 NuGet.org 上的MCP伺服器
在 NuGet.org 上搜尋 MCP 伺服器套件(或如果您發佈至整合環境 ,int.nugettest.org ),然後從清單中選取它。

檢視套件詳細數據,並從 [MCP 伺服器] 索引標籤複製 JSON。

在
mcp.json資料夾中的.vscode檔案中,新增複製的 JSON,如下所示:{ "inputs": [ { "type": "promptString", "id": "weather_choices", "description": "Comma separated list of weather descriptions to randomly select.", "password": false } ], "servers": { "Contoso.SampleMcpServer": { "type": "stdio", "command": "dnx", "args": ["Contoso.SampleMcpServer@0.0.1-beta", "--yes"], "env": { "WEATHER_CHOICES": "${input:weather_choices}" } } } }如果您發佈至 NuGet 畫廊整合環境,則必須在
"--add-source", "https://apiint.nugettest.org/v3/index.json"陣列結尾新增"args"。儲存檔案。
在 GitHub Copilot 中,選取 [ 選取工具 ] 圖示,以確認 您的 SampleMcpServer 可供列出的工具使用。
輸入提示以執行新的 get_city_weather 工具:
What is the weather in Redmond?如果您已將輸入新增至 MCP 伺服器(例如
WEATHER_CHOICES),系統會提示您提供值。確認伺服器回應隨機天氣:
The weather in Redmond is balmy.
常見問題
找不到執行 SampleMcpServer 所需的命令「dnx」
如果 VS Code 在啟動 MCP 伺服器時顯示此錯誤,您需要安裝相容版本的 .NET SDK。

此 dnx 命令會隨附為 .NET SDK 的一部分,從第 10 版開始。
安裝 .NET 10 SDK 以解決此問題。
GitHub Copilot 不會使用您的工具 (會在不叫用您的工具的情況下提供答案)
一般來說,像 GitHub Copilot 的 AI 代理程式會由用戶端應用程式(例如 VS Code)告知其具備可用的工具。 某些工具,例如範例隨機數工具,可能無法由 AI 代理程式利用,因為它內建了類似的功能。
如果您的工具沒有被使用,請檢查以下項目:
- 確認您的工具出現在 VS Code 已啟用的工具清單中。 如需如何檢查此問題 ,請參閱測試 MCP 伺服器 中的螢幕快照。
- 請在您的指令中明確指出工具的名稱。 在 VS Code 中,您可以依名稱參考工具。 例如:
Using #get_random_weather, what is the weather in Redmond?。 - 確認您的 MCP 伺服器能夠啟動。 您可以按下 VS Code 使用者或工作區設定中 MCP 伺服器組態上方顯示的 [開始] 按鈕來檢查此情況。
