重要
本文說明如何建立範例專案。 如果您已經有專案,您可以直接跳到程式碼涵蓋範圍工具一節。
單元測試有助於確保功能,並提供重構工作的驗證方法。 程式碼涵蓋範圍是由單元測試執行程式碼數量的度量,可以是行數、分支或方法。 例如,如果您有一個簡單的應用程式,其中只有兩個條件式程式碼分支 (分支 a和分支 b),則驗證條件式分支 a的單元測試會報告分支程式碼涵蓋範圍 50%。
本文討論使用 Coverlet 進行單元測試的程式碼涵蓋範圍,以及使用 ReportGenerator 產生報表。 雖然本文著重於 C# 和 xUnit 作為測試架構,但 MSTest 和 NUnit 也可以使用。 Coverlet 是 GitHub 上的開放原始碼專案,可為 C# 提供跨平台程式碼涵蓋範圍架構。 Coverlet 是 .NET Foundation 的一部分。 Coverlet 會收集 Cobertura 涵蓋範圍測試回合資料,用於產生報表。
此外,本文會詳細說明如何使用 Coverlet 測試回合收集的程式碼涵蓋範圍資訊來產生報告。 您可以使用 GitHub - ReportGenerator 上的另一個開放原始碼專案來產生報表。 ReportGenerator 會將 Cobertura 所產生的涵蓋範圍報表轉換成各種人類可讀取的報表格式。
本文以範例瀏覽器上提供的範例原始程式碼專案為基礎。
待測系統
「受測系統」是指您要撰寫單元測試的程式碼,這可能是物件、服務,或公開可測試功能的任何其他項目。 在本文中,您將建立一個類別庫,即受測系統,以及兩個對應的單元測試專案。
建立類別庫
從名為 UnitTestingCodeCoverage 的新目錄中的命令提示字元,使用 dotnet new classlib 命令建立新的 .NET 標準類別庫:
dotnet new classlib -n Numbers
下列程式碼片段會定義簡單的 PrimeService 類別,提供功能來檢查數位是否為質數。 複製下列程式碼片段,並取代在 Numbers 目錄中自動建立的 Class1.cs 檔案內容。 將 Class1.cs 檔案重新命名為 PrimeService.cs。
namespace System.Numbers
{
    public class PrimeService
    {
        public bool IsPrime(int candidate)
        {
            if (candidate < 2)
            {
                return false;
            }

            for (int divisor = 2; divisor <= Math.Sqrt(candidate); ++divisor)
            {
                if (candidate % divisor == 0)
                {
                    return false;
                }
            }
            return true;
        }
    }
}
提示
值得一提的是,Numbers 類別庫已刻意新增至 System 命名空間。 這允許可以在沒有 System.Math 命名空間宣告的情況下存取 using System;。 如需詳細資訊,請參閱命名空間 (C# 參考)。
建立測試專案
使用 命令,從相同的命令提示字元建立兩個新的 dotnet new xunit 範本:
dotnet new xunit -n XUnit.Coverlet.Collector
dotnet new xunit -n XUnit.Coverlet.MSBuild
這兩個新建立的 xUnit 測試專案都需要加入 Numbers 類別庫的專案參考。 如此一來,測試專案就能夠存取 PrimeService 進行測試。 從命令提示字元中使用 dotnet add 命令:
dotnet add XUnit.Coverlet.Collector\XUnit.Coverlet.Collector.csproj reference Numbers\Numbers.csproj
dotnet add XUnit.Coverlet.MSBuild\XUnit.Coverlet.MSBuild.csproj reference Numbers\Numbers.csproj
MSBuild 專案會適當地命名,因為將取決於 coverlet.msbuild NuGet 套件。 運行 dotnet package add 命令來新增此套件依賴性。 (如果您使用 .NET 9 或更早版本的 SDK 版本,請改用 dotnet add package 表單。
cd XUnit.Coverlet.MSBuild && dotnet package add coverlet.msbuild && cd ..
先前的命令有效地將目錄範圍限定為 MSBuild 測試專案,然後新增了 NuGet 套件。 完成該操作後,便改變目錄,上升一層。
開啟這兩個 UnitTest1.cs 檔案,並以下列程式碼片段取代其內容。 將 UnitTest1.cs 檔案重新命名為 PrimeServiceTests.cs。
using System.Numbers;
using Xunit;

namespace XUnit.Coverlet
{
    public class PrimeServiceTests
    {
        readonly PrimeService _primeService;

        public PrimeServiceTests() => _primeService = new PrimeService();

        [Theory]
        [InlineData(-1), InlineData(0), InlineData(1)]
        public void IsPrime_ValuesLessThan2_ReturnFalse(int value) =>
            Assert.False(_primeService.IsPrime(value), $"{value} shouldn't be prime");

        [Theory]
        [InlineData(2), InlineData(3), InlineData(5), InlineData(7)]
        public void IsPrime_PrimesLessThan10_ReturnTrue(int value) =>
            Assert.True(_primeService.IsPrime(value), $"{value} should be prime");

        [Theory]
        [InlineData(4), InlineData(6), InlineData(8), InlineData(9)]
        public void IsPrime_NonPrimesLessThan10_ReturnFalse(int value) =>
            Assert.False(_primeService.IsPrime(value), $"{value} shouldn't be prime");
    }
}
建立解決方案
從命令提示字元中,建立新的解決方案來封裝類別庫和兩個測試專案。 使用 dotnet sln 命令:
dotnet new sln -n XUnit.Coverage
這會在 XUnit.Coverage 目錄中建立新的解決方案檔名。 新增專案至方案根部。
dotnet sln XUnit.Coverage.sln add **/*.csproj --in-root
使用 dotnet build 命令建置解決方案:
dotnet build XUnit.Coverage.sln
如果建置成功,則您已建立三個專案、適當參考的專案和套件,並正確更新原始程式碼。 做得好!
程式碼覆蓋工具
程式碼涵蓋範圍工具有兩種類型:
- DataCollectors:DataCollectors 會監視測試執行,並收集測試回合的相關資訊。 它們會以 XML 和 JSON 等各種輸出格式報告收集到的資訊。 如需詳細資訊,請參閱您的第一個資料收集器。
- 報表產生器:使用從測試回合收集的資料來產生報表,通常是樣式的 HTML。
本節中將著重於資料收集器工具。
.NET 包含內建的程式碼涵蓋範圍資料收集器,它也可以在 Visual Studio 中使用。 此資料收集器會產生二進位 .coverage 檔案,其可用來在 Visual Studio 中產生報告。 二進位檔不是人類可讀的,而且必須先轉換成人類可讀的格式,才能用來在 Visual Studio 外部產生報表。
提示
dotnet-coverage 工具是一個跨平台工具,它可用來將二進位涵蓋範圍測試結果檔案轉換成人類可讀取的格式。 如需詳細資訊,請參閱 dotnet-coverage。
Coverlet 是一個內建收集器的開放原始碼替代方案。 它可將測試結果產生為人類可讀取的 Cobertura XML 檔案,然後它可用來產生 HTML 報告。 若要針對程式碼涵蓋範圍使用 Coverlet,現有的單元測試專案必須具有適當的套件相依性,或者依賴 .NET 全域工具和對應的 coverlet.console NuGet 套件。
與 .NET 測試整合
根據預設,xUnit 測試專案範本已與 coverlet.collector 整合。
從命令提示字元中,將目錄變更為 XUnit.Coverlet.Collector 專案,然後執行 dotnet test 命令:
cd XUnit.Coverlet.Collector && dotnet test --collect:"XPlat Code Coverage"
備註
"XPlat Code Coverage" 參數是一個友善名稱,對應至 Coverlet 中的資料收集器。 此名稱必要但不區分大小寫。 若要使用 .NET 的內建程式碼涵蓋範圍資料收集器,請使用 "Code Coverage"。
在執行過程中 dotnet test,產生的 coverage.cobertura.xml 檔案會輸出至 TestResults 目錄。 XML 檔案包含結果。 這是依賴 .NET CLI 的跨平臺選項,非常適合無法使用 MSBuild 的建置系統。
以下是範例 coverage.cobertura.xml 檔案。
<?xml version="1.0" encoding="utf-8"?>
<coverage line-rate="1" branch-rate="1" version="1.9" timestamp="1592248008"
          lines-covered="12" lines-valid="12" branches-covered="6" branches-valid="6">
  <sources>
    <source>C:\</source>
  </sources>
  <packages>
    <package name="Numbers" line-rate="1" branch-rate="1" complexity="6">
      <classes>
        <class name="Numbers.PrimeService" line-rate="1" branch-rate="1" complexity="6"
               filename="Numbers\PrimeService.cs">
          <methods>
            <method name="IsPrime" signature="(System.Int32)" line-rate="1"
                    branch-rate="1" complexity="6">
              <lines>
                <line number="8" hits="11" branch="False" />
                <line number="9" hits="11" branch="True" condition-coverage="100% (2/2)">
                  <conditions>
                    <condition number="7" type="jump" coverage="100%" />
                  </conditions>
                </line>
                <line number="10" hits="3" branch="False" />
                <line number="11" hits="3" branch="False" />
                <line number="14" hits="22" branch="True" condition-coverage="100% (2/2)">
                  <conditions>
                    <condition number="57" type="jump" coverage="100%" />
                  </conditions>
                </line>
                <line number="15" hits="7" branch="False" />
                <line number="16" hits="7" branch="True" condition-coverage="100% (2/2)">
                  <conditions>
                    <condition number="27" type="jump" coverage="100%" />
                  </conditions>
                </line>
                <line number="17" hits="4" branch="False" />
                <line number="18" hits="4" branch="False" />
                <line number="20" hits="3" branch="False" />
                <line number="21" hits="4" branch="False" />
                <line number="23" hits="11" branch="False" />
              </lines>
            </method>
          </methods>
          <lines>
            <line number="8" hits="11" branch="False" />
            <line number="9" hits="11" branch="True" condition-coverage="100% (2/2)">
              <conditions>
                <condition number="7" type="jump" coverage="100%" />
              </conditions>
            </line>
            <line number="10" hits="3" branch="False" />
            <line number="11" hits="3" branch="False" />
            <line number="14" hits="22" branch="True" condition-coverage="100% (2/2)">
              <conditions>
                <condition number="57" type="jump" coverage="100%" />
              </conditions>
            </line>
            <line number="15" hits="7" branch="False" />
            <line number="16" hits="7" branch="True" condition-coverage="100% (2/2)">
              <conditions>
                <condition number="27" type="jump" coverage="100%" />
              </conditions>
            </line>
            <line number="17" hits="4" branch="False" />
            <line number="18" hits="4" branch="False" />
            <line number="20" hits="3" branch="False" />
            <line number="21" hits="4" branch="False" />
            <line number="23" hits="11" branch="False" />
          </lines>
        </class>
      </classes>
    </package>
  </packages>
</coverage>
提示
或者,如果您的組建系統已經使用 MSBuild,您可以使用 MSBuild 套件。 從命令提示字元中,將目錄變更為 XUnit.Coverlet.MSBuild 專案,然後執行 dotnet test 命令:
dotnet test /p:CollectCoverage=true /p:CoverletOutputFormat=cobertura
產生的 coverage.cobertura.xml 檔案為輸出。 如需詳細資訊,請參閱 Coverlet 與 MSBuild 整合
產生報表
現在您可以從單元測試回合收集資料,您能使用 ReportGenerator 產生報表。 若要將 ReportGenerator NuGet 套件安裝為 .NET 全域工具,請使用 dotnet tool install 命令:
dotnet tool install -g dotnet-reportgenerator-globaltool
執行工具並提供所需的選項,使用來自先前測試運行的輸出檔案coverage.cobertura.xml。
reportgenerator
-reports:"Path\To\TestProject\TestResults\{guid}\coverage.cobertura.xml"
-targetdir:"coveragereport"
-reporttypes:Html
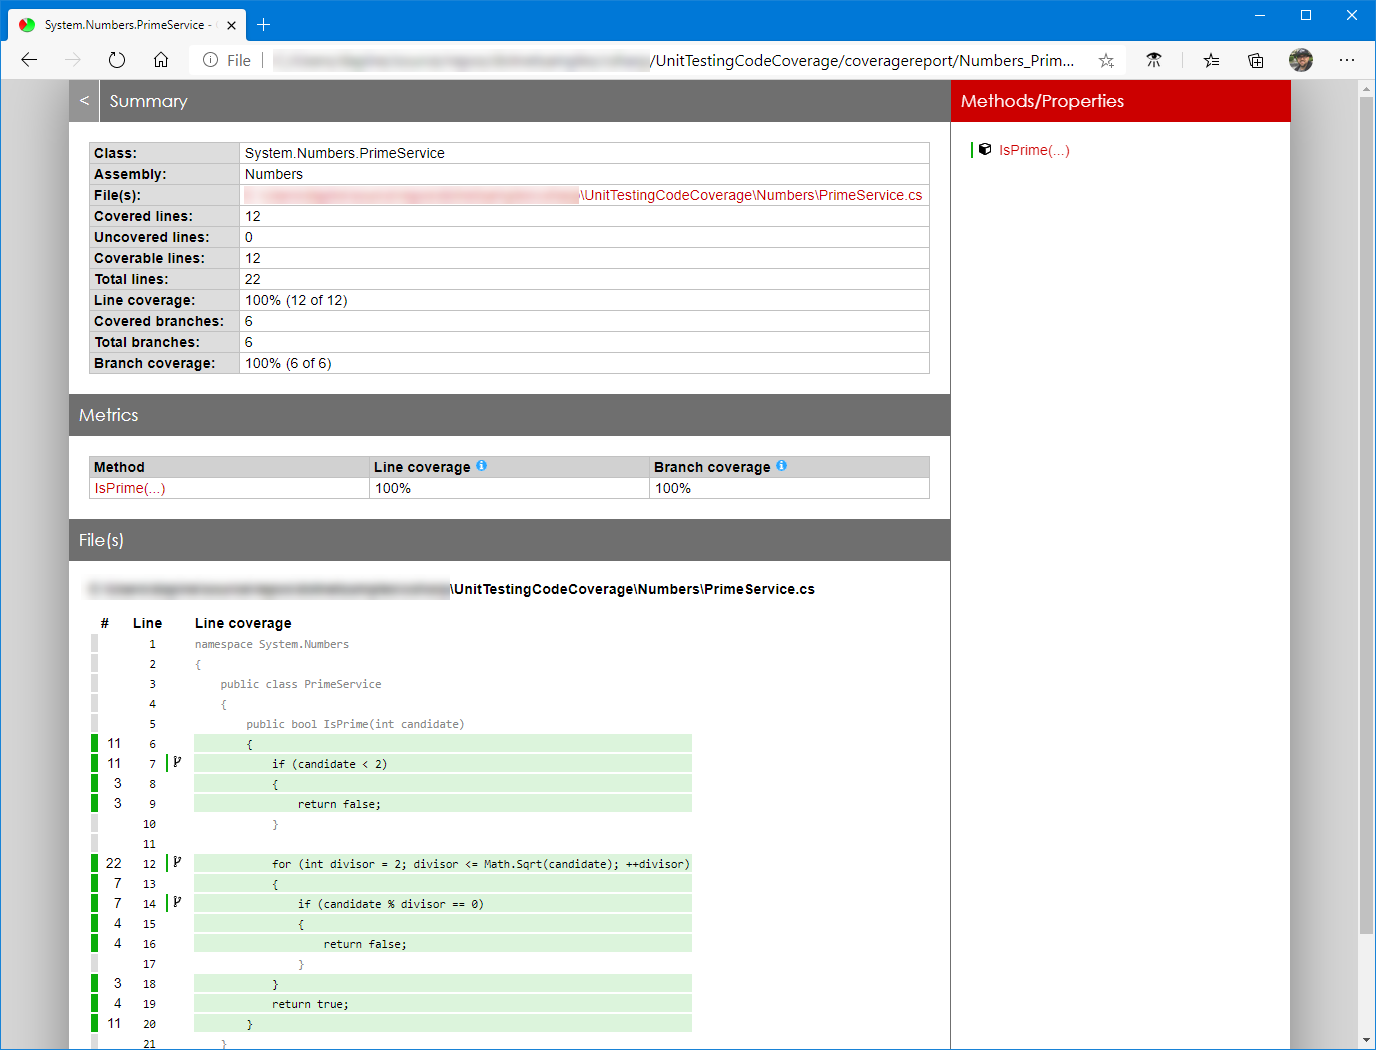
執行此命令之後,HTML 檔案代表產生的報表。
另請參閱
- Visual Studio 單元測試程式碼涵蓋範圍
- GitHub - Coverlet 存放庫
- GitHub - ReportGenerator 存放庫
- ReportGenerator 專案網站
- Azure:發佈程式碼涵蓋範圍結果
- Azure:檢閱程式碼涵蓋範圍結果
- .NET CLI 測試命令
- dotnet-coverage
- 範例原始程式碼

