如何建立控制項的樣本 (WPF.NET)
使用 Windows Presentation Foundation (WPF),您可以使用您自己的可重複使用範本來自定義現有控制件的視覺結構和行為。 範本可以全域套用至您的應用程式、視窗和頁面,或直接套用至控件。 大部分需要您建立新控件的案例,都可以改為建立現有控件的新範本來涵蓋。
在本文中,您將探索為 Button 控件建立新的 ControlTemplate 。
建立 ControlTemplate 的時機
控制件有許多屬性,例如 Background、 Foreground與 FontFamily。 這些屬性會控制控件外觀的不同層面,但是您可以藉由設定這些屬性所做的變更會受到限制。 例如,您可以將 屬性設定為藍色,並在 FontStyle 上CheckBox設定Foreground為斜體。 當您要自定義控制元件的外觀超出控制項上設定其他屬性可以執行的動作時,您可以建立 ControlTemplate。
在大部分的使用者介面中,按鈕具有相同的一般外觀:具有某些文字的矩形。 如果您想要建立四捨五入的按鈕,您可以建立繼承自按鈕的新控件,或重新建立按鈕的功能。 此外,新的使用者控制項會提供圓形視覺效果。
您可以自定義現有控制件的視覺配置,以避免建立新的控制件。 使用四捨五入的按鈕,您可以使用所需的視覺設定來建立 ControlTemplate 。
另一方面,如果您需要具有新功能、不同屬性和新設定的控件,您會建立新的 UserControl。
必要條件
在 MainWindow.xaml 中建立新的 WPF 應用程式(或您選擇的另一個視窗)在< Window> 元素上設定下列屬性:
| 屬性 | 值 |
|---|---|
| Title | Template Intro Sample |
| SizeToContent | WidthAndHeight |
| MinWidth | 250 |
將 Window> 元素的內容<設定為下列 XAML:
<StackPanel Margin="10">
    <Label>Unstyled Button</Label>
    <Button>Button 1</Button>
    <Label>Rounded Button</Label>
    <Button>Button 2</Button>
</StackPanel>
最後, MainWindow.xaml 檔案看起來應該如下所示:
<Window x:Class="IntroToStylingAndTemplating.Window1"
        xmlns="http://schemas.microsoft.com/winfx/2006/xaml/presentation"
        xmlns:x="http://schemas.microsoft.com/winfx/2006/xaml"
        xmlns:d="http://schemas.microsoft.com/expression/blend/2008"
        xmlns:mc="http://schemas.openxmlformats.org/markup-compatibility/2006"
        xmlns:local="clr-namespace:IntroToStylingAndTemplating"
        mc:Ignorable="d"
        Title="Template Intro Sample" SizeToContent="WidthAndHeight" MinWidth="250">
    <StackPanel Margin="10">
        <Label>Unstyled Button</Label>
        <Button>Button 1</Button>
        <Label>Rounded Button</Label>
        <Button>Button 2</Button>
    </StackPanel>
</Window>
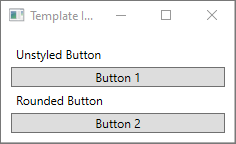
如果您執行應用程式,看起來如下所示:
建立 ControlTemplate
宣告 ControlTemplate 的最常見方式是作為 XAML 檔案區 Resources 段中的資源。 因為範本是資源,所以會遵守套用至所有資源的相同範圍規則。 簡單地說,您宣告範本會影響可套用範本的位置。 例如,如果您在應用程式定義 XAML 檔案的根元素中宣告範本,則可以在應用程式中的任何位置使用範本。 如果您在視窗中定義範本,則只有該視窗中的控制件可以使用範本。
若要從 開始,請將 Window.Resources 元素新增至 MainWindow.xaml 檔案:
<Window x:Class="IntroToStylingAndTemplating.Window2"
        xmlns="http://schemas.microsoft.com/winfx/2006/xaml/presentation"
        xmlns:x="http://schemas.microsoft.com/winfx/2006/xaml"
        xmlns:d="http://schemas.microsoft.com/expression/blend/2008"
        xmlns:mc="http://schemas.openxmlformats.org/markup-compatibility/2006"
        xmlns:local="clr-namespace:IntroToStylingAndTemplating"
        mc:Ignorable="d"
        Title="Template Intro Sample" SizeToContent="WidthAndHeight" MinWidth="250">
    <Window.Resources>

    </Window.Resources>
    <StackPanel Margin="10">
        <Label>Unstyled Button</Label>
        <Button>Button 1</Button>
        <Label>Rounded Button</Label>
        <Button>Button 2</Button>
    </StackPanel>
</Window>
使用下列屬性集建立新的 ControlTemplate>:<
| 屬性 | 值 |
|---|---|
| x:Key | roundbutton |
| TargetType | Button |
此控制項樣本很簡單:
- 控件的根元素, Grid
- Ellipse繪製按鈕圓角外觀的
- ContentPresenter,顯示使用者指定的按鈕內容
<ControlTemplate x:Key="roundbutton" TargetType="Button">
    <Grid>
        <Ellipse Fill="{TemplateBinding Background}" Stroke="{TemplateBinding Foreground}" />
        <ContentPresenter HorizontalAlignment="Center" VerticalAlignment="Center" />
    </Grid>
</ControlTemplate>
TemplateBinding
當您建立新的 ControlTemplate時,您仍可能想要使用公用屬性來變更控件的外觀。 TemplateBinding 標記延伸會將 中的 ControlTemplate 專案屬性系結至 控件所定義的公用屬性。 當您使用 TemplateBinding 時,您可以在控件上啟用屬性做為範本的參數。 也就是說,已設定控制項上的屬性時,該值會傳遞給具有 TemplateBinding 的元素。
橢圓形
請注意,FillEllipse> 專案的 和 Stroke 屬性<會系結至控件的 Foreground 和 Background 屬性。
ContentPresenter
<ContentPresenter> 元素也會新增至範本。 由於此樣本是針對按鈕所設計,因此請考慮到按鈕繼承自 ContentControl。 按鈕會顯示項目的內容。 您可以在按鈕內設定任何專案,例如純文字或甚至是另一個控件。 下列兩者都是有效的按鈕:
<Button>My Text</Button>

<!-- and -->

<Button>
    <CheckBox>Checkbox in a button</CheckBox>
</Button>
在上述兩個範例中,文字和複選框都會設定為 Button.Content 屬性。 任何設定為內容都可以透過 <ContentPresenter> 呈現的內容,這是範本的功能。
ControlTemplate如果套用至ContentControl型別,例如 Button,ContentPresenter則會在專案樹狀結構中搜尋 。 ContentPresenter如果找到 ,樣本會自動將控制元件的 Content 屬性系結至 ContentPresenter。
使用範本
尋找本文開頭所宣告的按鈕。
<StackPanel Margin="10">
    <Label>Unstyled Button</Label>
    <Button>Button 1</Button>
    <Label>Rounded Button</Label>
    <Button>Button 2</Button>
</StackPanel>
將第二個按鈕的 Template 屬性設定為 roundbutton 資源:
<StackPanel Margin="10">
    <Label>Unstyled Button</Label>
    <Button>Button 1</Button>
    <Label>Rounded Button</Label>
    <Button Template="{StaticResource roundbutton}">Button 2</Button>
</StackPanel>
如果您執行專案並查看結果,您會看到按鈕具有四捨五入的背景。
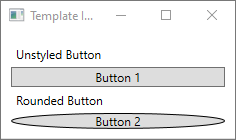
您可能已經注意到按鈕不是圓形,但扭曲。 由於Ellipse>元素的運作方式<,它一律會展開以填滿可用空間。 將按鈕的 width 和 height 屬性變更為相同的值,使圓形統一:
<StackPanel Margin="10">
    <Label>Unstyled Button</Label>
    <Button>Button 1</Button>
    <Label>Rounded Button</Label>
    <Button Template="{StaticResource roundbutton}" Width="65" Height="65">Button 2</Button>
</StackPanel>

新增觸發程式
即使套用範本的按鈕看起來不同,但它的行為與任何其他按鈕相同。 如果您按下按鈕,就會 Click 引發事件。 不過,您可能已經注意到,當您將滑鼠移至按鈕上方時,按鈕的視覺效果不會變更。 這些視覺互動都是由範本所定義。
使用 WPF 提供的動態事件和屬性系統,您可以監看值的特定屬性,然後在適當時重設範本。 在此範例中,您將監看按鈕的 IsMouseOver 屬性。 當滑鼠移至控件上方時,請使用新的色彩來 <設定Ellipse> 的樣式。 這種類型的觸發程式稱為 PropertyTrigger。
若要讓這項作業能夠運作,您必須將名稱新增至您可以參考的Ellipse>。< 為它命名 backgroundElement。
<Ellipse x:Name="backgroundElement" Fill="{TemplateBinding Background}" Stroke="{TemplateBinding Foreground}" />
接下來,將新的 Trigger 新增至 ControlTemplate.Triggers 集合。 觸發程式會監看 IsMouseOver 值 true的事件。
<ControlTemplate x:Key="roundbutton" TargetType="Button">
    <Grid>
        <Ellipse x:Name="backgroundElement" Fill="{TemplateBinding Background}" Stroke="{TemplateBinding Foreground}" />
        <ContentPresenter HorizontalAlignment="Center" VerticalAlignment="Center" />
    </Grid>
    <ControlTemplate.Triggers>
        <Trigger Property="IsMouseOver" Value="true">

        </Trigger>
    </ControlTemplate.Triggers>
</ControlTemplate>
接下來,將 <Setter 新增至<觸發>程式>,將 Ellipse> 的< Fill 屬性變更為新的色彩。
<Trigger Property="IsMouseOver" Value="true">
    <Setter Property="Fill" TargetName="backgroundElement" Value="AliceBlue"/>
</Trigger>
執行專案。 請注意,當您將滑鼠移至按鈕上方時,橢圓>形的<色彩會變更。
使用 VisualState
視覺狀態是由控件所定義和觸發。 例如,當滑鼠移至控件頂端時,就會 CommonStates.MouseOver 觸發狀態。 您可以根據控件的目前狀態,建立屬性變更的動畫效果。 在上一<節中,PropertyTrigger> 用來將按鈕AliceBlue的背景變更為 當屬性為 true時IsMouseOver。 相反地,請建立可視化狀態,以動畫顯示此色彩的變更,以提供平滑的轉換。 如需 VisualStates 的詳細資訊,請參閱 WPF 中的樣式和範本。
若要將 PropertyTrigger> 轉換成動畫視覺狀態,首先,請從範本中移除< ControlTemplate.Triggers> 元素。<
<ControlTemplate x:Key="roundbutton" TargetType="Button">
    <Grid>
        <Ellipse x:Name="backgroundElement" Fill="{TemplateBinding Background}" Stroke="{TemplateBinding Foreground}" />
        <ContentPresenter HorizontalAlignment="Center" VerticalAlignment="Center" />
    </Grid>
</ControlTemplate>
接下來,在控件範本的 Grid> 根目錄中,使用<<的 CommonStatesVisualStateGroup 新增 VisualStateManager.VisualStateGroups>> 元素。< 定義兩個狀態與 Normal MouseOver。
<ControlTemplate x:Key="roundbutton" TargetType="Button">
    <Grid>
        <VisualStateManager.VisualStateGroups>
            <VisualStateGroup Name="CommonStates">
                <VisualState Name="Normal">
                </VisualState>
                <VisualState Name="MouseOver">
                </VisualState>
            </VisualStateGroup>
        </VisualStateManager.VisualStateGroups>
        <Ellipse x:Name="backgroundElement" Fill="{TemplateBinding Background}" Stroke="{TemplateBinding Foreground}" />
        <ContentPresenter HorizontalAlignment="Center" VerticalAlignment="Center" />
    </Grid>
</ControlTemplate>
觸發該狀態時,會套用 VisualState> 中<定義的任何動畫。 為每個狀態建立動畫。 動畫會放在 Storyboard 元素內<。> 如需腳本的詳細資訊,請參閱 分鏡腳本概觀。
Normal
此狀態會以動畫顯示省略號填滿,並將它還原至控件的
Background色彩。<Storyboard> <ColorAnimation Storyboard.TargetName="backgroundElement" Storyboard.TargetProperty="(Shape.Fill).(SolidColorBrush.Color)" To="{TemplateBinding Background}" Duration="0:0:0.3"/> </Storyboard>MouseOver
此狀態會將省略
Background號色彩動畫化為新的色彩:Yellow。<Storyboard> <ColorAnimation Storyboard.TargetName="backgroundElement" Storyboard.TargetProperty="(Shape.Fill).(SolidColorBrush.Color)" To="Yellow" Duration="0:0:0.3"/> </Storyboard>
<ControlTemplate> 現在看起來應該如下所示。
<ControlTemplate x:Key="roundbutton" TargetType="Button">
<Grid>
<VisualStateManager.VisualStateGroups>
<VisualStateGroup Name="CommonStates">
<VisualState Name="Normal">
<Storyboard>
    <ColorAnimation Storyboard.TargetName="backgroundElement"
        Storyboard.TargetProperty="(Shape.Fill).(SolidColorBrush.Color)"
        To="{TemplateBinding Background}"
        Duration="0:0:0.3"/>
</Storyboard>
</VisualState>
<VisualState Name="MouseOver">
<Storyboard>
    <ColorAnimation Storyboard.TargetName="backgroundElement"
        Storyboard.TargetProperty="(Shape.Fill).(SolidColorBrush.Color)"
        To="Yellow"
        Duration="0:0:0.3"/>
</Storyboard>
</VisualState>
</VisualStateGroup>
</VisualStateManager.VisualStateGroups>
<Ellipse Name="backgroundElement" Fill="{TemplateBinding Background}" Stroke="{TemplateBinding Foreground}" />
<ContentPresenter x:Name="contentPresenter" HorizontalAlignment="Center" VerticalAlignment="Center" />
</Grid>
</ControlTemplate>
執行專案。 請注意,當您將滑鼠移至按鈕上方時,橢圓形>的<色彩會以動畫顯示。
下一步
意見反應
即將登場:在 2024 年,我們將逐步淘汰 GitHub 問題作為內容的意見反應機制,並將它取代為新的意見反應系統。 如需詳細資訊,請參閱:https://aka.ms/ContentUserFeedback。
提交並檢視相關的意見反應