繪圖物件概觀
本主題介紹 Drawing 物件,並說明如何使用它們,有效率地繪製圖形、點陣圖、文字及媒體。 當您建立美工圖案、使用 Drawing 繪製或使用 DrawingBrush 物件時,請使用 Visual 物件。
什麼是繪圖物件
Drawing 物件可描繪可見內容,例如圖形、點陣圖、視訊或文字行。 不同類型的繪圖可描繪不同類型的內容。 以下列出不同類型的繪圖物件。
GeometryDrawing – 繪製圖形。
ImageDrawing – 繪製影像。
GlyphRunDrawing – 繪製文字。
VideoDrawing – 播放音訊或視訊檔案。
DrawingGroup – 繪製其他繪圖。 您可以使用繪圖群組,將其他繪圖結合為單一複合繪圖。
Drawing 物件具有多用途,使用 Drawing 物件有多種不同方式。
您可以使用 DrawingImage 和 Image 控制項,以影像顯示。
您可以使用它搭配 DrawingBrush 來繪製物件,例如 Background 的 Page。
您可以使用它來描述 DrawingVisual 的外觀。
您可以使用它來列舉 Visual 的內容。
WPF 提供其他能夠繪製圖形、點陣圖、文字及媒體的物件類型。 例如,您也可以使用 Shape 物件來繪製圖形,而 MediaElement 控制項會提供另一種方式,來將視訊新增至您的應用程式。 那麼,何時應該使用 Drawing 物件? 當您可以犧牲架構等級功能以獲得效能優勢時,或者當您需要 Freezable 功能時。 因為 Drawing 物件缺少版面配置、輸入和焦點支援,它們提供的效能優勢,使其適合用來描繪背景、美工圖案,以及使用 Visual 物件的低等級繪圖。
因為它們是一種 Freezable 物件,Drawing 物件可取得數個特殊功能,包括下列各項︰可以宣告為資源、在多個物件之間共用、設定為唯讀以改善效能、複製以及成為安全執行緒。 如需 Freezable 物件所提供不同功能的詳細資訊,請參閱 Freezable 物件概觀。
繪製圖形
若要繪製圖形,您可以使用 GeometryDrawing。 幾何繪圖的 Geometry 屬性描述要繪製的圖形、其 Brush 屬性描述圖形的內部應如何繪製,而其 Pen 屬性描述其外框的繪製方式。
以下範例使用 GeometryDrawing 來繪製圖形。 圖形是由一個 GeometryGroup 和兩個 EllipseGeometry 物件所描述。 圖形的內部以 LinearGradientBrush 繪製,而其外框則以 BlackPen 繪製。
此範例將建立下列 GeometryDrawing。
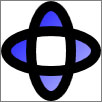
GeometryDrawing
//
// Create the Geometry to draw.
//
GeometryGroup ellipses = new GeometryGroup();
ellipses.Children.Add(
    new EllipseGeometry(new Point(50,50), 45, 20)
    );
ellipses.Children.Add(
    new EllipseGeometry(new Point(50, 50), 20, 45)
    );

//
// Create a GeometryDrawing.
//
GeometryDrawing aGeometryDrawing = new GeometryDrawing();
aGeometryDrawing.Geometry = ellipses;

// Paint the drawing with a gradient.
aGeometryDrawing.Brush =
    new LinearGradientBrush(
        Colors.Blue,
        Color.FromRgb(204,204,255),
        new Point(0,0),
        new Point(1,1));

// Outline the drawing with a solid color.
aGeometryDrawing.Pen = new Pen(Brushes.Black, 10);
<GeometryDrawing>
  <GeometryDrawing.Geometry>

    <!-- Create a composite shape. -->
    <GeometryGroup>
      <EllipseGeometry Center="50,50" RadiusX="45" RadiusY="20" />
      <EllipseGeometry Center="50,50" RadiusX="20" RadiusY="45" />
    </GeometryGroup>
  </GeometryDrawing.Geometry>
  <GeometryDrawing.Brush>

    <!-- Paint the drawing with a gradient. -->
    <LinearGradientBrush>
      <GradientStop Offset="0.0" Color="Blue" />
      <GradientStop Offset="1.0" Color="#CCCCFF" />
    </LinearGradientBrush>
  </GeometryDrawing.Brush>
  <GeometryDrawing.Pen>

    <!-- Outline the drawing with a solid color. -->
    <Pen Thickness="10" Brush="Black" />
  </GeometryDrawing.Pen>
</GeometryDrawing>
如需完整的範例,請參閱建立 GeometryDrawing。
其他 Geometry 類別,例如 PathGeometry,可讓您藉由建立曲線和弧線來打造更複雜的圖形。 如需有關 Geometry 物件的詳細資訊,請參閱幾何概觀。
如需不使用 Drawing 物件來繪製圖形之其他方式的詳細資訊,請參閱 WPF 中圖案和基本繪圖概觀。
繪製影像
若要繪製影像,您可以使用 ImageDrawing。 ImageDrawing 物件的 ImageSource 屬性描述要繪製的影像,而其 Rect 屬性會定義影像繪製的區域。
下列範例會在 (75,75) 繪製 100 x 100 像素的影像。 下圖顯示此範例所建立的 ImageDrawing。 已新增灰色邊界以顯示 ImageDrawing 的界限。
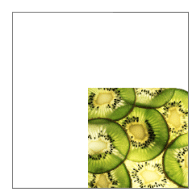
100 x 100 的 ImageDrawing
// Create a 100 by 100 image with an upper-left point of (75,75).
ImageDrawing bigKiwi = new ImageDrawing();
bigKiwi.Rect = new Rect(75, 75, 100, 100);
bigKiwi.ImageSource = new BitmapImage(
    new Uri(@"sampleImages\kiwi.png", UriKind.Relative));
<!-- The Rect property specifies that the image only fill a 100 by 100
     rectangular area. -->
<ImageDrawing Rect="75,75,100,100" ImageSource="sampleImages\kiwi.png"/>
如需有關影像的詳細資訊,請參閱影像處理概觀。
播放媒體 (僅程式碼)
注意
雖然您可以在 Extensible Application Markup Language (XAML) 中宣告 VideoDrawing,但只能使用程式碼載入和播放其媒體。 若要在 Extensible Application Markup Language (XAML) 中播放視訊,請改用 MediaElement。
若要播放音訊或視訊檔案,您可以使用 VideoDrawing 和 MediaPlayer。 有兩種方法可以載入及播放媒體。 第一種方法是單獨使用 MediaPlayer 和 VideoDrawing,第二種方法是建立您自己的 MediaTimeline 以搭配 MediaPlayer 和 VideoDrawing 使用。
注意
利用您的應用程式散發媒體時,您無法跟散發影像一樣,使用媒體檔案當作專案資源。 在您的專案檔中,您必須改為將媒體類型設定為 Content,並將 CopyToOutputDirectory 設定為 PreserveNewest 或 Always。
若要播放媒體,而不建立自己的 MediaTimeline,請執行下列步驟。
建立 MediaPlayer 物件。
MediaPlayer player = new MediaPlayer();使用 Open 方法來載入媒體檔案。
player.Open(new Uri(@"sampleMedia\xbox.wmv", UriKind.Relative));建立 VideoDrawing。
VideoDrawing aVideoDrawing = new VideoDrawing();藉由設定 Rect 的 VideoDrawing 屬性,指定要繪製媒體的大小和位置。
aVideoDrawing.Rect = new Rect(0, 0, 100, 100);使用您所建立的 Player,設定 VideoDrawing 的 MediaPlayer 屬性。
aVideoDrawing.Player = player;使用 Play 的 MediaPlayer 方法來開始播放媒體。
// Play the video once.
player.Play();
下列範例使用 VideoDrawing 和 MediaPlayer 播放視訊檔案一次。
//
// Create a VideoDrawing.
//
MediaPlayer player = new MediaPlayer();

player.Open(new Uri(@"sampleMedia\xbox.wmv", UriKind.Relative));

VideoDrawing aVideoDrawing = new VideoDrawing();

aVideoDrawing.Rect = new Rect(0, 0, 100, 100);

aVideoDrawing.Player = player;

// Play the video once.
player.Play();
若要取得媒體的其他計時控制項,請搭配 MediaTimeline 和 MediaPlayer 物件使用 VideoDrawing。 MediaTimeline 可讓您指定是否應重複視訊。 若要搭配 MediaTimeline 使用 VideoDrawing,您必須執行下列步驟:
宣告 MediaTimeline 並設定其計時行為。
// Create a MediaTimeline.
MediaTimeline mTimeline =
    new MediaTimeline(new Uri(@"sampleMedia\xbox.wmv", UriKind.Relative));

// Set the timeline to repeat.
mTimeline.RepeatBehavior = RepeatBehavior.Forever;
從 MediaClock 建立 MediaTimeline。
// Create a clock from the MediaTimeline.
MediaClock mClock = mTimeline.CreateClock();
建立 MediaPlayer 並使用 MediaClock 來設定其 Clock 屬性。
MediaPlayer repeatingVideoDrawingPlayer = new MediaPlayer();
repeatingVideoDrawingPlayer.Clock = mClock;
建立 VideoDrawing,並將 MediaPlayer 指派給 Player 的 VideoDrawing 屬性。
VideoDrawing repeatingVideoDrawing = new VideoDrawing();
repeatingVideoDrawing.Rect = new Rect(150, 0, 100, 100);
repeatingVideoDrawing.Player = repeatingVideoDrawingPlayer;
下列範例搭配 MediaTimeline 和 MediaPlayer 使用 VideoDrawing 以重複播放視訊。
//
// Create a VideoDrawing that repeats.
//

// Create a MediaTimeline.
MediaTimeline mTimeline =
    new MediaTimeline(new Uri(@"sampleMedia\xbox.wmv", UriKind.Relative));

// Set the timeline to repeat.
mTimeline.RepeatBehavior = RepeatBehavior.Forever;

// Create a clock from the MediaTimeline.
MediaClock mClock = mTimeline.CreateClock();

MediaPlayer repeatingVideoDrawingPlayer = new MediaPlayer();
repeatingVideoDrawingPlayer.Clock = mClock;

VideoDrawing repeatingVideoDrawing = new VideoDrawing();
repeatingVideoDrawing.Rect = new Rect(150, 0, 100, 100);
repeatingVideoDrawing.Player = repeatingVideoDrawingPlayer;
請注意,當您使用 MediaTimeline 時,會使用從 ClockController 的 Controller 屬性傳回的互動式 MediaClock 來控制媒體播放,而不是使用 MediaPlayer 的互動式方法。
繪製文字
若要繪製文字,您可以使用 GlyphRunDrawing 和 GlyphRun。 以下範例使用 GlyphRunDrawing 來繪製文字「Hello World」。
GlyphRun theGlyphRun = new GlyphRun(
    new GlyphTypeface(new Uri(@"C:\WINDOWS\Fonts\TIMES.TTF")),
    0,
    false,
    13.333333333333334,
    new ushort[]{43, 72, 79, 79, 82, 3, 58, 82, 85, 79, 71},
    new Point(0, 12.29),
    new double[]{
        9.62666666666667, 7.41333333333333, 2.96,
        2.96, 7.41333333333333, 3.70666666666667,
        12.5866666666667, 7.41333333333333,
        4.44, 2.96, 7.41333333333333},
    null,
    null,
    null,
    null,
    null,
    null

    );

GlyphRunDrawing gDrawing = new GlyphRunDrawing(Brushes.Black, theGlyphRun);
<GlyphRunDrawing ForegroundBrush="Black">
  <GlyphRunDrawing.GlyphRun>
    <GlyphRun
      CaretStops="{x:Null}"
      ClusterMap="{x:Null}"
      IsSideways="False"
      GlyphOffsets="{x:Null}"
      GlyphIndices="43 72 79 79 82 3 58 82 85 79 71"
      BaselineOrigin="0,12.29"
      FontRenderingEmSize="13.333333333333334"
      DeviceFontName="{x:Null}"
      AdvanceWidths="9.62666666666667 7.41333333333333 2.96 2.96 7.41333333333333 3.70666666666667 12.5866666666667 7.41333333333333 4.44 2.96 7.41333333333333"
      BidiLevel="0">
      <GlyphRun.GlyphTypeface>
        <GlyphTypeface FontUri="C:\WINDOWS\Fonts\TIMES.TTF" />
      </GlyphRun.GlyphTypeface>
    </GlyphRun>
  </GlyphRunDrawing.GlyphRun>
</GlyphRunDrawing>
GlyphRun 是低等級物件,專供固定格式文件展示及列印案例使用。 將文字繪製到畫面的更簡單方法是使用 Label 或 TextBlock。 如需 GlyphRun 的詳細資訊,請參閱 GlyphRun 物件和 Glyphs 元素簡介概觀。
複合繪圖
DrawingGroup 可讓您將多個圖形合併為單一複合繪圖。 透過使用 DrawingGroup,您可以將圖形、影像和文字合併成單一 Drawing 物件。
下列範例使用 DrawingGroup 來合併兩個 GeometryDrawing 物件和一個 ImageDrawing 物件。 此範例會產生下列輸出。
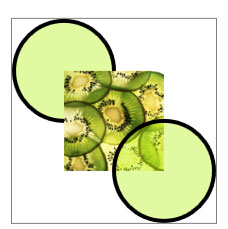
複合圖形
//
// Create three drawings.
//
GeometryDrawing ellipseDrawing =
    new GeometryDrawing(
        new SolidColorBrush(Color.FromArgb(102, 181, 243, 20)),
        new Pen(Brushes.Black, 4),
        new EllipseGeometry(new Point(50,50), 50, 50)
    );

ImageDrawing kiwiPictureDrawing =
    new ImageDrawing(
        new BitmapImage(new Uri(@"sampleImages\kiwi.png", UriKind.Relative)),
        new Rect(50,50,100,100));

GeometryDrawing ellipseDrawing2 =
    new GeometryDrawing(
        new SolidColorBrush(Color.FromArgb(102,181,243,20)),
        new Pen(Brushes.Black, 4),
        new EllipseGeometry(new Point(150, 150), 50, 50)
    );

// Create a DrawingGroup to contain the drawings.
DrawingGroup aDrawingGroup = new DrawingGroup();
aDrawingGroup.Children.Add(ellipseDrawing);
aDrawingGroup.Children.Add(kiwiPictureDrawing);
aDrawingGroup.Children.Add(ellipseDrawing2);
<DrawingGroup>

  <GeometryDrawing Brush="#66B5F314">
    <GeometryDrawing.Geometry>
      <EllipseGeometry Center="50,50" RadiusX="50"  RadiusY="50"/>
    </GeometryDrawing.Geometry>
    <GeometryDrawing.Pen>
      <Pen Brush="Black" Thickness="4" />
    </GeometryDrawing.Pen>
  </GeometryDrawing>
  <ImageDrawing ImageSource="sampleImages\kiwi.png" Rect="50,50,100,100"/>
  <GeometryDrawing Brush="#66B5F314">
    <GeometryDrawing.Geometry>
      <EllipseGeometry Center="150,150" RadiusX="50"  RadiusY="50"/>
    </GeometryDrawing.Geometry>
    <GeometryDrawing.Pen>
      <Pen Brush="Black" Thickness="4" />
    </GeometryDrawing.Pen>
  </GeometryDrawing>
</DrawingGroup>
DrawingGroup 也可讓您將不透明度遮罩、轉換、點陣圖效果以及其他作業套用至其內容。 會依下列順序套用 DrawingGroup 作業:OpacityMask、Opacity、BitmapEffect、ClipGeometry、GuidelineSet,然後 Transform。
下圖顯示套用 DrawingGroup 作業的順序。

DrawingGroup 作業的順序
下表描述您可用來操作 DrawingGroup 物件內容的屬性。
| 屬性 | 說明 | 範例說明 |
|---|---|---|
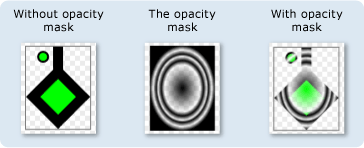
| OpacityMask | 改變 DrawingGroup 內容的選取部分不透明度。 如需範例,請參閱操作說明︰控制繪圖的不透明度。 |
|
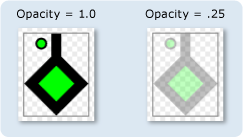
| Opacity | 統一變更 DrawingGroup 內容的不透明度。 使用這個屬性讓 Drawing 變透明或部分透明。 如需範例,請參閱操作說明︰對繪圖套用不透明度遮罩。 |
|
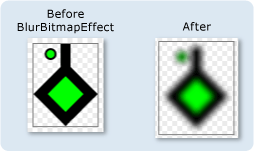
| BitmapEffect | 將 BitmapEffect 套用至 DrawingGroup 內容。 如需範例,請參閱操作說明︰對繪圖套用 BitmapEffect。 |
|
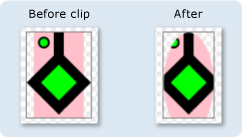
| ClipGeometry | 將 DrawingGroup 內容裁剪至您使用 Geometry 來描述的區域。 如需範例,請參閱操作說明︰裁剪繪圖。 |
|
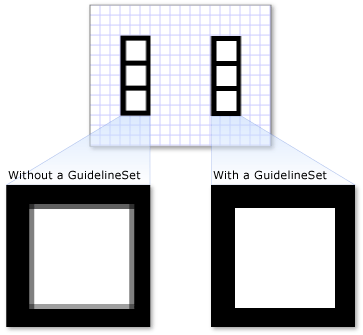
| GuidelineSet | 沿著指定的標線將裝置獨立像素貼齊裝置像素。 這個屬性可用於確保在低 DPI 顯示器上呈現清晰的細緻圖形。 如需範例,請參閱對繪圖套用 GuidelineSet。 |
|
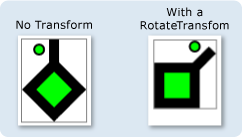
| Transform | 轉換 DrawingGroup 內容。 如需範例,請參閱操作說明︰對繪圖套用轉換。 |
|
將繪圖顯示為影像
若要使用 Drawing 控制項來顯示 Image,請使用 DrawingImage 作為 Image 控制項的 Source,並將 DrawingImage 物件的 DrawingImage.Drawing 屬性設定為您想要顯示的繪圖。
下列範例使用 DrawingImage 和 Image 控制項來顯示 GeometryDrawing。 此範例會產生下列輸出。

DrawingImage
using System;
using System.Windows;
using System.Windows.Controls;
using System.Windows.Media;
using System.Windows.Media.Animation;
using System.Windows.Shapes;

namespace SDKSample
{
    public class DrawingImageExample : Page
    {

        public DrawingImageExample()
        {

            //
            // Create the Geometry to draw.
            //
            GeometryGroup ellipses = new GeometryGroup();
            ellipses.Children.Add(
                new EllipseGeometry(new Point(50,50), 45, 20)
                );
            ellipses.Children.Add(
                new EllipseGeometry(new Point(50, 50), 20, 45)
                );

            //
            // Create a GeometryDrawing.
            //
            GeometryDrawing aGeometryDrawing = new GeometryDrawing();
            aGeometryDrawing.Geometry = ellipses;

            // Paint the drawing with a gradient.
            aGeometryDrawing.Brush =
                new LinearGradientBrush(
                    Colors.Blue,
                    Color.FromRgb(204,204,255),
                    new Point(0,0),
                    new Point(1,1));

            // Outline the drawing with a solid color.
            aGeometryDrawing.Pen = new Pen(Brushes.Black, 10);

            //
            // Use a DrawingImage and an Image control
            // to display the drawing.
            //
            DrawingImage geometryImage = new DrawingImage(aGeometryDrawing);

            // Freeze the DrawingImage for performance benefits.
            geometryImage.Freeze();

            Image anImage = new Image();
            anImage.Source = geometryImage;
            anImage.HorizontalAlignment = HorizontalAlignment.Left;

            //
            // Place the image inside a border and
            // add it to the page.
            //
            Border exampleBorder = new Border();
            exampleBorder.Child = anImage;
            exampleBorder.BorderBrush = Brushes.Gray;
            exampleBorder.BorderThickness = new Thickness(1);
            exampleBorder.HorizontalAlignment = HorizontalAlignment.Left;
            exampleBorder.VerticalAlignment = VerticalAlignment.Top;
            exampleBorder.Margin = new Thickness(10);

            this.Margin = new Thickness(20);
            this.Background = Brushes.White;
            this.Content = exampleBorder;
        }
    }
}
<Page
  xmlns="http://schemas.microsoft.com/winfx/2006/xaml/presentation"
  xmlns:x="http://schemas.microsoft.com/winfx/2006/xaml"
  xmlns:PresentationOptions="http://schemas.microsoft.com/winfx/2006/xaml/presentation/options"
  xmlns:mc="http://schemas.openxmlformats.org/markup-compatibility/2006"
  mc:Ignorable="PresentationOptions"
  Background="White" Margin="20">

  <Border BorderBrush="Gray" BorderThickness="1"
    HorizontalAlignment="Left" VerticalAlignment="Top"
    Margin="10">

    <!-- This image uses a Drawing object for its source. -->
    <Image>
      <Image.Source>
        <DrawingImage PresentationOptions:Freeze="True">
          <DrawingImage.Drawing>
            <GeometryDrawing>
              <GeometryDrawing.Geometry>
                <GeometryGroup>
                  <EllipseGeometry Center="50,50" RadiusX="45" RadiusY="20" />
                  <EllipseGeometry Center="50,50" RadiusX="20" RadiusY="45" />
                </GeometryGroup>
              </GeometryDrawing.Geometry>
              <GeometryDrawing.Brush>
                <LinearGradientBrush>
                  <GradientStop Offset="0.0" Color="Blue" />
                  <GradientStop Offset="1.0" Color="#CCCCFF" />
                </LinearGradientBrush>
              </GeometryDrawing.Brush>
              <GeometryDrawing.Pen>
                <Pen Thickness="10" Brush="Black" />
              </GeometryDrawing.Pen>
            </GeometryDrawing>
          </DrawingImage.Drawing>
        </DrawingImage>
      </Image.Source>
    </Image>
  </Border>

</Page>
使用繪圖繪製物件
DrawingBrush 是一種筆刷類型,可使用繪圖物件來繪製區域。 您可以使用它來繪製含有繪圖的任何圖形物件。 Drawing 的 DrawingBrush 屬性描述其 Drawing。 若要使用 Drawing 轉譯 DrawingBrush,請使用筆刷的 Drawing 屬性將它新增至筆刷,並使用筆刷繪製圖形物件,例如控制項或面板。
下列範例會使用 DrawingBrush,以透過從 Fill 建立的圖樣來繪製 Rectangle 的 GeometryDrawing。 此範例會產生下列輸出。
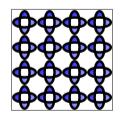
搭配 DrawingBrush 使用的 GeometryDrawing
using System;
using System.Windows;
using System.Windows.Controls;
using System.Windows.Media;
using System.Windows.Media.Animation;
using System.Windows.Shapes;

namespace SDKSample
{
    public class DrawingBrushExample : Page
    {

        public DrawingBrushExample()
        {

            //
            // Create the Geometry to draw.
            //
            GeometryGroup ellipses = new GeometryGroup();
            ellipses.Children.Add(
                new EllipseGeometry(new Point(50,50), 45, 20)
                );
            ellipses.Children.Add(
                new EllipseGeometry(new Point(50, 50), 20, 45)
                );

            //
            // Create a GeometryDrawing.
            //
            GeometryDrawing aGeometryDrawing = new GeometryDrawing();
            aGeometryDrawing.Geometry = ellipses;

            // Paint the drawing with a gradient.
            aGeometryDrawing.Brush =
                new LinearGradientBrush(
                    Colors.Blue,
                    Color.FromRgb(204,204,255),
                    new Point(0,0),
                    new Point(1,1));

            // Outline the drawing with a solid color.
            aGeometryDrawing.Pen = new Pen(Brushes.Black, 10);

            DrawingBrush patternBrush = new DrawingBrush(aGeometryDrawing);
            patternBrush.Viewport = new Rect(0, 0, 0.25, 0.25);
            patternBrush.TileMode = TileMode.Tile;
            patternBrush.Freeze();

            //
            // Create an object to paint.
            //
            Rectangle paintedRectangle = new Rectangle();
            paintedRectangle.Width = 100;
            paintedRectangle.Height = 100;
            paintedRectangle.Fill = patternBrush;

            //
            // Place the image inside a border and
            // add it to the page.
            //
            Border exampleBorder = new Border();
            exampleBorder.Child = paintedRectangle;
            exampleBorder.BorderBrush = Brushes.Gray;
            exampleBorder.BorderThickness = new Thickness(1);
            exampleBorder.HorizontalAlignment = HorizontalAlignment.Left;
            exampleBorder.VerticalAlignment = VerticalAlignment.Top;
            exampleBorder.Margin = new Thickness(10);

            this.Margin = new Thickness(20);
            this.Background = Brushes.White;
            this.Content = exampleBorder;
        }
    }
}
<Page
  xmlns="http://schemas.microsoft.com/winfx/2006/xaml/presentation"
  xmlns:x="http://schemas.microsoft.com/winfx/2006/xaml"
  xmlns:PresentationOptions="http://schemas.microsoft.com/winfx/2006/xaml/presentation/options"
  xmlns:mc="http://schemas.openxmlformats.org/markup-compatibility/2006"
  mc:Ignorable="PresentationOptions"
  Margin="20" Background="White">

  <Border BorderBrush="Gray" BorderThickness="1"
    HorizontalAlignment="Left" VerticalAlignment="Top"
    Margin="10">
    <Rectangle Width="100" Height="100">
      <Rectangle.Fill>
        <DrawingBrush PresentationOptions:Freeze="True"
                      Viewport="0,0,0.25,0.25" TileMode="Tile">
          <DrawingBrush.Drawing>
            <GeometryDrawing>
              <GeometryDrawing.Geometry>
                <GeometryGroup>
                  <EllipseGeometry Center="50,50" RadiusX="45" RadiusY="20" />
                  <EllipseGeometry Center="50,50" RadiusX="20" RadiusY="45" />
                </GeometryGroup>
              </GeometryDrawing.Geometry>
              <GeometryDrawing.Brush>
                <LinearGradientBrush>
                  <GradientStop Offset="0.0" Color="Blue" />
                  <GradientStop Offset="1.0" Color="#CCCCFF" />
                </LinearGradientBrush>
              </GeometryDrawing.Brush>
              <GeometryDrawing.Pen>
                <Pen Thickness="10" Brush="Black" />
              </GeometryDrawing.Pen>
            </GeometryDrawing>
          </DrawingBrush.Drawing>
        </DrawingBrush>
      </Rectangle.Fill>

    </Rectangle>
  </Border>


</Page>
DrawingBrush 類別提供各種不同的選項,可自動縮放和並排顯示其內容。 如需 DrawingBrush 的詳細資訊,請參閱使用影像、繪圖和視覺效果繪製概觀。
使用視覺物件呈現繪圖
DrawingVisual 是在設計上可轉譯繪圖的視覺物件類型。 開發人員若想要建置高度自訂的圖形化環境,可以選擇直接在視覺分層處理,但這不屬於本概觀的說明範圍。 如需詳細資訊,請參閱使用 DrawingVisual 物件概觀。
DrawingContext 物件
DrawingContext 類別可讓您使用視覺內容填入 Visual 或 Drawing。 這類較低等級的圖形物件許多都使用 DrawingContext,因為它可以非常有效率地描繪圖形內容。
雖然 DrawingContext 繪製方法看起來與 System.Drawing.Graphics 類型的繪製方法類似,但它們實際上非常不同。 DrawingContext 與保留模式圖形系統搭配使用,而 System.Drawing.Graphics 類型則與即時模式圖形系統搭配使用。 當您使用 DrawingContext 物件的繪製命令時,實際上是在儲存一組稍後將由圖形系統使用的轉譯指示 (雖然確切的儲存機制取決於提供 DrawingContext 的物件類型);您並非即時繪製至螢幕。 如需 Windows Presentation Foundation (WPF) 圖形系統如何運作的詳細資訊,請參閱 WPF 圖形轉譯概觀。
您絕不會直接具現化 DrawingContext;不過,您可以從特定方法取得繪圖內容,例如 DrawingGroup.Open 和 DrawingVisual.RenderOpen。
列舉視覺物件的內容
除了其他用途之外,Drawing 物件也提供物件模型來列舉 Visual 的內容。
下列範例會使用 GetDrawing 方法來擷取 DrawingGroup 的 Visual 值並加以列舉。
public void RetrieveDrawing(Visual v)
{
    DrawingGroup drawingGroup = VisualTreeHelper.GetDrawing(v);
    EnumDrawingGroup(drawingGroup);
}

// Enumerate the drawings in the DrawingGroup.
public void EnumDrawingGroup(DrawingGroup drawingGroup)
{
    DrawingCollection dc = drawingGroup.Children;

    // Enumerate the drawings in the DrawingCollection.
    foreach (Drawing drawing in dc)
    {
        // If the drawing is a DrawingGroup, call the function recursively.
        if (drawing is DrawingGroup group)
        {
            EnumDrawingGroup(group);
        }
        else if (drawing is GeometryDrawing)
        {
            // Perform action based on drawing type.
        }
        else if (drawing is ImageDrawing)
        {
            // Perform action based on drawing type.
        }
        else if (drawing is GlyphRunDrawing)
        {
            // Perform action based on drawing type.
        }
        else if (drawing is VideoDrawing)
        {
            // Perform action based on drawing type.
        }
    }
}
