這個逐步解說會示範如何在「主要詳細數據」表單中將POCO類型系結至WPF控件。 應用程式會使用 Entity Framework API,將來自資料庫的數據填入對象、追蹤變更,並將數據保存到資料庫。
此模型會定義兩種參與一對多關聯性的類型: Category (principal\main) 和 Product (dependent\detail)。 WPF 數據系結架構可使您在相關對象之間進行導覽:在主檢視中選取列時,詳細檢視會使用對應的子數據來更新。
本逐步解說中的螢幕快照和程式代碼清單取自 Visual Studio 2019 16.6.5。
Tip
您可以在 GitHub 上檢視本文的範例。
Pre-Requisites
您必須安裝 Visual Studio 2019 16.3 或更新版本,並選取 .NET 桌面工作負載 來完成本逐步解說。 如需安裝最新版本 Visual Studio 的詳細資訊,請參閱安裝 Visual Studio。
建立應用程式
- 開啟 Visual Studio
- 在 [開始] 視窗中,選擇 [ 建立新專案]。
- 搜尋 「WPF」,選擇 [WPF 應用程式] [.NET], 然後選擇 [ 下一步]。
- 在下一個畫面中,為專案命名,例如 GetStartedWPF,然後選擇 [ 建立]。
安裝 Entity Framework NuGet 套件
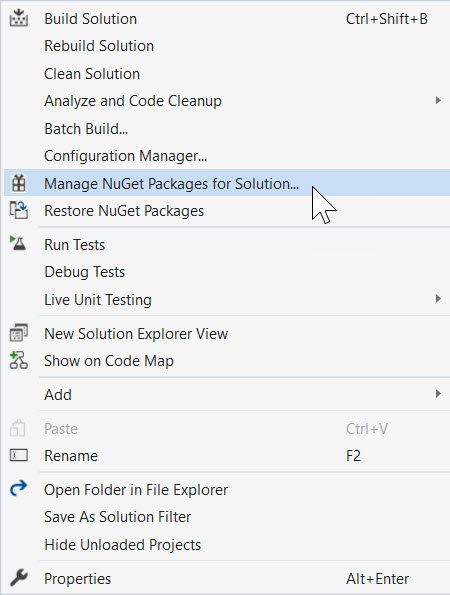
按滑鼠右鍵解決方案,然後選擇 [管理解決方案的 NuGet 套件...]。

在搜尋方塊中輸入
entityframeworkcore.sqlite。選取 Microsoft.EntityFrameworkCore.Sqlite 套件。
檢查右窗格中的專案,然後按下 [ 安裝]

重複步驟以搜尋
entityframeworkcore.proxies並安裝 Microsoft.EntityFrameworkCore.Proxies。
Note
當您安裝 Sqlite 套件時,它會自動下載相關的 Microsoft.EntityFrameworkCore 基礎套件。 Microsoft.EntityFrameworkCore.Proxies 套件支援「延遲載入」數據。 這表示當您有具有子實體的實體時,只有父實體會在初始載入時被讀取。 Proxy 會偵測何時嘗試存取子實體,並視需要自動載入它們。
定義模型
在本逐步解說中,您將使用「程式代碼優先」來實作模型。這表示 EF Core 會根據您定義的 C# 類別來建立資料庫數據表和架構。
新增類別。 為它命名: Product.cs ,並填入如下:
Product.cs
namespace GetStartedWPF
{
    public class Product
    {
        public int ProductId { get; set; }
        public string Name { get; set; }

        public int CategoryId { get; set; }
        public virtual Category Category { get; set; }
    }
}
接下來,新增名為 Category.cs 的類別,並填入下列程序代碼:
Category.cs
using System.Collections.Generic;
using System.Collections.ObjectModel;

namespace GetStartedWPF
{
    public class Category
    {
        public int CategoryId { get; set; }
        public string Name { get; set; }

        public virtual ICollection<Product>
            Products
        { get; private set; } =
            new ObservableCollection<Product>();
    }
}
Product 類別上的 Products 屬性和 Product 類別上的 Category 屬性是導覽屬性。 在 Entity Framework 中,導覽屬性提供一種方式來巡覽兩個實體類型之間的關聯性。
除了定義實體之外,您還需要定義衍生自 DbContext 的類別,並公開 DbSet<TEntity> 屬性。 DbSet<TEntity> 屬性可讓內容知道您要包含在模型中的類型。
DbContext 衍生型別的實例會在運行時間管理實體物件,其中包括將來自資料庫的數據填入對象、變更追蹤,以及將數據保存至資料庫。
使用下列定義將新 ProductContext.cs 類別新增至專案:
ProductContext.cs
using Microsoft.EntityFrameworkCore;

namespace GetStartedWPF
{
    public class ProductContext : DbContext
    {
        public DbSet<Product> Products { get; set; }
        public DbSet<Category> Categories { get; set; }

        protected override void OnConfiguring(
            DbContextOptionsBuilder optionsBuilder)
        {
            optionsBuilder.UseSqlite(
                "Data Source=products.db");
            optionsBuilder.UseLazyLoadingProxies();
        }
    }
}
- 會
DbSet通知 EF Core 應該將哪些 C# 實體對應至資料庫。 - 有各種不同的方式可以設定 EF Core
DbContext。 您可以在: 設定 DbContext 中閱讀它們。 - 此範例使用
OnConfiguring覆寫來指定 SQLite 資料檔案。 -
UseLazyLoadingProxies函數的呼叫會指示 EF Core 執行延遲載入,因此子實體會在從父代存取時自動載入。
按 CTRL+SHIFT+B 或導覽至 建置 > 建置方案 來編譯專案。
Tip
了解讓資料庫和 EF Core 模型保持同步的不同方式:管理資料庫架構。
延遲載入
Product 類別上的 Products 屬性和 Product 類別上的 Category 屬性是導覽屬性。 在 Entity Framework Core 中,導覽屬性提供一種方式來巡覽兩個實體類型之間的關聯性。
EF Core 可讓您在第一次存取導覽屬性時,自動從資料庫載入相關實體。 使用這種類型的負載(稱為延遲載入),第一次存取每個導覽屬性時,請注意,若內容未載入至上下文中,便會對資料庫執行個別查詢。
使用「Plain Old C# Object」(POCO)實體類型時,EF Core 會在運行期間建立衍生的代理類型實例,然後覆寫類別中的虛擬屬性以添加載入掛鉤,從而實現延遲載入。 若要取得相關對象的延遲載入,您必須將導覽屬性 getter 宣告為 公用 和 虛擬 (在 Visual Basic 中可覆),而且您的類別不得 密封 (在 Visual Basic 中為 NotOverridable)。 使用 Database First 時,導覽屬性會自動設為虛擬,以啟用延遲載入。
將對象系結至控件
新增模型中定義為這個 WPF 應用程式的數據源的類別。
按兩下 [方案總管] 中的 MainWindow.xaml 以開啟主要表單
選擇 [XAML] 索引標籤以編輯 XAML。
緊接在開頭
Window標記之後,新增下列來源以連線到 EF Core 實體。<Window x:Class="GetStartedWPF.MainWindow" xmlns="http://schemas.microsoft.com/winfx/2006/xaml/presentation" xmlns:x="http://schemas.microsoft.com/winfx/2006/xaml" xmlns:d="http://schemas.microsoft.com/expression/blend/2008" xmlns:mc="http://schemas.openxmlformats.org/markup-compatibility/2006" xmlns:local="clr-namespace:GetStartedWPF" mc:Ignorable="d" Title="MainWindow" Height="450" Width="800" Loaded="Window_Loaded"> <Window.Resources> <CollectionViewSource x:Key="categoryViewSource"/> <CollectionViewSource x:Key="categoryProductsViewSource" Source="{Binding Products, Source={StaticResource categoryViewSource}}"/> </Window.Resources>這會設定「主」類別的來源,以及「細節」產品的第二個來源。
接下來,在開頭
Grid標記之後,將下列標記新增至您的 XAML。<DataGrid x:Name="categoryDataGrid" AutoGenerateColumns="False" EnableRowVirtualization="True" ItemsSource="{Binding Source={StaticResource categoryViewSource}}" Margin="13,13,43,229" RowDetailsVisibilityMode="VisibleWhenSelected"> <DataGrid.Columns> <DataGridTextColumn Binding="{Binding CategoryId}" Header="Category Id" Width="SizeToHeader" IsReadOnly="True"/> <DataGridTextColumn Binding="{Binding Name}" Header="Name" Width="*"/> </DataGrid.Columns> </DataGrid>請注意,
CategoryId是設定為ReadOnly,因為它是由資料庫指派,而且無法變更。
新增詳細數據方格
現在網格線已存在以顯示類別,因此可以新增詳細數據方格來顯示產品。 在 Grid 元素內, 在 DataGrid 元素後面加入這個。
MainWindow.xaml
<DataGrid x:Name="productsDataGrid" AutoGenerateColumns="False"
          EnableRowVirtualization="True"
          ItemsSource="{Binding Source={StaticResource categoryProductsViewSource}}"
          Margin="13,205,43,108" RowDetailsVisibilityMode="VisibleWhenSelected"
          RenderTransformOrigin="0.488,0.251">
    <DataGrid.Columns>
        <DataGridTextColumn Binding="{Binding CategoryId}"
                            Header="Category Id" Width="SizeToHeader"
                            IsReadOnly="True"/>
        <DataGridTextColumn Binding="{Binding ProductId}" Header="Product Id"
                            Width="SizeToHeader" IsReadOnly="True"/>
        <DataGridTextColumn Binding="{Binding Name}" Header="Name" Width="*"/>
    </DataGrid.Columns>
</DataGrid>
最後,新增一個按鈕 Save 並將點擊事件連結至 Button_Click。
<Button Content="Save" HorizontalAlignment="Center" Margin="0,240,0,0"
        Click="Button_Click" Height="20" Width="123"/>
您的設計檢視看起來應該像這樣:

新增處理數據互動的程序代碼
是時候將一些事件處理程式新增至主視窗了。
在 XAML 視窗中,按兩下 <Window> 元素,以選取主視窗。
在 屬性 視窗中,選擇右上方的 事件,然後雙擊 載入 標籤右邊的文字框。

這會帶您前往表單的後置程式碼,我們現在將編輯程式碼來使用 ProductContext 進行資料存取。 更新程序代碼,如下所示。
程序代碼會宣告 長時間執行的 實例 ProductContext。 對象 ProductContext 可用來查詢數據,並將數據儲存至資料庫。 然後從覆寫的Dispose()方法呼叫ProductContext實例上的OnClosing方法。 程序代碼批注會說明每個步驟的功能。
MainWindow.xaml.cs
using Microsoft.EntityFrameworkCore;
using System.ComponentModel;
using System.Windows;
using System.Windows.Data;

namespace GetStartedWPF
{
    /// <summary>
    /// Interaction logic for MainWindow.xaml
    /// </summary>
    public partial class MainWindow : Window
    {
        private readonly ProductContext _context =
            new ProductContext();

        private CollectionViewSource categoryViewSource;

        public MainWindow()
        {
            InitializeComponent();
            categoryViewSource =
                (CollectionViewSource)FindResource(nameof(categoryViewSource));
        }

        private void Window_Loaded(object sender, RoutedEventArgs e)
        {
            // this is for demo purposes only, to make it easier
            // to get up and running
            _context.Database.EnsureCreated();

            // load the entities into EF Core
            _context.Categories.Load();

            // bind to the source
            categoryViewSource.Source =
                _context.Categories.Local.ToObservableCollection();
        }

        private void Button_Click(object sender, RoutedEventArgs e)
        {
            // all changes are automatically tracked, including
            // deletes!
            _context.SaveChanges();

            // this forces the grid to refresh to latest values
            categoryDataGrid.Items.Refresh();
            productsDataGrid.Items.Refresh();
        }

        protected override void OnClosing(CancelEventArgs e)
        {
            // clean up database connections
            _context.Dispose();
            base.OnClosing(e);
        }
    }
}
Note
程式碼會呼叫 EnsureCreated() 在首次執行時建立資料庫。 這適用於示範,但在正式應用程式中,您應該查看遷移來管理您的資料庫結構。 程序代碼也會同步執行,因為它使用本機 SQLite 資料庫。 對於通常涉及遠端伺服器的生產場景,請考慮使用 Load 和 SaveChanges 方法的異步版本。
測試 WPF 應用程式
按 F5 或選擇 [偵錯 > 開始偵錯] 來編譯並執行應用程式。 資料庫應該使用名為 products.db的檔案自動建立。 輸入類別名稱,然後按 enter 鍵,然後將產品新增至下方方格。 按兩下 [儲存],並使用資料庫提供的標識符監看方格重新整理。 反白顯示數據列,然後按 [ 刪除] 移除數據列。 當您按兩下 [ 儲存] 時,將會刪除實體。

屬性變更通知
此範例依賴四個步驟來同步處理實體與UI。
- 初始呼叫
_context.Categories.Load()會載入類別數據。 - 延遲載入的代理會載入依賴產品的數據。
- 呼叫
_context.SaveChanges()時,EF Core 的內建變更追蹤會對實體進行必要的修改,包括插入和刪除。 - 呼叫
DataGridView.Items.Refresh()會強制重載並使用新產生的ID。
這適用於我們入門範例,但您可能需要其他案例的額外程序代碼。 WPF 控制項會藉由讀取實體上的欄位和屬性來呈現UI。 當您在使用者介面 (UI) 中編輯值時,該值會傳遞至您的實體。 當您直接在實體上修改屬性值時,例如將屬性從資料庫載入時,WPF 不會立即在 UI 中反映此變更。 轉譯引擎必須收到變更的通知。 項目會藉由手動呼叫 Refresh()來執行此動作。 自動化此通知的簡單方式是實作 INotifyPropertyChanged 介面。 WPF 元件會自動偵測介面並註冊變更事件。 實體負責引發這些事件。
Tip
若要深入瞭解如何處理變更,請參閱: 如何實作屬性變更通知。
後續步驟
深入瞭解 如何設定 DbContext。
