適用於:  外部租用戶 (深入瞭解)
在這個教學中,你將利用原生認證的 JavaScript SDK 為你的 Angular 單頁應用程式(SPA)註冊一個強認證方法。
如果你啟用多重驗證(MFA),但使用者沒有註冊強認證方式,你需要先讓使用者註冊一個,才能發出憑證。
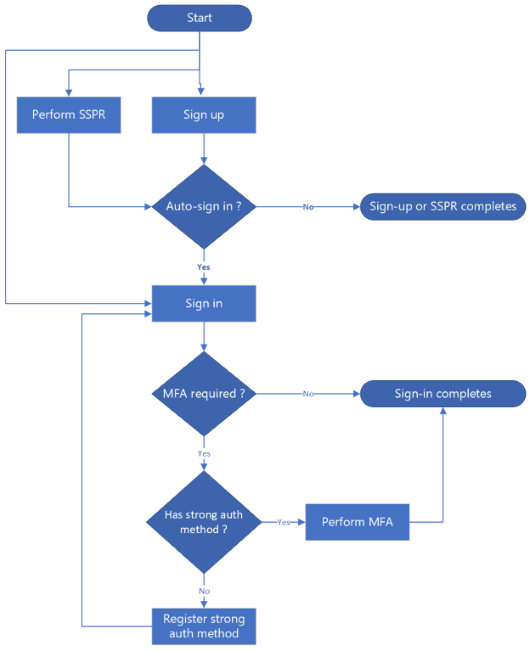
強認證方法註冊流程發生於三種情境:
- 登入時:使用者登入但沒有註冊強認證方式。
- 註冊後:使用者成功註冊並自動登入。
- 自助密碼重設(SSPR)後:使用者成功重設密碼並自動登入。
當需要強認證方法註冊時,使用者會從支援的方法列表中選擇選擇。 可用的方法是 電子郵件 和 簡訊 一次性密碼。
下方的流程圖說明了三種情境:
先決條件
- 完成 註冊、 登入 和 密碼重設 教學的步驟。
- Visual Studio Code或其他程式碼編輯器。
- Node.js 20.x 或更晚版本。
- 全域安裝 Angular CLI。 此範例使用版本 19.2.1。
- 為您的應用程式啟用多重驗證(MFA)。
啟用應用程式,以便處理強認證方法的註冊
要在您的 React 應用程式中啟用強認證方法註冊,請更新應用程式設定,新增所需功能:
找到 src/app/config/auth-config.ts 檔案。
在物件中
customAuth新增或更新capabilities屬性,將該值納入registration_required陣列,如下程式碼片段所示:const customAuthConfig: CustomAuthConfiguration = { customAuth: { ... capabilities: ["registration_required"], ... }, ... };
能力值 registration_required 告訴 Microsoft Entra,您的應用程式可以處理強式身份驗證方法註冊流程。 了解更多關於 原生認證挑戰類型與功能。
建立UI元件
你需要表單組件來處理強認證方法的註冊。 以下章節將說明如何新增形態元件。
建立強認證方法選擇表單
在你的主控台中,前往 src/app/components/shared 資料夾,然後使用 Angular CLI 用以下指令建立元件,例如 auth-method-selection-form :
ng generate component auth-method-selection-form此指令會在 src/app/components/shared/auth-method-selection-form/ 資料夾中產生 auth-method-selection-form.component.html 和 auth-method-selection-form.component.ts 檔案。
打開 auth-method-selection-form.component.ts 檔案,然後用 auth-method-selection-form.component.ts 的內容替換。
打開
auth-method-selection-form.component.html 檔案,然後加入auth-method-selection-form.component.html> 裡的內容
創建強驗證方法挑戰表單
在你的主控台中,前往 src/app/components/shared 資料夾,然後使用 Angular CLI 建立元件,例如 auth-method-challenge-form ,並使用以下指令:
ng generate component auth-method-challenge-form此指令會在 src/app/components/shared/auth-method-challenge-form/ 資料夾中產生 auth-method-challenge-form.component.ts 和 auth-method-challenge-form.component.html 檔案。
打開 auth-method-challenge-form.component.ts 檔案,然後用 auth-method-challenge-form.component.ts 中的內容替換。
打開 auth-method-challenge-form.component.html 檔案,然後將 auth-method-challenge-form.component.html 裡的內容加入其中
註冊強化認證方法於登錄時
更新 src/app/components/sign-in/sign-in.component.ts 檔案,讓應用程式能在登入時處理強驗證方法註冊流程。 完整代碼請見sign-in.component.ts:
匯入必要的類型與元件:
import {
    AuthMethodRegistrationRequiredState,
    AuthenticationMethod,
    AuthMethodVerificationRequiredState,
} from "@azure/msal-browser/custom-auth";
import { AuthMethodSelectionFormComponent } from "../shared/auth-method-selection-form/auth-method-selection-form.component";
import { AuthMethodChallengeFormComponent } from "../shared/auth-method-challenge-form/auth-method-challenge-form.component";

@Component({
    selector: "app-sign-in",
    templateUrl: "./sign-in.component.html",
    standalone: true,
    imports: [
        ...
        AuthMethodSelectionFormComponent,
        AuthMethodChallengeFormComponent,
        ...
    ],
})
新增用於強認證方法註冊的新變數:
showAuthMethodsForRegistration = false;
showChallengeForRegistration = false;
authMethodsForRegistration: AuthenticationMethod[] = [];
selectedAuthMethodForRegistration: AuthenticationMethod | undefined = undefined;
verificationContactForRegistration: string | undefined = undefined;
challengeForRegistration: string | undefined = undefined;
更新
startSignIn、handlePasswordSubmit及handleCodeSubmit函式以檢查是否需要強認證方法註冊:async startSignIn() { const client = await this.auth.getClient(); const result: SignInResult = await client.signIn({ username: this.username }); ... if (result.isAuthMethodRegistrationRequired()) { this.showAuthMethodsForRegistration = true; this.showPassword = false; this.showCode = false; this.showChallengeForRegistration = false; this.showMfaAuthMethods = false; this.showMfaChallenge = false; this.authMethodsForRegistration = result.state.getAuthMethods(); // Set default selection to the first auth method this.selectedAuthMethodForRegistration = this.authMethodsForRegistration.length > 0 ? this.authMethodsForRegistration[0] : undefined; this.signInState = result.state; } ... } async submitPassword() { if (this.signInState instanceof SignInPasswordRequiredState) { const result = await this.signInState.submitPassword(this.password); ... if (result.isAuthMethodRegistrationRequired()) { this.showAuthMethodsForRegistration = true; this.showPassword = false; this.showCode = false; this.showChallengeForRegistration = false; this.showMfaAuthMethods = false; this.showMfaChallenge = false; this.authMethodsForRegistration = result.state.getAuthMethods(); // Set default selection to the first auth method this.selectedAuthMethodForRegistration = this.authMethodsForRegistration.length > 0 ? this.authMethodsForRegistration[0] : undefined; this.signInState = result.state; } ... } } async submitCode() { if (this.signInState instanceof SignInCodeRequiredState) { const result = await this.signInState.submitCode(this.code); ... if (result.isAuthMethodRegistrationRequired()) { this.showAuthMethodsForRegistration = true; this.showPassword = false; this.showCode = false; this.showChallengeForRegistration = false; this.showMfaAuthMethods = false; this.showMfaChallenge = false; this.authMethodsForRegistration = result.state.getAuthMethods(); // Set default selection to the first auth method this.selectedAuthMethodForRegistration = this.authMethodsForRegistration.length > 0 ? this.authMethodsForRegistration[0] : undefined; this.signInState = result.state; } } }在每個函式中,請注意我們會使用以下程式碼片段檢查是否需要強驗證方法註冊:
if (result.isAuthMethodRegistrationRequired()) {...}新增多重身分驗證方法選擇的處理器:
async submitAuthMethodForRegistration() {
    this.error = "";
    this.loading = true;

    if (!this.selectedAuthMethodForRegistration || !this.verificationContactForRegistration) {
        this.error = "Please select an authentication method and enter a verification contact.";
        this.loading = false;
        return;
    }

    if (this.signInState instanceof AuthMethodRegistrationRequiredState) {
        const result = await this.signInState.challengeAuthMethod({
            authMethodType: this.selectedAuthMethodForRegistration,
            verificationContact: this.verificationContactForRegistration,
        });

        if (result.isFailed()) {
            if (result.error?.isInvalidInput()) {
                this.error = "Incorrect verification contact.";
            } else if (result.error?.isVerificationContactBlocked()) {
                this.error =
                    "The verification contact is blocked. Consider using a different contact or a different authentication method.";
            } else {
                this.error =
                    result.error?.errorData?.errorDescription ||
                    "An error occurred while verifying the authentication method.";
            }
        }

        if (result.isCompleted()) {
            this.isSignedIn = true;
            this.userData = result.data;
            this.showAuthMethodsForRegistration = false;
            this.signInState = result.state;
        }

        if (result.isVerificationRequired()) {
            this.showAuthMethodsForRegistration = false;
            this.showChallengeForRegistration = true;
            this.signInState = result.state;
        }
    }
    this.loading = false;
}
加入強式驗證方法驗證的處理程序:
async submitChallengeForRegistration() {
    this.error = "";
    this.loading = true;

    if (!this.challengeForRegistration) {
        this.error = "Please enter a code.";
        this.loading = false;
        return;
    }

    if (this.signInState instanceof AuthMethodVerificationRequiredState) {
        const result = await this.signInState.submitChallenge(this.challengeForRegistration);

        if (result.isFailed()) {
            if (result.error?.isIncorrectChallenge()) {
                this.error = "Incorrect code.";
            } else {
                this.error =
                    result.error?.errorData?.errorDescription ||
                    "An error occurred while verifying the challenge response.";
            }
        }

        if (result.isCompleted()) {
            this.isSignedIn = true;
            this.userData = result.data;
            this.showChallengeForRegistration = false;
            this.signInState = result.state;
        }
    }
    this.loading = false;
}
更新 sign-in.component.html 檔案,加入認證方法註冊表單。 完整範例請見sign-in.component.html:
<!-- Use shared auth method selection form -->
<app-auth-method-selection-form *ngIf="showAuthMethodsForRegistration" [authMethods]="authMethodsForRegistration"
    [selectedAuthMethod]="selectedAuthMethodForRegistration"
    [verificationContact]="verificationContactForRegistration" [loading]="loading"
    [getPlaceholderText]="getPlaceholderTextForVerificationContact.bind(this)"
    (selectedAuthMethodChange)="selectedAuthMethodForRegistration = $event"
    (verificationContactChange)="verificationContactForRegistration = $event"
    (submitForm)="submitAuthMethodForRegistration()">
</app-auth-method-selection-form>

<!-- Use shared challenge form -->
<app-auth-method-challenge-form *ngIf="showChallengeForRegistration" [challenge]="challengeForRegistration"
    [loading]="loading" (challengeChange)="challengeForRegistration = $event"
    (submitForm)="submitChallengeForRegistration()">
</app-auth-method-challenge-form>
註冊後或重設密碼後,請註冊強認證方式
強式驗證方法的註冊流程在註冊和密碼重設後,其運作方式類似於方法在登入流程中的註冊。 成功註冊或重設密碼後,SDK 即可自動繼續登入。 如果使用者沒有註冊強認證方法,流程就會切換到認證方法註冊狀態。
註冊後登錄強認證方式
註冊流程後若要進行強認證方法註冊,你需要更新 src/app/components/sign-up/sign-up.component.ts 檔案。 完整代碼請參見sign-up.component.ts:
確保你匯入所需的類型和元件。
處理強認證方法的註冊狀態,應與登入流程中的操作方法類似。 註冊成功完成後,你可以利用結果自動觸發登入,如下程式碼片段所示:
// In your sign-up completion handler
if (this.signUpState instanceof SignUpCompletedState) {
    const result = await this.signUpState.signIn();

    ...

    if (result.isAuthMethodRegistrationRequired()) {
        this.showAuthMethodsForRegistration = true;
        this.showPassword = false;
        this.showCode = false;
        this.showChallengeForRegistration = false;
        this.showMfaAuthMethods = false;
        this.showMfaChallenge = false;
        this.authMethodsForRegistration = result.state.getAuthMethods();
        // Set default selection to the first auth method
        this.selectedAuthMethodForRegistration =
            this.authMethodsForRegistration.length > 0 ? this.authMethodsForRegistration[0] : undefined;
        this.signUpState = result.state;
    }

    ...
}
更新 sign-up.component.html 檔案,新增認證方法註冊表單(auth-method-selection-form 與 auth-method-challenge-form),方式與登入流程相似。 完整範例見 sign-up.component.html。
密碼重設後註冊強認證方法
SSPR 後若要進行強認證方法註冊,你需要更新 /src/app/components/reset-password/reset-password.component.ts 檔案。 完整程式碼請參見reset-password.component.ts:
確保你匯入所需的類型和元件。
強認證方法註冊狀態的處理方式與登入流程相似。 SSPRS 成功完成後,你可以利用結果自動觸發登入,如下程式碼片段所示:
if (this.resetState instanceof ResetPasswordCompletedState) {
    const result = await this.resetState.signIn();

    ...

    if (result.isAuthMethodRegistrationRequired()) {
        this.showAuthMethodsForRegistration = true;
        this.showCode = false;
        this.showNewPassword = false;
        this.showChallengeForRegistration = false;
        this.showMfaAuthMethods = false;
        this.showMfaChallenge = false;
        this.isReset = false;
        this.authMethodsForRegistration = result.state.getAuthMethods();
        // Set default selection to the first auth method
        this.selectedAuthMethodForRegistration =
            this.authMethodsForRegistration.length > 0 ? this.authMethodsForRegistration[0] : undefined;
        this.resetState = result.state;
    }

    ...
}
更新 reset-password.component.html 檔案,新增認證方法註冊表單(auth-method-selection-form 與 auth-method-challenge-form),方式與登入流程相似。 完整範例見 reset-password.component.html。
執行及測試您的應用程式
請使用 「執行並測試你的應用程式 」中的步驟來執行你的應用程式,但這次要測試強認證方法註冊流程。
測試註冊後的驗證方法
請導航到 http://localhost:4200/sign-up 顯示報名表單。
輸入所需資料,然後依照提示報名。 成功註冊後,應用程式會自動顯示強認證方式註冊表單,繼續進行登入流程。
選擇強認證方式,例如 電子郵件 OTP,然後輸入電子郵件地址。
選擇 繼續 以提交表單細節。 你應該會收到一組驗證碼到你的電子郵件地址。
在挑戰表單文字框輸入驗證碼,然後選擇 繼續 按鈕。 驗證碼後,你的強認證方式會被註冊,你就會登入。
登入時測試強認證方法註冊
在登入時測試強認證方法註冊時,請確保你的使用者帳號沒有註冊任何強認證方法。
請導覽到 http://localhost:4200/sign-in 顯示登入表單。
輸入您的資料,選擇 繼續 按鈕,然後依照指示操作。 應用程式進入強化驗證方法註冊流程。
依照應用程式提示完成強認證方法註冊。
密碼重設後測試認證方法註冊
若要測試 SSPR 後的強認證方法註冊,請確保你的使用者帳號尚未註冊任何強認證方法。
請導航到 http://localhost:4200/reset-password 顯示密碼重設表單。
輸入您的資料,選擇 繼續 按鈕,然後依照應用程式提示完成密碼重設流程。 當你成功重設密碼後,應用程式會繼續顯示強驗證方式的註冊表單,進行登入流程。
依照應用程式提示完成強認證方法註冊。