基本認證 是一種 HTTP 協議中的 認證 方法。
WebView2 應用程式的基本認證包含一連串的認證與導航步驟,以從 HTTP 伺服器擷取網頁。 WebView2 控制項作為主機應用程式與 HTTP 伺服器間通訊的中介。
使用 HTTPS 來傳送憑證
警告:使用基本認證時必須使用 HTTPS。 否則使用者名稱和密碼並未加密。 你也可以考慮其他形式的認證。
基本認證的 HTTP 標準包含未加密 (使用者名稱和密碼) 認證憑證。 因此,你必須使用 https,以確保憑證已被加密。
航行事件的順序
基本的認證事件發生在事件序列的中間:
-
NavigationStarting- 導航事件 -
ContentLoading- 導航事件 BasicAuthenticationRequestedDOMContentLoaded-
NavigationCompleted- 導航事件
欲了解更多資訊,請參閱 WebView2 應用程式的導航事件。
HTTP 伺服器、WebView2 控制項與主機應用程式之間的通訊
HTTP 伺服器會檢查 (使用者名稱與密碼憑證) 認證,並回傳錯誤文件或所請求的網頁。
WebView2 控制實例會引發事件。 WebView2 控制項位於 HTTP 伺服器與主機應用程式之間。 WebView2 控制項作為主機應用程式與 HTTP 伺服器間通訊的中介。
你自己寫 主機應用程式。 主機應用程式會在事件的參數中設定使用者名稱和密碼, (
EventArgs) 回應物件。
BasicAuthenticationRequestedEventArgs 擁有一 Response 處房產。 屬性 Response 是一個包含使用者名稱和密碼屬性的物件。
導航事件順序
下圖顯示了 WebView2 應用程式基本認證的導航事件流程:
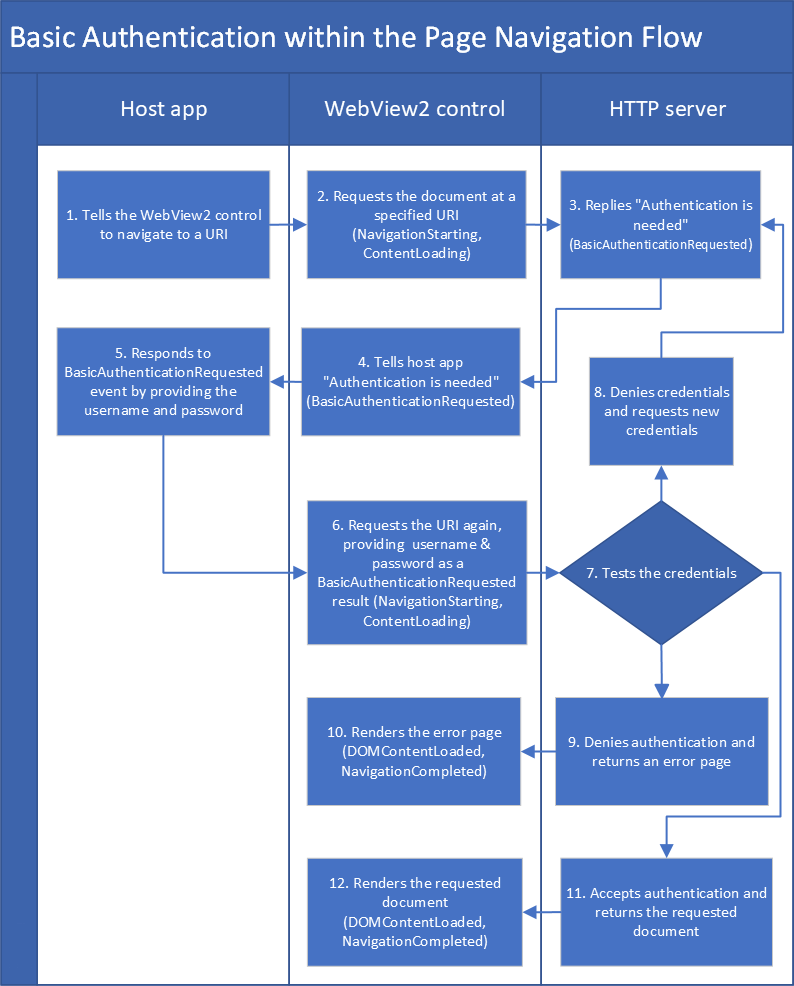
主機應用程式會告訴 WebView2 控制項導航到 URI。
WebView2 控制項會與請求在指定 URI 取得文件的 HTTP 伺服器通訊。
HTTP 伺服器回覆 WebView2 控制項,說「沒有認證你無法取得該 URI (文件) 。」
WebView2 控制項會告訴主機應用程式「需要認證」 (這是
BasicAuthenticationRequested事件) 。主機應用程式會回應該事件,提供 WebView2 控制項的使用者名稱和密碼。
WebView2 控制項再次向 HTTP 伺服器請求 URI,但這次的驗證 (使用者名稱與密碼) 。
HTTP 伺服器會評估憑證 (使用者名稱和密碼) 。
HTTP 伺服器可能會拒絕該憑證並請求新的憑證。
HTTP 伺服器可能會拒絕使用者名稱和密碼;它可能會告訴 WebView2 控制項「你不被允許取得那個 URI/文件」。
WebView2 控制項會呈現 HTTP 伺服器回傳的錯誤頁面。 渲染發生在事件與
ContentLoadingDOMContentLoaded事件之間。HTTP 伺服器可能會接受認證憑證並回傳所請求的文件。
WebView2 控制項會渲染回傳的文件。 渲染發生在事件與
ContentLoadingDOMContentLoaded事件之間。
範例程式碼:應用程式提供事先已知的憑證
以下簡化範例顯示主機應用程式提供事先已知的憑證 (使用者名稱和密碼) 。 這個範例是 WebView2Samples 倉庫 > WebView2API 範例中程式碼的稍微修改版本,ScenarioAuthentication.cpp>。
這個例子不現實,因為:
- 實務上,你會提示使用者輸入使用者名稱和密碼,而不是像 和
"pass"一樣硬編碼。"user" - 這些程式碼是同步的,但你大概會用非同步程式碼。
如需更真實的程式碼,請參見下一節。
// Prerequisite: Before using this code, make sure you read the section "Use HTTPS
// for sending credentials" in this article.
    webView.CoreWebView2.BasicAuthenticationRequested += delegate (
       object sender,
       CoreWebView2BasicAuthenticationRequestedEventArgs args)
    {
        args.Response.UserName = "user";
        args.Response.Password = "pass";
    };
API:
範例程式碼:提示使用者輸入憑證
此範例展示了主機應用程式提示使用者輸入憑證 (使用者名稱與密碼) ,並使用非同步程式碼。
此範例基於上述範例,加入以下特性:
- 會顯示對話框,提示使用者輸入使用者名稱和密碼。
- 呼叫 參數
event的方法GetDeferral。
// Prerequisite: Before using this code, make sure you read the section "Use HTTPS
// for sending credentials" in this article.
webView.CoreWebView2.BasicAuthenticationRequested += delegate (
    object sender,
    CoreWebView2BasicAuthenticationRequestedEventArgs args)
{
    // We need to show UI asynchronously so we obtain a deferral.
    // A deferral will delay the CoreWebView2 from
    // examining the properties we set on the event args until
    // after we call the Complete method asynchronously later.
    // This gives us time to asynchronously show UI.
    CoreWebView2Deferral deferral = args.GetDeferral();

    // We avoid potential reentrancy from running a message loop in the
    // event handler by showing our download dialog later when we
    // complete the deferral asynchronously.
    System.Threading.SynchronizationContext.Current.Post((_) =>
    {
        using (deferral)
        {
            // When prompting the end user for authentication its important
            // to show them the URI or origin of the URI that is requesting
            // authentication so the end user will know who they are giving
            // their username and password to.

            // Its also important to display the challenge to the end user
            // as it may have important site specific information for the
            // end user to provide the correct username and password.

            // Use an app or UI framework method to get input from the end user.
            TextInputDialog dialog = new TextInputDialog(
                title: "Authentication Request",
                description: "Authentication request from " + args.Uri + "\r\n" +
                    "Challenge: " + args.Challenge,
                defaultInput: "username\r\npassword");
            bool userNameAndPasswordSet = false;

            if (dialog.ShowDialog().GetValueOrDefault(false))
            {
                string[] userNameAndPassword = dialog.Input.Text.Split(
                    new char[] { '\r', '\n' }, StringSplitOptions.RemoveEmptyEntries);
                if (userNameAndPassword.Length > 1)
                {
                    args.Response.UserName = userNameAndPassword[0];
                    args.Response.Password = userNameAndPassword[1];
                    userNameAndPasswordSet = true;
                }
            }

            // If we didn't get a username and password from the end user then
            // we cancel the authentication request and don't provide any
            // authentication.
            if (!userNameAndPasswordSet)
            {
                args.Cancel = true;
            }
        }
    }, null);
};
API:
-
CoreWebView2BasicAuthenticationRequestedEventArgs 類別
- 屬性:
CancelChallengeResponseUri
- 方法:
GetDeferral()
- 屬性:
導航運作原理
本節提供導航運作的可選背景資訊。
導航對應多個導航事件。 這裡的 導航指的是每次重試,從 NavigationStarting 上圖的盒子開始,經過該 NavigationCompleted 盒子。
當新導航開始時,會指派一個新的導航 ID。 為了新的導航,HTTP 伺服器給了 WebView2 控制一份文件。 這就是「有文件」的導航。
作為導航的一部分,WebView2 控制項會將相應頁面 (請求頁面或錯誤頁面(HTTP 伺服器) 回傳者為準),而「成功」或「失敗」結果則會產生成功或失敗 NavigationCompleted 事件。
欲了解更多資訊,請參閱 WebView2 應用程式的導航事件。
基本認證導航
流程中有兩種導航方式:
- 一個「伺服器請求認證」的導航。
- 一個「伺服器給 WebView2 控制權一份文件」的導航。
在完成第一種導航後,伺服器會要求驗證,應用程式需要用新的導航 ID) (再次嘗試這種導航方式。 新的導航會使用主機應用程式從事件參數、回應物件中取得的資料。
HTTP 伺服器可能需要 HTTP 認證。 在這種情況下,有一個 第一個導航,包含上述列出的導航事件。 HTTP 伺服器會回傳 401 或 407 的 HTTP 回應,因此該 NavigationCompleted 事件會產生相應的失敗。 WebView2 接著會渲染一個空白頁面,並提出 BasicAuthenticationRequested 事件,可能會提示使用者輸入憑證。
如果 BasicAuthenticationRequested 活動被取消,則不會有後續的導覽,WebView2 會留在空白頁面上。
如果 BasicAuthenticationRequested 活動沒有被取消,WebView2 會再次執行初始導航,但這次會使用任何提供的憑證。 你還是會看到之前一樣的導航事件。
如果 HTTP 伺服器不接受憑證,導航又會失敗,使用 401 或 407。 此時, CoreWebView2 類別實例再次提出事件 BasicAuthenticationRequested ,導航則如前所述繼續。
當 HTTP 伺服器接受憑證時,導航即成功。 如果 HTTP 伺服器拒絕認證,導覽會失敗 (伺服器通常會回傳錯誤頁面) 。
活動前後 BasicAuthenticationRequested 的導航是獨立的導航,並擁有獨特的導航 ID。
導航 event args 有一個性質:該 NavigationId。 這些事件 NavigationId 串聯起來,對應於單一的導航事件。 每次導航時,例如重試時,這個數字 NavigationId 都會保持不變。 在下一次事件流程中,會使用不同的 NavigationId 方法。
API 參考概述
另請參閱
- MDN 的 HTTP 認證。