Workflow bot in Teams
A workflow bot allows users to interact with an Adaptive Card. Adaptive Card action handler enables the Adaptive card to converse in Teams app. You can create a workflow bot in multiple scenarios for your users to enhance the user experience, such as incident management, ticketing, approval workflow, and project management cards. You can create and assign a work item with workflow bot and sync the content to Azure DevOps or Jira system.
A workflow bot can be installed into a team, group chat, or as personal app, depending on different scopes. The default command logic returns an Adaptive Card. You can customize this logic with your business requirement. For the customization, you need to call your existing APIs.
Advantages:
Automates business processes and repetitive workflows without leaving the context of conversations.
Supports users with sequential workflow through various cards progressively, without sending additional cards.
Provides up-to-date user-specific views.
Simplifies programming model with TeamsFx SDK.
Note
You can select the capability that you want to install, when adding the app. For more information, see configure default install options.
You can create a workflow bot to respond to the Adaptive Card triggered by users. Adaptive Card action handler powered by TeamsFx SDK can execute the Adaptive Card universal action Action.Execute triggered by users. In response to this respective card action in the conversation, the Adaptive Card action handler sends another Adaptive Card.

Card action handler
To simplify the creation of a workflow bot, the TeamsFx SDK provides an Adaptive Card action handler TeamsFxAdaptiveCardActionHandler. You can focus only on the development of workflow bot to respond to the card action without learning the Bot Framework.
The following diagram illustrates how to respond to an Adaptive Card action with TeamsFx SDK:

- Action card: The card where you define your action that users can invoke, for example the
DoStuff. - Card action handler: Triggered when users invoke the corresponding card action, its
triggerVerbis same as theverbproperty in Adaptive Card action. It can send a response card to respond to the action. - Response card: The card that responds to the action when user invokes it from the action card.
To handle card actions with TeamsFx SDK, each card action handler must implement the TeamsFxAdaptiveCardActionHandler interface:
-
TeamsFxAdaptiveCardActionHandler
{
    /**
     * The verb defined in adaptive card action that can trigger this handler.
     */
    triggerVerb: string;

    /**
     * Specify the behavior for how the card response will be sent in Teams conversation.
     * The default value is `AdaptiveCardResponse.ReplaceForInteractor`, which means the card
     * response will replace the current one only for the interactor.
     */
    adaptiveCardResponse?: AdaptiveCardResponse;

    /**
     * The handler function that will be invoked when the action is fired.
     * @param context The turn context.
     * @param actionData The contextual data that associated with the action.
     */
    handleActionInvoked(context: TurnContext, actionData: any): Promise<InvokeResponse>;
}
Customize initialization
You can initialize the workflow bot with your own adapter or customize after initialization. The default initialization is located in bot/src/internal/initialize.js(ts).
You can update the initialization logic to:
- Set
options.adapterto use your ownBotFrameworkAdapter. - Set
options.command.commandsto include multiple command handlers. - Set
options.cardAction.actionsto include multiple action handlers. - Set
options.{feature}.enabledto enable multipleConversationBotfunctionality.
For more information on initialization customization, see additional initialization customization
Add card actions
To add card actions with JavaScript and TypeScript, follow these steps:
1. Add an action to your Adaptive Card
You can add a new action (button) to an Adaptive Card by defining it in the JSON file, such as add a new DoSomething action to the src/adaptiveCards/helloworldCommandResponse.json file.
The following code is an example of the action type Action.Execute:
{
  "type": "AdaptiveCard",
  "body": [
    ...
    {
      "type": "ActionSet",
      "actions": [
        {
          "type": "Action.Execute",
          "title": "DoSomething",
          "verb": "doSomething"
        }
      ]
    },
    ...
  ]
}
When the action is invoked in Teams, verb property is required, so that the TeamsFx conversation SDK can invoke the corresponding action handler.
Note
Ensure to provide a global unique string for the verb property, when you're using a general string that might cause a collision with other bot. This can avoid unexpected behavior.
2. Respond with new Adaptive Card
You can return a new Adaptive Card for each action invoked to display the response to end user. You need to create a new file, bot/src/adaptiveCards/doSomethingResponse.json as a response for the doSomething action with the following content:
{
  "type": "AdaptiveCard",
  "body": [
    {
      "type": "TextBlock",
      "size": "Medium",
      "weight": "Bolder",
      "text": "A sample response to DoSomething."
    }
  ],
  "$schema": "http://adaptivecards.io/schemas/adaptive-card.json",
  "version": "1.4"
}
Note
You can design your card layout according to your business need. See, adaptive Card designer.
3. Add action handler
You can handle a new action invoked by Adaptive Card with TeamsFx SDK's class TeamsFxAdaptiveCardActionHandler. You need to customize the action in this step, such as calling an API, processing data, or any other action as per your business need.
You can create a new file bot/src/cardActions/doSomethingActionHandler.js:
    const { AdaptiveCards } = require("@microsoft/adaptivecards-tools");
    const { AdaptiveCardResponse, InvokeResponseFactory } = require("@microsoft/teamsfx");
    const responseCard = require("../adaptiveCards/doSomethingResponse.json");

    class DoSomethingActionHandler {
    triggerVerb = "doStuff";

        async handleActionInvoked(context, message) {
            const responseCardJson = AdaptiveCards.declare(responseCard).render(actionData);
            return InvokeResponseFactory.adaptiveCard(responseCardJson);
        }
    }

     module.exports = {

       DoSomethingActionHandler,
    }
Note
triggerVerbis the verb property of your action.actionDatais the data associated with the action, which may include dynamic user input, or some contextual data provided in the data property of your action.- If an Adaptive Card is returned, the existing card is replaced with it by default.
4. Register the action handler
You need to configure each new card action in the conversationBot that enables the conversational flow of the workflow bot template. You can navigate to bot/src/internal/initialize.js(ts) file and update the actions array of the cardAction property.
The following steps help you to register the action handler:
You can open file
bot/src/internal/initialize.js(ts).You need to update your
conversationBotinitialization, to enablecardActionfeature. Add the handler toactionsarray using the following code:const conversationBot = new ConversationBot({ ... cardAction: { enabled: true, actions: [ new DoStuffActionHandler(), new DoSomethingActionHandler() ], } });Note
To learn more about extending the Workflow bot template, see respond to card actions in Teams
Customize the action response
You can use the adaptiveCardResponse property in handler to customize how the bot sends the Adaptive Card to users. Following are the three options to customize:
The response card is replaced by the current card where the button is defined for the interactor that triggers the action. The users in the conversation can still view the original action card
AdaptiveCardResponse.ReplaceForInteractorby default.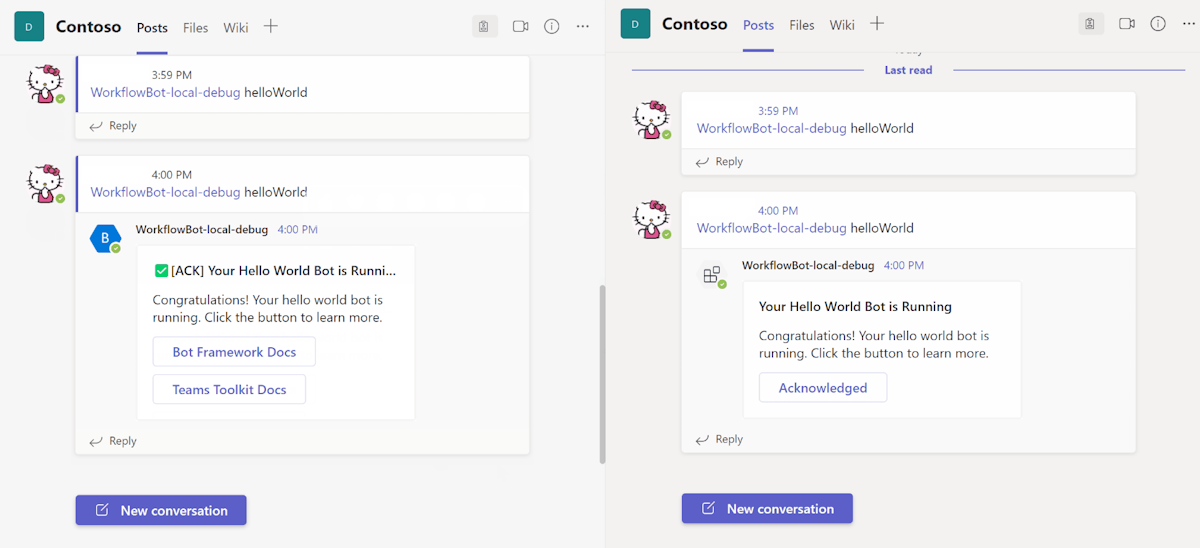
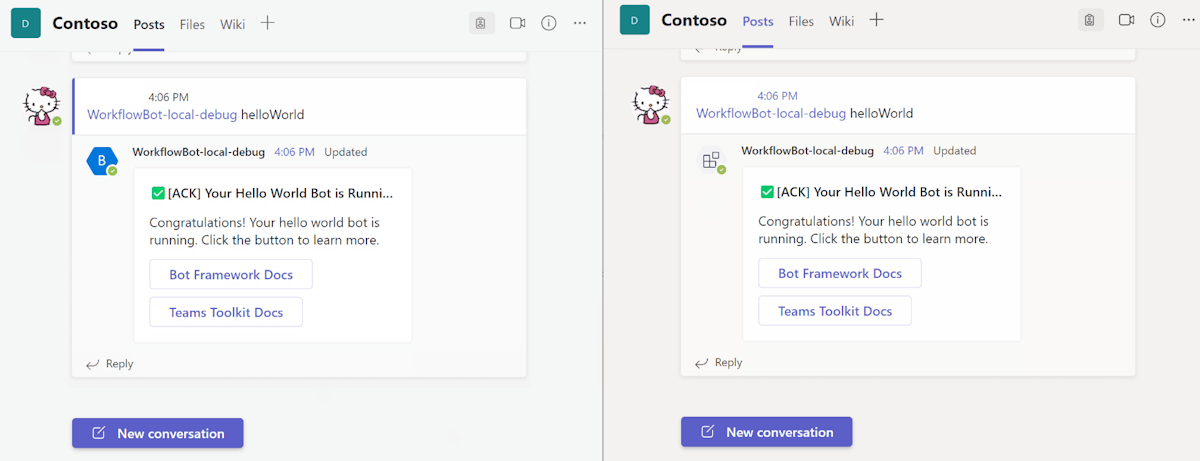
The response card is replaced by the action card for all users in the chat, and they can view the response card
AdaptiveCardResponse.ReplaceForAll.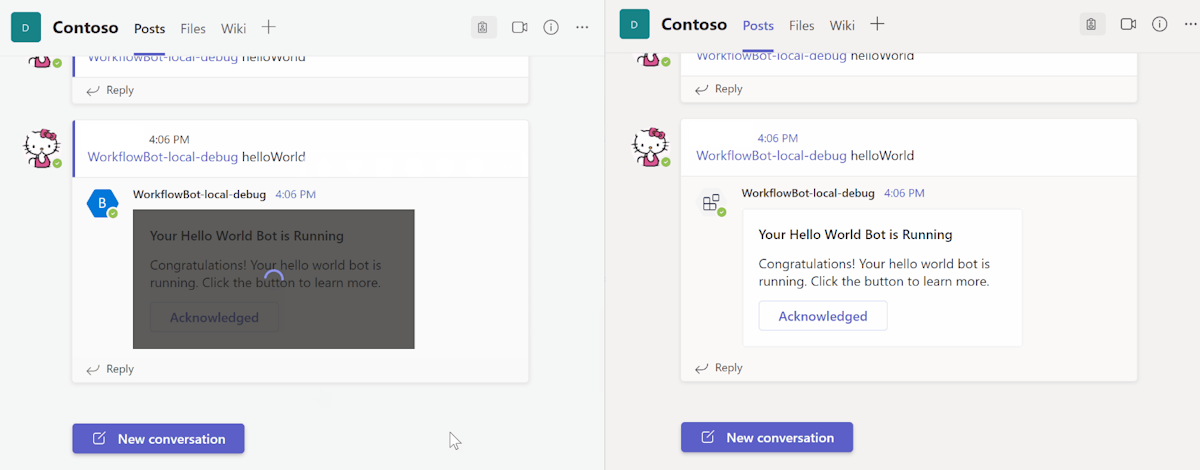
The response card is sent as a separate message in the conversation that can't replace the action card. All users in the chat can view the response card
AdaptiveCardResponse.NewForAll.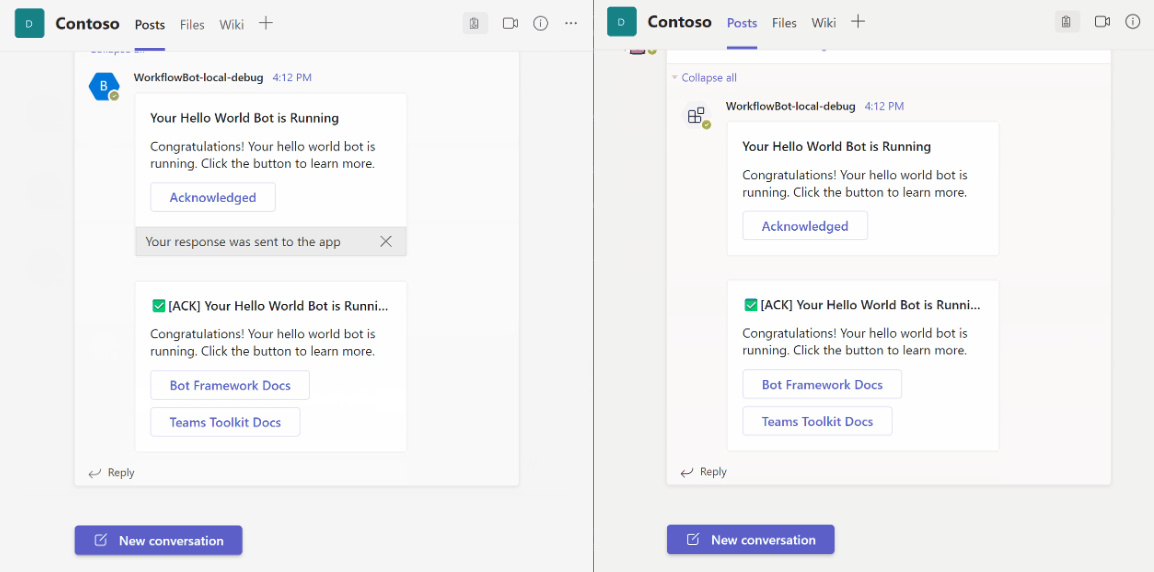


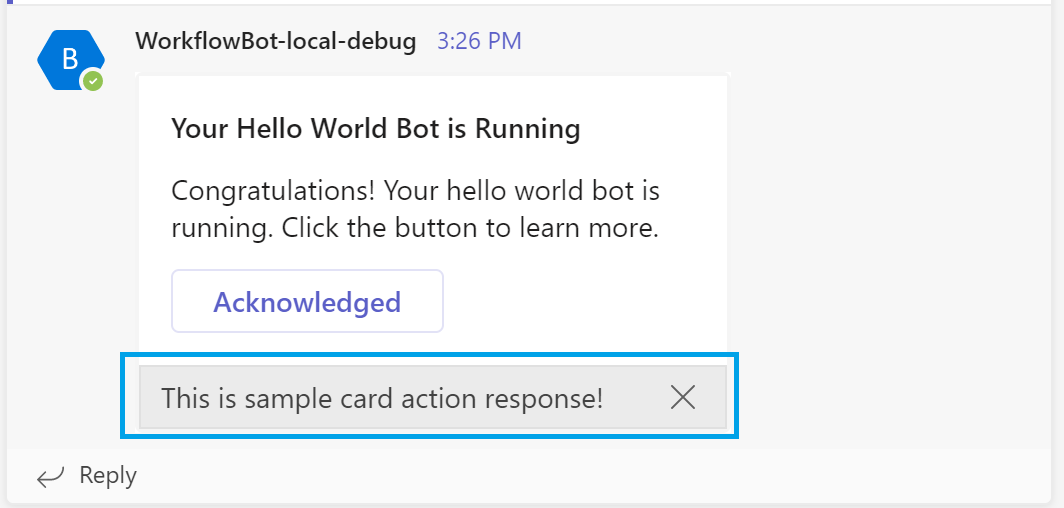
Respond with text message
You can also respond with text messages instead of using Adaptive Card for card action response, using InvokeResponseFactory.textMessage:
async handleActionInvoked(context: TurnContext, actionData: any): Promise<InvokeResponse> {
    return InvokeResponseFactory.textMessage("This is a sample card action response!");
}
You can see the following response message in Teams:
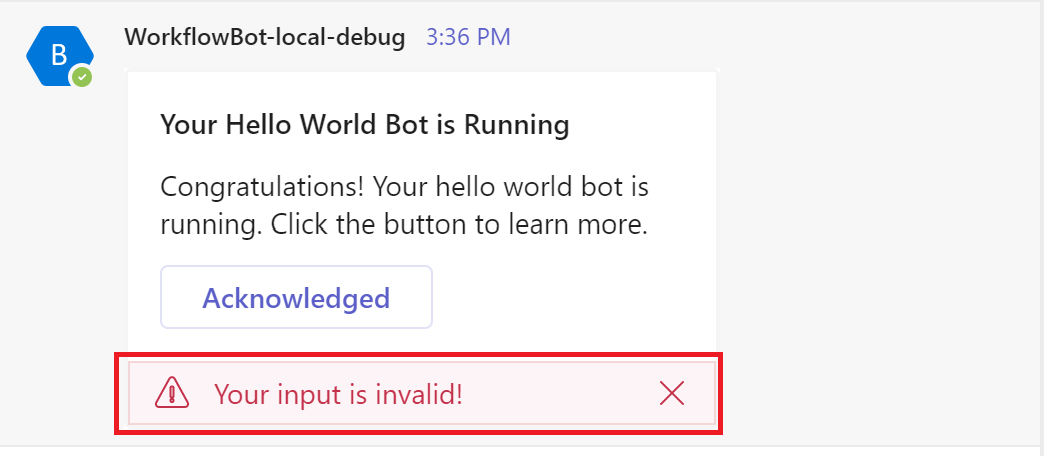
Respond with error messages
When you want to return an error response message to the client, you can apply InvokeResponseFactory.errorResponse to build your invoke response. The following image shows error message in Adaptive Card:
Note
For more information about the invoke response format, see response format.
Customize Adaptive Card content
You can edit the file src/adaptiveCards/helloworldCommand.json to customize Adaptive Card to your preference. The file src/cardModels.ts defines a data structure used to fill data for the Adaptive Card.
The binding between the model and the Adaptive Card is done by matching name such as, CardData.title maps to ${title} in Adaptive Card. You can add, edit, or remove properties, and their bindings to customize the Adaptive Card to your needs.
You can also add new cards, if needed for your application. To build different types of Adaptive Cards with a list or a table of dynamic content using ColumnSet and FactSet, see TeamsFx-Samples.
Auto-refresh to user-specific view
When Adaptive Cards are sent in a Teams channel or group chat, all users can see the same card content. With the new refresh model for Adaptive Cards universal action, users can have a user-specific view. The auto-refresh also facilitates scenarios such as approvals, poll creator controls, ticketing, incident management, and project management cards. The following diagram illustrates how to provide user-specific view with refresh model:
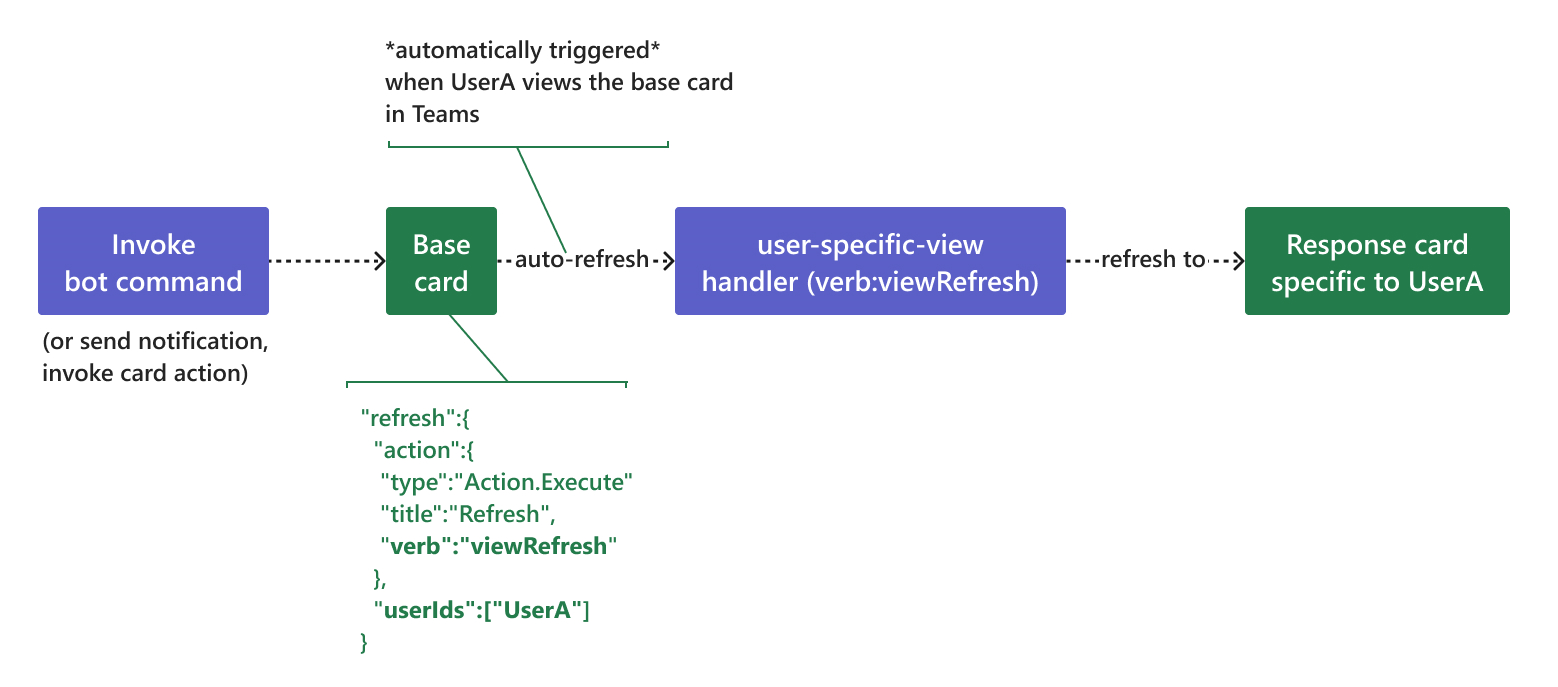
Base card: The bot sends a message with the base version of the card. This base card can be sent as a bot notification, command response, or any other card action response. All members of the conversation can view the same response. The base card is automatically refreshed to the user defined
userIdin therefreshproperty of the base card.Refresh behavior: After the user views the message, Teams client automatically triggers a refresh a minute after the last refresh response. The user-specific view handler is invoked to return a card view
Response Cardfor specific userUserA. Other users in the conversation can still view the base card.
The following image illustrates how user-specific view is displayed in Teams:

Add user-specific view
The following steps help you to add user-specific view with TeamsFx SDK:
1. Enable refresh in base Adaptive Card
The user-specific views are refreshed from a base card, when response card is refreshed from the base card, as illustrated in the auto-refresh user-specific view. You can enable auto-refresh on the base card as follows:
First option enables user-specific view refresh with SDK. The base card can be sent as a command response or a card action response. You can enable user-specific view refresh in
handleCommandReceivedof a command handler, or inhandleActionInvokedof card action handler where the base card is returned. You can userefresh(refreshVerb, userIds, data)method from the@microsoft/adaptivecards-toolslibrary to inject a refresh section into your base card. To define the refresh section, ensure that you provide the following properties:userIds: A set of user MRIs for those who can trigger auto-refresh. For more information on how to add inuserIdslist in refresh section of Adaptive Card, see fetch the roster or user profile.verb: A string to identify the refresh action.data: An optional data to associate with the refresh action.
In the following sample, a base card returns as command response that can auto-refresh to specific user, such as the command sender:
         import baseCard from "../adaptiveCards/baseCard.json";
         import { AdaptiveCards } from "@microsoft/adaptivecards-tools";

         export class MyCommandHandler1 implements TeamsFxBotCommandHandler {
         triggerPatterns: TriggerPatterns = "helloWorld";

         async handleCommandReceived(context: TurnContext, message: CommandMessage):
         Promise<string | Partial<Activity> | void> {
         const refreshVerb = "userViewRefresh";        // verb to identify the refresh action
         const userIds = [ context.activity.from.id ]; // users who will be refreshed
         const data = { key: "value"};                 // optional data associated with the action

         const responseCard = AdaptiveCards
           .declare(baseCard)
           .refresh(refreshVerb, userIds, data)
           .render(cardData);

             return MessageFactory.attachment(CardFactory.adaptiveCard(responseCard));
         }
       }
Second option enables user-specific view to refresh your Adaptive Card. This is a sample refresh action defined in
baseCard.json:{ "type": "AdaptiveCard", "refresh": { "action": { "type": "Action.Execute", "title": "Refresh", "verb": "userViewRefresh" , "data": { "key": "value" } }, "userIds": [ "${userID}" ] }, "body": [ ... ], ... }You need to replace
${userID}with user MRI in code, while rendering your card content.
2. Add user-specific Adaptive Card
You need to design the user-specific Adaptive Card to refresh a specific response card such as responseCard.json for userA shown in the diagram for refresh behavior. To get started, you can create a responseCard.json with the following content, and save it in bot/src/adaptiveCards folder:
-
{
  "type": "AdaptiveCard",
  "body": [
    {
      "type": "TextBlock",
      "size": "Medium",
      "weight": "Bolder",
      "text": "This is a user-specific view"
    }
  ],
  "$schema": "http://adaptivecards.io/schemas/adaptive-card.json",
  "version": "1.4"
}
3. Add card action handler to refresh views
You can add handler that implements TeamsFxAdaptiveCardActionHandler to process the refresh invoke activity that is automatically triggered in Teams:
import responseCard from "../adaptiveCards/responseCard.json";

export class Handler1 implements TeamsFxBotCardActionHandler {
    triggerVerb: string = "userViewRefresh";

    async handleActionInvoked(context: TurnContext, actionData: any): Promise<InvokeResponse> {
      /**
       * If you have multiple userIds defined in your refresh action, for example: userIds: [ "<UserA>", "<userB>" ] ,
       * and you can return different card response for those users respectively with the following code sample.

        const currentUserId = context.activity.from.id;
        switch (currentUserId) {
          case "<userA's id>":
            const card1 = AdaptiveCards.declare(card1).render(actionData);
            return InvokeResponseFactory.adaptiveCard(card1);
          case "<userB's id>":
            const card1 = AdaptiveCards.declare(card2).render(actionData);
            return InvokeResponseFactory.adaptiveCard(card2);
        }
     */
      const responseCardJson = AdaptiveCards.declare(responseCard).render(actionData);
      return InvokeResponseFactory.adaptiveCard(responseCardJson);
    }
}
4. Register the action handler
You can register the refresh action handler in bot/src/internal/initialize.js(ts) with the following code:
export const commandBot = new ConversationBot({
  ...
  cardAction: {
    enabled: true,
    actions: [
      new Handler1()
    ],
  }
})
Access Microsoft Graph
If you're responding to a command that needs to access Microsoft Graph data of an already signed in Teams user, you can do so by single sign-on (SSO) with their Teams user token. Read more about how Teams Toolkit can help you to add single sign-on to Teams app.
Connect to existing APIs
You need to often connect to existing APIs for retrieving data to send to Teams. Teams Toolkit makes it easy for you to configure and manage authentication for existing APIs. For more information, see how to integrate existing third party APIs.
FAQ
How to extend workflow bot with notifications?
Notifications add the ability in your app to send Adaptive Cards in response to external events. For example, when a message is posted to an Event Hub, your app can respond with an Adaptive Card as required. How to extend workflow bot with notifications, see customize notifications.
How to extend workflow bot with command and response?
The default workflow bot comes with command and response. For more information to extend workflow bot with command and response, see add command and response.
Step-by-step guide
Follow the step-by-step guide to build Teams workflow bot.
See also
意見反應
即將登場:在 2024 年,我們將逐步淘汰 GitHub 問題作為內容的意見反應機制,並將它取代為新的意見反應系統。 如需詳細資訊,請參閱:https://aka.ms/ContentUserFeedback。
提交並檢視相關的意見反應