通用 Windows 平台 (UWP) 會為每個執行 Windows 10 的裝置提供通用應用程式平台。 在此模型內,UWP 應用程式可以呼叫所有裝置通用的 WinRT API,也可以呼叫應用程式執行所在裝置系列特有的 API (包含 Win32 和 .NET)。
在本逐步解說中,您會使用 C# UWP 元件建立 NuGet 套件(包括 XAML 控制件),以同時用於 Managed 和 Native 專案。
必要條件
Visual Studio 2019。 從 visualstudio.com 免費安裝 2019 Community 版本。 您也可以使用 Professional 和 Enterprise 版本。
NuGet CLI。 從 nuget.org/downloads 下載最新版本
nuget.exe,並將工具儲存到您選擇的位置。 (下載是直接的.exe檔案。如果尚未新增工具檔案位置,請將工具檔案位置新增至您的PATH環境變數。 如需詳細資訊,請參閱 安裝nuget.exe。
建立 UWP Windows 執行階段元件
在 Visual Studio 中,選取 [ 檔案 > 新 > 專案],然後搜尋 “uwp c#”。 選取 Windows 執行階段元件 (通用 Windows) 範本,然後選取 [下一步]。 將名稱變更為 ImageEnhancer,然後選取 [ 建立]。 當系統出現提示時,請接受目標版本和最低版本的預設值。

以滑鼠右鍵按兩下 方案總管中的項目,選取 [新增>專案],選取 [範本化控件],將名稱變更為 [AwesomeImageControl.cs],然後選取 [新增]:

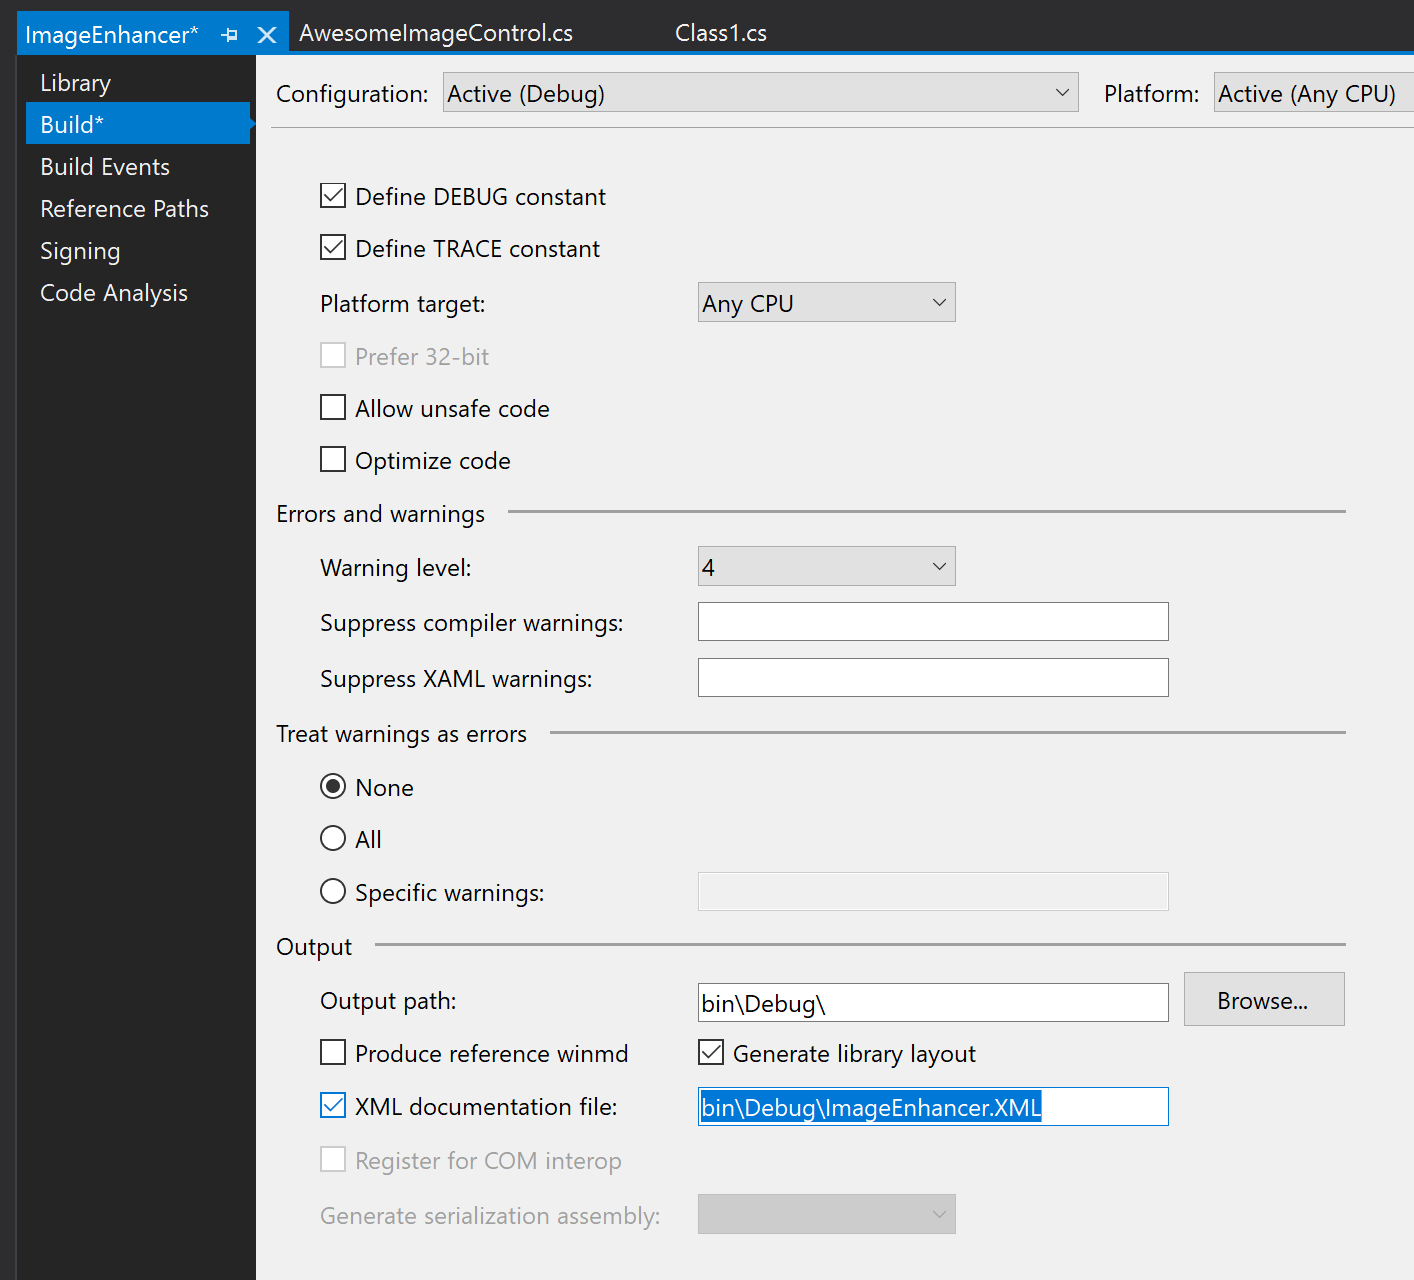
以滑鼠右鍵按兩下 方案總管中的項目,然後選取 [屬性]。在 [屬性] 頁面中,選擇 [建置] 索引標籤並啟用 XML 檔案檔:
以滑鼠右鍵按兩下方案,然後選取 [批次建置]。 選取五個組建方塊,如下圖所示。 這確保當您執行建置時,會為 Windows 所支援的每個目標系統產生一組完整成品。
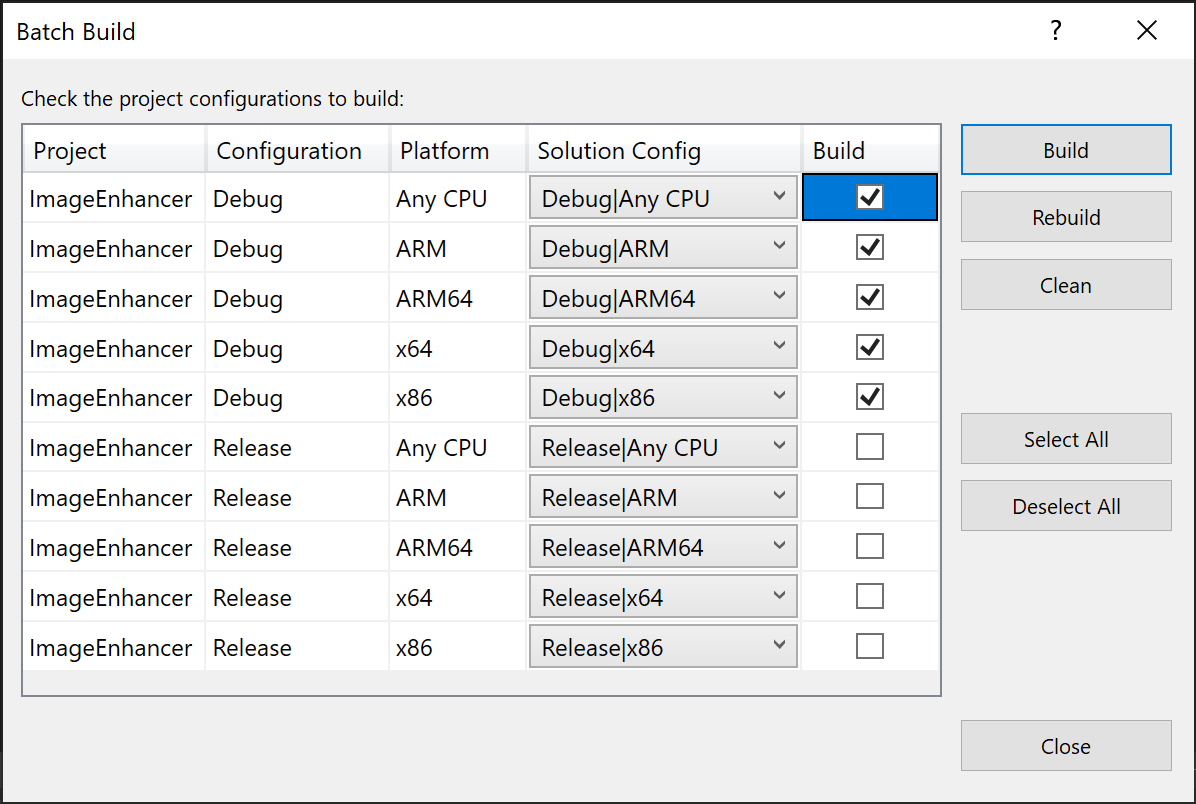
在 [批次建置] 對話框中,選取 [建 置] 以確認專案,並建立 NuGet 套件所需的輸出檔。
注意
在本逐步解說中,您將偵錯成品用於套件。 針對非偵錯套件,請改為檢查 [批次建置] 對話方塊中的 [發行] 選項,並參照所遵循步驟中產生的發行資料夾。
建立和更新 .nuspec 檔案
若要建立初始 .nuspec 檔案,請完成下列步驟。 後續各節會引導您完成其他必要更新。
開啟命令提示字元並流覽至包含
ImageEnhancer.csproj檔案的資料夾,該資料夾應該是包含方案檔的資料夾子資料夾。NuGet spec執行 命令以產生ImageEnhancer.nuspec檔案。 檔名取自.csroj檔名。nuget spec在編輯器中開啟
ImageEnhancer.nuspec,然後進行更新使其符合下列內容,並使用適當的值取代 YOUR_NAME。 請勿保留任何 $propertyName$ 值。 尤其是在整個 nuget.org 中,<id>值必須是唯一的 (請參閱建立套件中所述的命名慣例。 另請注意,您也必須更新作者和描述標記,否則會在封裝步驟期間發生錯誤。<?xml version="1.0"?> <package > <metadata> <id>ImageEnhancer.YOUR_NAME</id> <version>1.0.0</version> <title>ImageEnhancer</title> <authors>YOUR_NAME</authors> <owners>YOUR_NAME</owners> <requireLicenseAcceptance>false</requireLicenseAcceptance> <description>Awesome Image Enhancer</description> <releaseNotes>First release</releaseNotes> <copyright>Copyright 2020</copyright> <tags>image enhancer imageenhancer</tags> </metadata> </package>
注意
針對公眾使用而建置的套件,請特別注意 <tags> 項目,因為這些標籤可協助其他人找到您的套件,並了解其用途。
將 Windows 中繼資料新增至套件
Windows 執行階段元件需要描述其所有公開可用類型的中繼資料,讓其他應用程式和程式庫可以使用元件。 此中繼資料包含在 .winmd 檔案中,而此檔案是在您編譯專案時建立,並且必須併入 NuGet 套件中。 具有 IntelliSense 資料的 XML 檔案也會在相同的時間建置,同時應該予以包含。
將下列 <files> 節點新增至 .nuspec 檔案:
<package>
    <metadata>
        ...
    </metadata>

    <files>
        <!-- WinMd and IntelliSense files -->
      <file src="bin\Debug\ImageEnhancer.winmd" target="lib\uap10.0"/>
      <file src="bin\Debug\ImageEnhancer.xml" target="lib\uap10.0"/>
    </files>
</package>
新增 XAML 內容
若要包含 XAML 控制項與您的元件,您需要新增包含控制項的預設範本 (如專案範本所產生)。 在 <files> 區段中也包含這項內容:
<?xml version="1.0"?>
<package >
    <metadata>
        ...
    </metadata>
    <files>
        ...

        <!-- XAML controls -->
        <file src="Themes\Generic.xaml" target="lib\uap10.0\Themes"/>

    </files>
</package>
新增原生實作程式庫
在您的元件中,ImageEnhancer 類型的核心邏輯是原生程式代碼,包含在針對每個目標運行時間產生的各種 ImageEnhancer.winmd 元件中(ARM、ARM64、x86 和 x64)。 若要將這些併入套件中,請在 <files> 區段和其相關聯 .pri 資源檔中參考它們:
<?xml version="1.0"?>
<package >
    <metadata>
        ...
    </metadata>
    <files>
        ...

        <!-- WINMDs and resources -->
      <file src="bin\ARM\Debug\ImageEnhancer.winmd" target="runtimes\win10-arm"/>
      <file src="bin\ARM\Debug\ImageEnhancer.pri" target="runtimes\win10-arm"/>

      <file src="bin\ARM64\Debug\ImageEnhancer.winmd" target="runtimes\win10-arm64"/>
      <file src="bin\ARM64\Debug\ImageEnhancer.pri" target="runtimes\win10-arm64"/>

      <file src="bin\x64\Debug\ImageEnhancer.winmd" target="runtimes\win10-x64"/>
      <file src="bin\x64\Debug\ImageEnhancer.pri" target="runtimes\win10-x64"/>

      <file src="bin\x86\Debug\ImageEnhancer.winmd" target="runtimes\win10-x86"/>
      <file src="bin\x86\Debug\ImageEnhancer.pri" target="runtimes\win10-x86"/>

    </files>
</package>
最終 .nuspec
最終 .nuspec 檔案現在看起來應該如下所示,並且應該將 YOUR_NAME 取代為適當值:
<?xml version="1.0"?>
<package >
    <metadata>
    <id>ImageEnhancer.YOUR_NAME</id>
    <version>1.0.0</version>
    <title>ImageEnhancer</title>
    <authors>YOUR_NAME</authors>
    <owners>YOUR_NAME</owners>
    <requireLicenseAcceptance>false</requireLicenseAcceptance>
    <description>Awesome Image Enhancer</description>
    <releaseNotes>First Release</releaseNotes>
    <copyright>Copyright 2020</copyright>
    <tags>image enhancer imageenhancer</tags>
    </metadata>
    <files>
    <!-- WinMd and IntelliSense -->
      <file src="bin\Debug\ImageEnhancer.winmd" target="lib\uap10.0"/>
      <file src="bin\Debug\ImageEnhancer.xml" target="lib\uap10.0"/>

    <!-- XAML controls -->
    <file src="Themes\Generic.xaml" target="lib\uap10.0\Themes"/>

    <!-- WINMDs and resources -->
      <file src="bin\ARM\Debug\ImageEnhancer.winmd" target="runtimes\win10-arm"/>
      <file src="bin\ARM\Debug\ImageEnhancer.pri" target="runtimes\win10-arm"/>

      <file src="bin\ARM64\Debug\ImageEnhancer.winmd" target="runtimes\win10-arm64"/>
      <file src="bin\ARM64\Debug\ImageEnhancer.pri" target="runtimes\win10-arm64"/>

      <file src="bin\x64\Debug\ImageEnhancer.winmd" target="runtimes\win10-x64"/>
      <file src="bin\x64\Debug\ImageEnhancer.pri" target="runtimes\win10-x64"/>

      <file src="bin\x86\Debug\ImageEnhancer.winmd" target="runtimes\win10-x86"/>
      <file src="bin\x86\Debug\ImageEnhancer.pri" target="runtimes\win10-x86"/>

    </files>
</package>
封裝元件
只要已完成的 .nuspec 參考您需要包含在套件中的所有檔案,就可隨時執行 nuget pack 命令:
nuget pack ImageEnhancer.nuspec
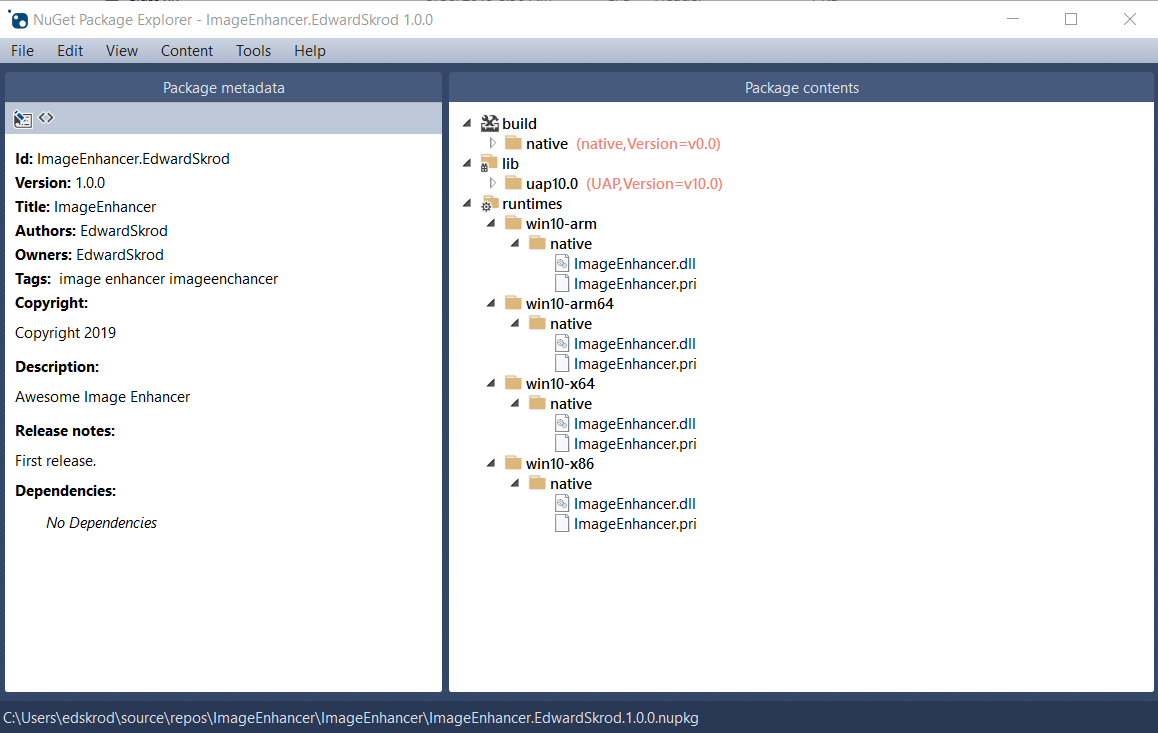
這會產生 ImageEnhancer.YOUR_NAME.1.0.0.nupkg。 在如 NuGet 套件總管的工具中開啟此檔案,並展開所有節點,您將會看到下列內容:
提示
.nupkg 檔案只是一個使用不同副檔名的 ZIP 檔。 然後,您也可以將 .nupkg 變更為 .zip 來檢查套件內容,但是請記住要先還原副檔名,再將套件上傳至 nuget.org。
若要讓其他開發人員使用您的套件,請遵循發佈套件上的指示。