搭配 Power BI 使用服務標籤
您可以使用 Azure 服務標籤搭配 Power BI 來啟用 Azure SQL 受控執行個體 (MI) 以允許來自 Power BI 服務 的連入連線。 在 Azure 中, 服務標籤 是一組定義的 IP 位址,您可以設定為自動管理,以群組形式管理,以將更新或變更的複雜度降到最低。 透過 Power BI 使用服務標籤,您可讓 SQL 受控執行個體得以允許來自 Power BI 服務的連入連線。
若要成功啟用端點,才能在 Power BI 服務 中使用下列設定:
- 在 SQL 受管理執行個體 中啟用公用端點。
- 建立網路安全組規則以允許輸入流量。
- 在 Power BI 中輸入認證。
下列各節會逐一查看這些步驟。
啟用公用端點
程式的第一個部分是在 SQL 受管理執行個體 中啟用公用端點。 執行下列步驟:
登入 Azure 入口網站 並流覽至您的 SQL 受管理執行個體。
在頁面左側,選取 [網络]。
將公用端點 (data) 投影片設為 [啟用],然後將 [最低 TLS 版本] 設定為 1.2。 下圖顯示 Azure 入口網站 中的畫面。
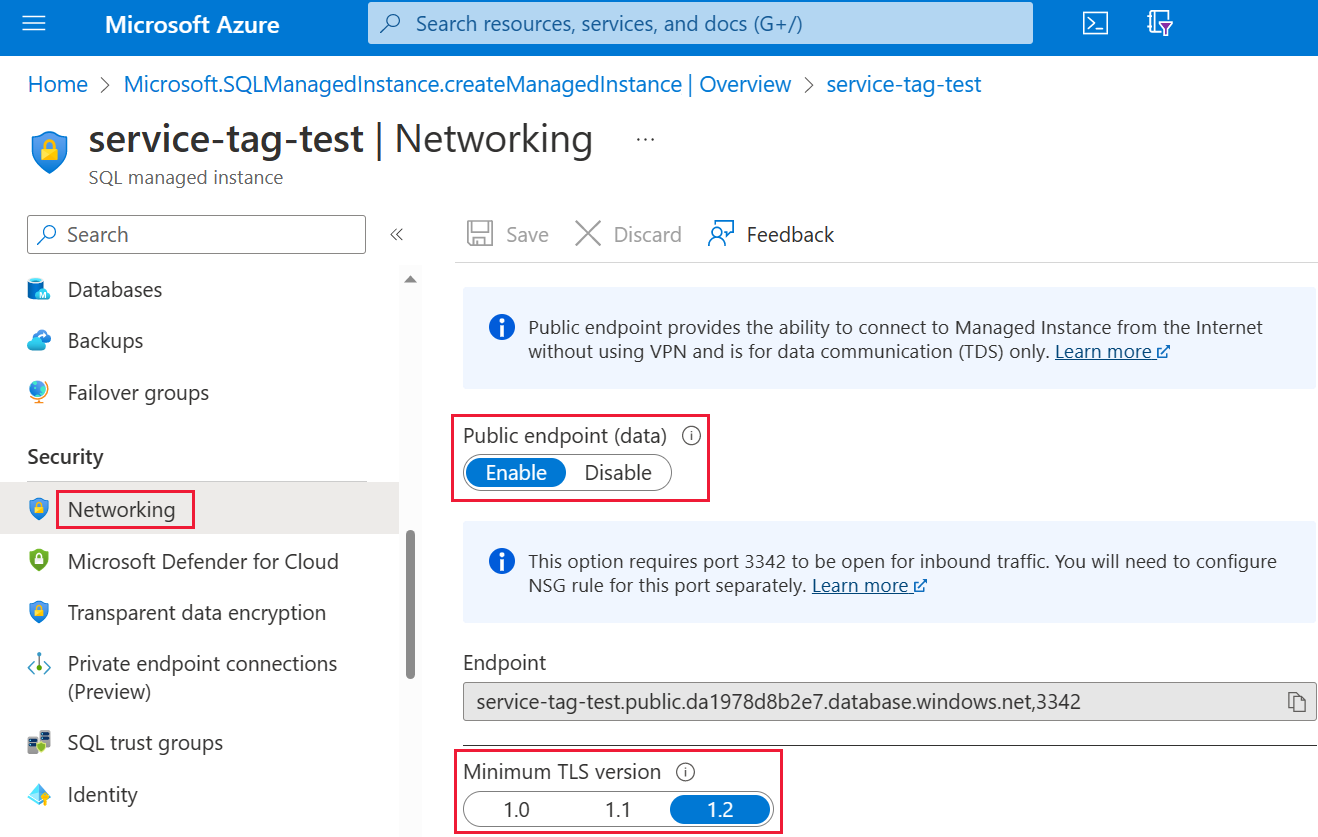
選取 [儲存] 以儲存您的設定。
建立網路安全組規則
下一個步驟集合會要求您建立網路安全組 (NSG) 規則,以允許 Power BI 服務 的輸入流量。 此動作可以在 Azure 入口網站 中完成,方法是利用 Power BI 的「來源服務標籤」,或使用命令行介面 (CLI) 或 PowerShell。
注意
您設定的規則優先順序必須高於 4096 deny_all_inbound 規則,這表示優先順序值必須低於 4096。 在下列範例中,會使用優先順序值為 400。
下列 CLI 腳本 是以參考範例的形式提供。 如需詳細資訊,請參閱 az network nsg rule。 您可能需要變更多個值,範例才能在情況中正常運作。 之後會提供PowerShell腳本。
#login to azure
az login

#set subscription that contains SQL MI instance
$subname = "mysubscriptionname"
az account set --subscription $subname

#set NSG rule for inbound PowerBI traffic

#update $RG to your resource group name
$rg = 'myresourcegroup'
#update $nsg to your Network Security Group name
$nsg = 'nsgresourcename'
# Name the NSG rule
$rule = 'allow_inbound_PowerBI'
#set the priority - this must be higher priority (lower number) than the deny_all_inbound rule
$priority = 400
#specifiy the service tag to use
$servicetag = 'PowerBI'
#specify the public endpoint port defined in step 1
$port = 3342
#set the rule to inbound direction
$direction = 'Inbound'
#set the access type to "Allow"
$access = 'Allow'
#Set the protocol as TCP
$protocol = 'tcp'
#Provide a description for the rule
$desc = 'Allow PowerBI Access to SQL MI for Direct Query or Data Refresh.'

#create the NSG rule
az network nsg rule create -g $rg \
--nsg-name $nsg -n $rule --priority $priority \
--source-address-prefixes $servicetag --destination-address-prefixes '*' \
--destination-port-ranges $port --direction $direction --access $access \
--protocol $protocol --description $desc
下列 PowerShell 腳本會作為另一個建立 NSG 規則的參考來提供。 如需詳細資訊,請參閱 在PowerShell中新增網路安全組規則。 您可能需要變更多個值,範例才能在情況中正常運作。
#login to azure
Login-AzAccount

#get your subscription ID
Get-AzSubscription

####
#Script to create Network Security Group Rule
###

#enter your subscription ID
Set-AzContext -SubscriptionId "yoursubscriptionID"

#Provide the resource group for your Network Security Group
$RGname="yourRG"
#Enter the port for the SQL Managed Instance Public Endpoint
$port=3342
#name the NSG rule
$rulename="allow_inbound_PowerBI"
#provide the name of the Network Security Group to add the rule to
$nsgname="yourNSG"
#set direction to inbound to allow PowerBI to access SQL MI
$direction ="Inbound"
#set the priority of the rule. Priority must be higher (ie. lower number) than the deny_all_inbound (4096)
$priority=400
#set the service tags for the source to \u201cPowerBI\u201d
$serviceTag = "PowerBI"

# Get the NSG resource
$nsg = Get-AzNetworkSecurityGroup -Name $nsgname -ResourceGroupName $RGname

# Add the inbound security rule.
$nsg | Add-AzNetworkSecurityRuleConfig -Name $rulename -Description "Allow app port" -Access Allow `
    -Protocol * -Direction $direction -Priority $priority -SourceAddressPrefix $serviceTag -SourcePortRange * `
    -DestinationAddressPrefix * -DestinationPortRange $port

# Update the NSG.
$nsg | Set-AzNetworkSecurityGroup
在 Power BI 中輸入認證
程序的最後一個部分是在 Power BI 服務 中輸入認證。
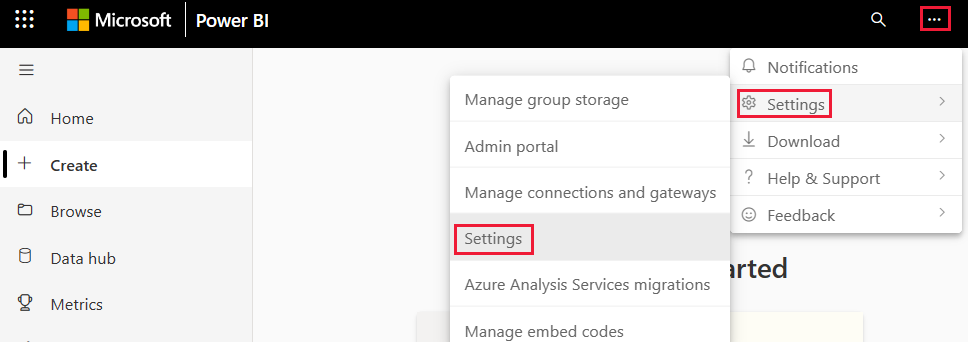
登入 Power BI 服務,並流覽至包含使用 SQL 受管理執行個體 之數據集的工作區。 在下列範例中,該工作區稱為 ASAdataset ,而數據集稱為 Contoso SQL MI Demo。
從右上角選取 [設定],然後從下拉菜單中選擇 [設定]。
在 [數據集] 底 下,展開 [ 數據源認證 ] 區段。
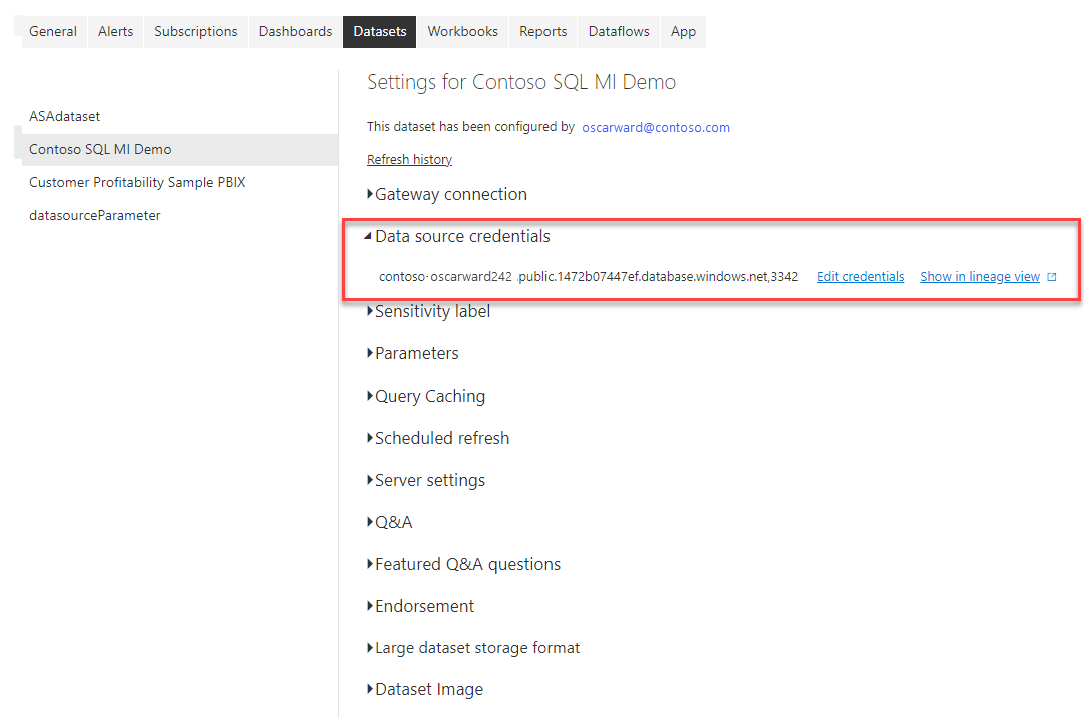
選取 [ 編輯認證 ] 連結。 在出現的對話框中,輸入有效的認證。
儲存您的設定並結束。 您的 SQL 受管理執行個體 現在已設定為允許來自 Power BI 服務 的連入連線。
相關內容
意見反應
即將登場:在 2024 年,我們將逐步淘汰 GitHub 問題作為內容的意見反應機制,並將它取代為新的意見反應系統。 如需詳細資訊,請參閱:https://aka.ms/ContentUserFeedback。
提交並檢視相關的意見反應