本文提供詳細資訊和範例,示範如何在 Azure App Service 的 Mobile Apps 功能中使用 Node.js 後端。
簡介
Mobile Apps 提供將行動優化數據存取 Web API 新增至 Web 應用程式的功能。 Mobile Apps SDK 適用於 ASP.NET 和 Node.js Web 應用程式。 SDK 提供下列作業:
- 資料存取的數據表作業(讀取、插入、更新、刪除)
- 自定義 API 作業
這兩項作業都針對 Azure App Service 允許的所有識別提供者提供驗證。 這些提供者包括 Facebook、Twitter、Google 和 Microsoft 等社交識別提供者,以及適用於企業身分識別的 Azure Active Directory。
您可以在 GitHub 上的 samples 目錄中找到每個使用案例的範例。
支援的平臺
Mobile Apps Node.js SDK 支援當前 LTS 版本的 Node 及其更高版本。 目前,最新的 LTS 版本是 Node v4.5.0。 其他版本的 Node 可能會運作,但不受支援。
Mobile Apps Node.js SDK 支援兩個資料庫驅動程式:
- node-mssql 驅動程序支援 Azure SQL Database 和本機 SQL Server 實例。
- sqlite3 驅動程式僅支援單一實例上的 SQLite 資料庫。
使用命令行建立基本 Node.js 後端
每個Mobile Apps Node.js 後端都會以ExpressJS應用程式的形式啟動。 ExpressJS 是適用於 Node.js最受歡迎的 Web 服務架構。 您可以建立基本的 Express 應用程式,如下所示:
在命令或 PowerShell 視窗中,為您的專案建立目錄:
mkdir basicapp執行
npm init來初始化封裝結構:cd basicapp npm initnpm init命令會要求一組問題來初始化專案。 請參閱範例輸出: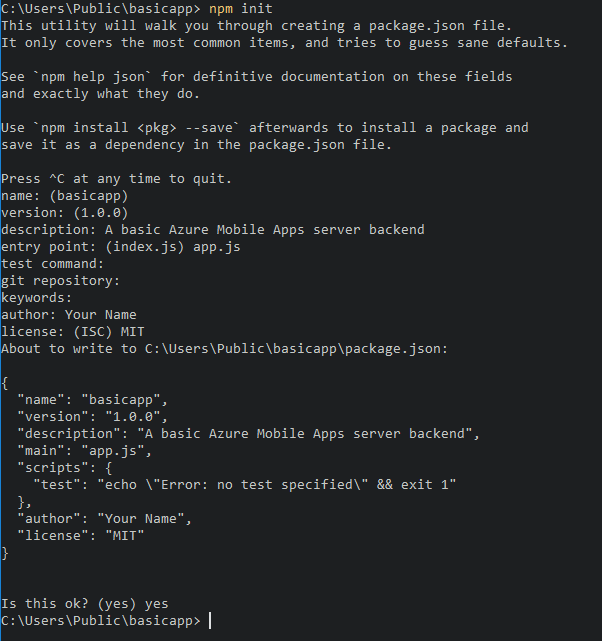
從 npm 存放庫安裝
express和azure-mobile-apps連結庫:npm install --save express azure-mobile-apps建立 app.js 檔案以實作基本行動伺服器:
var express = require('express'),
    azureMobileApps = require('azure-mobile-apps');

var app = express(),
    mobile = azureMobileApps();

// Define a TodoItem table.
mobile.tables.add('TodoItem');

// Add the Mobile API so it is accessible as a Web API.
app.use(mobile);

// Start listening on HTTP.
app.listen(process.env.PORT || 3000);
此應用程式會建立具有單一端點(/tables/TodoItem)的行動優化 Web API,以使用動態架構來提供基礎 SQL 資料存放區未經驗證的存取權。 它適用於下列用戶端連結庫快速入門:
- Android 用戶端快速入門
- Apache Cordova 用戶端快速入門
- iOS 用戶端快速入門
- Windows 應用商店用戶端快速入門
- Xamarin.iOS 用戶端快速入門
- Xamarin.Android 用戶端快速入門
- Xamarin.Forms 用戶端快速入門
您可以在 GitHub 上的 basicapp 範例中找到此基本應用程式的程式代碼。
使用 Visual Studio 2015 建立 Node.js 後端
Visual Studio 2015 需要擴充功能,才能在 IDE 內開發 Node.js 應用程式。 若要開始,請安裝 Node.js Tools 1.1 for Visual Studio。 當您完成安裝時,請建立 Express 4.x 應用程式:
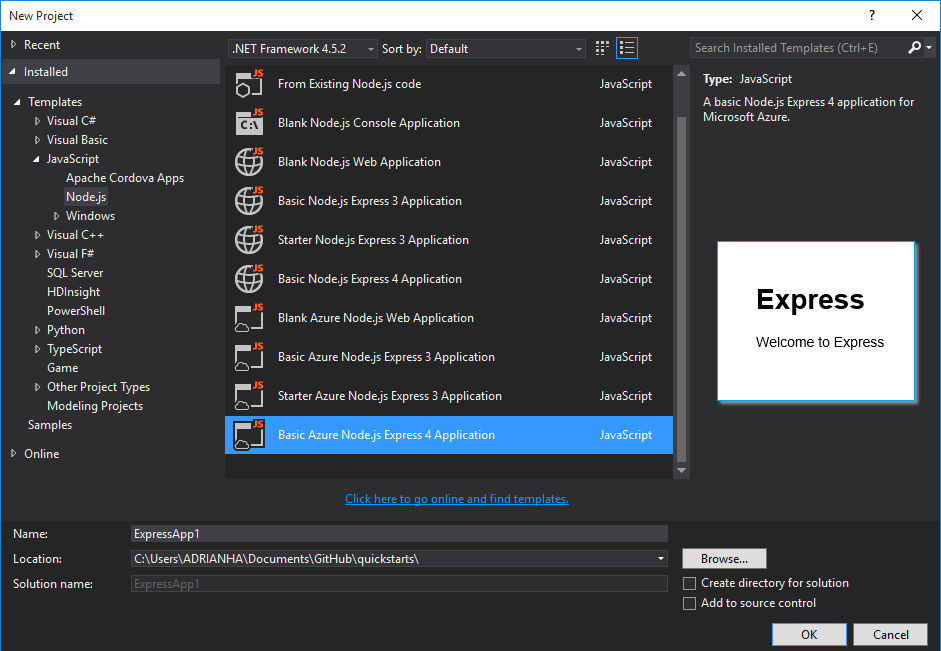
開啟 [ 新增專案] 對話框(從 [檔案>新>專案] 。
展開 範本>JavaScript>Node.js。
選取 [基本 Azure Node.js Express 4 應用程式]。
填入項目名稱。 選取 [確定]。
以滑鼠右鍵按下 npm 節點,然後選取 [ 安裝新的 npm 套件]。
建立第一個 Node.js 應用程式之後,您可能需要重新整理 npm 目錄。 如有必要,請選取 重新整理。
在搜尋方塊中輸入 azure-mobile-apps 。 選取 azure-mobile-apps 2.0.0 套件,然後選取 [ 安裝套件]。
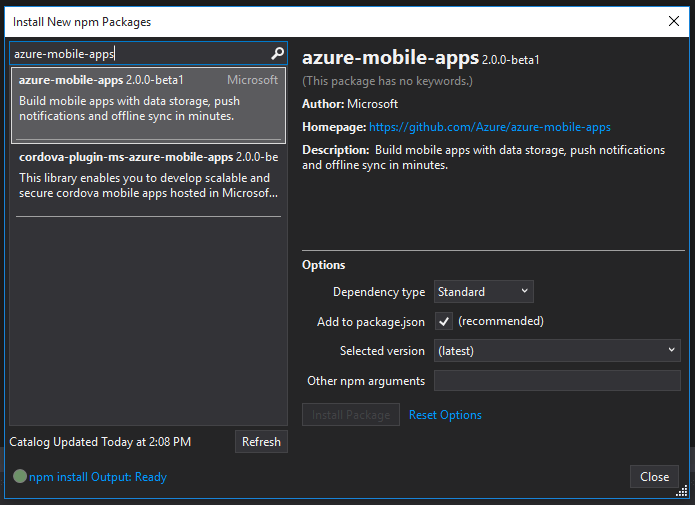
選取 [關閉]。
開啟 app.js 檔案,以新增Mobile Apps SDK的支援。 在連結庫
require語句底部的第 6 行,新增下列程式代碼:var bodyParser = require('body-parser'); var azureMobileApps = require('azure-mobile-apps');在大約第 27 行的其他
app.use語句後面,新增下列程式代碼:app.use('/users', users); // Mobile Apps initialization var mobile = azureMobileApps(); mobile.tables.add('TodoItem'); app.use(mobile);儲存檔案。
在本機執行應用程式(API 已於上
https://localhost:3000提供),或發佈至 Azure。
使用 Azure 入口網站建立 Node.js 後端
您可以在 Azure 入口網站中直接建立 Mobile Apps 後端。 您可以遵循建立 行動應用程式 教學課程,完成下列步驟,或一起建立客戶端和伺服器。 本教學課程包含這些指示的簡化版本,最適合用於概念證明專案。
在 Azure 入口網站登入。
選取 [+新增>Web + 行動>裝置應用程式],然後為您的Mobile Apps 後端提供名稱。
針對 [資源群組],選取現有的資源群組,或建立新的資源群組(使用與應用程式相同的名稱)。
針對 App Service 方案,會選取預設方案(在 標準層中)。 您也可以選取不同的方案,或 建立新的方案。
App Service 方案的設定會決定與您的應用程式相關聯的 位置、功能、成本和計算資源 。 如需 App Service 方案以及如何在不同的定價層和所需位置建立新方案的詳細資訊,請參閱 Azure App Service 方案深入概觀。
選取 建立。 此步驟會建立Mobile Apps 後端。
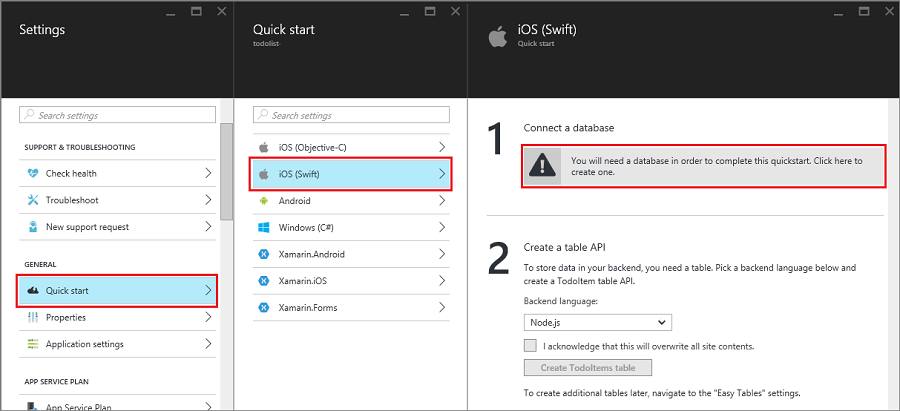
在新的Mobile Apps 後端的 [ 設定 ] 窗格中,選取 [快速入門> ] 用戶端應用程式平臺 >[連接資料庫]。
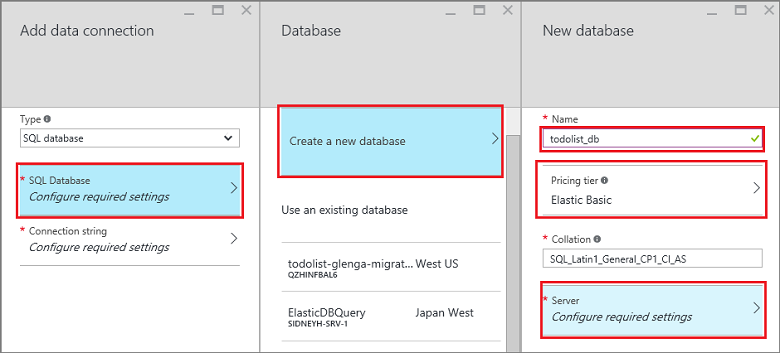
在 [ 新增數據連線 ] 窗格中,選取 [SQL Database>建立新的資料庫]。 輸入資料庫名稱,選擇定價層,然後選取 [伺服器]。 您可以重複使用這個新的資料庫。 如果您已經有相同位置的資料庫,您可以改為選擇 [使用現有的資料庫]。 我們不建議在不同的位置使用資料庫,因為頻寬成本和延遲較高。

在 [ 新增伺服器 ] 窗格中,於 [ 伺服器名稱 ] 方塊中輸入唯一的伺服器名稱、提供登入和密碼、選取 [允許 Azure 服務存取伺服器],然後選取 [ 確定]。 此步驟會建立新的資料庫。
回到 [ 新增數據連線 ] 窗格中,選取 [ 連接字串],輸入資料庫的登入和密碼值,然後選取 [ 確定]。
請等候幾分鐘,讓資料庫順利部署,再繼續進行。
回到 [ 開始使用] 窗格的 [ 建立數據表 API] 底下,選擇 [Node.js 作為後端語言。 選取 [我確認此操作會覆蓋所有網站內容] 的核取方塊,然後選取 [建立 TodoItem 表格]。
使用 Git 下載 Node.js 後端快速入門程式代碼專案
當您使用入口網站的 [ 快速入門 ] 窗格建立 Node.js Mobile Apps 後端時,系統會為您建立 Node.js 專案,並部署到您的網站。 在入口網站中,您可以新增數據表和 API,以及編輯 Node.js 後端的程式代碼檔案。 您也可以使用各種部署工具來下載後端專案,以便新增或修改數據表和 API,然後重新發佈專案。 如需詳細資訊,請參閱 Azure App Service 部署指南。
下列程式會使用 Git 存放庫來下載快速入門項目程式代碼:
如果您尚未這麼做,請安裝 Git。 安裝 Git 所需的步驟會因作系統而異。 如需作系統特定的發行版和安裝指引,請參閱 安裝 Git。
請參閱 準備您的存放庫 ,以啟用後端網站的 Git 存放庫。 記下部署使用者名稱和密碼。
在Mobile Apps後端的窗格中,記下Git clone URL設定。
使用 Git 複製 URL 來執行
git clone命令。 視需要輸入密碼,如下列範例所示:$ git clone https://username@todolist.scm.azurewebsites.net:443/todolist.git流覽至本機目錄 (
/todolist在上述範例中),並注意專案檔已下載。 在目錄中找出 todoitem.json 檔案/tables。 此檔案會定義數據表的許可權。 同時在相同的目錄中尋找 todoitem.js 檔案。 它會定義數據表的 CRUD 作業腳本。對專案檔進行變更之後,請執行下列命令以新增、認可,然後將變更上傳至網站:
 $ git commit -m "updated the table script"
 $ git push origin master
當您將新檔案新增至專案時,您必須先執行
git add .命令。
每次將一組新的提交推送至網站後,網站都會被更新。
將您的 Node.js 後端發佈至 Azure
Microsoft Azure 提供許多機制,可讓您將Mobile Apps Node.js 後端發佈至 Azure 服務。 這些機制包括整合至 Visual Studio 的部署工具、命令行工具,以及根據原始檔控制的持續部署選項。 如需詳細資訊,請參閱 Azure App Service 部署指南。
Azure App Service 有 Node.js 應用程式的具體建議,您應該在發佈後端之前查看。
為您的應用程式啟用首頁
許多應用程式都是 Web 和行動應用程式的組合。 您可以使用 ExpressJS 架構來結合這兩個方面。 不過,有時候您可能只想實作行動介面。 提供首頁以確保App Service已啟動並執行很有用。 您可以提供自己的首頁或啟用暫時首頁。 若要啟用暫時首頁,請使用下列程式代碼來具現化Mobile Apps:
var mobile = azureMobileApps({ homePage: true });
如果您只想要在本機開發時可以使用這個選項,您可以將此設定新增至您的 azureMobile.js 檔案。
表格操作
azure-mobile-apps Node.js Server SDK 提供機制,將儲存在 Azure SQL Database 中的數據數據表公開為 Web API。 它提供五項作業:
| 行動 | 說明 |
|---|---|
| GET /tables/tablename | 取得數據表中的所有記錄。 |
| GET /tables/tablename/:id | 取得數據表中的特定記錄。 |
| POST /tables/tablename | 在數據表中建立記錄。 |
| PATCH /tables/tablename/:id | 更新數據表中的記錄。 |
| DELETE /tables/tablename/:id | 刪除資料表中的記錄。 |
此 Web API 支援 OData ,並擴充數據表架構以支援 離線資料同步處理。
使用動態架構定義數據表
您必須先定義資料表,才能使用資料表。 您可以使用靜態架構來定義數據表(您可以在其中定義架構中的資料行),或動態定義數據表(SDK 會根據傳入要求控制架構)。 此外,您可以將 JavaScript 程式代碼新增至定義,以控制 Web API 的特定層面。
最佳做法是,您應該在 tables 目錄中的 JavaScript 檔案中定義每個數據表,然後使用 tables.import() 方法來匯入數據表。 擴充基本應用程式範例,您可以調整 app.js 檔案:
var express = require('express'),
    azureMobileApps = require('azure-mobile-apps');

var app = express(),
    mobile = azureMobileApps();

// Define the database schema that is exposed.
mobile.tables.import('./tables');

// Provide initialization of any tables that are statically defined.
mobile.tables.initialize().then(function () {
    // Add the Mobile API so it is accessible as a Web API.
    app.use(mobile);

    // Start listening on HTTP.
    app.listen(process.env.PORT || 3000);
});
在 ./tables/TodoItem.js中定義資料表:
var azureMobileApps = require('azure-mobile-apps');

var table = azureMobileApps.table();

// Additional configuration for the table goes here.

module.exports = table;
數據表預設會使用動態架構。 若要全域關閉動態架構,請在 Azure 入口網站中將 MS_DynamicSchema 應用程式設定設為 false。
您可以在 GitHub 上的 todo 範例中找到完整的範例。
使用靜態架構定義數據表
您可以明確定義要透過 Web API 公開的數據行。 azure-mobile-apps Node.js SDK 會自動將離線數據同步所需的任何額外資料行新增至您提供的清單。 例如,快速入門用戶端應用程式需要具有兩個數據行的數據表:text(字串)和 complete(布爾值)。
您可以在資料表定義 JavaScript 檔案中定義資料表(位於 tables 目錄中),如下所示:
var azureMobileApps = require('azure-mobile-apps');

var table = azureMobileApps.table();

// Define the columns within the table.
table.columns = {
    "text": "string",
    "complete": "boolean"
};

// Turn off the dynamic schema.
table.dynamicSchema = false;

module.exports = table;
如果您以靜態方式定義數據表,您也必須呼叫 tables.initialize() 方法來在啟動時建立資料庫架構。 方法 tables.initialize() 會傳回 承諾 ,讓 Web 服務在初始化資料庫之前不會提供要求。
使用 SQL Server Express 作為本機電腦上的開發資料存放區
Mobile Apps Node.js SDK 提供三個選項來提供現用的數據:
- 使用 記憶體 驅動程式來提供非持續性的範例存放區。
- 使用 mssql 驅動程式提供 SQL Server Express 資料存放區以供開發。
- 使用 mssql 驅動程式提供 Azure SQL Database 資料存放區以供生產環境使用。
Mobile Apps Node.js SDK 會使用 mssql Node.js 套件 來建立和使用 SQL Server Express 和 SQL Database 的連線。 此套件會要求您在 SQL Server Express 實例上啟用 TCP 連線。
小提示
記憶體驅動程式不提供一組完整的測試設施。 如果您想要在本機測試後端,建議您使用 SQL Server Express 資料存放區和 mssql 驅動程式。
下載並安裝 sql Server 2014 Express Microsoft。 請確定您安裝 SQL Server 2014 Express with Tools 版本。 除非您明確需要 64 位支援,否則 32 位版本在執行時會耗用較少的記憶體。
執行 SQL Server 2014 Configuration Manager:
一。 展開樹狀功能表中的 [SQL Server 網络組態 ] 節點。
b。 選取 [SQLEXPRESS 的通訊協定]。
丙. 以滑鼠右鍵按兩下 [TCP/IP ],然後選取 [ 啟用]。 在快顯對話框中選取 [確定 ]。
d。 以滑鼠右鍵按兩下 [TCP/IP ],然後選取 [ 屬性]。
e。 選取 IP 位址 標籤。
f. 尋找 IPAll 節點。 在 [ TCP 埠] 字段中,輸入 1433。
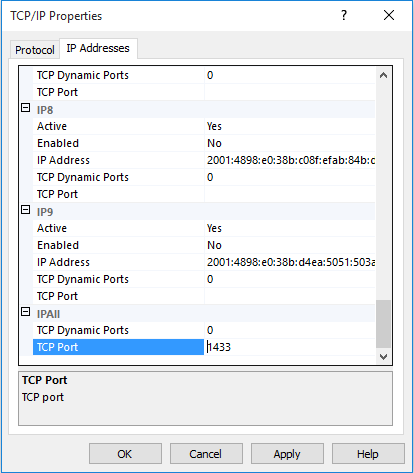
g。 選取 [確定]。 在快顯對話框中選取 [確定 ]。
h。 在樹狀目錄中選取 [SQL Server 服務 ]。
一。 以滑鼠右鍵按兩下 [SQL Server][SQLEXPRESS], 然後選取 [ 重新啟動]。
j. 關閉 SQL Server 2014 Configuration Manager。
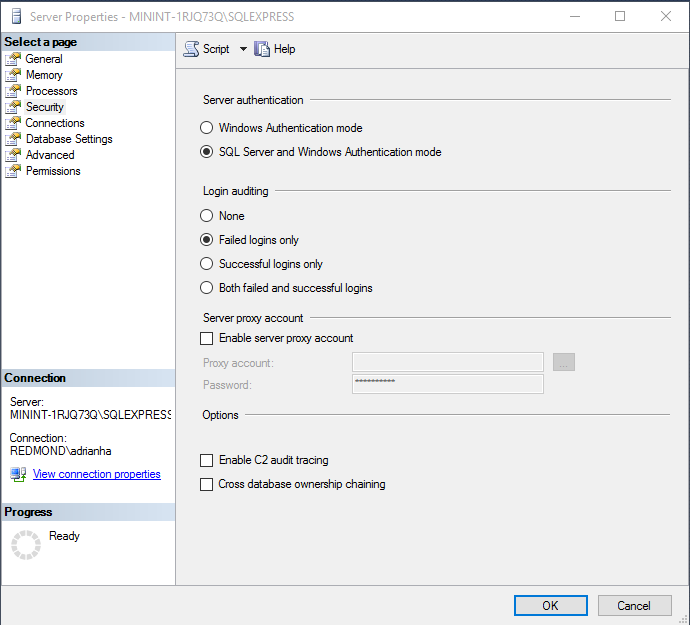
執行 SQL Server 2014 Management Studio 並連線到您的本機 SQL Server Express 實例:
以滑鼠右鍵按一下 [物件總管] 中的實例,然後選取 屬性。
選取 [安全性] 頁面 。
確定已選取 SQL Server 和 Windows 驗證模式 。
選取 [確定]。
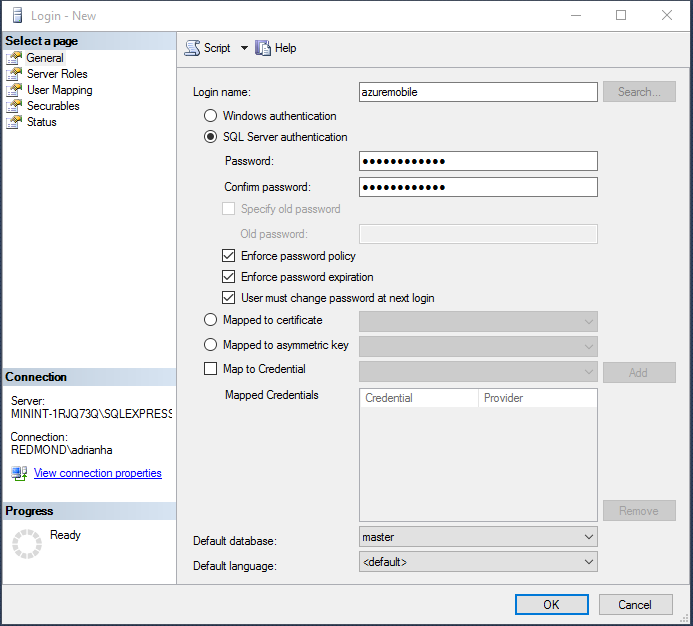
展開 [物件總管] 中的 安全性>登入。
以滑鼠右鍵按兩下 [ 登入] ,然後選取 [ 新增登入]。
輸入登入名稱。 選取 [SQL Server 驗證] 。 輸入密碼,然後在 [ 確認密碼] 中輸入相同的密碼。 密碼必須符合 Windows 複雜度需求。
選取 [確定]。
以滑鼠右鍵按下新的登入,然後選取 [ 屬性]。
選取 [伺服器角色] 頁面。
選取 dbcreator 伺服器角色的複選框。
選取 [確定]。
關閉 SQL Server 2015 Management Studio。
請務必記錄您選取的使用者名稱和密碼。 視資料庫需求而定,您可能需要指派其他伺服器角色或許可權。
Node.js 應用程式會讀取此資料庫的連接字串 SQLCONNSTR_MS_TableConnectionString 環境變數。 您可以在環境中設定此變數。 例如,您可以使用 PowerShell 來設定此環境變數:
$env:SQLCONNSTR_MS_TableConnectionString = "Server=127.0.0.1; Database=mytestdatabase; User Id=azuremobile; Password=T3stPa55word;"
透過 TCP/IP 連線存取資料庫。 提供連線的使用者名稱和密碼。
設定您的專案以進行本機開發
Mobile Apps 會從本機文件系統讀取名為 azureMobile.js 的 JavaScript 檔案。 請勿使用此檔案在生產環境中設定Mobile Apps SDK。 請改用 Azure 入口網站中的應用程式設定。
azureMobile.js 檔案應該匯出組態物件。 最常見的設定如下:
- 資料庫設定
- 診斷記錄設定
- 替代 CORS 設定
此範例 azureMobile.js 檔案會實作上述資料庫設定:
module.exports = {
    cors: {
        origins: [ 'localhost' ]
    },
    data: {
        provider: 'mssql',
        server: '127.0.0.1',
        database: 'mytestdatabase',
        user: 'azuremobile',
        password: 'T3stPa55word'
    },
    logging: {
        level: 'verbose'
    }
};
我們建議您將 azureMobile.js 新增至 .gitignore 檔案(或其他原始程式碼控件忽略檔案),以防止密碼儲存在雲端中。 一律在 Azure 入口網站內的應用程式設定中設定生產設定。
設定行動應用程式的應用程式設定
azureMobile.js 檔案中的大部分設定在 Azure 入口網站中都有對等的應用程式設定。 使用下列清單在 應用程式設定中設定您的應用程式:
| 應用程式設定 | azureMobile.js 設定 | 說明 | 有效值 |
|---|---|---|---|
| MS_MobileAppName | 名稱 | 應用程式的名稱 | 字符串 |
| MS_MobileLoggingLevel | 紀錄層級 (logging.level) | 要記錄的訊息記錄層級下限 | error, warning, info, verbose, debug, silly |
| MS_DebugMode | 除錯 | 啟用或停用偵錯模式 | 真, 假 |
| MS_TableSchema | data.schema | SQL 資料表的預設架構名稱 | string (預設值:dbo) |
| MS_DynamicSchema | data.dynamicSchema | 啟用或停用偵錯模式 | 真, 假 |
| MS_DisableVersionHeader | version (設定為未定義) | 停用 X-ZUMO-Server-Version 標頭 | 真, 假 |
| MS_SkipVersionCheck | skipversioncheck | 停用用戶端 API 版本檢查 | 真, 假 |
若要設定應用程式設定:
- 登入 Azure 入口網站。
- 選取 [所有資源 ] 或 [ 應用程式服務],然後選取行動應用程式的名稱。
- [ 設定] 窗格預設會開啟。 如果沒有,請選取 [ 設定]。
- 在 [ 一般] 功能表上,選取 [ 應用程式設定]。
- 捲動至 [應用程式設定] 區段。
- 如果您的應用程式設定已經存在,請選取應用程式設定的值以編輯該值。 如果您的應用程式設定不存在,請在 [ 金鑰 ] 方塊中輸入應用程式設定,並在 [ 值 ] 方塊中輸入值。
- 選取 [ 儲存]。
變更大部分的應用程式設定需要重新啟動服務。
使用 SQL Database 作為生產數據存放區
使用 Azure SQL Database 作為數據存放區在所有 Azure App Service 應用程式類型上都相同。 如果您尚未這麼做,請遵循下列步驟來建立Mobile Apps 後端:
登入 Azure 入口網站。
在視窗左上角,選取 [+新增 ] 按鈕 >[Web + 行動>行動應用程式],然後為您的Mobile Apps 後端提供名稱。
在 [ 資源群組] 方塊 中,輸入與您應用程式相同的名稱。
已選取預設的 App Service 方案。 如果您想要變更 App Service 方案:
一。 選取 [App 服務方案>+新建]。
b。 提供新 App Service 方案的名稱,然後選取適當的位置。
丙. 為服務選取適當的定價層。 選取 [全部檢視 ] 以檢視更多定價選項,例如 [免費 ] 和 [共用]。
d。 按兩下 [選取] 按鈕。
e。 回到 [App Service 方案] 窗格中,選取 [ 確定]。
選取 建立。
布建Mobile Apps 後端可能需要幾分鐘的時間。 布建Mobile Apps 後端之後,入口網站會開啟Mobile Apps 後端的 [ 設定 ] 窗格。
您可以選擇將現有的 SQL 資料庫連接到 Mobile Apps 後端,或建立新的 SQL 資料庫。 在本節中,我們會建立 SQL 資料庫。
備註
如果您已經有與Mobile Apps 後端位於相同位置的資料庫,您可以改為選取 [使用現有的資料庫 ],然後選取該資料庫。 我們不建議在不同的位置使用資料庫,因為延遲較高。
在新的Mobile Apps 後端中,選取 [ 設定>行動應用程式>資料>+新增]。
在 [ 新增數據連線 ] 窗格中,選取 [SQL Database - 設定必要的設定>][建立新的資料庫]。 在 [ 名稱 ] 方塊中輸入新資料庫的名稱。
選取 [伺服器]。 在 [ 新增伺服器 ] 窗格中,於 [ 伺服器名稱 ] 方塊中輸入唯一的伺服器名稱,並提供適當的伺服器管理員登入和密碼。 確定已選取 [允許 Azure 服務存取伺服器 ]。 選取 [確定]。
在 [ 新增資料庫] 窗格中,選取 [ 確定]。
回到 [ 新增數據連線 ] 窗格中,選取 [ 連接字串],然後輸入您在建立資料庫時所提供的登入和密碼。 如果您使用現有的資料庫,請提供該資料庫的登入認證。 選取 [確定]。
再次回到 [ 新增數據連線 ] 窗格中,選取 [確定 ] 以建立資料庫。
建立資料庫可能需要幾分鐘的時間。 使用 [通知] 區域來監視部署的進度。 在資料庫成功部署之前,請勿進行。 部署資料庫之後,會在Mobile Apps 後端應用程式設定中建立SQL Database 實例的連接字串。 您可以在 [設定>應用程式設定][連接字串] 中看到此應用程式設定>。
需要驗證才能存取數據表
如果您想要搭配 tables 端點使用 App Service 驗證,您必須先在 Azure 入口網站中設定 App Service 驗證。 如需詳細資訊,請參閱您想要使用之識別提供者的設定指南:
每個數據表都有一個存取屬性,可用來控制數據表的存取權。 下列範例顯示具有必要驗證的靜態定義數據表。
var azureMobileApps = require('azure-mobile-apps');

var table = azureMobileApps.table();

// Define the columns within the table.
table.columns = {
    "text": "string",
    "complete": "boolean"
};

// Turn off the dynamic schema.
table.dynamicSchema = false;

// Require authentication to access the table.
table.access = 'authenticated';

module.exports = table;
access 屬性可以接受三個值之一:
- anonymous 表示允許用戶端應用程式讀取未經驗證的數據。
- authenticated 表示客戶端應用程式必須隨要求傳送有效的驗證令牌。
- disabled 表示此數據表目前已停用。
如果未定義存取屬性,則允許未經驗證的存取。
搭配數據表使用驗證宣告
您可以設定設定驗證時要求的各種宣告。 這些宣告通常無法透過 context.user 物件取得。 不過,您可以使用 context.user.getIdentity() 方法來擷取它們。
getIdentity() 方法會傳回解析為 對象的承諾。 物件是由驗證方法進行索引鍵facebook、google、twitter、microsoftaccount或 aad)。
例如,如果您設定Microsoft帳戶驗證並要求電子郵件位址宣告,您可以使用下表控制器將電子郵件位址新增至記錄:
var azureMobileApps = require('azure-mobile-apps');

// Create a new table definition.
var table = azureMobileApps.table();

table.columns = {
    "emailAddress": "string",
    "text": "string",
    "complete": "boolean"
};
table.dynamicSchema = false;
table.access = 'authenticated';

/**
* Limit the context query to those records with the authenticated user email address
* @param {Context} context the operation context
* @returns {Promise} context execution Promise
*/
function queryContextForEmail(context) {
    return context.user.getIdentity().then((data) => {
        context.query.where({ emailAddress: data.microsoftaccount.claims.emailaddress });
        return context.execute();
    });
}

/**
* Adds the email address from the claims to the context item - used for
* insert operations
* @param {Context} context the operation context
* @returns {Promise} context execution Promise
*/
function addEmailToContext(context) {
    return context.user.getIdentity().then((data) => {
        context.item.emailAddress = data.microsoftaccount.claims.emailaddress;
        return context.execute();
    });
}

// Configure specific code when the client does a request.
// READ: only return records that belong to the authenticated user.
table.read(queryContextForEmail);

// CREATE: add or overwrite the userId based on the authenticated user.
table.insert(addEmailToContext);

// UPDATE: only allow updating of records that belong to the authenticated user.
table.update(queryContextForEmail);

// DELETE: only allow deletion of records that belong to the authenticated user.
table.delete(queryContextForEmail);

module.exports = table;
若要查看可用的宣告,請使用網頁瀏覽器來檢視您網站的 /.auth/me 端點。
停用特定數據表作業的存取
除了出現在數據表上之外,存取屬性還可以用來控制個別作業。 有四個作業:
-
read是數據表上的 RESTful GET 作業。 -
insert是數據表上的 RESTful POST 作業。 -
update是數據表上的 RESTful PATCH 作業。 -
delete是數據表上的 RESTful DELETE 作業。
例如,您可能想要提供唯讀未經驗證的數據表:
var azureMobileApps = require('azure-mobile-apps');

var table = azureMobileApps.table();

// Read-only table. Only allow READ operations.
table.read.access = 'anonymous';
table.insert.access = 'disabled';
table.update.access = 'disabled';
table.delete.access = 'disabled';

module.exports = table;
調整與數據表作業搭配使用的查詢
數據表作業的常見需求是提供數據的限制檢視。 例如,您可以提供以已驗證的使用者標識碼標記的數據表,以便您只能讀取或更新自己的記錄。 下表定義提供這項功能:
var azureMobileApps = require('azure-mobile-apps');

var table = azureMobileApps.table();

// Define a static schema for the table.
table.columns = {
    "userId": "string",
    "text": "string",
    "complete": "boolean"
};
table.dynamicSchema = false;

// Require authentication for this table.
table.access = 'authenticated';

// Ensure that only records for the authenticated user are retrieved.
table.read(function (context) {
    context.query.where({ userId: context.user.id });
    return context.execute();
});

// When adding records, add or overwrite the userId with the authenticated user.
table.insert(function (context) {
    context.item.userId = context.user.id;
    return context.execute();
});

module.exports = table;
通常執行查詢的作業具有您可以使用 where 子句來調整的查詢屬性。 查詢屬性是 QueryJS 物件,用來將 OData 查詢轉換成數據後端可以處理的專案。 對於簡單的相等案例(如上述案例),您可以使用地圖。 您也可以新增特定的 SQL 子句:
context.query.where('myfield eq ?', 'value');
在數據表上設定虛刪除
虛刪除實際上不會刪除記錄。 相反地,它會將已刪除的數據行設定為 true,將其標示為在資料庫中刪除。 除非行動用戶端 SDK 使用 IncludeDeleted(),否則 Mobile Apps SDK 會自動從結果中移除已軟刪除的記錄。 若要設定虛刪除的資料表,請在資料表定義檔中設定 softDelete 屬性:
var azureMobileApps = require('azure-mobile-apps');

var table = azureMobileApps.table();

// Define the columns within the table.
table.columns = {
    "text": "string",
    "complete": "boolean"
};

// Turn off the dynamic schema.
table.dynamicSchema = false;

// Turn on soft delete.
table.softDelete = true;

// Require authentication to access the table.
table.access = 'authenticated';

module.exports = table;
您應該建立刪除記錄的機制:用戶端應用程式、WebJob、Azure 函式或自定義 API。
使用數據植入資料庫
當您建立新的應用程式時,可能會想要使用資料植入數據表。 您可以在資料表定義 JavaScript 檔案執行這項作,如下所示:
var azureMobileApps = require('azure-mobile-apps');

var table = azureMobileApps.table();

// Define the columns within the table.
table.columns = {
    "text": "string",
    "complete": "boolean"
};
table.seed = [
    { text: 'Example 1', complete: false },
    { text: 'Example 2', complete: true }
];

// Turn off the dynamic schema.
table.dynamicSchema = false;

// Require authentication to access the table.
table.access = 'authenticated';

module.exports = table;
只有在您使用Mobile Apps SDK來建立數據表時,才會植入數據。 如果數據表已存在於資料庫中,則數據表中不會插入任何數據。 如果開啟動態架構,則會從植入的數據推斷架構。
建議您在服務開始執行時,明確呼叫 tables.initialize() 方法來建立數據表。
啟用 Swagger 支援
Mobile Apps 隨附內建 Swagger 支援。 若要啟用 Swagger 支援,請先將 swagger-ui 安裝為相依性:
npm install --save swagger-ui
然後,您可以在 Mobile Apps 建構函式中啟用 Swagger 支援:
var mobile = azureMobileApps({ swagger: true });
您可能只想在開發版本中啟用 Swagger 支援。 您可以使用應用程式設定來執行此 NODE_ENV 動作:
var mobile = azureMobileApps({ swagger: process.env.NODE_ENV !== 'production' });
端點 swagger 位於 http:// oursite.azurewebsites.net/swagger。 您可以透過 /swagger/ui 端點存取 Swagger UI。 如果您選擇在整個應用程式中要求驗證,Swagger 會產生錯誤。 為了獲得最佳結果,請選擇在 Azure App Service 驗證/授權設定中允許未經驗證的要求,然後使用 table.access 屬性來控制驗證。
如果您只想要 Swagger 支援在本機開發,您也可以將 Swagger 選項新增至您的 azureMobile.js 檔案。
推播通知
Mobile Apps 與 Azure 通知中樞整合,讓您可以跨所有主要平臺將目標推播通知傳送至數百萬部裝置。 使用通知中樞,您可以將推播通知傳送至 iOS、Android 和 Windows 裝置。 若要深入瞭解您可以使用通知中樞執行的所有作業,請參閱 通知中樞概觀。
傳送推播通知
下列程式代碼示範如何使用 push 物件將廣播推播通知傳送至已註冊的 iOS 裝置:
// Create an APNS payload.
var payload = '{"aps": {"alert": "This is an APNS payload."}}';

// Only do the push if configured.
if (context.push) {
    // Send a push notification by using APNS.
    context.push.apns.send(null, payload, function (error) {
        if (error) {
            // Do something or log the error.
        }
    });
}
從用戶端建立範本推送註冊後,您可以選擇將範本推播訊息發送至所有支援平台的裝置。 下列程式代碼示範如何傳送範本通知:
// Define the template payload.
var payload = '{"messageParam": "This is a template payload."}';

// Only do the push if configured.
if (context.push) {
    // Send a template notification.
    context.push.send(null, payload, function (error) {
        if (error) {
            // Do something or log the error.
        }
    });
}
使用標記將推播通知傳送給已驗證的使用者
當已驗證的用戶註冊推播通知時,使用者標識符標籤會自動新增至註冊。 藉由使用此標籤,您可以將推播通知傳送給特定用戶註冊的所有裝置。 下列程式碼會取得發出請求的使用者之 SID,並將範本推播通知發送給該使用者所有已註冊的裝置:
// Only do the push if configured.
if (context.push) {
    // Send a notification to the current user.
    context.push.send(context.user.id, payload, function (error) {
        if (error) {
            // Do something or log the error.
        }
    });
}
當您從已驗證的用戶端註冊推播通知時,請先確定驗證已完成,再嘗試註冊。
自訂 API
定義自定義 API
除了透過 /tables 端點的數據存取 API 之外,Mobile Apps 還可以提供自定義 API 涵蓋範圍。 自定義 API 的定義方式與資料表定義類似,而且可以存取所有相同的設施,包括驗證。
如果您想要搭配自定義 API 使用 App Service 驗證,您必須先在 Azure 入口網站中設定 App Service 驗證。 如需詳細資訊,請參閱您想要使用之識別提供者的設定指南:
自訂 API 的定義方式與資料表 API 大致相同:
- 建立
api目錄。 - 在
api目錄中建立 API 定義 JavaScript 檔案。 - 使用 import 方法匯入
api目錄。
以下是以我們稍早使用的基本應用程式範例為基礎的原型 API 定義:
var express = require('express'),
    azureMobileApps = require('azure-mobile-apps');

var app = express(),
    mobile = azureMobileApps();

// Import the custom API.
mobile.api.import('./api');

// Add the Mobile API so it is accessible as a Web API.
app.use(mobile);

// Start listening on HTTP
app.listen(process.env.PORT || 3000);
讓我們使用 Date.now() 方法來傳回伺服器日期的範例 API。 以下是 api/date.js 檔案:
var api = {
    get: function (req, res, next) {
        var date = { currentTime: Date.now() };
        res.status(200).type('application/json').send(date);
    });
};

module.exports = api;
每個參數都是其中一個標準 RESTful 動詞:GET、POST、PATCH 或 DELETE。 方法是傳送所需輸出的標準 ExpressJS 中間件 函式。
需要驗證才能存取自定義 API
Mobile Apps SDK 以相同的方式在 tables 端點和自定義 API 上實作驗證。 若要將驗證新增至上一節中開發的 API,請新增 access 屬性:
var api = {
    get: function (req, res, next) {
        var date = { currentTime: Date.now() };
        res.status(200).type('application/json').send(date);
    });
};
// All methods must be authenticated.
api.access = 'authenticated';

module.exports = api;
您也可以指定特定作業的驗證:
var api = {
    get: function (req, res, next) {
        var date = { currentTime: Date.now() };
        res.status(200).type('application/json').send(date);
    }
};
// The GET methods must be authenticated.
api.get.access = 'authenticated';

module.exports = api;
用於 tables 端點的相同令牌,必須用於需要驗證的自定義 API。
處理大型檔案上傳
Mobile Apps SDK 會使用 body-parser 中間件 來接收和解碼提交的主體內容。 您可以預先設定本文剖析器,以接受較大的檔案上傳:
var express = require('express'),
    bodyParser = require('body-parser'),
    azureMobileApps = require('azure-mobile-apps');

var app = express(),
    mobile = azureMobileApps();

// Set up large body content handling.
app.use(bodyParser.json({ limit: '50mb' }));
app.use(bodyParser.urlencoded({ limit: '50mb', extended: true }));

// Import the custom API.
mobile.api.import('./api');

// Add the Mobile API so it is accessible as a Web API.
app.use(mobile);

// Start listening on HTTP.
app.listen(process.env.PORT || 3000);
檔案在傳輸之前會以base-64編碼。 此編碼會增加實際上傳的大小(以及您必須考慮的大小)。
執行自定義 SQL 語句
Mobile Apps SDK 允許透過要求物件存取整個內容。 您可以輕鬆地對定義的資料提供者執行參數化 SQL 語句:
var api = {
    get: function (request, response, next) {
        // Check for parameters. If not there, pass on to a later API call.
        if (typeof request.params.completed === 'undefined')
            return next();

        // Define the query. Anything that the mssql
        // driver can handle is allowed.
        var query = {
            sql: 'UPDATE TodoItem SET complete=@completed',
            parameters: [{
                completed: request.params.completed
            }]
        };

        // Execute the query. The context for Mobile Apps is available through
        // request.azureMobile. The data object contains the configured data provider.
        request.azureMobile.data.execute(query)
        .then(function (results) {
            response.json(results);
        });
    }
};

api.get.access = 'authenticated';
module.exports = api;
偵錯 / 除錯
針對Mobile Apps進行偵錯、診斷和疑難解答
Azure App Service 為 Node.js 應用程式提供數種偵錯和疑難解答技術。 若要開始針對您的 Node.js Mobile Apps 後端進行疑難解答,請參閱下列文章:
Node.js 應用程式可以存取各種診斷記錄工具。 在內部,Mobile Apps Node.js SDK 會使用 Winston 進行診斷記錄。 當您啟用偵錯模式,或在 Azure 入口網站中將MS_DebugMode應用程式設定設為 true 時,會自動啟用記錄。 產生的記錄會出現在 Azure 入口網站的診斷記錄中。