本文示範如何建立 Map 控制項的自訂轉譯器,該控制項會在每個平台上以釘選資料的自訂釘選和自訂檢視來顯示原生地圖。
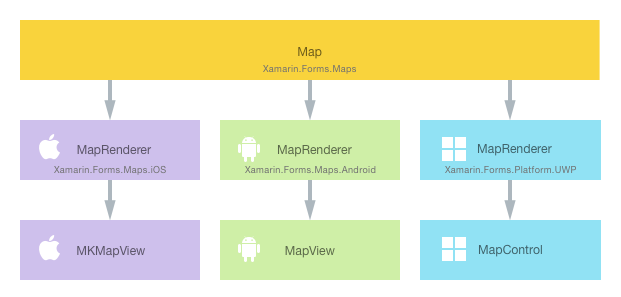
每個 Xamarin.Forms 檢視都有每個平臺的隨附轉譯器,可建立原生控件的實例。 Map當 應用程式Xamarin.Forms在 iOS 中轉譯 時,類別MapRenderer會具現化,進而具現化原生MKMapView控件。 在 Android 平台上,MapRenderer 類別會具現化原生 MapView 控制項。 在通用 Windows 平台 (UWP) 上,MapRenderer 類別會具現化原生的 MapControl。 如需控件對應之轉譯器和原生控件類別 Xamarin.Forms 的詳細資訊,請參閱 轉譯器基類和原生控件。
下圖說明 Map 和實作它之對應原生控制項間的關聯性:
您可在每個平台上建立 Map 的自訂轉譯器,使用轉譯處理序實作平台特定的自訂。 執行這項作業的程序如下:
- 建立Xamarin.Forms自定義對應。
- 從Xamarin.Forms取用自定義對應。
- 在每個平台上建立地圖的自訂轉譯器。
每個項目現在會依序進行討論,以實作在每個平台上顯示自訂釘選及釘選資料自定檢視的 CustomMap 轉譯器。
注意
您必須先初始化及設定 Xamarin.Forms.Maps,才能使用。 如需詳細資訊,請參閱Maps Control。
建立自訂地圖
您可以子類別化 Map 類別來建立自訂地圖控制項,如下列程式碼範例所示:
public class CustomMap : Map
{
    public List<CustomPin> CustomPins { get; set; }
}
CustomMap 控制項會在 .NET Standard 程式庫專案中建立,並定義自訂地圖的 API。 自訂地圖會公開 CustomPins 屬性,代表會由每個平台原生地圖控制項轉譯的 CustomPin 物件集合。 CustomPin 類別如下列程式碼範例所示:
public class CustomPin : Pin
{
    public string Name { get; set; }
    public string Url { get; set; }
}
這個類別會將 CustomPin 定義為繼承 類別的屬性 Pin ,以及新增 Name 和 Url 屬性。
使用自訂地圖
您可以宣告控制項的位置命名空間並使用自訂地圖控制項上的命名空間前置詞,在 .NET Standard 程式庫專案的 XAML 中參考 CustomMap 控制項。 下列程式碼範例示範 XAML 頁面如何使用 CustomMap 控制項:
<ContentPage ...
			       xmlns:local="clr-namespace:CustomRenderer;assembly=CustomRenderer">
	<local:CustomMap x:Name="customMap"
                   MapType="Street" />
</ContentPage>
local 命名空間前置詞沒有命名限制。 不過,clr-namespace 和 assembly 值必須符合自訂地圖的詳細資料。 一旦宣告命名空間,即會使用前置詞來參考自訂地圖。
下列程式碼範例示範 C# 頁面如何使用 CustomMap 控制項:
public class MapPageCS : ContentPage
{
    public MapPageCS()
    {
        CustomMap customMap = new CustomMap
        {
            MapType = MapType.Street
        };
        // ...
        Content = customMap;
    }
}
CustomMap 執行個體會用來在每個平台上顯示原生地圖。 MapType 屬性會設定 Map 的顯示樣式,其可能的值已定義在 MapType 列舉中。
地圖的位置以及其包含的釘選會進行初始化,如下列程式碼範例所示:
public MapPage()
{
    // ...
    CustomPin pin = new CustomPin
    {
        Type = PinType.Place,
        Position = new Position(37.79752, -122.40183),
        Label = "Xamarin San Francisco Office",
        Address = "394 Pacific Ave, San Francisco CA",
        Name = "Xamarin",
        Url = "http://xamarin.com/about/"
    };
    customMap.CustomPins = new List<CustomPin> { pin };
    customMap.Pins.Add(pin);
    customMap.MoveToRegion(MapSpan.FromCenterAndRadius(new Position(37.79752, -122.40183), Distance.FromMiles(1.0)));
}
此初始化會新增自訂釘選,並使用 MoveToRegion 方法定位地圖的檢視,其從 Position 和 Distance 建立 MapSpan 來變更地圖的位置和縮放比例。
自訂轉譯器現在可以新增至每個應用程式專案,來自訂原生地圖控制項。
在每個平台上建立自訂轉譯器
建立自訂轉譯器類別的流程如下:
- 建立轉譯自訂地圖
MapRenderer類別的子類別。 - 覆寫轉譯自訂地圖的
OnElementChanged方法,並撰寫自訂它的邏輯。 建立對應的 Xamarin.Forms 自定義對應時,會呼叫這個方法。 ExportRenderer將屬性新增至自定義轉譯器類別,以指定將用來轉Xamarin.Forms譯自定義地圖。 這個屬性是用來向 Xamarin.Forms註冊自定義轉譯器。
注意
您可以選擇在每個平台專案中提供自訂轉譯器。 如果自訂轉譯器未註冊,則會使用控制項基底類別的預設轉譯器。
下圖說明應用程式範例中每個專案的責任,以及這些專案之間的關聯性:
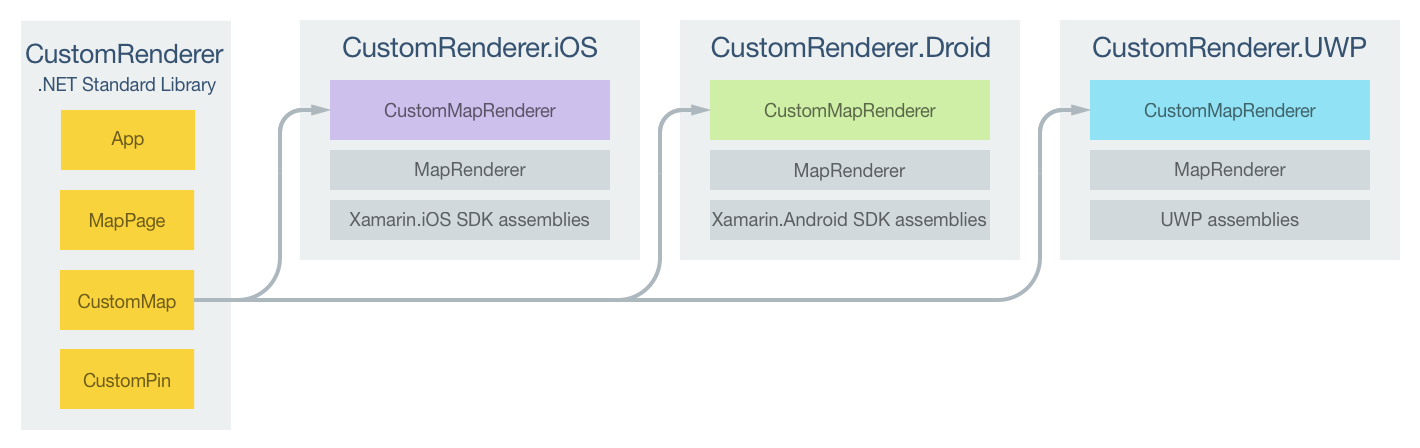
CustomMap 控制項是由平台特定轉譯器類別轉譯,其全部衍生自各平台的 MapRenderer 類別。 這會導致每個 CustomMap 控制項都使用平台特定控制項轉譯,如下列螢幕擷取畫面所示:
類別 MapRenderer 會 OnElementChanged 公開 方法,這個方法會在建立自定義對應來轉譯對應的原生控件時 Xamarin.Forms 呼叫。 這個方法採用 ElementChangedEventArgs 參數,其中包含 OldElement 和 NewElement 屬性。 這些屬性代表Xamarin.Forms轉譯器所附加的專案,以及Xamarin.Forms轉譯器分別附加至的專案。 在範例應用程式中,OldElement 屬性會是 null,而 NewElement 屬性會包含 CustomMap 執行個體的參考。
在每個平台特定轉譯器類別中,OnElementChanged 方法的覆寫版本是執行原生控制項自訂的位置。 平台上所使用的原生控制項具型別參考可透過 Control 屬性存取。 此外,可以透過 屬性取得所轉譯之控件的Element參考Xamarin.Forms。
在 OnElementChanged 方法中訂閱事件處理常式時必須留意,如下列程式碼範例中所示:
protected override void OnElementChanged (ElementChangedEventArgs<Xamarin.Forms.View> e)
{
  base.OnElementChanged (e);

  if (e.OldElement != null)
  {
      // Unsubscribe from event handlers
  }

  if (e.NewElement != null)
  {
      // Configure the native control and subscribe to event handlers
  }
}
只有在自定義轉譯器附加至新 Xamarin.Forms 元素時,才應該設定原生控件並訂閱事件處理程式。 同樣地,您應該只在轉譯器附加到的項目變更時,才取消訂閱任何已訂閱的事件處理常式。 採用這個方法將有助於建立不會發生記憶體流失的自訂轉譯器。
每個自定義轉譯器類別都會以 ExportRenderer 向 註冊轉譯器 Xamarin.Forms的屬性裝飾。 屬性會採用兩個參數 :要轉譯之 Xamarin.Forms 自定義控件的類型名稱,以及自定義轉譯器的型別名稱。 屬性的 assembly 前置詞會指定套用至整個組件的屬性。
下列各節會討論每個平台特定自訂轉譯器類別的實作。
在 iOS 上建立自訂轉譯器
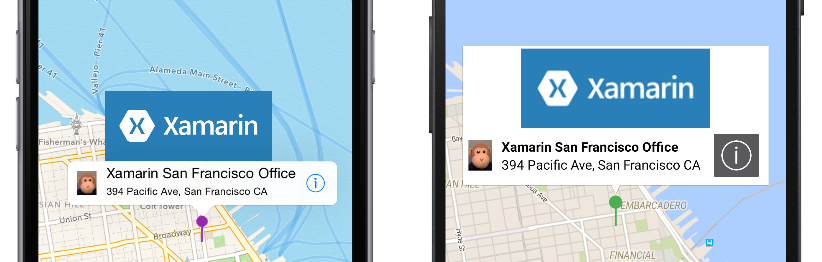
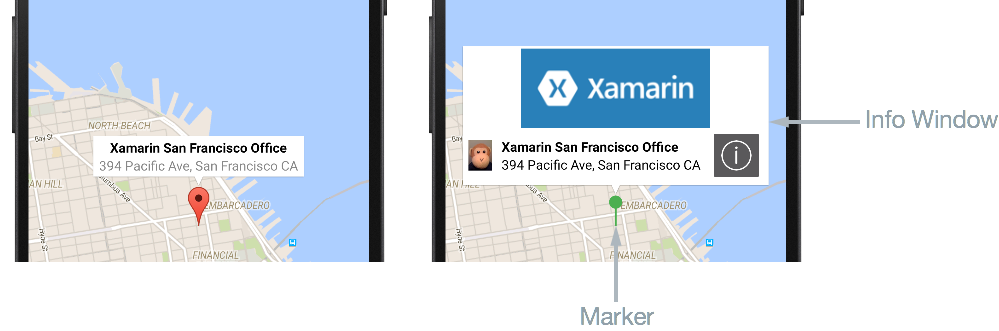
下列螢幕擷取畫面會顯示自訂前和自訂後的地圖:
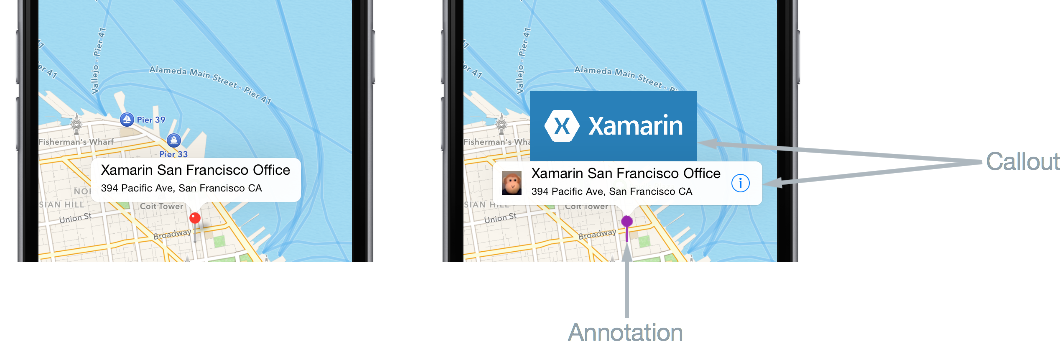
在 iOS 上,釘選稱為「註釋」,且可以是自訂影像或系統定義的各種顏色圖釘。 釘選可以選擇性地顯示「圖說文字」,該文字會在回應選取註釋的使用者時顯示。 圖說文字會顯示 Pin 執行個體的 Label 和 Address 屬性,且可以選擇性的附帶左側或右側裝飾檢視。 在上方的螢幕擷取畫面中,左側裝飾檢視是一隻猴子的影像,右側裝飾檢視則是「資訊」按鈕。
下列程式碼範例示範適用於 iOS 平台的自訂轉譯器:
[assembly: ExportRenderer(typeof(CustomMap), typeof(CustomMapRenderer))]
namespace CustomRenderer.iOS
{
    public class CustomMapRenderer : MapRenderer
    {
        UIView customPinView;
        List<CustomPin> customPins;

        protected override void OnElementChanged(ElementChangedEventArgs<View> e)
        {
            base.OnElementChanged(e);

            if (e.OldElement != null)
            {
                var nativeMap = Control as MKMapView;
                if (nativeMap != null)
                {
                    nativeMap.RemoveAnnotations(nativeMap.Annotations);
                    nativeMap.GetViewForAnnotation = null;
                    nativeMap.CalloutAccessoryControlTapped -= OnCalloutAccessoryControlTapped;
                    nativeMap.DidSelectAnnotationView -= OnDidSelectAnnotationView;
                    nativeMap.DidDeselectAnnotationView -= OnDidDeselectAnnotationView;
                }
            }

            if (e.NewElement != null)
            {
                var formsMap = (CustomMap)e.NewElement;
                var nativeMap = Control as MKMapView;
                customPins = formsMap.CustomPins;

                nativeMap.GetViewForAnnotation = GetViewForAnnotation;
                nativeMap.CalloutAccessoryControlTapped += OnCalloutAccessoryControlTapped;
                nativeMap.DidSelectAnnotationView += OnDidSelectAnnotationView;
                nativeMap.DidDeselectAnnotationView += OnDidDeselectAnnotationView;
            }
        }
        // ...
    }
}
方法 OnElementChanged 會執行實例的 MKMapView 下列組態,前提是自定義轉譯器已附加至新 Xamarin.Forms 元素:
GetViewForAnnotation屬性會設為GetViewForAnnotation方法。 此方法會在註釋位置於地圖上可見時呼叫,且會用於在顯示前自訂註釋。CalloutAccessoryControlTapped、DidSelectAnnotationView和DidDeselectAnnotationView的事件處理常式會進行註冊。 這些事件分別會在使用者點選圖說文字中的右側裝飾,以及使用者選取和取消選取註釋時引發。 只有在轉譯器附加到的項目變更時,才會取消訂閱事件。
顯示註釋
GetViewForAnnotation 方法會在註釋位置於地圖上可見時呼叫,且會用於在顯示前自訂註釋。 註釋有兩個部分:
MkAnnotation– 包含標題、子標題,以及註釋的位置。MkAnnotationView– 包含表示註釋的影像,以及在使用者點選註釋時顯示的選擇性圖說文字。
GetViewForAnnotation 方法接受 IMKAnnotation,其中包含註釋的資料,並會傳回 MKAnnotationView,用於在地圖上顯示,如下列程式碼範例所示:
protected override MKAnnotationView GetViewForAnnotation(MKMapView mapView, IMKAnnotation annotation)
{
    MKAnnotationView annotationView = null;

    if (annotation is MKUserLocation)
        return null;

    var customPin = GetCustomPin(annotation as MKPointAnnotation);
    if (customPin == null)
    {
        throw new Exception("Custom pin not found");
    }

    annotationView = mapView.DequeueReusableAnnotation(customPin.Name);
    if (annotationView == null)
    {
        annotationView = new CustomMKAnnotationView(annotation, customPin.Name);
        annotationView.Image = UIImage.FromFile("pin.png");
        annotationView.CalloutOffset = new CGPoint(0, 0);
        annotationView.LeftCalloutAccessoryView = new UIImageView(UIImage.FromFile("monkey.png"));
        annotationView.RightCalloutAccessoryView = UIButton.FromType(UIButtonType.DetailDisclosure);
        ((CustomMKAnnotationView)annotationView).Name = customPin.Name;
        ((CustomMKAnnotationView)annotationView).Url = customPin.Url;
    }
    annotationView.CanShowCallout = true;

    return annotationView;
}
此方法可確保將註釋顯示為自訂影像,而非系統定義的圖釘,且在註釋受到點選時,顯示在註釋標題和地址左側和右側包含額外內容的圖說文字。 執行此作業的流程如下:
- 呼叫
GetCustomPin方法傳回註釋的自訂釘選資料。 - 為了節省記憶體,註釋的檢視會透過呼叫
DequeueReusableAnnotation集中以重複使用。 CustomMKAnnotationView類別會使用對應到CustomPin執行個體中相同屬性的Name和Url屬性來擴充MKAnnotationView類別。 建立 的新實例CustomMKAnnotationView,前提是批注為null:CustomMKAnnotationView.Image屬性會設為表示地圖上註釋的影像。CustomMKAnnotationView.CalloutOffset屬性會設為CGPoint,其指定圖說文字置中並位於註釋上方。CustomMKAnnotationView.LeftCalloutAccessoryView屬性會設為猴子影像,顯示在註釋標題和地址的左側。CustomMKAnnotationView.RightCalloutAccessoryView屬性會設為「資訊」按鈕,顯示在註釋標題和地址的右側。CustomMKAnnotationView.Name屬性會設為GetCustomPin方法傳回的CustomPin.Name屬性。 這可以用來識別註釋,使其圖說文字能供進一步自訂 (若需要的話)。CustomMKAnnotationView.Url屬性會設為GetCustomPin方法傳回的CustomPin.Url屬性。 當使用者點選顯示在右側圖說文字裝飾檢視中的按鈕時,便會巡覽至該 URL。
MKAnnotationView.CanShowCallout屬性會設為true,使圖說文字在註釋受到點選時顯示。- 註釋接著便會傳回,以供在地圖上顯示。
選取註釋
當使用者點選註釋時,便會引發 DidSelectAnnotationView 事件,該事件接著便會執行 OnDidSelectAnnotationView 方法:
void OnDidSelectAnnotationView(object sender, MKAnnotationViewEventArgs e)
{
    CustomMKAnnotationView customView = e.View as CustomMKAnnotationView;
    customPinView = new UIView();

    if (customView.Name.Equals("Xamarin"))
    {
        customPinView.Frame = new CGRect(0, 0, 200, 84);
        var image = new UIImageView(new CGRect(0, 0, 200, 84));
        image.Image = UIImage.FromFile("xamarin.png");
        customPinView.AddSubview(image);
        customPinView.Center = new CGPoint(0, -(e.View.Frame.Height + 75));
        e.View.AddSubview(customPinView);
    }
}
若選取的註釋已將其 Name 屬性設為 Xamarin,此方法便會藉由將包含 Xamarin 標誌影像的 UIView 執行個體新增到其中,來擴充現有的圖說文字 (包含左側及右側裝飾檢視)。 這可應用在為不同註釋顯示不同圖說文字的案例中。 UIView 執行個體會置中並顯示在現有圖說文字的上方。
點選右側圖說文字裝飾檢視
當使用者點選位於右側圖說文字裝飾檢視中的「資訊」按鈕時,便會引發 CalloutAccessoryControlTapped 事件,該事件接著便會執行 OnCalloutAccessoryControlTapped 方法:
void OnCalloutAccessoryControlTapped(object sender, MKMapViewAccessoryTappedEventArgs e)
{
    CustomMKAnnotationView customView = e.View as CustomMKAnnotationView;
    if (!string.IsNullOrWhiteSpace(customView.Url))
    {
        UIApplication.SharedApplication.OpenUrl(new Foundation.NSUrl(customView.Url));
    }
}
此方法會開啟網頁瀏覽器,並巡覽至儲存在 CustomMKAnnotationView.Url 屬性中的網址。 請注意,網址會在於 .NET Standard 程式庫專案中建立 CustomPin 集合時定義。
取消選取註釋
當註釋已顯示並且使用者點選地圖時,便會引發 DidDeselectAnnotationView 事件,該事件接著便會執行 OnDidDeselectAnnotationView 方法:
void OnDidDeselectAnnotationView(object sender, MKAnnotationViewEventArgs e)
{
    if (!e.View.Selected)
    {
        customPinView.RemoveFromSuperview();
        customPinView.Dispose();
        customPinView = null;
    }
}
此方法可確保當未選取現有圖說文字時,圖說文字的擴充部分 (Xamarin 標誌的影像) 也會停止顯示,並釋放其資源。
如需自訂 MKMapView 執行個體的詳細資訊,請參閱 iOS Maps。
在 Android 上建立自訂轉譯器
下列螢幕擷取畫面會顯示自訂前和自訂後的地圖:
在 Android 上,釘選稱為「標記」,且可以是自訂影像或系統定義的各種顏色圖釘。 標記可以顯示「資訊視窗」,該視窗會在回應點選標記的使用者時顯示。 資訊視窗會顯示 Pin 執行個體的 Label 及 Address 屬性,且可以進行自訂以包含其它內容。 但是,一次只能顯示一個資訊視窗。
下列程式碼範例示範適用於 Android 平台的自訂轉譯器:
[assembly: ExportRenderer(typeof(CustomMap), typeof(CustomMapRenderer))]
namespace CustomRenderer.Droid
{
    public class CustomMapRenderer : MapRenderer, GoogleMap.IInfoWindowAdapter
    {
        List<CustomPin> customPins;

        public CustomMapRenderer(Context context) : base(context)
        {
        }

        protected override void OnElementChanged(Xamarin.Forms.Platform.Android.ElementChangedEventArgs<Map> e)
        {
            base.OnElementChanged(e);

            if (e.OldElement != null)
            {
                NativeMap.InfoWindowClick -= OnInfoWindowClick;
            }

            if (e.NewElement != null)
            {
                var formsMap = (CustomMap)e.NewElement;
                customPins = formsMap.CustomPins;
            }
        }

        protected override void OnMapReady(GoogleMap map)
        {
            base.OnMapReady(map);

            NativeMap.InfoWindowClick += OnInfoWindowClick;
            NativeMap.SetInfoWindowAdapter(this);
        }
        ...
    }
}
如果自定義轉譯器附加至新 Xamarin.Forms 元素,方法 OnElementChanged 會從控件擷取自定義針腳清單。 一旦 GoogleMap 可供使用,便會叫用 OnMapReady 覆寫。 此方法會註冊 InfoWindowClick 事件的事件處理常式,該事件會在使用者按一下資訊視窗時引發,且只會在轉譯器附加到的項目變更時取消訂閱。 OnMapReady 覆寫也會呼叫 SetInfoWindowAdapter 方法來指定 CustomMapRenderer 類別執行個體提供自訂資訊視窗的方法。
CustomMapRenderer 類別會實作 GoogleMap.IInfoWindowAdapter 介面,來自訂資訊視窗。 此介面會指定必須實作下列方法:
public Android.Views.View GetInfoWindow(Marker marker)– 此方法會進行呼叫以傳回標記的自訂資訊視窗。 若其傳回null,則會使用預設視窗轉譯。 若其傳回View,便會將該View放置在資訊視窗框架中。public Android.Views.View GetInfoContents(Marker marker)– 此方法會進行呼叫,以傳回包含資訊視窗內容的View,且只會在GetInfoWindow方法傳回null時呼叫。 若其傳回null,則會使用資訊視窗內容的預設轉譯。
在應用程式範例中,由於只有資訊視窗內容經過自訂,因此 GetInfoWindow 方法會傳回 null 來啟用它。
自訂標記
用來表示標記的圖示可透過呼叫 MarkerOptions.SetIcon 方法來自訂。 這可透過覆寫 CreateMarker 方法來完成,該方法會針對每個新增到地圖的 Pin 叫用:
protected override MarkerOptions CreateMarker(Pin pin)
{
    var marker = new MarkerOptions();
    marker.SetPosition(new LatLng(pin.Position.Latitude, pin.Position.Longitude));
    marker.SetTitle(pin.Label);
    marker.SetSnippet(pin.Address);
    marker.SetIcon(BitmapDescriptorFactory.FromResource(Resource.Drawable.pin));
    return marker;
}
此方法會為每個 Pin 執行個體建立新的 MarkerOption 執行個體。 在設定標記的位置、標籤及地址後,便會使用 SetIcon 方法來設定其圖示。 此方法接受 BitmapDescriptor 物件,該物件包含轉譯圖示所需要的資料,並使用 BitmapDescriptorFactory 類別提供協助程式方法來簡化 BitmapDescriptor 的建立。 如需使用 BitmapDescriptorFactory 類別自訂標記的詳細資訊,請參閱自訂標記。
注意
如有需要,可以在您的地圖轉譯器中叫用 GetMarkerForPin 方法,來從 Pin 擷取 Marker。
自訂資訊視窗
若 GetInfoWindow 方法傳回 null,則當使用者點選標記時,便會執行 GetInfoContents 方法。 下列程式碼範例示範 GetInfoContents 方法:
public Android.Views.View GetInfoContents(Marker marker)
{
    var inflater = Android.App.Application.Context.GetSystemService(Context.LayoutInflaterService) as Android.Views.LayoutInflater;
    if (inflater != null)
    {
        Android.Views.View view;

        var customPin = GetCustomPin(marker);
        if (customPin == null)
        {
            throw new Exception("Custom pin not found");
        }

        if (customPin.Name.Equals("Xamarin"))
        {
            view = inflater.Inflate(Resource.Layout.XamarinMapInfoWindow, null);
        }
        else
        {
            view = inflater.Inflate(Resource.Layout.MapInfoWindow, null);
        }

        var infoTitle = view.FindViewById<TextView>(Resource.Id.InfoWindowTitle);
        var infoSubtitle = view.FindViewById<TextView>(Resource.Id.InfoWindowSubtitle);

        if (infoTitle != null)
        {
            infoTitle.Text = marker.Title;
        }
        if (infoSubtitle != null)
        {
            infoSubtitle.Text = marker.Snippet;
        }

        return view;
    }
    return null;
}
此方法會傳回包含資訊視窗內容的 View。 執行此作業的流程如下:
- 擷取
LayoutInflater執行個體。 這可用來將配置 XML 檔案具現化為對應的View。 - 呼叫
GetCustomPin方法,傳回資訊視窗的自訂釘選資料。 - 若
CustomPin.Name屬性等於Xamarin,則XamarinMapInfoWindow配置將會擴大。 否則,MapInfoWindow配置便會擴大。 這可應用在為不同標記顯示不同資訊視窗配置的案例中。 - 若資源並非
null,便會從擴大的配置中擷取InfoWindowTitle和InfoWindowSubtitle資源,且其Text屬性會設為Marker執行個體中的對應資料。 - 接著便會傳回
View執行個體,以供在地圖上顯示。
注意
資訊視窗並非即時 View。 相反地,Android 會將 View 轉換成靜態點陣圖並將其顯示為影像。 這表示雖然資訊視窗可以回應 Click 事件,但它無法回應任何觸控事件或手勢,且資訊視窗中的個別控制項也都無法回應各自 Click 事件。
按一下資訊視窗
當使用者按一下資訊視窗時,便會引發 InfoWindowClick 事件,該事件接著便會執行 OnInfoWindowClick 方法:
void OnInfoWindowClick(object sender, GoogleMap.InfoWindowClickEventArgs e)
{
    var customPin = GetCustomPin(e.Marker);
    if (customPin == null)
    {
        throw new Exception("Custom pin not found");
    }

    if (!string.IsNullOrWhiteSpace(customPin.Url))
    {
        var url = Android.Net.Uri.Parse(customPin.Url);
        var intent = new Intent(Intent.ActionView, url);
        intent.AddFlags(ActivityFlags.NewTask);
        Android.App.Application.Context.StartActivity(intent);
    }
}
此方法會開啟網頁瀏覽器,並巡覽至儲存在針對 Marker 所擷取到 CustomPin 執行個體中 Url 屬性內的網址。 請注意,網址會在於 .NET Standard 程式庫專案中建立 CustomPin 集合時定義。
如需自訂 MapView 執行個體的詳細資訊,請參閱 Maps API。
在通用 Windows 平台上建立自訂轉譯器
下列螢幕擷取畫面會顯示自訂前和自訂後的地圖:
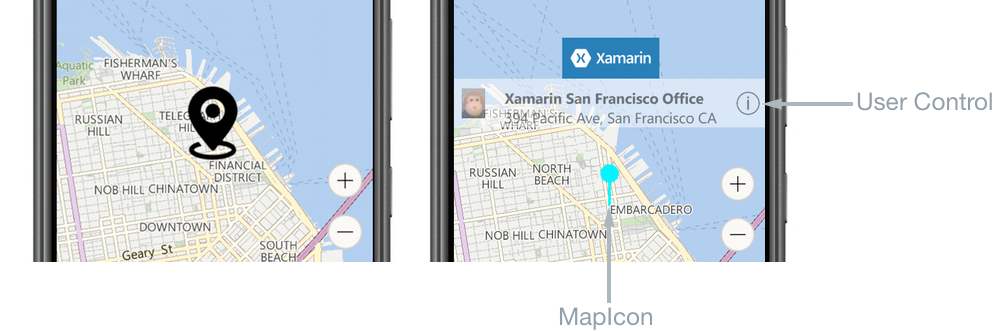
在 UWP 上,釘選稱為「地圖圖示」,且可以是自訂影像或系統定義的預設影像。 地圖圖示可以顯示 UserControl,該控制項會在回應點選地圖圖示的使用者時顯示。 UserControl 可以顯示任何內容,包括 Pin 執行個體的 Label 及 Address 屬性。
下列程式碼範例示範 UWP 自訂轉譯器:
[assembly: ExportRenderer(typeof(CustomMap), typeof(CustomMapRenderer))]
namespace CustomRenderer.UWP
{
    public class CustomMapRenderer : MapRenderer
    {
        MapControl nativeMap;
        List<CustomPin> customPins;
        XamarinMapOverlay mapOverlay;
        bool xamarinOverlayShown = false;

        protected override void OnElementChanged(ElementChangedEventArgs<Map> e)
        {
            base.OnElementChanged(e);

            if (e.OldElement != null)
            {
                nativeMap.MapElementClick -= OnMapElementClick;
                nativeMap.Children.Clear();
                mapOverlay = null;
                nativeMap = null;
            }

            if (e.NewElement != null)
            {
                var formsMap = (CustomMap)e.NewElement;
                nativeMap = Control as MapControl;
                customPins = formsMap.CustomPins;

                nativeMap.Children.Clear();
                nativeMap.MapElementClick += OnMapElementClick;

                foreach (var pin in customPins)
                {
                    var snPosition = new BasicGeoposition { Latitude = pin.Pin.Position.Latitude, Longitude = pin.Pin.Position.Longitude };
                    var snPoint = new Geopoint(snPosition);

                    var mapIcon = new MapIcon();
                    mapIcon.Image = RandomAccessStreamReference.CreateFromUri(new Uri("ms-appx:///pin.png"));
                    mapIcon.CollisionBehaviorDesired = MapElementCollisionBehavior.RemainVisible;
                    mapIcon.Location = snPoint;
                    mapIcon.NormalizedAnchorPoint = new Windows.Foundation.Point(0.5, 1.0);

                    nativeMap.MapElements.Add(mapIcon);
                }
            }
        }
        ...
    }
}
方法 OnElementChanged 會執行下列作業,前提是自定義轉譯器附加至新 Xamarin.Forms 元素:
- 清除
MapControl.Children集合以從地圖移除任何現有的使用者介面項目,再註冊MapElementClick事件的事件處理常式。 此事件會在使用者點選或按一下MapControl上的MapElement時引發,且只會在轉譯器附加到的項目變更時取消訂閱。 - 集合中的每個
customPins釘選都會在地圖上正確的地理位置顯示,如下所示:- 將釘選的位置作為
Geopoint執行個體建立。 - 建立
MapIcon執行個體以代表釘選。 - 透過設定
MapIcon.Image屬性,指定用來代表MapIcon的影像。 但是,無法保證一律會顯示地圖圖示的影像,因為影像可能會被地圖上的其它項目遮蔽。 因此,地圖圖示的CollisionBehaviorDesired屬性會設為MapElementCollisionBehavior.RemainVisible,以確保它保持在可見狀態。 - 透過設定
MapIcon.Location屬性,指定MapIcon的位置。 - 將
MapIcon.NormalizedAnchorPoint屬性設為影像上指標的近似位置。 若此屬性維持在預設值 (0,0) (表示影像的左上角),則變更地圖的縮放比例可能會導致影像指向不同位置。 - 將
MapIcon執行個體新增到MapControl.MapElements集合。 這會導致在MapControl中顯示地圖圖示。
- 將釘選的位置作為
注意
當針對多個地圖圖示使用相同影像時,應在頁面或應用程式層級宣告 RandomAccessStreamReference 執行個體,以取得最佳效能。
顯示使用者控制項
當使用者點選地圖圖示時,便會執行 OnMapElementClick 方法。 下列程式碼範例示範此方法:
private void OnMapElementClick(MapControl sender, MapElementClickEventArgs args)
{
    var mapIcon = args.MapElements.FirstOrDefault(x => x is MapIcon) as MapIcon;
    if (mapIcon != null)
    {
        if (!xamarinOverlayShown)
        {
            var customPin = GetCustomPin(mapIcon.Location.Position);
            if (customPin == null)
            {
                throw new Exception("Custom pin not found");
            }

            if (customPin.Name.Equals("Xamarin"))
            {
                if (mapOverlay == null)
                {
                    mapOverlay = new XamarinMapOverlay(customPin);
                }

                var snPosition = new BasicGeoposition { Latitude = customPin.Position.Latitude, Longitude = customPin.Position.Longitude };
                var snPoint = new Geopoint(snPosition);

                nativeMap.Children.Add(mapOverlay);
                MapControl.SetLocation(mapOverlay, snPoint);
                MapControl.SetNormalizedAnchorPoint(mapOverlay, new Windows.Foundation.Point(0.5, 1.0));
                xamarinOverlayShown = true;
            }
        }
        else
        {
            nativeMap.Children.Remove(mapOverlay);
            xamarinOverlayShown = false;
        }
    }
}
此方法會建立 UserControl 執行個體,顯示釘選的相關資訊。 執行此作業的流程如下:
- 擷取
MapIcon執行個體。 - 呼叫
GetCustomPin方法,傳回要顯示的自訂釘選資料。 - 建立
XamarinMapOverlay執行個體來顯示自訂釘選資料。 此類別為使用者控制項。 - 將要在
MapControl上顯示XamarinMapOverlay執行個體的地理位置作為Geopoint執行個體建立。 - 將
XamarinMapOverlay執行個體新增到MapControl.Children集合。 此集合包含將顯示在地圖上的 XAML 使用者介面項目。 - 透過呼叫
SetLocation方法,設定XamarinMapOverlay執行個體在地圖上的地理位置。 - 透過呼叫
SetNormalizedAnchorPoint方法,設定對應到指定位置的XamarinMapOverlay執行個體相對位置。 這可確保即使變更地圖的縮放比例,也一律會將XamarinMapOverlay執行個體顯示在正確的位置。
或者,若釘選的相關資訊已顯示在地圖上,點選地圖會將 XamarinMapOverlay 執行個體從 MapControl.Children 集合中移除。
點選資訊按鈕
當使用者點選 XamarinMapOverlay 使用者控制項中的「資訊」按鈕時,便會引發 Tapped 事件,該事件接著便會執行 OnInfoButtonTapped 方法:
private async void OnInfoButtonTapped(object sender, TappedRoutedEventArgs e)
{
    await Launcher.LaunchUriAsync(new Uri(customPin.Url));
}
此方法會開啟網頁瀏覽器,並巡覽至儲存在 CustomPin 執行個體 Url 屬性中的網址。 請注意,網址會在於 .NET Standard 程式庫專案中建立 CustomPin 集合時定義。
如需自訂 MapControl 執行個體的詳細資訊,請參閱 MSDN 上的地圖和位置概觀。