Xamarin.Forms ViewCell 是可新增至 ListView 或 TableView 的儲存格,其中包含開發人員定義的檢視。 本文示範如何為裝載於 ListView 控件內的 Xamarin.Forms ViewCell 建立自定義轉譯器。 這會停止 Xamarin.Forms 在 ListView 捲動期間重複呼叫版面配置計算。
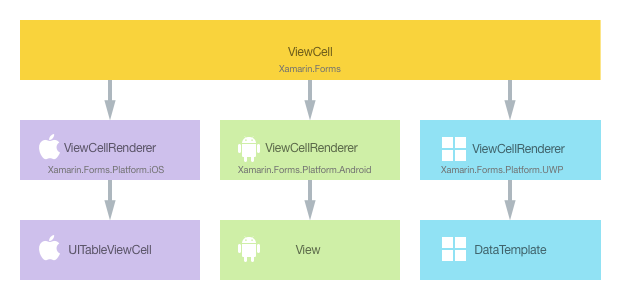
每個 Xamarin.Forms 數據格都有每個平臺的隨附轉譯器,可建立原生控件的實例。 ViewCell當應用程式轉Xamarin.Forms譯 時,會在iOS ViewCellRenderer 中具現化 類別,進而具現化原生UITableViewCell控件。 在 Android 平台上,ViewCellRenderer 類別會具現化原生 View 控制項。 在通用 Windows 平台 (UWP) 上,ViewCellRenderer 類別會具現化原生的 DataTemplate。 如需控件對應之轉譯器和原生控件類別 Xamarin.Forms 的詳細資訊,請參閱 轉譯器基類和原生控件。
下圖說明 ViewCell 和實作它之對應原生控制項間的關聯性:
您可在每個平台上建立 ViewCell 的自訂轉譯器,利用轉譯程序實作平台特定的自訂。 執行這項作業的程序如下:
- 建立Xamarin.Forms自定義儲存格。
- 從Xamarin.Forms取用自定義儲存格。
- 在每個平台上建立資料格的自訂轉譯器。
現在將討論每個專案,以實 NativeCell 作轉譯器,以利用控件內 Xamarin.FormsListView 裝載之每個數據格的平臺特定配置。 這樣會 Xamarin.Forms 停止在捲動期間 ListView 重複呼叫版面配置計算。
建立自訂資料格
您可以子類別化 ViewCell 類別,建立自訂的資料格控制項,如下列程式碼範例所示:
public class NativeCell : ViewCell
{
  public static readonly BindableProperty NameProperty =
    BindableProperty.Create ("Name", typeof(string), typeof(NativeCell), "");

  public string Name {
    get { return (string)GetValue (NameProperty); }
    set { SetValue (NameProperty, value); }
  }

  public static readonly BindableProperty CategoryProperty =
    BindableProperty.Create ("Category", typeof(string), typeof(NativeCell), "");

  public string Category {
    get { return (string)GetValue (CategoryProperty); }
    set { SetValue (CategoryProperty, value); }
  }

  public static readonly BindableProperty ImageFilenameProperty =
    BindableProperty.Create ("ImageFilename", typeof(string), typeof(NativeCell), "");

  public string ImageFilename {
    get { return (string)GetValue (ImageFilenameProperty); }
    set { SetValue (ImageFilenameProperty, value); }
  }
}
在 .NET Standard 程式庫專案中建立的 NativeCell 類別,會為自訂資料格定義 API。 自訂資料格會公開可透過資料繫結顯示的 Name、Category 和 ImageFilename 屬性。 如需有關資料繫結的詳細資訊,請參閱資料繫結基本概念。
使用自訂的資料格
您可以宣告自訂資料格的位置命名空間並使用自訂資料格項目上的命名空間前置詞,在 .NET Standard 程式庫專案的 XAML 中參考 NativeCell 自訂資料格。 下列程式碼範例示範 XAML 頁面可如何使用 NativeCell 自訂資料格:
<ContentPage ...
    xmlns:local="clr-namespace:CustomRenderer;assembly=CustomRenderer"
    ...>
    ...
    <ContentPage.Content>
          <StackLayout>
              <Label Text="Xamarin.Forms native cell" HorizontalTextAlignment="Center" />
              <ListView x:Name="listView" CachingStrategy="RecycleElement" ItemSelected="OnItemSelected">
                  <ListView.ItemTemplate>
                      <DataTemplate>
                          <local:NativeCell Name="{Binding Name}" Category="{Binding Category}" ImageFilename="{Binding ImageFilename}" />
                      </DataTemplate>
                  </ListView.ItemTemplate>
              </ListView>
          </StackLayout>
      </ContentPage.Content>
</ContentPage>
local 命名空間前置詞沒有命名限制。 不過,clr-namespace 和 assembly 值必須符合自訂控制項的詳細資料。 一旦宣告命名空間,即會使用前置詞來參考自訂資料格。
下列程式碼範例示範 C# 頁面如何使用 NativeCell 自訂資料格:
public class NativeCellPageCS : ContentPage
{
    ListView listView;

    public NativeCellPageCS()
    {
        listView = new ListView(ListViewCachingStrategy.RecycleElement)
        {
            ItemsSource = DataSource.GetList(),
            ItemTemplate = new DataTemplate(() =>
            {
                var nativeCell = new NativeCell();
                nativeCell.SetBinding(NativeCell.NameProperty, "Name");
                nativeCell.SetBinding(NativeCell.CategoryProperty, "Category");
                nativeCell.SetBinding(NativeCell.ImageFilenameProperty, "ImageFilename");

                return nativeCell;
            })
        };

        switch (Device.RuntimePlatform)
        {
            case Device.iOS:
                Padding = new Thickness(0, 20, 0, 0);
                break;
            case Device.Android:
            case Device.UWP:
                Padding = new Thickness(0);
                break;
        }

        Content = new StackLayout
        {
            Children = {
                new Label { Text = "Xamarin.Forms native cell", HorizontalTextAlignment = TextAlignment.Center },
                listView
            }
        };
        listView.ItemSelected += OnItemSelected;
    }
    ...
}
Xamarin.FormsListView控制項可用來顯示透過 ItemSource 屬性填入的數據清單。 RecycleElement 快取策略嘗試透過回收清單資料格,將 ListView 磁碟使用量和執行速度降至最低。 如需詳細資訊,請參閱快取資料。
清單中的每個資料列都包含三個資料項目 – 名稱、類別和影像檔案名稱。 清單中每個資料列的配置都是由 DataTemplate 所定義,它是透過 ListView.ItemTemplate 可繫結屬性所參考。 DataTemplate 將清單中的每個資料列定義為 NativeCell,透過資料繫結顯示其 Name、Category 和 ImageFilename 屬性。 如需 ListView 控制項的詳細資訊,請參閱 ListView。
自訂轉譯器現在可以新增至每個應用程式專案,為每個資料格自訂平台特定的配置。
在每個平台上建立自訂轉譯器
建立自訂轉譯器類別的流程如下:
- 建立轉譯自訂資料格之
ViewCellRenderer類別的子類別。 - 覆寫轉譯自訂資料格的平台特定方法,並撰寫自訂方法的邏輯。
ExportRenderer將屬性新增至自定義轉譯器類別,以指定將用來轉Xamarin.Forms譯自定義儲存格。 這個屬性是用來向 Xamarin.Forms註冊自定義轉譯器。
注意
對於大多數 Xamarin.Forms 元素,您可以選擇在每個平台專案中提供自定義轉譯器。 如果自訂轉譯器未註冊,則會使用控制項基底類別的預設轉譯器。 不過,轉譯 ViewCell 項目時,每個平台專案都必須要有自訂轉譯器。
下圖說明應用程式範例中每個專案的責任,以及這些專案之間的關聯性:
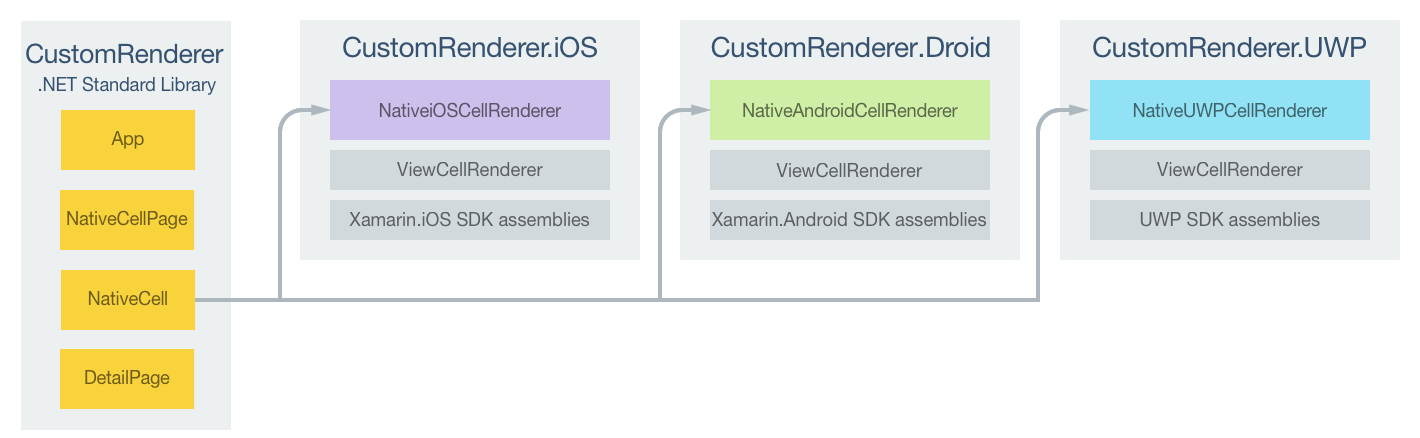
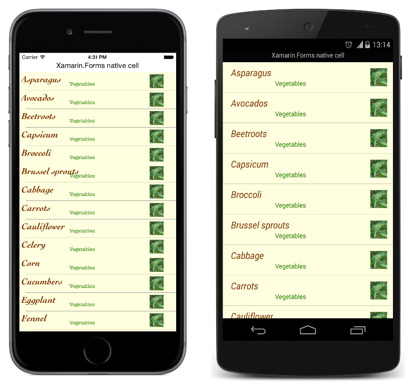
NativeCell 自訂資料格是由平台特定轉譯器類別轉譯,其全部衍生自各平台的 ViewCellRenderer 類別。 這會導致每個 NativeCell 自訂資料格都使用平台特定配置轉譯,如下列螢幕擷取畫面所示:
ViewCellRenderer 類別會公開平台轉譯自訂資料格的特定方法。 這在 iOS 平台為 GetCell 方法、在 Android 平台為 GetCellCore 方法,在 UWP 為 GetTemplate 方法。
每個自定義轉譯器類別都會以 ExportRenderer 向 註冊轉譯器 Xamarin.Forms的屬性裝飾。 屬性會採用兩個參數 : 要轉譯之儲存格的類型 Xamarin.Forms 名稱,以及自定義轉譯器的型別名稱。 屬性的 assembly 前置詞會指定套用至整個組件的屬性。
下列各節會討論每個平台特定自訂轉譯器類別的實作。
在 iOS 上建立自訂轉譯器
下列程式碼範例示範適用於 iOS 平台的自訂轉譯器:
[assembly: ExportRenderer(typeof(NativeCell), typeof(NativeiOSCellRenderer))]
namespace CustomRenderer.iOS
{
    public class NativeiOSCellRenderer : ViewCellRenderer
    {
        NativeiOSCell cell;

        public override UITableViewCell GetCell(Cell item, UITableViewCell reusableCell, UITableView tv)
        {
            var nativeCell = (NativeCell)item;

            cell = reusableCell as NativeiOSCell;
            if (cell == null)
                cell = new NativeiOSCell(item.GetType().FullName, nativeCell);
            else
                cell.NativeCell.PropertyChanged -= OnNativeCellPropertyChanged;

            nativeCell.PropertyChanged += OnNativeCellPropertyChanged;
            cell.UpdateCell(nativeCell);
            return cell;
        }
        ...
    }
}
呼叫 GetCell 方法來建置要顯示的每個資料格。 每個資料格都是 NativeiOSCell 執行個體,其定義資料格的配置及其資料。 GetCell 方法的操作取決於 ListView 快取策略:
當
ListView快取策略為RetainElement時,每個資料格都需要叫用GetCell方法。 畫面最初顯示的每個NativeCell執行個體都需要建立NativeiOSCell執行個體。 當使用者捲動ListView時,會重複使用NativeiOSCell執行個體。 如需 iOS 資料格重複使用的詳細資訊,請參閱資料格重複使用。注意
即使當
ListView設為保留資料格時,此自訂轉譯器程式碼仍會執行一些資料格重複使用。UpdateCell方法會使用每個NativeCell執行個體的資料來更新按每個NativeiOSCell執行個體顯示的資料,無論其為新建或為重複使用。注意
當
ListView快取策略設為保留資料格時,絕不叫用OnNativeCellPropertyChanged方法。當
ListView快取策略為RecycleElement時,畫面最初顯示的每個資料格都需要叫用GetCell方法。 畫面最初顯示的每個NativeCell執行個體都需要建立NativeiOSCell執行個體。UpdateCell方法會使用NativeCell執行個體的資料來更新按每個NativeiOSCell執行個體顯示的資料。 不過,當使用者捲動ListView時,不會叫用GetCell方法。 而是重複使用NativeiOSCell執行個體。 當資料變更時,NativeCell執行個體上會引發PropertyChanged事件,而OnNativeCellPropertyChanged事件處理常式會更新每個重複使用的NativeiOSCell執行個體資料。
下列程式碼範例示範 PropertyChanged 事件引發時叫用的 OnNativeCellPropertyChanged 方法:
namespace CustomRenderer.iOS
{
    public class NativeiOSCellRenderer : ViewCellRenderer
    {
        ...

        void OnNativeCellPropertyChanged(object sender, PropertyChangedEventArgs e)
        {
            var nativeCell = (NativeCell)sender;
            if (e.PropertyName == NativeCell.NameProperty.PropertyName)
            {
                cell.HeadingLabel.Text = nativeCell.Name;
            }
            else if (e.PropertyName == NativeCell.CategoryProperty.PropertyName)
            {
                cell.SubheadingLabel.Text = nativeCell.Category;
            }
            else if (e.PropertyName == NativeCell.ImageFilenameProperty.PropertyName)
            {
                cell.CellImageView.Image = cell.GetImage(nativeCell.ImageFilename);
            }
        }
    }
}
這個方法會更新按重複使用之 NativeiOSCell 執行個體顯示的資料。 因為此方法會呼叫多次,所以會檢查變更的屬性。
NativeiOSCell 類別定義每個資料格的配置,如下列程式碼範例所示:
internal class NativeiOSCell : UITableViewCell, INativeElementView
{
  public UILabel HeadingLabel { get; set; }
  public UILabel SubheadingLabel { get; set; }
  public UIImageView CellImageView { get; set; }

  public NativeCell NativeCell { get; private set; }
  public Element Element => NativeCell;

  public NativeiOSCell(string cellId, NativeCell cell) : base(UITableViewCellStyle.Default, cellId)
  {
    NativeCell = cell;

    SelectionStyle = UITableViewCellSelectionStyle.Gray;
    ContentView.BackgroundColor = UIColor.FromRGB(255, 255, 224);
    CellImageView = new UIImageView();

    HeadingLabel = new UILabel()
    {
      Font = UIFont.FromName("Cochin-BoldItalic", 22f),
      TextColor = UIColor.FromRGB(127, 51, 0),
      BackgroundColor = UIColor.Clear
    };

    SubheadingLabel = new UILabel()
    {
      Font = UIFont.FromName("AmericanTypewriter", 12f),
      TextColor = UIColor.FromRGB(38, 127, 0),
      TextAlignment = UITextAlignment.Center,
      BackgroundColor = UIColor.Clear
    };

    ContentView.Add(HeadingLabel);
    ContentView.Add(SubheadingLabel);
    ContentView.Add(CellImageView);
  }

  public void UpdateCell(NativeCell cell)
  {
    HeadingLabel.Text = cell.Name;
    SubheadingLabel.Text = cell.Category;
    CellImageView.Image = GetImage(cell.ImageFilename);
  }

  public UIImage GetImage(string filename)
  {
    return (!string.IsNullOrWhiteSpace(filename)) ? UIImage.FromFile("Images/" + filename + ".jpg") : null;
  }

  public override void LayoutSubviews()
  {
    base.LayoutSubviews();

    HeadingLabel.Frame = new CGRect(5, 4, ContentView.Bounds.Width - 63, 25);
    SubheadingLabel.Frame = new CGRect(100, 18, 100, 20);
    CellImageView.Frame = new CGRect(ContentView.Bounds.Width - 63, 5, 33, 33);
  }
}
這個類別會定義用來轉譯資料格內容的控制項及其配置。 此類別會實作 INativeElementView 介面,當 ListView 使用 RecycleElement 快取策略時為必要。 此介面會指定類別必須實作 Element 屬性,這應會傳回回收資料格的自訂資料格資料。
NativeiOSCell 建構函式會初始化 HeadingLabel、SubheadingLabel 和 CellImageView 屬性的外觀。 這些屬性用以顯示儲存在 NativeCell 執行個體的資料,使用正在呼叫的 UpdateCell 方法來設定每個屬性的值。 此外,當 ListView 使用 RecycleElement 快取策略時,您可在自訂轉譯器中使用 OnNativeCellPropertyChanged 方法來更新按 HeadingLabel、SubheadingLabel 和 CellImageView 屬性顯示的資料。
資料格配置是由 LayoutSubviews 覆寫所執行,這會在資料格中設定 HeadingLabel、SubheadingLabel 和 CellImageView 的座標。
在 Android 上建立自訂轉譯器
下列程式碼範例示範適用於 Android 平台的自訂轉譯器:
[assembly: ExportRenderer(typeof(NativeCell), typeof(NativeAndroidCellRenderer))]
namespace CustomRenderer.Droid
{
    public class NativeAndroidCellRenderer : ViewCellRenderer
    {
        NativeAndroidCell cell;

        protected override Android.Views.View GetCellCore(Cell item, Android.Views.View convertView, ViewGroup parent, Context context)
        {
            var nativeCell = (NativeCell)item;
            Console.WriteLine("\t\t" + nativeCell.Name);

            cell = convertView as NativeAndroidCell;
            if (cell == null)
            {
                cell = new NativeAndroidCell(context, nativeCell);
            }
            else
            {
                cell.NativeCell.PropertyChanged -= OnNativeCellPropertyChanged;
            }

            nativeCell.PropertyChanged += OnNativeCellPropertyChanged;

            cell.UpdateCell(nativeCell);
            return cell;
        }
        ...
    }
}
呼叫 GetCellCore 方法來建置要顯示的每個資料格。 每個資料格都是 NativeAndroidCell 執行個體,其定義資料格的配置及其資料。 GetCellCore 方法的操作取決於 ListView 快取策略:
當
ListView快取策略為RetainElement時,每個資料格都需要叫用GetCellCore方法。 畫面最初顯示的每個NativeCell執行個體都需要建立NativeAndroidCell。 當使用者捲動ListView時,會重複使用NativeAndroidCell執行個體。 如需 Android 資料格重複使用的詳細資訊,請參閱資料列檢視重複使用。注意
請注意,當
ListView設為保留資料格時,此自訂轉譯器程式碼會執行一些資料格重複使用。UpdateCell方法會使用每個NativeCell執行個體的資料來更新按每個NativeAndroidCell執行個體顯示的資料,無論其為新建或為重複使用。注意
請注意,雖然
ListView設為保留資料格時會叫用OnNativeCellPropertyChanged方法,但它不會更新NativeAndroidCell屬性值。當
ListView快取策略為RecycleElement時,畫面最初顯示的每個資料格都需要叫用GetCellCore方法。 畫面最初顯示的每個NativeCell執行個體都需要建立NativeAndroidCell執行個體。UpdateCell方法會使用NativeCell執行個體的資料來更新按每個NativeAndroidCell執行個體顯示的資料。 不過,當使用者捲動ListView時,不會叫用GetCellCore方法。 而是重複使用NativeAndroidCell執行個體。 當資料變更時,NativeCell執行個體上會引發PropertyChanged事件,而OnNativeCellPropertyChanged事件處理常式會更新每個重複使用的NativeAndroidCell執行個體資料。
下列程式碼範例示範 PropertyChanged 事件引發時叫用的 OnNativeCellPropertyChanged 方法:
namespace CustomRenderer.Droid
{
    public class NativeAndroidCellRenderer : ViewCellRenderer
    {
        ...

        void OnNativeCellPropertyChanged(object sender, PropertyChangedEventArgs e)
        {
            var nativeCell = (NativeCell)sender;
            if (e.PropertyName == NativeCell.NameProperty.PropertyName)
            {
                cell.HeadingTextView.Text = nativeCell.Name;
            }
            else if (e.PropertyName == NativeCell.CategoryProperty.PropertyName)
            {
                cell.SubheadingTextView.Text = nativeCell.Category;
            }
            else if (e.PropertyName == NativeCell.ImageFilenameProperty.PropertyName)
            {
                cell.SetImage(nativeCell.ImageFilename);
            }
        }
    }
}
這個方法會更新按重複使用之 NativeAndroidCell 執行個體顯示的資料。 因為此方法會呼叫多次,所以會檢查變更的屬性。
NativeAndroidCell 類別定義每個資料格的配置,如下列程式碼範例所示:
internal class NativeAndroidCell : LinearLayout, INativeElementView
{
  public TextView HeadingTextView { get; set; }
  public TextView SubheadingTextView { get; set; }
  public ImageView ImageView { get; set; }

  public NativeCell NativeCell { get; private set; }
  public Element Element => NativeCell;

  public NativeAndroidCell(Context context, NativeCell cell) : base(context)
  {
    NativeCell = cell;

    var view = (context as Activity).LayoutInflater.Inflate(Resource.Layout.NativeAndroidCell, null);
    HeadingTextView = view.FindViewById<TextView>(Resource.Id.HeadingText);
    SubheadingTextView = view.FindViewById<TextView>(Resource.Id.SubheadingText);
    ImageView = view.FindViewById<ImageView>(Resource.Id.Image);

    AddView(view);
  }

  public void UpdateCell(NativeCell cell)
  {
    HeadingTextView.Text = cell.Name;
    SubheadingTextView.Text = cell.Category;

    // Dispose of the old image
    if (ImageView.Drawable != null)
    {
      using (var image = ImageView.Drawable as BitmapDrawable)
      {
        if (image != null)
        {
          if (image.Bitmap != null)
          {
            image.Bitmap.Dispose();
          }
        }
      }
    }

    SetImage(cell.ImageFilename);
  }

  public void SetImage(string filename)
  {
    if (!string.IsNullOrWhiteSpace(filename))
    {
      // Display new image
      Context.Resources.GetBitmapAsync(filename).ContinueWith((t) =>
      {
        var bitmap = t.Result;
        if (bitmap != null)
        {
          ImageView.SetImageBitmap(bitmap);
          bitmap.Dispose();
        }
      }, TaskScheduler.FromCurrentSynchronizationContext());
    }
    else
    {
      // Clear the image
      ImageView.SetImageBitmap(null);
    }
  }
}
這個類別會定義用來轉譯資料格內容的控制項及其配置。 此類別會實作 INativeElementView 介面,當 ListView 使用 RecycleElement 快取策略時為必要。 此介面會指定類別必須實作 Element 屬性,這應會傳回回收資料格的自訂資料格資料。
NativeAndroidCell 建構函式會擴大 NativeAndroidCell 配置,並初始化擴大配置中的控制項 HeadingTextView、SubheadingTextView 和 ImageView 屬性。 這些屬性用以顯示儲存在 NativeCell 執行個體的資料,使用正在呼叫的 UpdateCell 方法來設定每個屬性的值。 此外,當 ListView 使用 RecycleElement 快取策略時,您可在自訂轉譯器中使用 OnNativeCellPropertyChanged 方法來更新按 HeadingTextView、SubheadingTextView 和 ImageView 屬性顯示的資料。
下列程式碼範例示範 NativeAndroidCell.axml 配置檔案的配置定義:
<?xml version="1.0" encoding="utf-8"?>
<RelativeLayout xmlns:android="http://schemas.android.com/apk/res/android"
    android:layout_width="fill_parent"
    android:layout_height="wrap_content"
    android:padding="8dp"
    android:background="@drawable/CustomSelector">
    <LinearLayout
        android:id="@+id/Text"
        android:orientation="vertical"
        android:layout_width="wrap_content"
        android:layout_height="wrap_content"
        android:paddingLeft="10dip">
        <TextView
            android:id="@+id/HeadingText"
            android:layout_width="wrap_content"
            android:layout_height="wrap_content"
            android:textColor="#FF7F3300"
            android:textSize="20dip"
            android:textStyle="italic" />
        <TextView
            android:id="@+id/SubheadingText"
            android:layout_width="wrap_content"
            android:layout_height="wrap_content"
            android:textSize="14dip"
            android:textColor="#FF267F00"
            android:paddingLeft="100dip" />
    </LinearLayout>
    <ImageView
        android:id="@+id/Image"
        android:layout_width="48dp"
        android:layout_height="48dp"
        android:padding="5dp"
        android:src="@drawable/icon"
        android:layout_alignParentRight="true" />
</RelativeLayout>
此配置指定顯示資料格內容所用的兩個 TextView 控制項和一個 ImageView 控制項。 兩個 TextView 控制項在 LinearLayout 控制項內是垂直方向,而且所有控制項都包含在 RelativeLayout 內。
在 UWP 上建立自訂轉譯器
下列程式碼範例示範適用於 UWP 的自訂轉譯器:
[assembly: ExportRenderer(typeof(NativeCell), typeof(NativeUWPCellRenderer))]
namespace CustomRenderer.UWP
{
    public class NativeUWPCellRenderer : ViewCellRenderer
    {
        public override Windows.UI.Xaml.DataTemplate GetTemplate(Cell cell)
        {
            return App.Current.Resources["ListViewItemTemplate"] as Windows.UI.Xaml.DataTemplate;
        }
    }
}
呼叫 GetTemplate 方法以傳回清單中每個資料列要轉譯的資料格。 它會為將顯示在畫面中的每個 NativeCell 執行個體建立 DataTemplate,以 DataTemplate 定義資料格的外觀和內容。
DataTemplate 儲存在應用程式層級的資源字典中,如下列程式碼範例所示:
<DataTemplate x:Key="ListViewItemTemplate">
    <Grid Background="LightYellow">
        <Grid.Resources>
            <local:ConcatImageExtensionConverter x:Name="ConcatImageExtensionConverter" />
        </Grid.Resources>
        <Grid.RowDefinitions>
            <RowDefinition Height="Auto" />
            <RowDefinition Height="Auto" />
        </Grid.RowDefinitions>
        <Grid.ColumnDefinitions>
            <ColumnDefinition Width="0.40*" />
            <ColumnDefinition Width="0.40*"/>
            <ColumnDefinition Width="0.20*" />
        </Grid.ColumnDefinitions>
        <TextBlock Grid.ColumnSpan="2" Foreground="#7F3300" FontStyle="Italic" FontSize="22" VerticalAlignment="Top" Text="{Binding Name}" />
        <TextBlock Grid.RowSpan="2" Grid.Column="1" Foreground="#267F00" FontWeight="Bold" FontSize="12" VerticalAlignment="Bottom" Text="{Binding Category}" />
        <Image Grid.RowSpan="2" Grid.Column="2" HorizontalAlignment="Left" VerticalAlignment="Center" Source="{Binding ImageFilename, Converter={StaticResource ConcatImageExtensionConverter}}" Width="50" Height="50" />
        <Line Grid.Row="1" Grid.ColumnSpan="3" X1="0" X2="1" Margin="30,20,0,0" StrokeThickness="1" Stroke="LightGray" Stretch="Fill" VerticalAlignment="Bottom" />
    </Grid>
</DataTemplate>
DataTemplate 指定顯示資料格內容及其配置和外觀所用的控制項。 透過資料繫結使用兩個 TextBlock 控制項和一個 Image 控制項來顯示資料格的內容。 此外,使用 ConcatImageExtensionConverter 的執行個體將 .jpg 副檔名串連到每個影像檔案名稱。 這可確保 Image 控制項在設定 Source 屬性後,可以載入及轉譯影像。
摘要
本文示範如何為 ViewCell 控件內裝載的 Xamarin.FormsListView 建立自定義轉譯器。 這樣會 Xamarin.Forms 停止在捲動期間 ListView 重複呼叫版面配置計算。