在此 Visual Studio 集成開發環境 (IDE) 簡介中,您將建立可在任何 Windows 10 或更新版本裝置上執行的 「Hello World」 應用程式。 若要這樣做,您將使用 Windows App SDK (WinUI 3) 專案範本、可延伸的應用程式標記語言 (XAML)和 C# 程式設計語言。
注意
WinUI 3 是隨附於 Windows App SDK 的原生 UI 平台元件(完全與 Windows SDK分離)。 如需詳細資訊,請參閱 WinUI 3。
如果您尚未安裝 Visual Studio,請移至 Visual Studio 下載 頁面免費安裝。
先決條件
您需要 Visual Studio 才能完成本教學課程。 如需免費版本,請流覽 Visual Studio 下載頁面。
使用 WinUI 和 Windows App SDK 進行開發所需的工作負載和元件。 若要在 Visual Studio 中確認或安裝工作負載,請選取 [工具]>[取得工具和功能]。 如需詳細資訊,請參閱 變更工作負載或的個別元件。
在 Visual Studio 安裝程式的 [ 工作負載] 索引標籤上,選取下列項目:
- 針對使用 Windows App SDK 進行 C# 應用程式開發,請選取 [WinUI] 應用程式開發。
注意
在 Visual Studio 17.10 - 17.12 中,此工作負載稱為 Windows 應用程式開發。
如需詳細資訊,請參閱 安裝 Windows 應用程式 SDK 的工具。
建立專案
首先,建立 WinUI 3 專案。 這個專案類型包含您需要的所有範本檔案,在您新增任何內容之前就已經準備好了!
重要
Visual Studio 2019 僅支援 Windows App SDK 1.1 和更早版本。 建議使用 Visual Studio 2022,以所有版本的 Windows App SDK 開發應用程式。
Windows App SDK 1.1.x 範本可藉由安裝 Visual Studio 擴充功能 (VSIX)來取得。
注意
如果您已安裝 Windows App SDK Visual Studio 延伸模組 (VSIX),請在安裝另一個版本之前將其卸載。 如需指示,請參閱 管理 Visual Studio 的擴充功能。
- 您可以從 Visual Studio 安裝最新的穩定 1.1.x 版 VSIX。 選取 [擴充功能>管理擴充功能],搜尋 Windows App SDK,然後下載 Windows App SDK 擴充功能。 關閉並重新開啟 Visual Studio,並遵循提示來安裝延伸模組。 請務必安裝 Windows App SDK 1.1 的範本。
- 或者,您也可以直接從 Visual Studio Marketplace下載延伸模組,並加以安裝:
安裝範本延伸模組之後,您可以建立您的第一個專案。 如需 Visual Studio 2019 支援的詳細資訊,請參閱 Windows App SDK安裝工具。 本教學課程的其餘部分會假設您使用Visual Studio 2022。
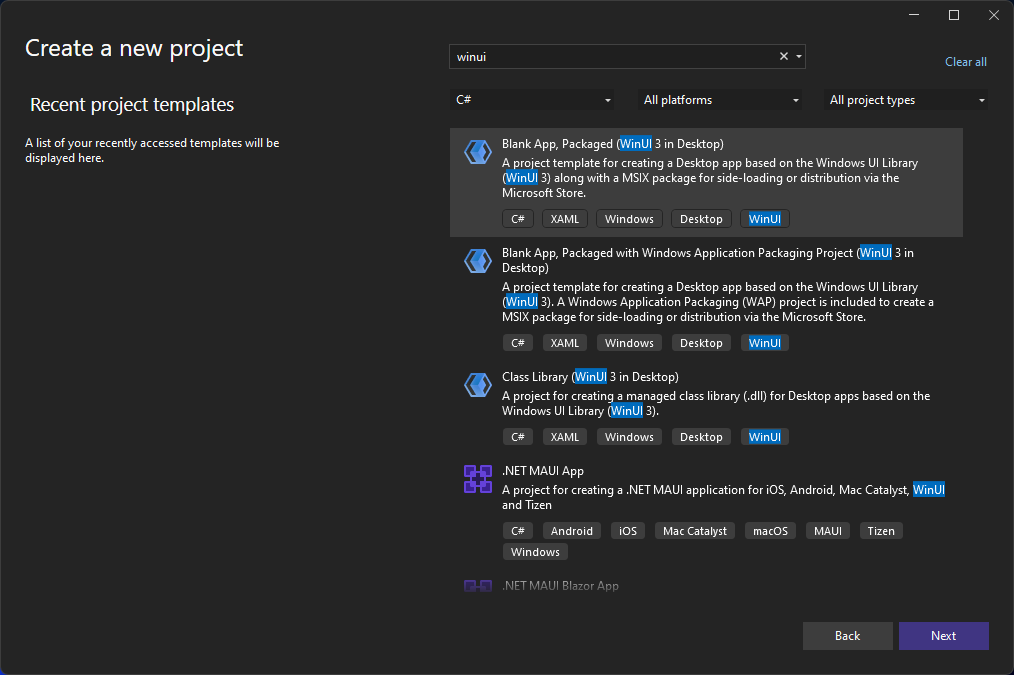
開啟 Visual Studio,然後在 [開始] 視窗中,選擇 [[建立新專案]。
在 [建立新專案] 畫面上,於搜尋方塊中輸入 WinUI,選擇 C# 範本的 [空白應用程式,打包 (WinUI 3 在桌面)],然後選擇 [下一步]。
為專案指定名稱,HelloWorld,然後選擇 建立。
![[項目名稱] 字段中輸入 『HelloWorld』 的 [設定新專案] 對話框螢幕快照。](media/vs-2022/winui-configure-your-project.png?view=vs-2022)
注意
如果這是您第一次使用 Visual Studio 建立 Windows App SDK 應用程式,則可能會出現 設定 對話框。 選擇 開發人員模式,然後選擇 [是]。
![顯示 [設定] 對話框的螢幕快照,其中包含啟用開發人員模式的選項。](media/enable-developer-mode.png?view=vs-2022)
Visual Studio 會為您安裝額外的開發人員模式套件。 套件安裝完成時,請關閉 設定 對話框。
建立應用程式
是時候開始開發了。 您將新增按鈕控制件、將動作新增至按鈕,然後執行 「Hello World」 應用程式以查看其外觀。
將按鈕新增至設計畫布
在 [方案總管]中,按兩下 mainWindow.xaml 以開啟 XAML 標記編輯器。
![[方案總管] 視窗的螢幕快照,其中顯示 HelloWorld 專案中的屬性、參考、資產和檔案。已選取MainWindow.xaml檔案。](media/vs-2022/winui-solution-explorer-mainwindow-xaml.png?view=vs-2022)
XAML 編輯器 是您可以新增或變更標記的位置。 不同於UWP專案,WinUI 3 沒有 設計 檢視。
![顯示 Visual Studio IDE 中開啟 MainWindow.xaml 的螢幕快照。[XAML 編輯器] 窗格會顯示視窗的 XAML 標記。](media/vs-2022/winui-xaml-editor.png?view=vs-2022)
檢閱巢狀在 StackPanelWindow根目錄內巢狀的 Button 控件。
![顯示 XAML 編輯器中醒目提示 [按鈕] 的螢幕快照。](media/vs-2022/winui-button-control.png?view=vs-2022)
變更按鈕上的標籤
在 [XAML 編輯器]中,將 [按鈕內容] 值從 [按兩下我] 變更為 “Hello World!”。
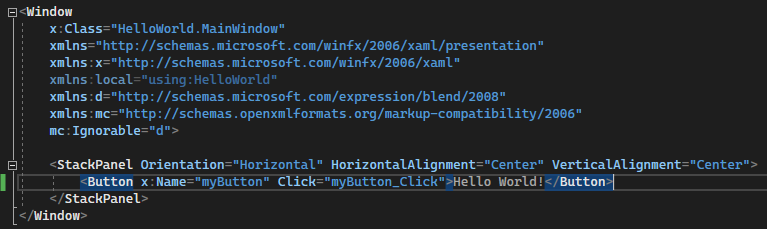
請注意,按鈕也有指定的 Click 事件處理程式,名為 myButton_Click。 我們將在下一個步驟來談到這個問題。

修改事件處理程式
「事件處理程式」聽起來很複雜,但這只是事件發生時所呼叫之程序代碼的另一個名稱。 在此情況下,它會新增由 「Hello World!“ 按鈕觸發的動作。
在 [方案總管]中,按兩下 MainWindow.xaml.cs,即程式碼後置頁面。
在開啟的 C# 編輯器視窗中編輯事件處理程式程式代碼。
以下是事情變得有趣的地方。 預設事件處理程式看起來像這樣:

讓我們加以變更,如下所示:
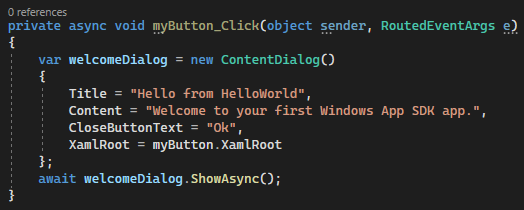
以下是要複製並貼上的程式碼:
private async void myButton_Click(object sender, RoutedEventArgs e)
{
    var welcomeDialog = new ContentDialog()
    {
        Title = "Hello from HelloWorld",
        Content = "Welcome to your first Windows App SDK app.",
        CloseButtonText = "Ok",
        XamlRoot = myButton.XamlRoot
    };
    await welcomeDialog.ShowAsync();
}
我們剛剛做了什麼?
程序代碼會使用 ContentDialog 控制項,在當前視窗中的模態彈出控制項中顯示歡迎訊息。 (如需使用 Microsoft.UI.Xaml.Controls.ContentDialog的詳細資訊,請參閱 ContentDialog 類別。)
執行應用程式
是時候建置、部署及啟動 「Hello World」 Windows App SDK 應用程式,以查看其外觀。 以下是做法。
使用 [播放] 按鈕(帶有文字 HelloWorld(套件))在本機啟動應用程式。
![螢幕快照,顯示 [播放] 按鈕旁的下拉式方塊,其中已選取 [HelloWorld(套件)]。](media/vs-2022/winui-start-or-debug.png?view=vs-2022)
(或者,您可以從功能表欄選擇 [偵錯]>[開始偵錯],或按 F5 啟動您的應用程式。
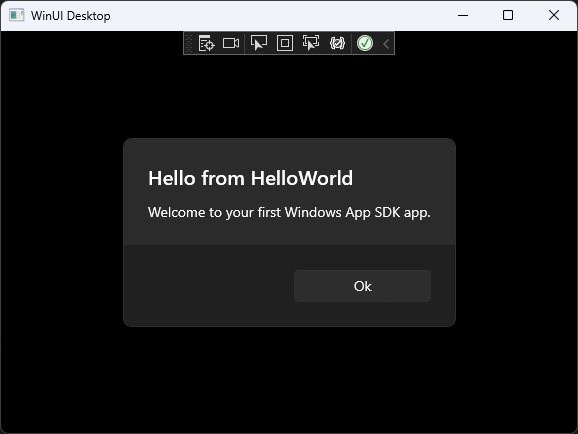
查看您的應用程式,此應用程式會在啟動畫面消失後不久出現。 應用程式看起來應該類似下圖:
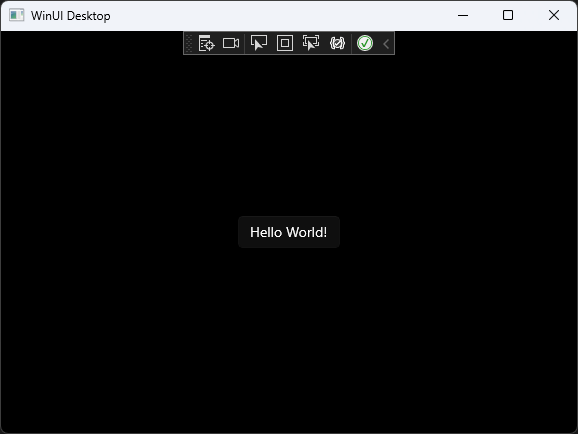
選取 [Hello World] 按鈕。
您的 Windows 10 或更新版本裝置會顯示訊息,指出「歡迎使用您的第一個 Windows App SDK 應用程式」,標題為「Hello from HelloWorld」。按一下 [確定] 以關閉訊息。
若要關閉應用程式,請選取工具列中的 [停止偵錯 ] 按鈕。 (或者,從功能表欄選擇 [偵錯]>[停止偵錯],或按 Shift+F5。)
後續步驟
恭喜您完成本教學課程! 我們希望您已瞭解 Windows App SDK、WinUI 3 和 Visual Studio IDE 的一些基本概念。 若要深入瞭解,請繼續進行下列教學課程:
教學課程:使用 WinUI 3 建立簡單的相片查看器