在本 教學課程的上一個階段中,我們使用 PyTorch 來建立機器學習模型。 不過,該模型是檔案 .pth 。 若要能夠將其與 Windows ML 應用程式整合,您必須將模型轉換成 ONNX 格式。
匯出模型
若要匯出模型,您將使用 函式 torch.onnx.export() 。 此函式會執行模型,並記錄在計算輸出的過程中使用的操作符追蹤。
- 將下列程式代碼
DataClassifier.py複製到 Visual Studio 中的檔案,位於您的 main 函式上方。
#Function to Convert to ONNX
def convert():

    # set the model to inference mode
    model.eval()

    # Let's create a dummy input tensor
    dummy_input = torch.randn(1, 3, 32, 32, requires_grad=True)

    # Export the model
    torch.onnx.export(model,         # model being run
         dummy_input,       # model input (or a tuple for multiple inputs)
         "Network.onnx",       # where to save the model
         export_params=True,  # store the trained parameter weights inside the model file
         opset_version=11,    # the ONNX version to export the model to
         do_constant_folding=True,  # whether to execute constant folding for optimization
         input_names = ['input'],   # the model's input names
         output_names = ['output'], # the model's output names
         dynamic_axes={'input' : {0 : 'batch_size'},    # variable length axes
                                'output' : {0 : 'batch_size'}})
    print(" ")
    print('Model has been converted to ONNX')
請務必在導出模型之前呼叫 model.eval() 或 model.train(False) ,因為這會將模型設定為 推斷模式。 這是必要的,因為運算符類似 dropout 或 batchnorm 的行為在推斷和定型模式上不同。
- 若要執行對 ONNX 的轉換,請將對轉換函式的呼叫新增至 main 函式。 您不需要再次訓練模型,因此我們會將不再需要執行的一些函式註解掉。 您的主要職責如下。
if __name__ == "__main__":
    num_epochs = 10
    train(num_epochs)
    print('Finished Training\n')
    test()
    test_species()
    convert()
- 再次執行專案,請選取工具列上的
Start Debugging按鈕或按下F5。 不需要再次定型模型,只要從專案資料夾載入現有的模型即可。
流覽至您的專案位置,尋找 .pth 模型旁邊的 ONNX 模型。
備註
有興趣深入瞭解嗎? 檢閱 導出 mdoel 的 PyTorch 教學課程。
探索您的模型。
使用 Neutron 開啟
Network.onnx模型檔案。選取 數據 節點以開啟模型屬性。
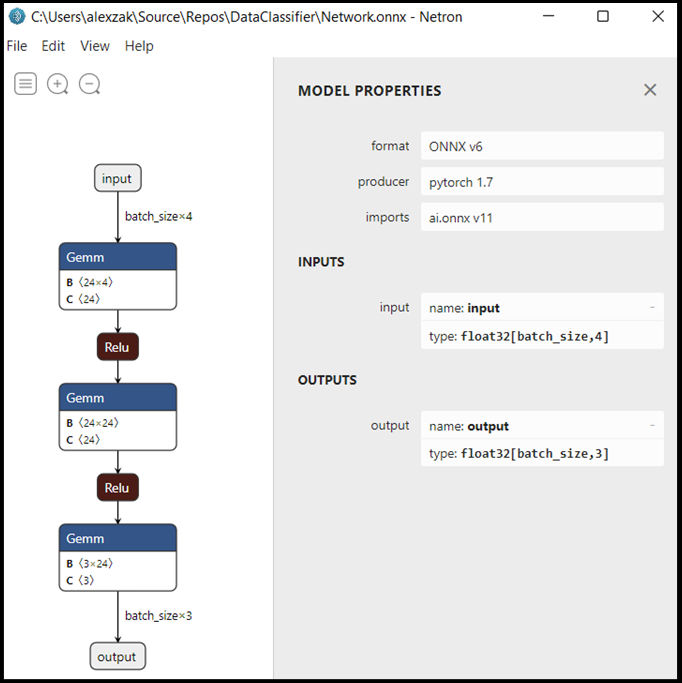
如您所見,模型需要以 32 位元浮點數的張量(多維陣列)物件作為輸入,並返回張量浮點數作為輸出。 輸出陣列將包含每個標籤的機率。 您建置模型的方式,標籤會以3個數位表示,每個數位都與特定類型的鳶尾花相關聯。
| 標籤 1 | 標籤 2 | 標籤 3 |
|---|---|---|
| 0 | 1 | 2 |
| 鳶尾花 | 花斑鳶尾花 | 維吉尼亞鳶尾花 |
您必須擷取這些值,才能使用Windows ML 應用程式顯示正確的預測。
後續步驟
我們的模型已準備好部署。 接下來,針對主要事件 - 讓我們建置 Windows 應用程式,並在您的 Windows 裝置本機執行。