使用 AppWindow 顯示多重檢視
AppWindow 及其相關 API,可讓您在次要視窗中顯示應用程式內容,而仍同時處理各視窗的同個 UI 執行緒,以此方式簡化多重視窗應用程式的建立作業。
注意
AppWindow 目前為預覽狀態。 也就是您可以將使用 AppWindow 的應用程式提交至 Microsoft Store,但是已知某些平台和架構元件無法與 AppWindow 搭配使用 (請參閱限制)。
以下會透過名為 HelloAppWindow 的範例應用程式,介紹一些多重視窗的案例。 此範例應用程式會示範下列功能:
- 從主頁面取消固定控制項,並在新視窗中開啟。
- 在新視窗中開啟頁面的新執行個體。
- 在應用程式中以程式設計方式調整新視窗的大小並設定其位置。
- 在應用程式中將 ContentDialog 與適當的視窗建立關聯。

單視窗的範例應用程式
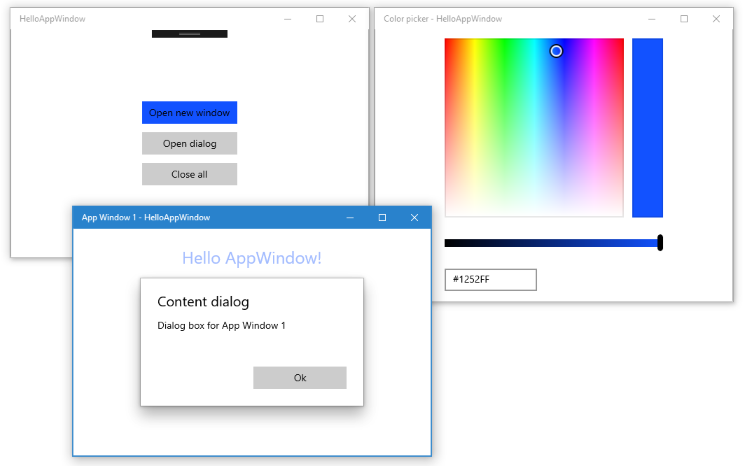
具有位置不固定的色彩選擇器和次要視窗的範例應用程式
API 概觀
從 Windows 10 版本 1903 (SDK 18362) 起,可使用 WindowManagement 命名空間中的 AppWindow 類別和其他 API。 如果您的應用程式以舊版 Windows 10 為目標,請務必使用 ApplicationView 來建立次要視窗。 WindowManagement API 仍在開發中,而且具有限制,如 API 參考文件中所述。
以下是用來在 AppWindow 中顯示內容的一些重要 API。
AppWindow
AppWindow 類別可用於在次要視窗中顯示部分 UWP 應用程式。 其概念與 ApplicationView 類似,但行為和存留期方面並不相同。 AppWindow 的主要功能即是令每個執行個體共用相同的 UI 處理執行緒 (包括事件發送器),該執行緒就是執行個體的建立來源,因此可簡化多重視窗應用程式。
您只能將 XAML 內容連線到您的 AppWindow,不支援原生 DirectX 或全像攝影內容。 不過,您可以顯示裝載 DirectX 內容的 XAML SwapChainPanel。
WindowingEnvironment
WindowingEnvironment API 可讓您了解應用程式的呈現環境,以便視需要調整應用程式。 其會提供環境支援的視窗類型描述;舉例來說,如果應用程式是在電腦上執行,則為 Overlapped,如果應用程式是在 Xbox 上執行,則為 Tiled。 此 API 也會提供一組 DisplayRegion 物件,描述應用程式可能會顯示在邏輯顯示器上的區域。
DisplayRegion
DisplayRegion API 會描述可在邏輯顯示器上向使用者顯示檢視的區域;例如,在桌上型電腦上,該區域即是完整顯示減去工作列區域。 其與後端監視器的實際顯示區域不一定會 1:1 對應。 同一個監視器中可以有多個顯示區域,如果這些監視器在各方面都具同質性,也可將 DisplayRegion 設為涵蓋多個監視器範圍。
AppWindowPresenter
AppWindowPresenter API 可讓您輕鬆地將視窗切換為預先定義的組態,例如 FullScreen 或 CompactOverlay。 這些組態可在支援該組態的任何裝置上,為使用者提供一致的體驗。
UIContext
UIContext 是應用程式視窗或檢視的唯一識別碼。 UIContext 會自動建立,您可以使用 UIElement.UIContext 屬性擷取 UIContext。 XAML 樹狀結構中的每個 UIElement 都具有相同的 UIContext。
UIContext 很重要,因為 Window.Current 之類的 API 和 GetForCurrentView 模式必須要在每個執行緒上搭配使用單一 ApplicationView/CoreWindow 和單一 XAML 樹狀結構。 當您使用 AppWindow 時,不會發生這種情況,因此可以改用 UIContext 來識別特定視窗。
XamlRoot
XamlRoot 類別會保留 XAML 元素樹狀結構,將其連線至視窗主機物件 (例如 AppWindow 或 ApplicationView),並提供大小和可見度等資訊。 您不會直接建立 XamlRoot 物件。 而是當您將 XAML 元素連結至 AppWindow 時,建立該物件。 然後可以使用 UIElement.XamlRoot 屬性來擷取 XamlRoot。
如需 UIContext 和 XamlRoot 的詳細資訊,請參閱讓程式碼可在視窗化主機之間移植。
顯示新視窗
接下來會介紹如何在新的 AppWindow 中顯示內容。
顯示新視窗
呼叫靜態 AppWindow.TryCreateAsync 方法,以建立新的 AppWindow。
AppWindow appWindow = await AppWindow.TryCreateAsync();建立視窗內容。
通常會建立 XAML Frame,然後將 Frame 導覽到應用程式內容已定義的 XAML Page。 如需框架與頁面的詳細資訊,請參閱兩個頁面之間的對等瀏覽。
Frame appWindowContentFrame = new Frame();
appWindowContentFrame.Navigate(typeof(AppWindowMainPage));
不過,您可以在 AppWindow 中顯示任何 XAML 內容,而不只是 Frame 和 Page。 例如,您可以僅顯示單一控制項,例如 ColorPicker,也可以顯示裝載 DirectX 內容的 SwapChainPanel。
呼叫 ElementCompositionPreview.SetAppWindowContent 方法,將 XAML 內容附加到 AppWindow。
ElementCompositionPreview.SetAppWindowContent(appWindow, appWindowContentFrame);呼叫此方法,即會建立 XamlRoot 物件,並設為指定 UIElement 的 XamlRoot 屬性。
每個 AppWindow 執行個體只能呼叫此方法一次。 設定內容之後,再對此 AppWindow 執行個體進行 SetAppWindowContent 呼叫就會失敗。 此外,如果嘗試以傳入 null UIElement 物件的方式來中斷 AppWindow 內容的連線,則呼叫會失敗。
呼叫 AppWindow.TryShowAsync 方法以顯示新視窗。
await appWindow.TryShowAsync();
關閉視窗時,會釋放資源
請一律處理 AppWindow.Closed 事件,以釋放 XAML 資源 (AppWindow 內容) 和對 AppWindow 的參考。
appWindow.Closed += delegate
{
    appWindowContentFrame.Content = null;
    appWindow = null;
};
提示
您應該盡量讓Closed事件處理程序中的程式碼量維持在最低數量,以避免發生非預期的問題。
追蹤 AppWindow 的執行個體
不一定需要追蹤建立的 AppWindow 執行個體,端看應用程式中多重視窗的使用方式。 HelloAppWindow 範例會示範一些不同的 AppWindow 常見使用方式。 接下來會介紹為何要追蹤視窗,以及如何追蹤。
簡單追蹤
色彩選擇器視窗會裝載單一 XAML 控制項,與色彩選擇器互動的程式碼皆位於 MainPage.xaml.cs 檔案中。 色彩選擇器視窗僅允許單一執行個體,而且基本上是 MainWindow 的延伸模組。 為了確保僅建立一個執行個體,會使用頁面層級的變數追蹤色彩選擇器視窗。 在建立新的色彩選擇器視窗之前,請檢查是否存在執行個體。如果存在,請略過建立新視窗的步驟,直接在現有視窗呼叫 TryShowAsync。
AppWindow colorPickerAppWindow;

// ...

private async void DetachColorPickerButton_Click(object sender, RoutedEventArgs e)
{
    // Create the color picker window.
    if (colorPickerAppWindow == null)
    {
        // ...
        // Create a new window
        colorPickerAppWindow = await AppWindow.TryCreateAsync();
        // ...
    }
    // Show the window.
    await colorPickerAppWindow.TryShowAsync();
}
在其裝載內容中追蹤 AppWindow 執行個體
AppWindowPage 視窗會裝載完整的 XAML 頁面,而且與該頁面互動的程式碼位於 AppWindowPage.xaml.cs 中。 其允許多個執行個體,每一個執行個體都有獨立功能。
該頁面的功能可讓您操作視窗,將其設為 FullScreen 或 CompactOverlay,也會接聽 AppWindow.Changed 事件,以顯示視窗的相關資訊。 為了呼叫這些 API,AppWindowPage 需要參考裝載它的 AppWindow 執行個體。
如果這正是您的需求,您可以在 AppWindowPage 中建立屬性,並在建立時將 AppWindow 執行個體指派給該屬性。
AppWindowPage.xaml.cs
在 AppWindowPage 中,建立屬性以保留 AppWindow 參考。
public sealed partial class AppWindowPage : Page
{
    public AppWindow MyAppWindow { get; set; }

    // ...
}
MainPage.xaml.cs
在 MainPage 中,取得對頁面執行個體的參考,並將新建的 AppWindow 指派給 AppWindowPage 中的屬性。
private async void ShowNewWindowButton_Click(object sender, RoutedEventArgs e)
{
    // Create a new window.
    AppWindow appWindow = await AppWindow.TryCreateAsync();

    // Create a Frame and navigate to the Page you want to show in the new window.
    Frame appWindowContentFrame = new Frame();
    appWindowContentFrame.Navigate(typeof(AppWindowPage));

    // Get a reference to the page instance and assign the
    // newly created AppWindow to the MyAppWindow property.
    AppWindowPage page = (AppWindowPage)appWindowContentFrame.Content;
    page.MyAppWindow = appWindow;

    // ...
}
使用 UIContext 追蹤應用程式視窗
您可能也需要有權從應用程式的其他部分存取 AppWindow 執行個體。 例如,MainPage 可設有 [全部關閉] 按鈕,用來關閉所有追蹤的 AppWindow 執行個體。
在此情況下,請使用 UIContext 唯一識別碼來追蹤 Dictionary 中的視窗執行個體。
MainPage.xaml.cs
在 MainPage 中,建立 Dictionary 做為靜態屬性。 接著在建立時將頁面新增至 Dictionary,並在頁面關閉時將其移除。 您可以在呼叫 ElementCompositionPreview.SetAppWindowContent 之後,從內容 Frame (appWindowContentFrame.UIContext) 取得 UIContext。
public sealed partial class MainPage : Page
{
    // Track open app windows in a Dictionary.
    public static Dictionary<UIContext, AppWindow> AppWindows { get; set; }
        = new Dictionary<UIContext, AppWindow>();

    // ...

    private async void ShowNewWindowButton_Click(object sender, RoutedEventArgs e)
    {
        // Create a new window.
        AppWindow appWindow = await AppWindow.TryCreateAsync();

        // Create a Frame and navigate to the Page you want to show in the new window.
        Frame appWindowContentFrame = new Frame();
        appWindowContentFrame.Navigate(typeof(AppWindowPage));

        // Attach the XAML content to the window.
        ElementCompositionPreview.SetAppWindowContent(appWindow, appWindowContentFrame);

        // Add the new page to the Dictionary using the UIContext as the Key.
        AppWindows.Add(appWindowContentFrame.UIContext, appWindow);
        appWindow.Title = "App Window " + AppWindows.Count.ToString();

        // When the window is closed, be sure to release
        // XAML resources and the reference to the window.
        appWindow.Closed += delegate
        {
            MainPage.AppWindows.Remove(appWindowContentFrame.UIContext);
            appWindowContentFrame.Content = null;
            appWindow = null;
        };

        // Show the window.
        await appWindow.TryShowAsync();
    }

    private async void CloseAllButton_Click(object sender, RoutedEventArgs e)
    {
        while (AppWindows.Count > 0)
        {
            await AppWindows.Values.First().CloseAsync();
        }
    }
    // ...
}
AppWindowPage.xaml.cs
若要在您的 AppWindowPage 程式碼中使用 AppWindow 執行個體,請使用頁面的 UIContext,以從 MainPage 中的靜態 Dictionary 擷取該執行個體。 請在該頁面的 Loaded 事件處理常式中 (而非建構函式) 執行此動作,如此 UIContext 才不會為 null。 您可以從 Page 取得 UIContext:this.UIContext。
public sealed partial class AppWindowPage : Page
{
    AppWindow window;

    // ...
    public AppWindowPage()
    {
        this.InitializeComponent();

        Loaded += AppWindowPage_Loaded;
    }

    private void AppWindowPage_Loaded(object sender, RoutedEventArgs e)
    {
        // Get the reference to this AppWindow that was stored when it was created.
        window = MainPage.AppWindows[this.UIContext];

        // Set up event handlers for the window.
        window.Changed += Window_Changed;
    }
    // ...
}
注意
HelloAppWindow 範例示範了兩種在 AppWindowPage 中追蹤視窗的方法,但通常只會使用其中一種方法,而非兩者並用。
要求視窗大小和位置
AppWindow 類別有幾個方法,可讓您用來控制視窗大小和位置。 正如方法名稱所指,系統不一定會根據環境因素接受要求的變更。
請呼叫 RequestSize 以指定所需的視窗大小,如下所示。
colorPickerAppWindow.RequestSize(new Size(300, 428));
管理視窗放置的方法名稱為 RequestMove*:RequestMoveAdjacentToCurrentView、RequestMoveAdjacentToWindow、RequestMoveRelativeToDisplayRegion、RequestMoveToDisplayRegion。
在此範例中,此程式碼會將視窗移動到產生該視窗的主要檢視旁邊。
colorPickerAppWindow.RequestMoveAdjacentToCurrentView();
若要取得視窗目前大小和位置的相關資訊,請呼叫 GetPlacement。 這會傳回 AppWindowPlacement 物件,提供視窗目前的 DisplayRegion、Offset 和 Size。
例如,您可以呼叫此程式碼,將視窗移動到顯示器的右上角。 此程式碼必須在顯示視窗後呼叫,則呼叫 GetPlacement 所傳回的視窗大小會是 0,0,且位移會不正確。
DisplayRegion displayRegion = window.GetPlacement().DisplayRegion;
double displayRegionWidth = displayRegion.WorkAreaSize.Width;
double windowWidth = window.GetPlacement().Size.Width;
int horizontalOffset = (int)(displayRegionWidth - windowWidth);
window.RequestMoveRelativeToDisplayRegion(displayRegion, new Point(horizontalOffset, 0));
要求外觀組態
透過 AppWindowPresenter 類別,您可以使用適合 AppWindow 顯示裝置的預先定義組態來加以顯示。 您可以使用 AppWindowPresentationConfiguration 值,將視窗置於 FullScreen 或 CompactOverlay 模式。
此範例會示範如何執行下列動作:
- 使用 AppWindow.Changed 事件,在可用視窗外觀有所變更時接收通知。
- 使用 AppWindow.Presenter 屬性,取得目前的 AppWindowPresenter。
- 呼叫 IsPresentationSupported,查看是否支援特定的 AppWindowPresentationKind。
- 呼叫 GetConfiguration,檢查目前使用的組態種類。
- 呼叫 RequestPresentation,變更目前組態。
private void Window_Changed(AppWindow sender, AppWindowChangedEventArgs args)
{
    if (args.DidAvailableWindowPresentationsChange)
    {
        EnablePresentationButtons(sender);
    }

    if (args.DidWindowPresentationChange)
    {
        ConfigText.Text = window.Presenter.GetConfiguration().Kind.ToString();
    }

    if (args.DidSizeChange)
    {
        SizeText.Text = window.GetPlacement().Size.ToString();
    }
}

private void EnablePresentationButtons(AppWindow window)
{
    // Check whether the current AppWindowPresenter supports CompactOverlay.
    if (window.Presenter.IsPresentationSupported(AppWindowPresentationKind.CompactOverlay))
    {
        // Show the CompactOverlay button...
        compactOverlayButton.Visibility = Visibility.Visible;
    }
    else
    {
        // Hide the CompactOverlay button...
        compactOverlayButton.Visibility = Visibility.Collapsed;
    }

    // Check whether the current AppWindowPresenter supports FullScreen?
    if (window.Presenter.IsPresentationSupported(AppWindowPresentationKind.FullScreen))
    {
        // Show the FullScreen button...
        fullScreenButton.Visibility = Visibility.Visible;
    }
    else
    {
        // Hide the FullScreen button...
        fullScreenButton.Visibility = Visibility.Collapsed;
    }
}

private void CompactOverlayButton_Click(object sender, RoutedEventArgs e)
{
    if (window.Presenter.GetConfiguration().Kind != AppWindowPresentationKind.CompactOverlay)
    {
        window.Presenter.RequestPresentation(AppWindowPresentationKind.CompactOverlay);
        fullScreenButton.IsChecked = false;
    }
    else
    {
        window.Presenter.RequestPresentation(AppWindowPresentationKind.Default);
    }
}

private void FullScreenButton_Click(object sender, RoutedEventArgs e)
{
    if (window.Presenter.GetConfiguration().Kind != AppWindowPresentationKind.FullScreen)
    {
        window.Presenter.RequestPresentation(AppWindowPresentationKind.FullScreen);
        compactOverlayButton.IsChecked = false;
    }
    else
    {
        window.Presenter.RequestPresentation(AppWindowPresentationKind.Default);
    }
}
重複使用 XAML 元素
AppWindow 可讓您擁有多個具有相同 UI 執行緒的 XAML 樹狀結構。 不過,只能將 XAML 元素新增至 XAML 樹狀結構一次。 如果您想要將部分 UI 從某個視窗移至另一個視窗,則必須管理其在 XAML 樹狀結構中的位置。
此範例會示範如何重複使用 ColorPicker 控制項,並將其在主視窗和次要視窗之間移動。
MainPage 的色彩選擇器是在 XAML 中宣告,並放在 MainPage XAML 樹狀結構中。
<StackPanel x:Name="colorPickerContainer" Grid.Column="1" Background="WhiteSmoke">
<Button Click="DetachColorPickerButton_Click" HorizontalAlignment="Right">
<FontIcon FontFamily="Segoe MDL2 Assets" Glyph="" />
</Button>
<ColorPicker x:Name="colorPicker" Margin="12" Width="288"
IsColorChannelTextInputVisible="False"
ColorChanged="ColorPicker_ColorChanged"/>
</StackPanel>
卸離色彩選擇器以放置到新的 AppWindow 中時,必須先將其從父容器中移除,才能將之移出 MainPage XAML 樹狀結構。 雖然並非必要,但此範例也會隱藏父容器。
colorPickerContainer.Children.Remove(colorPicker);
colorPickerContainer.Visibility = Visibility.Collapsed;
然後可以將其新增至新的 XAML 樹狀結構。 接下來要先建立一個 Grid,做為 ColorPicker 的父容器,並新增 ColorPicker 做為 Grid 的子系。 (這讓您稍後可以輕鬆地從此 XAML 樹狀結構中移除 ColorPicker。) 然後將 Grid 設定為新視窗中 XAML 樹狀結構的根目錄。
Grid appWindowRootGrid = new Grid();
appWindowRootGrid.Children.Add(colorPicker);

// Create a new window
colorPickerAppWindow = await AppWindow.TryCreateAsync();

// Attach the XAML content to our window
ElementCompositionPreview.SetAppWindowContent(colorPickerAppWindow, appWindowRootGrid);
當 AppWindow 關閉時,可以反過來進行此程序。 首先從 Grid 移除 ColorPicker,然後將其新增為 MainPage 中 StackPanel 的子系。
// When the window is closed, be sure to release XAML resources
// and the reference to the window.
colorPickerAppWindow.Closed += delegate
{
    appWindowRootGrid.Children.Remove(colorPicker);
    appWindowRootGrid = null;
    colorPickerAppWindow = null;

    colorPickerContainer.Children.Add(colorPicker);
    colorPickerContainer.Visibility = Visibility.Visible;
};
private async void DetachColorPickerButton_Click(object sender, RoutedEventArgs e)
{
    ColorPickerContainer.Visibility = Visibility.Collapsed;

    // Create the color picker window.
    if (colorPickerAppWindow == null)
    {
        ColorPickerContainer.Children.Remove(colorPicker);

        Grid appWindowRootGrid = new Grid();
        appWindowRootGrid.Children.Add(colorPicker);

        // Create a new window
        colorPickerAppWindow = await AppWindow.TryCreateAsync();
        colorPickerAppWindow.RequestMoveAdjacentToCurrentView();
        colorPickerAppWindow.RequestSize(new Size(300, 428));
        colorPickerAppWindow.Title = "Color picker";

        // Attach the XAML content to our window
        ElementCompositionPreview.SetAppWindowContent(colorPickerAppWindow, appWindowRootGrid);

        // When the window is closed, be sure to release XAML resources
        // and the reference to the window.
        colorPickerAppWindow.Closed += delegate
        {
            appWindowRootGrid.Children.Remove(colorPicker);
            appWindowRootGrid = null;
            colorPickerAppWindow = null;

            ColorPickerContainer.Children.Add(colorPicker);
            ColorPickerContainer.Visibility = Visibility.Visible;
        };
    }
    // Show the window.
    await colorPickerAppWindow.TryShowAsync();
}
顯示對話方塊
根據預設,內容對話方塊顯示強制相對於根目錄 ApplicationView。 當您使用 AppWindow 內的 ContentDialog 時,需要在對話方塊中將 XamlRoot 手動設為 XAML 主機的根目錄。
若要這麼做,請將 ContentDialog 的 XamlRoot 屬性設為與 AppWindow 中現有元素相同的 XamlRoot。 這裡的程式碼位於按鈕的 Click 事件處理常式中,因此可以使用 sender (點擊的 Button) 取得 XamlRoot。
if (ApiInformation.IsApiContractPresent("Windows.Foundation.UniversalApiContract", 8))
{
    simpleDialog.XamlRoot = ((Button)sender).XamlRoot;
}
如果除了主視窗 (ApplicationView) 之外,還有開啟另一個或多個 AppWindow,則每個視窗都可以嘗試開啟對話方塊,因為強制回應對話方塊只會封鎖其根目錄所在的視窗。 不過,每個執行緒一次只能開啟一個 ContentDialog。 嘗試開啟兩個 ContentDialogs 會擲回例外狀況,即使它們嘗試在不同的 AppWindows 中開啟。
若要進行管理,需至少在 try/catch 區塊中開啟對話方塊,以攔截例外狀況,以防另一個對話方塊已開啟。
try
{
    ContentDialogResult result = await simpleDialog.ShowAsync();
}
catch (Exception)
{
    // The dialog didn't open, probably because another dialog is already open.
}
還有另一種管理對話方塊的方式,即是追蹤目前開啟的對話方塊,在嘗試開啟新對話方塊之前將其關閉。 如果要達到此目標,請在 MainPage 中建立靜態屬性,名為 CurrentDialog。
public sealed partial class MainPage : Page
{
    // Track the last opened dialog so you can close it if another dialog tries to open.
    public static ContentDialog CurrentDialog { get; set; } = null;

   // ...
}
然後檢查目前是否有開啟的對話方塊。如果有,請呼叫 Hide 方法來關閉對話方塊。 最後將新對話方塊指派給 CurrentDialog,並嘗試顯示該對話方塊。
private async void DialogButton_Click(object sender, RoutedEventArgs e)
{
    ContentDialog simpleDialog = new ContentDialog
    {
        Title = "Content dialog",
        Content = "Dialog box for " + window.Title,
        CloseButtonText = "Ok"
    };

    if (MainPage.CurrentDialog != null)
    {
        MainPage.CurrentDialog.Hide();
    }
    MainPage.CurrentDialog = simpleDialog;

    // Use this code to associate the dialog to the appropriate AppWindow by setting
    // the dialog's XamlRoot to the same XamlRoot as an element that is already
    // present in the AppWindow.
    if (ApiInformation.IsApiContractPresent("Windows.Foundation.UniversalApiContract", 8))
    {
        simpleDialog.XamlRoot = ((Button)sender).XamlRoot;
    }

    try
    {
        ContentDialogResult result = await simpleDialog.ShowAsync();
    }
    catch (Exception)
    {
        // The dialog didn't open, probably because another dialog is already open.
    }
}
如果不希望以程式設計方式關閉對話方塊,請不要將其指派為 CurrentDialog。 MainPage 會在這裡顯示重要的對話方塊,只有在使用者點擊 Ok 時,才會關閉。 由於未指派為 CurrentDialog,因此不會嘗試以程式設計方式將其關閉。
public sealed partial class MainPage : Page
{
    // Track the last opened dialog so you can close it if another dialog tries to open.
    public static ContentDialog CurrentDialog { get; set; } = null;

    // ...
    private async void DialogButton_Click(object sender, RoutedEventArgs e)
    {
        ContentDialog importantDialog = new ContentDialog
        {
            Title = "Important dialog",
            Content = "This dialog can only be dismissed by clicking Ok.",
            CloseButtonText = "Ok"
        };

        if (MainPage.CurrentDialog != null)
        {
            MainPage.CurrentDialog.Hide();
        }
        // Do not track this dialog as the MainPage.CurrentDialog.
        // It should only be closed by clicking the Ok button.
        MainPage.CurrentDialog = null;

        try
        {
            ContentDialogResult result = await importantDialog.ShowAsync();
        }
        catch (Exception)
        {
            // The dialog didn't open, probably because another dialog is already open.
        }
    }
    // ...
}
完整程式碼
「MainPage.xaml」
<Page
x:Class="HelloAppWindow.MainPage"
xmlns="http://schemas.microsoft.com/winfx/2006/xaml/presentation"
xmlns:x="http://schemas.microsoft.com/winfx/2006/xaml"
xmlns:local="using:HelloAppWindow"
xmlns:d="http://schemas.microsoft.com/expression/blend/2008"
xmlns:mc="http://schemas.openxmlformats.org/markup-compatibility/2006"
mc:Ignorable="d"
Background="{ThemeResource ApplicationPageBackgroundThemeBrush}">
<Grid>
<Grid.ColumnDefinitions>
<ColumnDefinition/>
<ColumnDefinition Width="Auto"/>
</Grid.ColumnDefinitions>
<StackPanel VerticalAlignment="Center" HorizontalAlignment="Center">
<Button x:Name="NewWindowButton" Content="Open new window"
Click="ShowNewWindowButton_Click" Margin="0,12"/>
<Button Content="Open dialog" Click="DialogButton_Click"
HorizontalAlignment="Stretch"/>
<Button Content="Close all" Click="CloseAllButton_Click"
Margin="0,12" HorizontalAlignment="Stretch"/>
</StackPanel>
<StackPanel x:Name="colorPickerContainer" Grid.Column="1" Background="WhiteSmoke">
<Button Click="DetachColorPickerButton_Click" HorizontalAlignment="Right">
<FontIcon FontFamily="Segoe MDL2 Assets" Glyph="" />
</Button>
<ColorPicker x:Name="colorPicker" Margin="12" Width="288"
IsColorChannelTextInputVisible="False"
ColorChanged="ColorPicker_ColorChanged"/>
</StackPanel>
</Grid>
</Page>
MainPage.xaml.cs
using System;
using System.Collections.Generic;
using System.Linq;
using Windows.Foundation;
using Windows.UI;
using Windows.UI.WindowManagement;
using Windows.UI.Xaml;
using Windows.UI.Xaml.Controls;
using Windows.UI.Xaml.Hosting;
using Windows.UI.Xaml.Media;

// The Blank Page item template is documented at https://go.microsoft.com/fwlink/?LinkId=402352&clcid=0x409

namespace HelloAppWindow
{
    /// <summary>
    /// An empty page that can be used on its own or navigated to within a Frame.
    /// </summary>
    public sealed partial class MainPage : Page
    {
        AppWindow colorPickerAppWindow;

        // Track open app windows in a Dictionary.
        public static Dictionary<UIContext, AppWindow> AppWindows { get; set; }
            = new Dictionary<UIContext, AppWindow>();

        // Track the last opened dialog so you can close it if another dialog tries to open.
        public static ContentDialog CurrentDialog { get; set; } = null;

        public MainPage()
        {
            this.InitializeComponent();
        }

        private async void ShowNewWindowButton_Click(object sender, RoutedEventArgs e)
        {
            // Create a new window.
            AppWindow appWindow = await AppWindow.TryCreateAsync();

            // Create a Frame and navigate to the Page you want to show in the new window.
            Frame appWindowContentFrame = new Frame();
            appWindowContentFrame.Navigate(typeof(AppWindowPage));

            // Get a reference to the page instance and assign the
            // newly created AppWindow to the MyAppWindow property.
            AppWindowPage page = (AppWindowPage)appWindowContentFrame.Content;
            page.MyAppWindow = appWindow;
            page.TextColorBrush = new SolidColorBrush(colorPicker.Color);

            // Attach the XAML content to the window.
            ElementCompositionPreview.SetAppWindowContent(appWindow, appWindowContentFrame);

            // Add the new page to the Dictionary using the UIContext as the Key.
            AppWindows.Add(appWindowContentFrame.UIContext, appWindow);
            appWindow.Title = "App Window " + AppWindows.Count.ToString();

            // When the window is closed, be sure to release XAML resources
            // and the reference to the window.
            appWindow.Closed += delegate
            {
                MainPage.AppWindows.Remove(appWindowContentFrame.UIContext);
                appWindowContentFrame.Content = null;
                appWindow = null;
            };

            // Show the window.
            await appWindow.TryShowAsync();
        }

        private async void DialogButton_Click(object sender, RoutedEventArgs e)
        {
            ContentDialog importantDialog = new ContentDialog
            {
                Title = "Important dialog",
                Content = "This dialog can only be dismissed by clicking Ok.",
                CloseButtonText = "Ok"
            };

            if (MainPage.CurrentDialog != null)
            {
                MainPage.CurrentDialog.Hide();
            }
            // Do not track this dialog as the MainPage.CurrentDialog.
            // It should only be closed by clicking the Ok button.
            MainPage.CurrentDialog = null;

            try
            {
                ContentDialogResult result = await importantDialog.ShowAsync();
            }
            catch (Exception)
            {
                // The dialog didn't open, probably because another dialog is already open.
            }
        }

        private async void DetachColorPickerButton_Click(object sender, RoutedEventArgs e)
        {
            // Create the color picker window.
            if (colorPickerAppWindow == null)
            {
                colorPickerContainer.Children.Remove(colorPicker);
                colorPickerContainer.Visibility = Visibility.Collapsed;

                Grid appWindowRootGrid = new Grid();
                appWindowRootGrid.Children.Add(colorPicker);

                // Create a new window
                colorPickerAppWindow = await AppWindow.TryCreateAsync();
                colorPickerAppWindow.RequestMoveAdjacentToCurrentView();
                colorPickerAppWindow.RequestSize(new Size(300, 428));
                colorPickerAppWindow.Title = "Color picker";

                // Attach the XAML content to our window
                ElementCompositionPreview.SetAppWindowContent(colorPickerAppWindow, appWindowRootGrid);

                // Make sure to release the reference to this window,
                // and release XAML resources, when it's closed
                colorPickerAppWindow.Closed += delegate
                {
                    appWindowRootGrid.Children.Remove(colorPicker);
                    appWindowRootGrid = null;
                    colorPickerAppWindow = null;

                    colorPickerContainer.Children.Add(colorPicker);
                    colorPickerContainer.Visibility = Visibility.Visible;
                };
            }
            // Show the window.
            await colorPickerAppWindow.TryShowAsync();
        }

        private void ColorPicker_ColorChanged(ColorPicker sender, ColorChangedEventArgs args)
        {
            NewWindowButton.Background = new SolidColorBrush(args.NewColor);
        }

        private async void CloseAllButton_Click(object sender, RoutedEventArgs e)
        {
            while (AppWindows.Count > 0)
            {
                await AppWindows.Values.First().CloseAsync();
            }
        }
    }
}
AppWindowPage.xaml
<Page
    x:Class="HelloAppWindow.AppWindowPage"
    xmlns="http://schemas.microsoft.com/winfx/2006/xaml/presentation"
    xmlns:x="http://schemas.microsoft.com/winfx/2006/xaml"
    xmlns:local="using:HelloAppWindow"
    xmlns:d="http://schemas.microsoft.com/expression/blend/2008"
    xmlns:mc="http://schemas.openxmlformats.org/markup-compatibility/2006"
    mc:Ignorable="d"
    Background="{ThemeResource ApplicationPageBackgroundThemeBrush}">

    <Grid>
        <TextBlock x:Name="TitleTextBlock" Text="Hello AppWindow!" FontSize="24" HorizontalAlignment="Center" Margin="24"/>

        <StackPanel VerticalAlignment="Center" HorizontalAlignment="Center">
            <Button Content="Open dialog" Click="DialogButton_Click"
                    Width="200" Margin="0,4"/>
            <Button Content="Move window" Click="MoveWindowButton_Click"
                    Width="200" Margin="0,4"/>
            <ToggleButton Content="Compact Overlay" x:Name="compactOverlayButton" Click="CompactOverlayButton_Click"
                          Width="200" Margin="0,4"/>
            <ToggleButton Content="Full Screen" x:Name="fullScreenButton" Click="FullScreenButton_Click"
                          Width="200" Margin="0,4"/>
            <Grid>
                <TextBlock Text="Size:"/>
                <TextBlock x:Name="SizeText" HorizontalAlignment="Right"/>
            </Grid>
            <Grid>
                <TextBlock Text="Presentation:"/>
                <TextBlock x:Name="ConfigText" HorizontalAlignment="Right"/>
            </Grid>
        </StackPanel>
    </Grid>
</Page>
AppWindowPage.xaml.cs
using System;
using Windows.Foundation;
using Windows.Foundation.Metadata;
using Windows.UI;
using Windows.UI.WindowManagement;
using Windows.UI.Xaml;
using Windows.UI.Xaml.Controls;
using Windows.UI.Xaml.Media;

// The Blank Page item template is documented at https://go.microsoft.com/fwlink/?LinkId=234238

namespace HelloAppWindow
{
    /// <summary>
    /// An empty page that can be used on its own or navigated to within a Frame.
    /// </summary>
    public sealed partial class AppWindowPage : Page
    {
        AppWindow window;

        public AppWindow MyAppWindow { get; set; }

        public SolidColorBrush TextColorBrush { get; set; } = new SolidColorBrush(Colors.Black);

        public AppWindowPage()
        {
            this.InitializeComponent();

            Loaded += AppWindowPage_Loaded;
        }

        private void AppWindowPage_Loaded(object sender, RoutedEventArgs e)
        {
            // Get the reference to this AppWindow that was stored when it was created.
            window = MainPage.AppWindows[this.UIContext];

            // Set up event handlers for the window.
            window.Changed += Window_Changed;

            TitleTextBlock.Foreground = TextColorBrush;
        }

        private async void DialogButton_Click(object sender, RoutedEventArgs e)
        {
            ContentDialog simpleDialog = new ContentDialog
            {
                Title = "Content dialog",
                Content = "Dialog box for " + window.Title,
                CloseButtonText = "Ok"
            };

            if (MainPage.CurrentDialog != null)
            {
                MainPage.CurrentDialog.Hide();
            }
            MainPage.CurrentDialog = simpleDialog;

            // Use this code to associate the dialog to the appropriate AppWindow by setting
            // the dialog's XamlRoot to the same XamlRoot as an element that is already
            // present in the AppWindow.
            if (ApiInformation.IsApiContractPresent("Windows.Foundation.UniversalApiContract", 8))
            {
                simpleDialog.XamlRoot = ((Button)sender).XamlRoot;
            }

            try
            {
                ContentDialogResult result = await simpleDialog.ShowAsync();
            }
            catch (Exception)
            {
                // The dialog didn't open, probably because another dialog is already open.
            }
        }

        private void Window_Changed(AppWindow sender, AppWindowChangedEventArgs args)
        {
            if (args.DidAvailableWindowPresentationsChange)
            {
                EnablePresentationButtons(sender);
            }

            if (args.DidWindowPresentationChange)
            {
                ConfigText.Text = window.Presenter.GetConfiguration().Kind.ToString();
            }

            if (args.DidSizeChange)
            {
                SizeText.Text = window.GetPlacement().Size.ToString();
            }
        }

        private void EnablePresentationButtons(AppWindow window)
        {
            // Check whether the current AppWindowPresenter supports CompactOverlay.
            if (window.Presenter.IsPresentationSupported(AppWindowPresentationKind.CompactOverlay))
            {
                // Show the CompactOverlay button...
                compactOverlayButton.Visibility = Visibility.Visible;
            }
            else
            {
                // Hide the CompactOverlay button...
                compactOverlayButton.Visibility = Visibility.Collapsed;
            }

            // Check whether the current AppWindowPresenter supports FullScreen?
            if (window.Presenter.IsPresentationSupported(AppWindowPresentationKind.FullScreen))
            {
                // Show the FullScreen button...
                fullScreenButton.Visibility = Visibility.Visible;
            }
            else
            {
                // Hide the FullScreen button...
                fullScreenButton.Visibility = Visibility.Collapsed;
            }
        }

        private void CompactOverlayButton_Click(object sender, RoutedEventArgs e)
        {
            if (window.Presenter.GetConfiguration().Kind != AppWindowPresentationKind.CompactOverlay)
            {
                window.Presenter.RequestPresentation(AppWindowPresentationKind.CompactOverlay);
                fullScreenButton.IsChecked = false;
            }
            else
            {
                window.Presenter.RequestPresentation(AppWindowPresentationKind.Default);
            }
        }

        private void FullScreenButton_Click(object sender, RoutedEventArgs e)
        {
            if (window.Presenter.GetConfiguration().Kind != AppWindowPresentationKind.FullScreen)
            {
                window.Presenter.RequestPresentation(AppWindowPresentationKind.FullScreen);
                compactOverlayButton.IsChecked = false;
            }
            else
            {
                window.Presenter.RequestPresentation(AppWindowPresentationKind.Default);
            }
        }

        private void MoveWindowButton_Click(object sender, RoutedEventArgs e)
        {
            DisplayRegion displayRegion = window.GetPlacement().DisplayRegion;
            double displayRegionWidth = displayRegion.WorkAreaSize.Width;
            double windowWidth = window.GetPlacement().Size.Width;
            int horizontalOffset = (int)(displayRegionWidth - windowWidth);
            window.RequestMoveRelativeToDisplayRegion(displayRegion, new Point(horizontalOffset, 0));
        }
    }
}
