本教學課程的這個部分會將新頁面新增至應用程式,此檢視會顯示先前建立的所有筆記。
多個附註和導覽
目前 附註檢視顯示單一附註。 若要顯示所有已儲存的筆記,請建立新的檢視和模型: AllNotes。
- 在 方案總管 面板中,右鍵點擊 Views 資料夾,選擇 新增>新項目...
- 在 [ 新增專案 ] 對話框中,選取視窗左側範本清單中的 WinUI 。 接著,選擇 空白頁(WinUI) 範本。 為檔案AllNotesPage.xaml命名,然後按 [新增]。
- 在 方案總管 面板中,右鍵點擊 Models 資料夾,選擇 Add>Class...
- 為類別AllNotes.cs命名,然後按 [新增]。
小提示
你可以從
撰寫 AllNotes 模型的程式代碼
新的數據模型包含顯示多個備註所需的數據。 在這裡,你會從應用程式的本機儲存取得所有筆記,並建立一個包含 Note 物件的集合,顯示在 AllNotesPage。
在 方案總管 面板中,開啟 Models\AllNotes.cs 檔案。
將檔案中的 AllNotes.cs 程式碼取代為以下程式碼:
using System;
using System.Collections.Generic;
using System.Collections.ObjectModel;
using System.Threading.Tasks;
using Windows.Storage;

namespace WinUINotes.Models
{
    public class AllNotes
    {
        public ObservableCollection<Note> Notes { get; set; } =
                                    new ObservableCollection<Note>();

        public AllNotes()
        {
            LoadNotes();
        }

        public async void LoadNotes()
        {
            Notes.Clear();
            // Get the folder where the notes are stored.
            StorageFolder storageFolder =
                          ApplicationData.Current.LocalFolder;
            await GetFilesInFolderAsync(storageFolder);
        }

        private async Task GetFilesInFolderAsync(StorageFolder folder)
        {
            // Each StorageItem can be either a folder or a file.
            IReadOnlyList<IStorageItem> storageItems =
                                        await folder.GetItemsAsync();
            foreach (IStorageItem item in storageItems)
            {
                if (item.IsOfType(StorageItemTypes.Folder))
                {
                    // Recursively get items from subfolders.
                    await GetFilesInFolderAsync((StorageFolder)item);
                }
                else if (item.IsOfType(StorageItemTypes.File))
                {
                    StorageFile file = (StorageFile)item ;
                    Note note = new Note()
                    {
                        Filename = file.Name,
                        Text = await FileIO.ReadTextAsync(file),
                        Date = file.DateCreated.DateTime
                    };
                    Notes.Add(note);
                }
            }
        }
    }
}
先前的程式碼宣告了一組 Note 項目,命名為 Notes,並使用 LoadNotes 方法從應用程式的本地storage載入筆記。
備註
此LoadNotes方法使用async void代替async Task,因為它是從建構子中呼叫,而建構子無法async。 此「發射後遺忘」模式在此可接受,因為該方法為類似事件的初始化例程。
集合 Notes 會使用 ObservableCollection,這是一個特別的集合,適用於數據系結。 當列出多個專案,例如 ItemsView 的控件系結至 ObservableCollection時,兩者會一起運作,以自動讓專案清單與集合保持同步。 如果專案加入至集合,控件就會自動更新為新的專案。 如果有項目新增至清單,資料集將會更新。
![]() 在文檔中了解更多:
在文檔中了解更多:
- StorageFolder class, StorageFile class, IStorageItem.IsOfType method
- 使用 Windows 應用程式 SDK 和 WinRT API 存取檔案和資料夾
現在 AllNotes 模型準備好提供視圖資料,你需要在 AllNotesPage 建立模型實例,讓視圖能access模型。
在 方案總管 面板中,開啟 Views\AllNotesPage.xaml.cs 檔案。
在
AllNotesPage類別中,新增此程式碼以建立一個名為AllNotes的 模型:備註
你需要在檔案頂端新增
using WinUINotes.Models;參考類別AllNotes。public sealed partial class AllNotesPage : Page { // ↓ Add this. ↓ private AllNotes notesModel = new AllNotes(); // ↑ Add this. ↑ public AllNotesPage() { this.InitializeComponent(); } }
設計 AllNotes 頁面
接下來,您必須設計檢視以支援 AllNotes 模型。
在 方案總管 面板中,開啟 Views\AllNotesPage.xaml 檔案。
將
<Grid> ... </Grid>元素取代為下列標記:<Grid> <Grid.RowDefinitions> <RowDefinition Height="Auto"/> <RowDefinition Height="*"/> </Grid.RowDefinitions> <CommandBar DefaultLabelPosition="Right"> <AppBarButton Icon="Add" Label="New note"/> <CommandBar.Content> <TextBlock Text="Quick notes" Margin="16,8" Style="{ThemeResource SubtitleTextBlockStyle}"/> </CommandBar.Content> </CommandBar> <ItemsView ItemsSource="{x:Bind notesModel.Notes}" Grid.Row="1" Padding="16" > <ItemsView.Layout> <UniformGridLayout MinItemWidth="200" MinColumnSpacing="12" MinRowSpacing="12" ItemsJustification="Start"/> </ItemsView.Layout> </ItemsView> </Grid>
先前的 XAML 引進了一些新概念:
-
CommandBar 控件包含 AppBarButton。 此按鈕具有
Label和Icon,且會受到包含它的CommandBar的影響。 例如,此CommandBar將按鈕的標籤位置設定為Right。 命令行通常會顯示在應用程式頂端,以及頁面標題。 -
ItemsView 控件顯示項目集合,在此案例中,綁定到模型的
Notes屬性。 項目檢視會透過ItemsView.Layout屬性設定項目呈現的方式。 在這裡,您會使用 UniformGridLayout。
現在您已建立 AllNotesPage,您需要最後一次更新 MainWindow.xaml,以便使其載入 AllNotesPage,而不是個別 NotePage。
在 方案總管 窗格中,開啟 MainWindow.xaml 檔案。
更新
rootFrame元素,讓SourcePageType指向views.AllNotesPage,如下所示:<Frame x:Name="rootFrame" Grid.Row="1" SourcePageType="views:AllNotesPage"/>
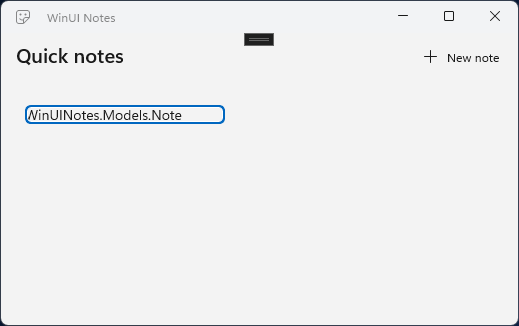
如果您現在執行應用程式,您會看到您先前建立的附註已載入到ItemsView控制項。 不過,它只會顯示為物件的字串表示。
ItemsView不知道應該如何顯示此項目。 您將在下一節修正此問題。
新增數據範本
您必須指定 DataTemplate ,以告知 ItemsView 應該如何顯示資料項。 將 DataTemplate 指派到 ItemTemplate 屬性 ItemsView。 針對集合中的每個專案,ItemsView.ItemTemplate 會根據宣告產生 XAML。
在 方案總管 面板中,雙擊 AllNotesPage.xaml 條目,可在 XAML 編輯器中開啟。
在
local的對應行下方新增這個新的命名空間對應:xmlns:models="using:WinUINotes.Models"在
<Page.Resources>標記開頭後新增一個<Page...>元素。 這會從的Page屬性取得 ResourceDictionary,讓您可以將 XAML 資源加入其中。<Page x:Class="WinUINotes.Views.AllNotesPage" ... > <!-- ↓ Add this. ↓ --> <Page.Resources> </Page.Resources>在
<Page.Resources>元素內,新增DataTemplate來描述如何顯示Note項目。<Page.Resources> <!-- ↓ Add this. ↓ --> <DataTemplate x:Key="NoteItemTemplate" x:DataType="models:Note"> <ItemContainer> <Grid Background="LightGray"> <Grid.RowDefinitions> <RowDefinition Height="120"/> <RowDefinition Height="Auto"/> </Grid.RowDefinitions> <TextBlock Text="{x:Bind Text}" Margin="12,8" TextWrapping="Wrap" TextTrimming="WordEllipsis"/> <Border Grid.Row="1" Padding="8,6,0,6" Background="Gray"> <TextBlock Text="{x:Bind Date}" Foreground="White"/> </Border> </Grid> </ItemContainer> </DataTemplate> <!-- ↑ Add this. ↑ --> </Page.Resources>在 XAML 的
ItemsView中,將Padding="16"更改為Margin="24",並將屬性ItemTemplate指派給您剛建立的資料模板:<ItemsView ItemsSource="{x:Bind notesModel.Notes}" Grid.Row="1" Margin="24" <!-- ↓ Add this. ↓ --> ItemTemplate="{StaticResource NoteItemTemplate}">建置並執行應用程式。
當您在 x:Bind 中使用 DataTemplate 標記延伸時,您必須在 x:DataType 上指定 DataTemplate。 在此情況下,這是特定 Note(因此您必須新增 XAML 命名空間 Models 的參考)。 附註的範本會使用兩 TextBlock 個控件,這些控件系結至附註的 Text 和 Date 屬性。
Grid 元素用於配置,並提供背景色彩。
Border 元素用於日期的背景。 (XAML Border 元素可以同時提供大綱和背景。
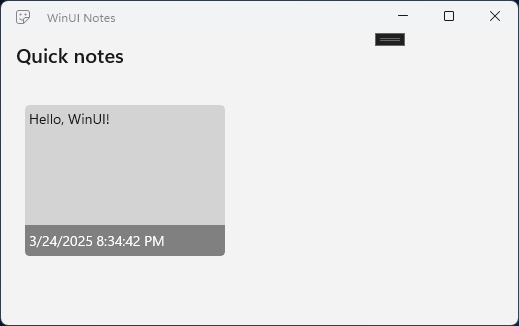
當你執行應用程式時,資料範本會套用到你的 Note 項目上,如果你的 Windows 個人化設定 > 色彩設定使用光照模式,會是這樣顯示的:
不過,如果你的Windows個人化> 色彩設定使用暗色模式,會呈現如下樣貌:
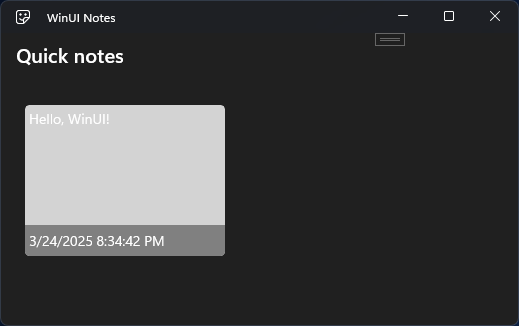
這不是應用程式的預期外觀。 之所以會這樣,是因為附註的數據範本中存在硬編碼的色彩值。 預設情況下,WinUI 3 元素會根據使用者偏好的深色或淺色來調整。 當你定義自己的元素,比如資料範本時,需要注意同樣的細節。
當您在 XAML ResourceDictionary中定義資源時,您必須指派 x:Key 值來識別資源。 然後,您可以使用該 x:Key 屬性,透過 {StaticResource} 標記延伸或 {ThemeResource} 標記延伸,在 XAML 中擷取資源。
- 不論色彩主題為何,
{StaticResource}都相同,因此會用於如Font或Style等設置。 -
{ThemeResource}會根據選取的色彩主題進行變更,因此會用於Foreground、Background和其他色彩相關屬性。
WinUI 包含各種不同的內建資源,可讓您用來讓您的應用程式遵循 Fluent 樣式指導方針,以及輔助功能指導方針。 您將使用內建的主題資源取代數據範本中的硬式編碼色彩,並套用一些其他資源以符合 Fluent Design 指導方針。
在您先前新增的數據範本中,更新此處指示的區段以使用內建資源:
<DataTemplate x:Key="NoteItemTemplate"
              x:DataType="models:Note">

<!-- ↓ Update this. ↓ -->
    <ItemContainer CornerRadius="{StaticResource OverlayCornerRadius}">
        <Grid Background="{ThemeResource CardBackgroundFillColorDefaultBrush}"
              BorderThickness="1"
              BorderBrush="{ThemeResource CardStrokeColorDefaultBrush}"
              CornerRadius="{StaticResource OverlayCornerRadius}">
<!-- ↑ Update this. ↑ -->

            <Grid.RowDefinitions>
                <RowDefinition Height="120"/>
                <RowDefinition Height="Auto"/>
            </Grid.RowDefinitions>
            <TextBlock Text="{x:Bind Text}" Margin="12,8"
                       TextWrapping="Wrap"
                       TextTrimming="WordEllipsis"/>

<!-- ↓ Update this. ↓ -->
            <Border Grid.Row="1" Padding="8,6,0,6"
                    Background="{ThemeResource SubtleFillColorSecondaryBrush}">
                <TextBlock Text="{x:Bind Date}"
                    Style="{StaticResource CaptionTextBlockStyle}"
                    Foreground="{ThemeResource TextFillColorSecondaryBrush}"/>
<!-- ↑ Update this. ↑ -->

            </Border>
        </Grid>
    </ItemContainer>
</DataTemplate>
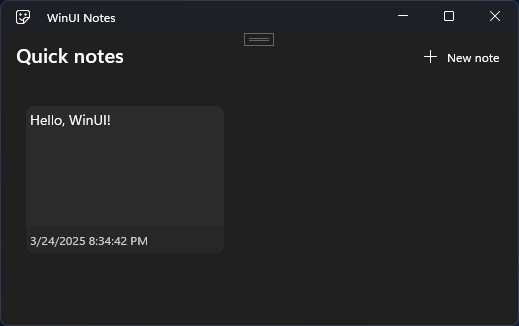
現在當您使用淺色設定執行應用程式時,看起來會像這樣:

當您以深色設定執行應用程式時,看起來會像這樣:
![]() 在文檔中了解更多:
在文檔中了解更多:
小提示
該應用程序 WinUI 3 Gallery 是了解不同 WinUI 控件和設計指南的好方法。 若要查看資料範本中使用的主題資源, 請開啟 WinUI 3 Gallery 應用程式以取得色彩指引。 您可以從該處查看資源的外觀,並直接從應用程式複製所需的值。

應用程式 WinUI 3 Gallery 包含 WinUI 控制項與功能的互動範例。 你可以從 Microsoft Store 下載應用程式,或瀏覽 GitHub 的原始碼。
