HoloLens (第 1 代) 和 Azure 312:Bot 整合
注意
混合實境學院教學課程的設計是以 HoloLens (第 1 代) 和混合實境沉浸式頭戴裝置為準。 因此,對於仍在尋找這些裝置開發指引的開發人員而言,我們覺得這些教學課程很重要。 這些教學課程不會使用用於 HoloLens 2 的最新工具組或互動進行更新。 系統會保留這些資訊,以繼續在支援的裝置上運作。 未來將會張貼一系列新的教學課程,以示範如何為 HoloLens 2 進行開發。 張貼這些教學課程的連結將會更新此通知。
在此課程中,您將瞭解如何使用 Microsoft Bot Framework V4 建立及部署 Bot,並透過 Windows Mixed Reality 應用程式與其通訊。

Microsoft Bot Framework V4 是一組 API,其設計目的是為開發人員提供工具來建置可延伸且可調整的 Bot 應用程式。 如需詳細資訊,請流覽 Microsoft Bot Framework 頁面 或 V4 Git 存放庫。
完成本課程之後,您將建置 Windows Mixed Reality 應用程式,以便執行下列動作:
- 使用點選手勢啟動 Bot 接聽用戶語音。
- 當使用者說些什麼時,Bot 會嘗試提供回應。
- 在 Unity 場景中,以文字顯示 Bot 回復。在 Bot 附近。
在您的應用程式中,您應該瞭解如何將結果與設計整合。 本課程旨在教導您如何整合 Azure 服務與 Unity 專案。 使用本課程中取得的知識來增強混合實境應用程式,是您的工作。
裝置支援
| 課程 | HoloLens | 沉浸式頭戴裝置 |
|---|---|---|
| MR 和 Azure 312:Bot 整合 | ✔️ | ✔️ |
注意
雖然本課程主要著重於 HoloLens,但您也可以將此課程中學到的內容套用至 Windows Mixed Reality 沉浸式 (VR) 頭戴式裝置。 由於沉浸式 (VR) 頭戴式裝置沒有無障礙相機,因此您需要連線到計算機的外部相機。 隨著您遵循課程,您將會看到任何您可能需要採用以支援沉浸式(VR)頭戴式裝置變更的附註。
必要條件
注意
本教學課程專為具備 Unity 和 C# 基本經驗的開發人員所設計。 另請注意,本檔內的必要條件和書面指示代表在撰寫期間經過測試和驗證的內容(2018 年 7 月)。 您可以自由使用最新的軟體,如安裝工具文章中所列,不過不應該假設本課程中的資訊會完全符合您在較新的軟體中找到的內容,而不是下面所列的內容。
針對此課程,我們建議使用下列硬體和軟體:
- 開發計算機, 與 Windows Mixed Reality 相容以進行沉浸式 (VR) 頭戴式裝置開發
- 已啟用開發人員模式的 Windows 10 Fall Creators Update (或更新版本)
- 最新的 Windows 10 SDK
- Unity 2017.4
- Visual Studio 2017
- 已啟用開發人員模式的 Windows Mixed Reality 沉浸式 (VR) 頭戴式裝置或Microsoft HoloLens
- Azure 和 Azure Bot 擷取的因特網存取。 如需詳細資訊, 請遵循此連結。
在您開始使用 Intune 之前
- 為了避免建置此專案時發生問題,強烈建議您在根資料夾或近根資料夾中建立本教學課程中所提及的專案(長文件夾路徑在建置時可能會導致問題)。
- 設定及測試 HoloLens。 如果您需要設定 HoloLens 的支援, 請務必流覽 HoloLens 設定文章。
- 開始開發新的 HoloLens 應用程式時,最好執行校正和感測器微調(有時有助於為每個使用者執行這些工作)。
如需校正的說明,請遵循此 連結至 HoloLens 校正文章。
如需感測器微調的說明,請遵循此 連結至 HoloLens 感測器微調文章。
第 1 章 – 建立 Bot 應用程式
第一個步驟是將您的 Bot 建立為本機 ASP.Net Core Web 應用程式。 完成並測試之後,您會將其發佈至 Azure 入口網站。
開啟 Visual Studio。 建立新項目,選取 [ASP NET Core Web 應用程式 ] 作為專案類型(您會在 .NET Core 子區段底下找到它),並將其稱為 MyBot。 按一下 [確定]。
在出現的視窗中,選取 [ 空白]。 此外,請確定目標已設定為 ASP NET Core 2.0 ,且 [驗證] 設定為 [無驗證]。 按一下 [確定]。
![顯示 [新增 S P 點 N E T Core Web 應用程式] 視窗的螢幕快照。](images/azurelabs-lab312-01.png)
解決方案現在會開啟。 以滑鼠右鍵按兩下 方案總管 中的 [解決方案 Mybot],然後按兩下 [管理方案的 NuGet 套件]。
![顯示已開啟解決方案的螢幕快照,其中已醒目提示 [MyBot] 和 [管理方案的 NuGet 套件]。](images/azurelabs-lab312-02.png)
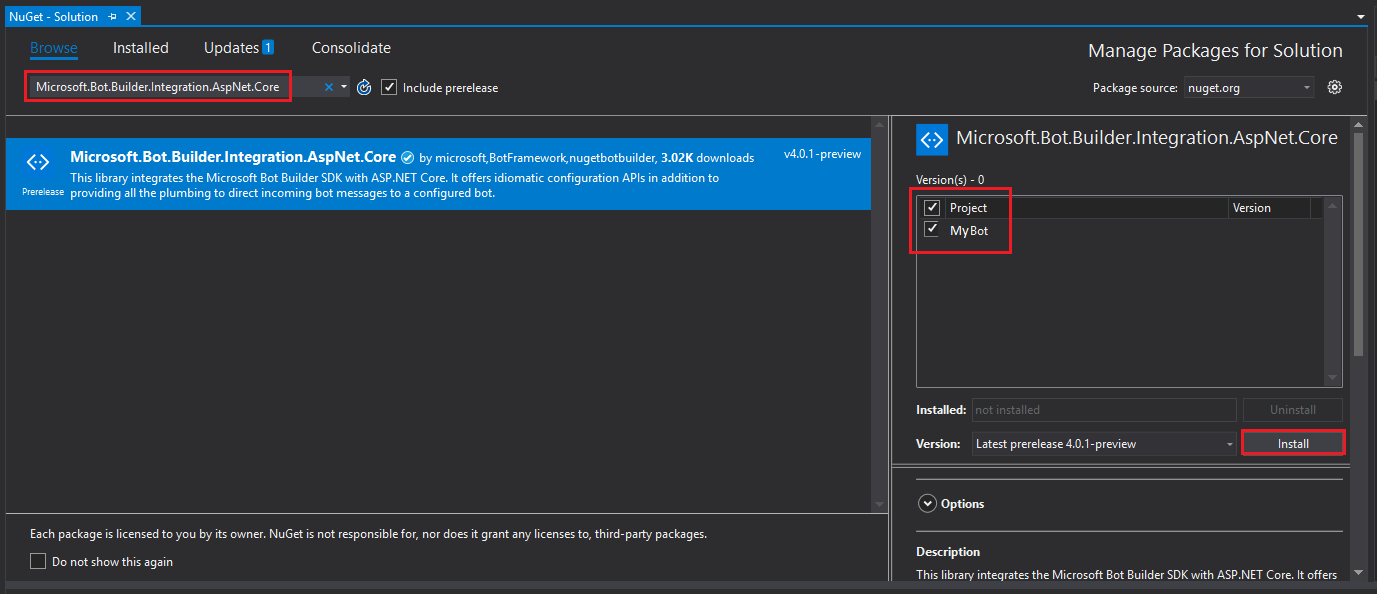
在 [流覽] 索引標籤中,搜尋 Microsoft.Bot.Builder.Integration.AspNet.Core(確定您已核取 [包含發行前版本]。 選取套件 4.0.1-preview 版,然後勾選專案方塊。 然後按兩下 [ 安裝]。 您現在已安裝 Bot Framework v4 所需的連結庫。 關閉 [NuGet] 頁面。
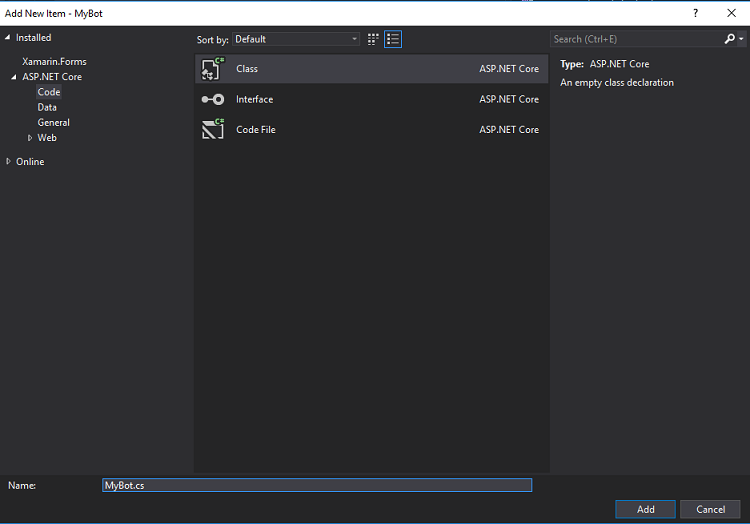
在 方案總管 中,以滑鼠右鍵按兩下您的 Project MyBot,然後按兩下 [新增|類別]。
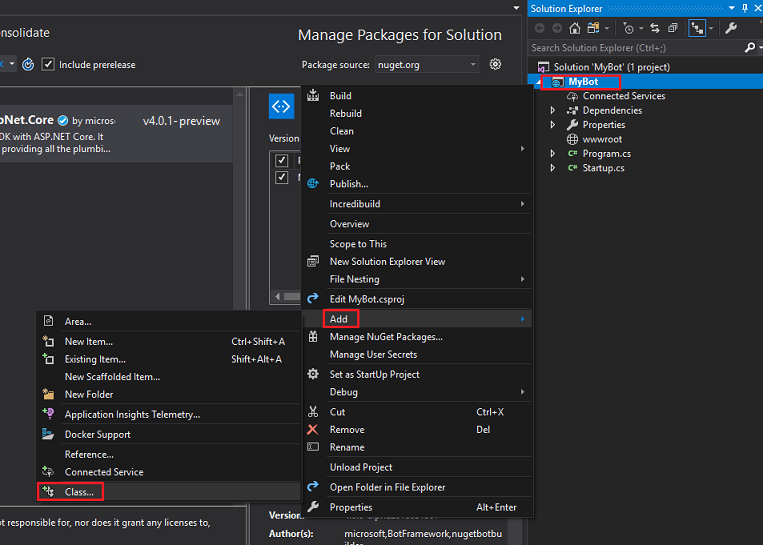
將類別 命名為 MyBot ,然後按兩下 [ 新增]。
重複上一個點,以建立另 一個名為 ConversationContext 的類別。
以滑鼠右鍵按兩下 方案總管中的 wwwroot,然後按下 [新增 | 專案]。 選取 [HTML 頁面 ] (您會在子區段 Web 底下找到它)。 將檔案 命名為default.html。 按一下新增。
![顯示從 [方案總管] 視窗中建立新 H T M L 頁面的螢幕快照。](images/azurelabs-lab312-06.png)
方案總管 中的類別/物件清單看起來應該像下圖。
![具有類別清單的 [方案總管] 視窗螢幕快照。](images/azurelabs-lab312-07.png)
按兩下 ConversationContext 類別。 此類別負責保存 Bot 用來維護交談內容的變數。 這些交談內容值會保留在此類別的實例中,因為每次收到活動時,MyBot 類別的任何實例都會重新整理。 將下列程式碼新增至 類別:
namespace MyBot
{
    public static class ConversationContext
    {
        internal static string userName;

        internal static string userMsg;
    }
}
按兩下 MyBot 類別。 此類別會裝載客戶任何傳入活動所呼叫的處理程式。 在此類別中,您將新增用來建置 Bot 與客戶對話的程式代碼。 如先前所述,每次收到活動時,都會初始化這個類別的實例。 將下列程式代碼新增至此類別:
using Microsoft.Bot;
using Microsoft.Bot.Builder;
using Microsoft.Bot.Schema;
using System.Threading.Tasks;

namespace MyBot
{
    public class MyBot : IBot
    {
        public async Task OnTurn(ITurnContext context)
        {
            ConversationContext.userMsg = context.Activity.Text;

            if (context.Activity.Type is ActivityTypes.Message)
            {
                if (string.IsNullOrEmpty(ConversationContext.userName))
                {
                    ConversationContext.userName = ConversationContext.userMsg;
                    await context.SendActivity($"Hello {ConversationContext.userName}. Looks like today it is going to rain. \nLuckily I have umbrellas and waterproof jackets to sell!");
                }
                else
                {
                    if (ConversationContext.userMsg.Contains("how much"))
                    {
                        if (ConversationContext.userMsg.Contains("umbrella")) await context.SendActivity($"Umbrellas are $13.");
                        else if (ConversationContext.userMsg.Contains("jacket")) await context.SendActivity($"Waterproof jackets are $30.");
                        else await context.SendActivity($"Umbrellas are $13. \nWaterproof jackets are $30.");
                    }
                    else if (ConversationContext.userMsg.Contains("color") || ConversationContext.userMsg.Contains("colour"))
                    {
                        await context.SendActivity($"Umbrellas are black. \nWaterproof jackets are yellow.");
                    }
                    else
                    {
                        await context.SendActivity($"Sorry {ConversationContext.userName}. I did not understand the question");
                    }
                }
            }
            else
            {

                ConversationContext.userMsg = string.Empty;
                ConversationContext.userName = string.Empty;
                await context.SendActivity($"Welcome! \nI am the Weather Shop Bot \nWhat is your name?");
            }

        }
    }
}
按兩下 Startup 類別。 這個類別會初始化 Bot。 將下列程式碼新增至 類別:
using Microsoft.AspNetCore.Builder;
using Microsoft.AspNetCore.Hosting;
using Microsoft.Bot.Builder.BotFramework;
using Microsoft.Bot.Builder.Integration.AspNet.Core;
using Microsoft.Extensions.Configuration;
using Microsoft.Extensions.DependencyInjection;

namespace MyBot
{
public class Startup
    {
        public IConfiguration Configuration { get; }

        public Startup(IHostingEnvironment env)
        {
            var builder = new ConfigurationBuilder()
                .SetBasePath(env.ContentRootPath)
                .AddJsonFile("appsettings.json", optional: true, reloadOnChange: true)
                .AddJsonFile($"appsettings.{env.EnvironmentName}.json", optional: true)
                .AddEnvironmentVariables();
            Configuration = builder.Build();
        }

        // This method gets called by the runtime. Use this method to add services to the container.
        public void ConfigureServices(IServiceCollection services)
        {
            services.AddSingleton(_ => Configuration);
            services.AddBot<MyBot>(options =>
            {
                options.CredentialProvider = new ConfigurationCredentialProvider(Configuration);
            });
        }

        // This method gets called by the runtime. Use this method to configure the HTTP request pipeline.
        public void Configure(IApplicationBuilder app, IHostingEnvironment env)
        {
            if (env.IsDevelopment())
            {
                app.UseDeveloperExceptionPage();
            }

            app.UseDefaultFiles();
            app.UseStaticFiles();
            app.UseBotFramework();
        }
    }
}
開啟 Program 類別檔案,並確認其中的程式代碼與下列程式代碼相同:
using Microsoft.AspNetCore;
using Microsoft.AspNetCore.Hosting;

namespace MyBot
{
    public class Program
    {
        public static void Main(string[] args)
        {
            BuildWebHost(args).Run();
        }

        public static IWebHost BuildWebHost(string[] args) =>
            WebHost.CreateDefaultBuilder(args)
                .UseStartup<Startup>()
                .Build();
    }
}
請記得儲存變更,若要這樣做,請從 Visual Studio 頂端的工具列移至 [全部>檔案儲存]。
第 2 章 - 建立 Azure Bot 服務
既然您已為 Bot 建置程式代碼,您必須將其發佈至 Azure 入口網站上的 Web App Bot Service 實例。 本章將說明如何在 Azure 上建立和設定 Bot Service,然後將程式代碼發佈至其中。
首先,登入 Azure 入口網站 (https://portal.azure.com)。
- 如果您還沒有 Azure 帳戶,則必須建立一個帳戶。 如果您在教室或實驗室情況中遵循本教學課程,請洽詢您的講師或其中一名監看員,以協助設定您的新帳戶。
登入之後,按兩下左上角的 [ 建立資源 ],然後搜尋 Web應用程式 Bot,然後按兩下 Enter。
![Microsoft Azure 儀錶板的螢幕快照,其中左上方醒目提示 [建立資源]。](images/azurelabs-lab312-08.png)
新頁面將提供 Web App Bot Service 的描述。 在此頁面左下方,選取 [ 建立] 按鈕,以建立此服務的關聯。
![Web 應用程式 Bot 頁面和左下角 [建立] 按鈕的螢幕快照。](images/azurelabs-lab312-09.png)
按兩下 [建立]:
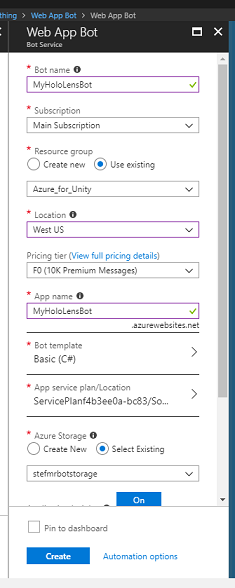
插入此服務實例所需的 名稱 。
選取 [訂用帳戶]。
選擇資源群組或建立新的群組。 資源群組提供一種方式來監視、控制存取、布建和管理 Azure 資產集合的計費。 建議將所有與單一專案相關聯的 Azure 服務(例如,例如這些課程)保留在通用資源群組下)。
如果您想要深入瞭解 Azure 資源群組, 請遵循此連結
判斷資源群組的位置(如果您要建立新的資源群組)。 在理想情況下,位置位於應用程式執行所在的區域中。 某些 Azure 資產僅適用於特定區域。
選取適合您的定價層,如果這是第一次建立 Web App Bot Service,您應該可以使用免費層 (名為 F0)
應用程式名稱 只能保留與 Bot 名稱相同的名稱。
將 Bot 範本保留為基本 #C#。
App Service 方案/位置 應該已自動填入您的帳戶。
設定您想要用來裝載 Bot 的 Azure 儲存體。 如果您還沒有帳戶,您可以在這裡建立它。
您也必須確認您已瞭解此服務適用的條款和條件。
按一下 [建立]。
按兩下 [建立] 之後,您必須等候服務建立,這可能需要一分鐘的時間。
建立服務實例之後,入口網站中會出現通知。

按兩下通知以探索新的服務實例。
![顯示部署成功和 [移至資源] 按鈕的螢幕快照。](images/azurelabs-lab312-12.png)
按兩下通知中的 [ 移至資源 ] 按鈕,以探索新的服務實例。 系統會帶您前往新的 Azure 服務實例。
![按兩下上一個視窗中 [移至資源] 按鈕後的資源視窗螢幕快照。](images/azurelabs-lab312-13.png)
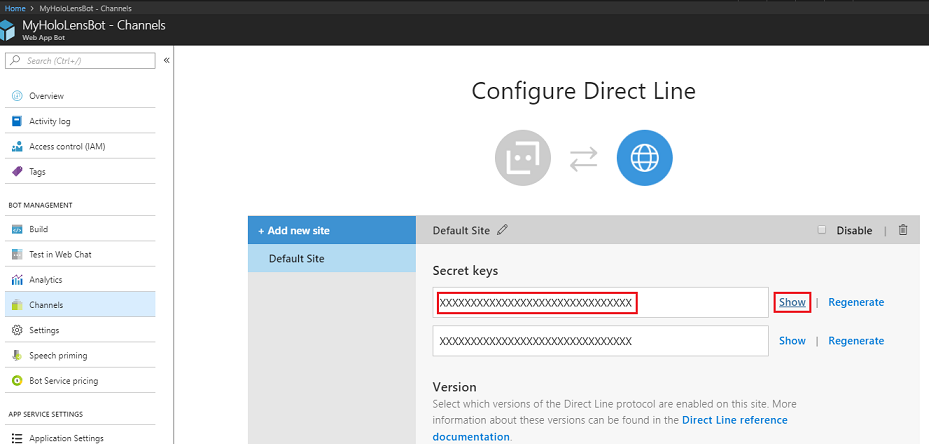
此時,您必須設定稱為 Direct Line 的功能,以允許用戶端應用程式與此 Bot 服務通訊。 按兩下 [通道],然後在 [新增精選通道] 區段中,按兩下 [設定 Direct Line 通道]。
![顯示 MyHoloLensBot 中醒目提示 [設定 Direct Line 通道] 的螢幕快照。](images/azurelabs-lab312-14.png)
在此頁面中,您會發現 秘密密鑰 可讓用戶端應用程式向 Bot 進行驗證。 按兩下 [ 顯示 ] 按鈕並取得其中一個顯示金鑰的複本,因為您稍後會在專案中用到此金鑰。
第 3 章 – 將 Bot 發佈至 Azure Web App Bot Service
現在您的服務已準備就緒,您必須將先前建置的 Bot 程式代碼發佈至新建立的 Web App Bot Service。
注意
每次對 Bot 解決方案 / 程式代碼進行變更時,都必須將 Bot 發佈至 Azure 服務。
返回您先前建立的Visual Studio解決方案。
以滑鼠右鍵按下 MyBot 專案,在 方案總管 中,然後按兩下 [發佈]。
![螢幕快照,顯示按兩下滑鼠右鍵之後的 [MyBot] 專案下拉功能表。](images/azurelabs-lab312-16.png)
在 [ 挑選發佈目標 ] 頁面上,按兩下 [App Service],然後按兩下 [現有],最後按兩下 [ 建立設定檔 ] (如果看不到,您可能需要按下拉式箭號旁的 [發佈 ] 按鈕。
![顯示 [挑選發佈目標] 頁面的螢幕快照,其中已醒目提示 [App Service]、[選取現有] 和 [建立配置檔]。](images/azurelabs-lab312-17.png)
如果您尚未登入Microsoft帳戶,您必須在這裡執行此作業。
在 [發佈] 頁面上,您會發現您必須設定用於建立 Web App Bot Service 的相同訂用帳戶。 然後將 [ 檢視 ] 設定為 [資源群組 ],然後在下拉式資料夾結構中,選取您先前建立的資源 群組 。 按一下 [確定]。
![顯示 [App Service] 視窗的螢幕快照,其中包含用於建立 Web App Bot Service 的相同訂用帳戶。](images/azurelabs-lab312-18.png)
現在按兩下 [ 發佈] 按鈕,並等候 Bot 發佈(可能需要幾分鐘的時間)。
![顯示 [發佈] 視窗與 [發佈] 按鈕的螢幕快照。](images/azurelabs-lab312-19.png)
第 4 章 – 設定 Unity 專案
以下是使用混合實境進行開發的一般設定,因此是其他專案的良好範本。
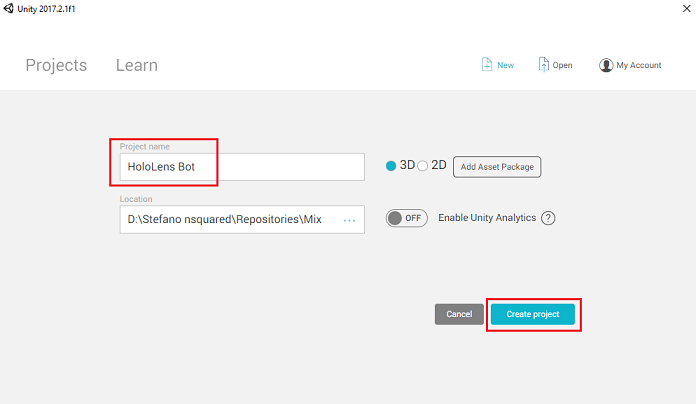
開啟 Unity ,然後按兩下 [ 新增]。
![顯示 Unity 專案視窗的螢幕快照,其中醒目提示右上角的 [新增] 項目圖示。](images/azurelabs-lab312-20.png)
您現在必須提供 Unity 項目名稱。 插入 HoloLens Bot。 請確定項目範本已設定為 3D。 將 [ 位置 ] 設定為您適當的位置(請記住,更接近根目錄會更好)。 然後按兩下 [ 建立專案]。
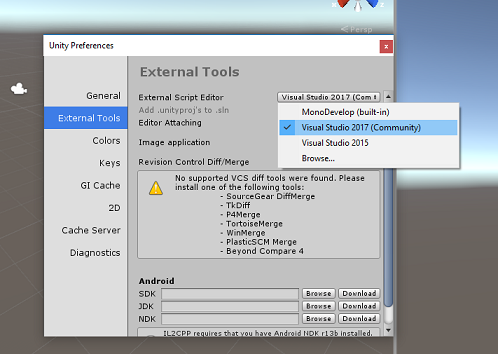
在 Unity 開啟時,值得檢查預設 的腳本編輯器 設定為 Visual Studio。 移至 [ 編輯 > 喜好設定 ],然後從新視窗流覽至 [外部工具]。 將外部腳本編輯器變更為 Visual Studio 2017。 關閉 [喜好設定] 視窗。
接下來,移至 [檔案>建置設定] 並選取 [通用 Windows 平台],然後按兩下 [切換平臺] 按鈕以套用您的選取專案。
![顯示 [建置設定] 視窗的螢幕快照,其中醒目提示 [切換平臺] 按鈕。](images/azurelabs-lab312-23.png)
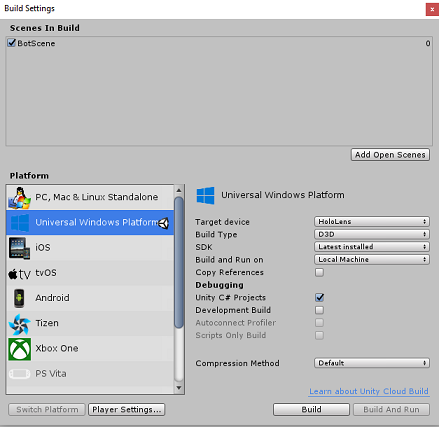
仍在 [檔案>建置設定] 中,並確定:
目標裝置 設定為 HoloLens
針對沉浸式頭戴裝置,將 [目標裝置] 設定為 [任何裝置]。
組建類型 設定為 D3D
SDK 設定為 [最新安裝]
Visual Studio 版本 設定為 [最新安裝]
[建置並執行 ] 設定為 [ 本機計算機]
儲存場景並將它新增至組建。
選取 [ 新增開啟場景] 來執行此動作。 隨即會出現儲存視窗。
![顯示 [建置設定] 視窗的螢幕快照,其中已醒目提示 [新增開啟場景] 按鈕。](images/azurelabs-lab312-24.png)
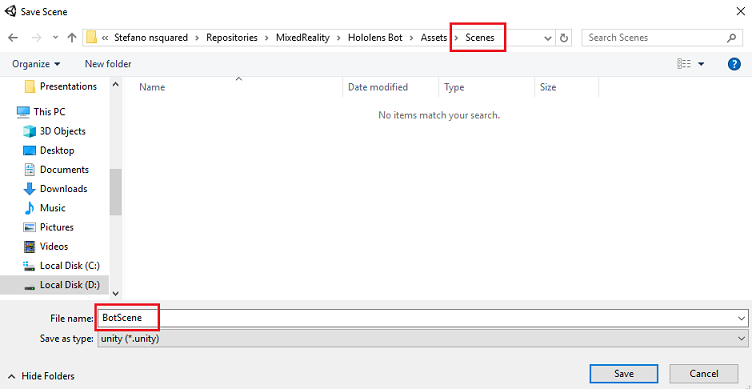
為此建立新的資料夾,以及任何未來場景,然後選取 [新增資料夾] 按鈕,以建立新的資料夾 ,並將它命名為 Scenes。
![顯示建立新 [場景] 資料夾的螢幕快照。](images/azurelabs-lab312-25.png)
開啟新建立 的 Scenes 資料夾,然後在 [檔名:文字] 字段中輸入 BotScene,然後按兩下 [ 儲存]。
[建置設定] 中的其餘設定現在應該保留為預設值。
在 [建置設定] 視窗中,按兩下 [播放程序設定] 按鈕,這會在 Inspector 所在的空間中開啟相關的面板。
![顯示 [偵測器] 索引標籤中 [建置設定] 視窗的螢幕快照。](images/azurelabs-lab312-27.png)
在此面板中,需要驗證一些設定:
在 [ 其他設定] 索引標籤中:
腳本運行時間版本 應該是 實驗性版本(NET 4.6 對等專案),變更這需要重新啟動編輯器。
腳本後端 應該是 .NET
API 相容性層級 應該是 .NET 4.6
![顯示 [其他設定] 索引標籤的螢幕快照,其中包含必要的設定。](images/azurelabs-lab312-28.png)
在 [發佈設定] 索引標籤的 [功能] 底下,檢查:
InternetClient
麥克風
![顯示 [發佈設定] 索引標籤中已啟用 [InternetClient] 和 [麥克風] 的螢幕快照。](images/azurelabs-lab312-29.png)
在面板的下方,在 [XR 設定] 中,勾選 [支援虛擬現實] 中的 [XR 設定],確定已新增 Windows Mixed Reality SDK。
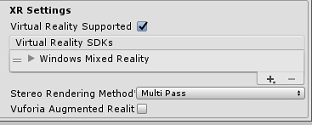
回到 [組建設定] Unity C# 專案不再呈現灰色;勾選此旁邊的複選框。
關閉 [建置設定] 視窗。
儲存場景和專案(檔案 > 儲存場景/檔案 > 儲存專案)。
第 5 章 – 相機設定
重要
如果您想要略過本課程的 Unity 設定元件,並繼續直接進入程式碼,請隨意下載此 Azure-MR-312-Package.unitypackage,將它匯入您的專案作為自定義套件,然後從第 7 章繼續進行。
在 [ 階層] 面板中,選取 [主要相機]。
選取之後,您將能夠在 [偵測器] 面板中看到主相機的所有元件。
- Camera 物件必須命名為 Main Camera (請注意拼字)
- 主相機 標籤 必須設定為 MainCamera (請注意拼字)
- 確定 [ 轉換位置 ] 設定為 0、0、0
- 將 [清除旗標] 設定為 [純色]。
- 將相機元件的背景色彩設定為黑色、Alpha 0 (十六進位代碼: #00000000000)
![顯示 [偵測器] 面板中主相機所有元件的螢幕快照。](images/azurelabs-lab312-31.png)
第 6 章 – 匯入 Newtonsoft 連結庫
若要協助您還原串行化和串行化接收並傳送至 Bot 服務的物件,您需要下載 Newtonsoft 連結庫。 您可以在這裡找到已使用正確 Unity 資料夾結構組織的相容版本。
若要將 Newtonsoft 連結庫匯入您的專案,請使用本課程隨附的 Unity 套件。
使用 [資產>匯入套件自定義套件>] 功能表選項,將 .unitypackage 新增至 Unity。
![顯示 [資產] 下拉功能表的螢幕快照,並已選取 [匯入套件],然後選取 [自定義套件]。](images/azurelabs-lab312-34.png)
在快顯的 [ 匯入 Unity 套件] 方塊中,確定已選取 [包含] 外掛程式 底下的所有專案。
![[匯入 Unity 套件] 彈出視窗的螢幕快照,其中已選取 [外掛程式]。](images/azurelabs-lab312-35.png)
按兩下 [ 匯 入] 按鈕,將專案新增至您的專案。
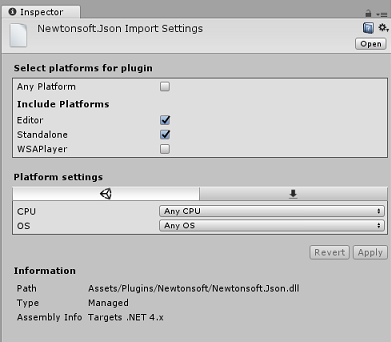
移至項目檢視中 [外掛程式] 底下的Newtonsoft資料夾,然後選取Newtonsoft外掛程式。
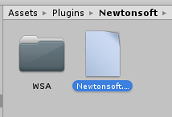
選取 Newtonsoft 外掛程式後,請確定未核取 [任何平臺],然後確定 WSAPlayer 也未核取,然後按兩下 [套用]。 這隻是為了確認檔案已正確設定。
注意
標記這些外掛程式會將這些外掛程式設定為只能在 Unity 編輯器中使用。 WSA 資料夾中有一組不同的專案,將在專案從 Unity 匯出之後使用。
接下來,您必須在 Newtonsoft 資料夾中開啟 WSA 資料夾。 您會看到您剛才設定的相同檔案複本。 選取檔案,然後在偵測器中確定
- 未核取任何平臺
- 只會檢查 WSAPlayer
- 未檢查處理程式

第 7 章 – 建立 BotTag
建立名為 BotTag 的新 Tag 物件。 選取場景中的主相機。 按兩下 [偵測器] 面板中的 [卷標] 下拉功能表。 按兩下 [ 新增卷標]。
![偵測器面板中 [主要相機捲標] 下拉功能表的螢幕快照,其中已醒目提示 [新增標籤]。](images/azurelabs-lab312-32.png)
+按兩下符號。 將新的標記命名為 BotTag,儲存。
![[偵測器] 面板的螢幕快照,其中包含新的 BotTag 名稱、加號和 [儲存] 按鈕。](images/azurelabs-lab312-33.png)
警告
請勿 將 BotTag 套用至主相機。 如果您不小心這麼做,請務必將主相機標籤變更回 MainCamera。
第 8 章 – 建立 BotObjects 類別
您需要建立的第一個腳本是 BotObjects 類別,這是建立的空白類別,讓一系列其他類別物件可以儲存在相同的腳本中,並由場景中的其他腳本存取。
此類別的建立純粹是架構選擇,這些物件可改為裝載於您稍後在此課程中建立的 Bot 腳本中。
若要建立此類別:
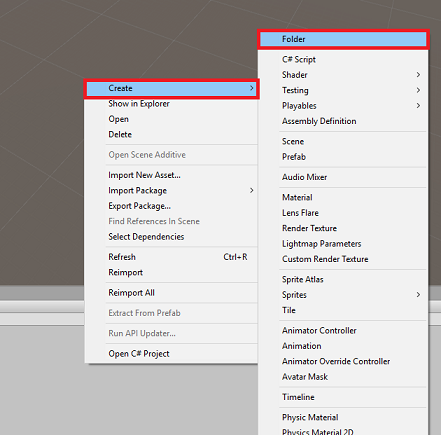
在 [ 專案] 面板中按兩下滑鼠右鍵,然後按兩下 [ 建立 > 資料夾]。 將資料夾 命名為文稿。
按兩下 [文稿] 資料夾以開啟它。 然後在該資料夾中按兩下滑鼠右鍵,然後選取 [ 建立 > C# 腳本]。 將腳本 命名為 BotObjects。
按兩下新的 BotObjects 腳本,以使用 Visual Studio 開啟它。
刪除文稿的內容,並將它取代為下列程式代碼:
using System;
using System.Collections;
using System.Collections.Generic;
using UnityEngine;

public class BotObjects : MonoBehaviour{}

/// <summary>
/// Object received when first opening a conversation
/// </summary>
[Serializable]
public class ConversationObject
{
    public string ConversationId;
    public string token;
    public string expires_in;
    public string streamUrl;
    public string referenceGrammarId;
}

/// <summary>
/// Object including all Activities
/// </summary>
[Serializable]
public class ActivitiesRootObject
{
    public List<Activity> activities { get; set; }
    public string watermark { get; set; }
}
[Serializable]
public class Conversation
{
    public string id { get; set; }
}
[Serializable]
public class From
{
    public string id { get; set; }
    public string name { get; set; }
}
[Serializable]
public class Activity
{
    public string type { get; set; }
    public string channelId { get; set; }
    public Conversation conversation { get; set; }
    public string id { get; set; }
    public From from { get; set; }
    public string text { get; set; }
    public string textFormat { get; set; }
    public DateTime timestamp { get; set; }
    public string serviceUrl { get; set; }
}
請務必先在Visual Studio中儲存變更,再返回 Unity。
第 9 章 – 建立 GazeInput 類別
您要建立的下一個類別是 GazeInput 類別。 此類別負責:
- 建立代表 玩家注視 的游標。
- 偵測玩家注視所叫用的物件,並保存所偵測對象的參考。
若要建立此類別:
移至您先前建立的 Scripts 資料夾。
以滑鼠右鍵按兩下資料夾內的 [ 建立 > C# 文稿]。 呼叫腳本 GazeInput。
按兩下新的 GazeInput 腳稿,以使用 Visual Studio 開啟它。
在類別名稱的頂端插入下列列:
/// <summary>
/// Class responsible for the User's gaze interactions
/// </summary>
[System.Serializable]
public class GazeInput : MonoBehaviour
然後在 GazeInput 類別中,於 Start() 方法上方新增下列變數:
    [Tooltip("Used to compare whether an object is to be interacted with.")]
    internal string InteractibleTag = "BotTag";

    /// <summary>
    /// Length of the gaze
    /// </summary>
    internal float GazeMaxDistance = 300;

    /// <summary>
    /// Object currently gazed
    /// </summary>
    internal GameObject FocusedObject { get; private set; }

    internal GameObject _oldFocusedObject { get; private set; }

    internal RaycastHit HitInfo { get; private set; }

    /// <summary>
    /// Cursor object visible in the scene
    /// </summary>
    internal GameObject Cursor { get; private set; }

    internal bool Hit { get; private set; }

    internal Vector3 Position { get; private set; }

    internal Vector3 Normal { get; private set; }

    private Vector3 _gazeOrigin;

    private Vector3 _gazeDirection;
應該新增 Start() 方法的程式代碼。 當 類別初始化時,將會呼叫此專案:
    /// <summary>
    /// Start method used upon initialization.
    /// </summary>
    internal virtual void Start()
    {
        FocusedObject = null;
        Cursor = CreateCursor();
    }
實作方法,以具現化及設定註視游標:
    /// <summary>
    /// Method to create a cursor object.
    /// </summary>
    internal GameObject CreateCursor()
    {
        GameObject newCursor = GameObject.CreatePrimitive(PrimitiveType.Sphere);
        newCursor.SetActive(false);
        // Remove the collider, so it does not block Raycast.
        Destroy(newCursor.GetComponent<SphereCollider>());
        newCursor.transform.localScale = new Vector3(0.05f, 0.05f, 0.05f);
        Material mat = new Material(Shader.Find("Diffuse"));
        newCursor.GetComponent<MeshRenderer>().material = mat;
        mat.color = Color.HSVToRGB(0.0223f, 0.7922f, 1.000f);
        newCursor.SetActive(true);

        return newCursor;
    }
實作方法,以設定來自主相機的Raycast,並追蹤目前焦點物件。
    /// <summary>
    /// Called every frame
    /// </summary>
    internal virtual void Update()
    {
        _gazeOrigin = Camera.main.transform.position;

        _gazeDirection = Camera.main.transform.forward;

        UpdateRaycast();
    }


    /// <summary>
    /// Reset the old focused object, stop the gaze timer, and send data if it
    /// is greater than one.
    /// </summary>
    private void ResetFocusedObject()
    {
        // Ensure the old focused object is not null.
        if (_oldFocusedObject != null)
        {
            if (_oldFocusedObject.CompareTag(InteractibleTag))
            {
                // Provide the OnGazeExited event.
                _oldFocusedObject.SendMessage("OnGazeExited",
                    SendMessageOptions.DontRequireReceiver);
            }
        }
    }


    private void UpdateRaycast()
    {
        // Set the old focused gameobject.
        _oldFocusedObject = FocusedObject;
        RaycastHit hitInfo;

        // Initialize Raycasting.
        Hit = Physics.Raycast(_gazeOrigin,
            _gazeDirection,
            out hitInfo,
            GazeMaxDistance);
        HitInfo = hitInfo;

        // Check whether raycast has hit.
        if (Hit == true)
        {
            Position = hitInfo.point;
            Normal = hitInfo.normal;

            // Check whether the hit has a collider.
            if (hitInfo.collider != null)
            {
                // Set the focused object with what the user just looked at.
                FocusedObject = hitInfo.collider.gameObject;
            }
            else
            {
                // Object looked on is not valid, set focused gameobject to null.
                FocusedObject = null;
            }
        }
        else
        {
            // No object looked upon, set focused gameobject to null.
            FocusedObject = null;

            // Provide default position for cursor.
            Position = _gazeOrigin + (_gazeDirection * GazeMaxDistance);

            // Provide a default normal.
            Normal = _gazeDirection;
        }

        // Lerp the cursor to the given position, which helps to stabilize the gaze.
        Cursor.transform.position = Vector3.Lerp(Cursor.transform.position, Position, 0.6f);

        // Check whether the previous focused object is this same. If so, reset the focused object.
        if (FocusedObject != _oldFocusedObject)
        {
            ResetFocusedObject();
            if (FocusedObject != null)
            {
                if (FocusedObject.CompareTag(InteractibleTag))
                {
                    // Provide the OnGazeEntered event.
                    FocusedObject.SendMessage("OnGazeEntered",
                        SendMessageOptions.DontRequireReceiver);
                }
            }
        }
    }
請務必先在Visual Studio中儲存變更,再返回 Unity。
第 10 章 – 建立 Bot 類別
您現在要建立的腳本稱為 Bot。 這是應用程式的核心類別,它會儲存:
- 您的 Web 應用程式 Bot 認證
- 收集使用者語音命令的方法
- 起始與 Web 應用程式 Bot 交談所需的方法
- 將訊息傳送至 Web 應用程式 Bot 所需的方法
若要將訊息傳送至 Bot 服務, SendMessageToBot() 協同程式會建置活動,這是 Bot Framework 所辨識為使用者所傳送數據的物件。
若要建立此類別:
按兩下 [文稿] 資料夾,以開啟它。
在 [腳本] 資料夾內按下滑鼠右鍵,按兩下 [建立 > C# 腳本]。 將腳本 命名為 Bot。
按兩下新的文稿,以使用Visual Studio 開啟它。
將命名空間更新為與下列相同,位於 Bot 類別頂端:
using Newtonsoft.Json;
using System.Collections;
using System.Text;
using UnityEngine;
using UnityEngine.Networking;
using UnityEngine.Windows.Speech;
在 Bot 類別內新增下列變數:
    /// <summary>
    /// Static instance of this class
    /// </summary>
    public static Bot Instance;

    /// <summary>
    /// Material of the sphere representing the Bot in the scene
    /// </summary>
    internal Material botMaterial;

    /// <summary>
    /// Speech recognizer class reference, which will convert speech to text.
    /// </summary>
    private DictationRecognizer dictationRecognizer;

    /// <summary>
    /// Use this variable to identify the Bot Id
    /// Can be any value
    /// </summary>
    private string botId = "MRBotId";

    /// <summary>
    /// Use this variable to identify the Bot Name
    /// Can be any value
    /// </summary>
    private string botName = "MRBotName";

    /// <summary>
    /// The Bot Secret key found on the Web App Bot Service on the Azure Portal
    /// </summary>
    private string botSecret = "-- Add your Secret Key here --";

    /// <summary>
    /// Bot Endpoint, v4 Framework uses v3 endpoint at this point in time
    /// </summary>
    private string botEndpoint = "https://directline.botframework.com/v3/directline";

    /// <summary>
    /// The conversation object reference
    /// </summary>
    private ConversationObject conversation;

    /// <summary>
    /// Bot states to regulate the application flow
    /// </summary>
    internal enum BotState {ReadyToListen, Listening, Processing}

    /// <summary>
    /// Flag for the Bot state
    /// </summary>
    internal BotState botState;

    /// <summary>
    /// Flag for the conversation status
    /// </summary>
    internal bool conversationStarted = false;
注意
請務必將 Bot 秘密金鑰插入 botSecret 變數。 在本課程的開頭,您會在步驟 10 第 2 章中記下 Bot 秘密密鑰。
現在必須新增 Awake() 和 Start() 的程式代碼。
    /// <summary>
    /// Called on Initialization
    /// </summary>
    void Awake()
    {
        Instance = this;
    }

    /// <summary>
    /// Called immediately after Awake method
    /// </summary>
    void Start()
    {
        botState = BotState.ReadyToListen;
    }
新增語音擷取開始和結束時語音連結庫所呼叫的兩個處理程式。 DictationRecognizer 會在使用者停止說話時自動停止擷取用戶語音。
    /// <summary>
    /// Start microphone capture.
    /// </summary>
    public void StartCapturingAudio()
    {
        botState = BotState.Listening;
        botMaterial.color = Color.red;

        // Start dictation
        dictationRecognizer = new DictationRecognizer();
        dictationRecognizer.DictationResult += DictationRecognizer_DictationResult;
        dictationRecognizer.Start();
    }


    /// <summary>
    /// Stop microphone capture.
    /// </summary>
    public void StopCapturingAudio()
    {
        botState = BotState.Processing;
        dictationRecognizer.Stop();
    }
下列處理程式會收集使用者語音輸入的結果,並呼叫負責將訊息傳送至 Web App Bot Service 的協同程式。
    /// <summary>
    /// This handler is called every time the Dictation detects a pause in the speech.
    /// </summary>
    private void DictationRecognizer_DictationResult(string text, ConfidenceLevel confidence)
    {
        // Update UI with dictation captured
        Debug.Log($"User just said: {text}");

        // Send dictation to Bot
        StartCoroutine(SendMessageToBot(text, botId, botName, "message"));
        StopCapturingAudio();
    }
呼叫下列協同程式以開始與 Bot 的交談。 您會注意到,一旦交談呼叫完成,它會傳遞一系列參數,將活動設定為傳送至 Bot Service 做為空訊息,以呼叫 SendMessageToCoroutine( )。 這樣做是為了提示 Bot 服務起始對話。
    /// <summary>
    /// Request a conversation with the Bot Service
    /// </summary>
    internal IEnumerator StartConversation()
    {
        string conversationEndpoint = string.Format("{0}/conversations", botEndpoint);

        WWWForm webForm = new WWWForm();

        using (UnityWebRequest unityWebRequest = UnityWebRequest.Post(conversationEndpoint, webForm))
        {
            unityWebRequest.SetRequestHeader("Authorization", "Bearer " + botSecret);
            unityWebRequest.downloadHandler = new DownloadHandlerBuffer();

            yield return unityWebRequest.SendWebRequest();
            string jsonResponse = unityWebRequest.downloadHandler.text;

            conversation = new ConversationObject();
            conversation = JsonConvert.DeserializeObject<ConversationObject>(jsonResponse);
            Debug.Log($"Start Conversation - Id: {conversation.ConversationId}");
            conversationStarted = true;
        }

        // The following call is necessary to create and inject an activity of type //"conversationUpdate" to request a first "introduction" from the Bot Service.
        StartCoroutine(SendMessageToBot("", botId, botName, "conversationUpdate"));
    }
系統會呼叫下列協同程式,以建置要傳送至 Bot Service 的活動。
    /// <summary>
    /// Send the user message to the Bot Service in form of activity
    /// and call for a response
    /// </summary>
    private IEnumerator SendMessageToBot(string message, string fromId, string fromName, string activityType)
    {
        Debug.Log($"SendMessageCoroutine: {conversation.ConversationId}, message: {message} from Id: {fromId} from name: {fromName}");

        // Create a new activity here
        Activity activity = new Activity();
        activity.from = new From();
        activity.conversation = new Conversation();
        activity.from.id = fromId;
        activity.from.name = fromName;
        activity.text = message;
        activity.type = activityType;
        activity.channelId = "DirectLineChannelId";
        activity.conversation.id = conversation.ConversationId;

        // Serialize the activity
        string json = JsonConvert.SerializeObject(activity);

        string sendActivityEndpoint = string.Format("{0}/conversations/{1}/activities", botEndpoint, conversation.ConversationId);

        // Send the activity to the Bot
        using (UnityWebRequest www = new UnityWebRequest(sendActivityEndpoint, "POST"))
        {
            www.uploadHandler = new UploadHandlerRaw(Encoding.UTF8.GetBytes(json));

            www.downloadHandler = new DownloadHandlerBuffer();
            www.SetRequestHeader("Authorization", "Bearer " + botSecret);
            www.SetRequestHeader("Content-Type", "application/json");

            yield return www.SendWebRequest();

            // extrapolate the response Id used to keep track of the conversation
            string jsonResponse = www.downloadHandler.text;
            string cleanedJsonResponse = jsonResponse.Replace("\r\n", string.Empty);
            string responseConvId = cleanedJsonResponse.Substring(10, 30);

            // Request a response from the Bot Service
            StartCoroutine(GetResponseFromBot(activity));
        }
    }
下列協同程式會在傳送活動至 Bot Service 之後要求回應。
    /// <summary>
    /// Request a response from the Bot by using a previously sent activity
    /// </summary>
    private IEnumerator GetResponseFromBot(Activity activity)
    {
        string getActivityEndpoint = string.Format("{0}/conversations/{1}/activities", botEndpoint, conversation.ConversationId);

        using (UnityWebRequest unityWebRequest1 = UnityWebRequest.Get(getActivityEndpoint))
        {
            unityWebRequest1.downloadHandler = new DownloadHandlerBuffer();
            unityWebRequest1.SetRequestHeader("Authorization", "Bearer " + botSecret);

            yield return unityWebRequest1.SendWebRequest();

            string jsonResponse = unityWebRequest1.downloadHandler.text;

            ActivitiesRootObject root = new ActivitiesRootObject();
            root = JsonConvert.DeserializeObject<ActivitiesRootObject>(jsonResponse);

            foreach (var act in root.activities)
            {
                Debug.Log($"Bot Response: {act.text}");
                SetBotResponseText(act.text);
            }

            botState = BotState.ReadyToListen;
            botMaterial.color = Color.blue;
        }
    }
要新增至此類別的最後一個方法,必須在場景中顯示訊息:
    /// <summary>
    /// Set the UI Response Text of the bot
    /// </summary>
    internal void SetBotResponseText(string responseString)
    {
        SceneOrganiser.Instance.botResponseText.text =  responseString;
    }
注意
您可能會在 Unity 編輯器控制台中看到有關遺漏 SceneOrganiser 類別的錯誤。 忽略此訊息,因為稍後將在教學課程中建立此類別。
請務必先在Visual Studio中儲存變更,再返回 Unity。
第 11 章 – 建立互動類別
您現在要建立的類別稱為 Interactions。 這個類別可用來偵測使用者的 HoloLens 點選輸入。
如果使用者在查看場景中的 Bot 物件時點選,且 Bot 已準備好接聽語音輸入,Bot 物件會將色彩變更為 紅色 ,並開始接聽語音輸入。
這個類別繼承自 GazeInput 類別,因此能夠參考該類別的 Start() 方法和變數,以基底表示。
若要建立此類別:
按兩下 [文稿] 資料夾,以開啟它。
在 [腳本] 資料夾內按下滑鼠右鍵,按兩下 [建立 > C# 腳本]。 將腳本 命名為 Interactions。
按兩下新的文稿,以使用Visual Studio 開啟它。
將命名空間和類別繼承更新為與下列相同,位於 Interactions 類別頂端:
using UnityEngine.XR.WSA.Input;

public class Interactions : GazeInput
{
在 Interactions 類別內新增下列變數:
    /// <summary>
    /// Allows input recognition with the HoloLens
    /// </summary>
    private GestureRecognizer _gestureRecognizer;
然後新增 Start() 方法:
    /// <summary>
    /// Called on initialization, after Awake
    /// </summary>
    internal override void Start()
    {
        base.Start();

        //Register the application to recognize HoloLens user inputs
        _gestureRecognizer = new GestureRecognizer();
        _gestureRecognizer.SetRecognizableGestures(GestureSettings.Tap);
        _gestureRecognizer.Tapped += GestureRecognizer_Tapped;
        _gestureRecognizer.StartCapturingGestures();
    }
新增當使用者在 HoloLens 相機前執行點選手勢時所觸發的處理程式
    /// <summary>
    /// Detects the User Tap Input
    /// </summary>
    private void GestureRecognizer_Tapped(TappedEventArgs obj)
    {
        // Ensure the bot is being gazed upon.
        if(base.FocusedObject != null)
        {
            // If the user is tapping on Bot and the Bot is ready to listen
            if (base.FocusedObject.name == "Bot" && Bot.Instance.botState == Bot.BotState.ReadyToListen)
            {
                // If a conversation has not started yet, request one
                if(Bot.Instance.conversationStarted)
                {
                    Bot.Instance.SetBotResponseText("Listening...");
                    Bot.Instance.StartCapturingAudio();
                }
                else
                {
                    Bot.Instance.SetBotResponseText("Requesting Conversation...");
                    StartCoroutine(Bot.Instance.StartConversation());
                }
            }
        }
    }
請務必先在Visual Studio中儲存變更,再返回 Unity。
第 12 章 – 建立 SceneOrganiser 類別
此實驗室中所需的最後一個類別稱為 SceneOrganiser。 這個類別會以程式設計方式設定場景,方法是將元件和腳本新增至Main Camera,並在場景中建立適當的物件。
若要建立此類別:
按兩下 [文稿] 資料夾,以開啟它。
在 [腳本] 資料夾內按下滑鼠右鍵,按兩下 [建立 > C# 腳本]。 將腳本 命名為 SceneOrganiser。
按兩下新的文稿,以使用Visual Studio 開啟它。
在 SceneOrganiser 類別內新增下列變數:
    /// <summary>
    /// Static instance of this class
    /// </summary>
    public static SceneOrganiser Instance;

    /// <summary>
    /// The 3D text representing the Bot response
    /// </summary>
    internal TextMesh botResponseText;
然後新增 Awake() 和 Start() 方法:
    /// <summary>
    /// Called on Initialization
    /// </summary>
    private void Awake()
    {
        Instance = this;
    }

    /// <summary>
    /// Called immediately after Awake method
    /// </summary>
    void Start ()
    {
        // Add the GazeInput class to this object
        gameObject.AddComponent<GazeInput>();

        // Add the Interactions class to this object
        gameObject.AddComponent<Interactions>();

        // Create the Bot in the scene
        CreateBotInScene();
    }
新增下列方法,負責在場景中建立 Bot 物件並設定參數和元件:
    /// <summary>
    /// Create the Sign In button object in the scene
    /// and sets its properties
    /// </summary>
    private void CreateBotInScene()
    {
        GameObject botObjInScene = GameObject.CreatePrimitive(PrimitiveType.Sphere);
        botObjInScene.name = "Bot";

        // Add the Bot class to the Bot GameObject
        botObjInScene.AddComponent<Bot>();

        // Create the Bot UI
        botResponseText = CreateBotResponseText();

        // Set properties of Bot GameObject
        Bot.Instance.botMaterial = new Material(Shader.Find("Diffuse"));
        botObjInScene.GetComponent<Renderer>().material = Bot.Instance.botMaterial;
        Bot.Instance.botMaterial.color = Color.blue;
        botObjInScene.transform.position = new Vector3(0f, 2f, 10f);
        botObjInScene.tag = "BotTag";
    }
新增下列方法,負責在場景中建立UI物件,代表來自Bot的回應:
    /// <summary>
    /// Spawns cursor for the Main Camera
    /// </summary>
    private TextMesh CreateBotResponseText()
    {
        // Create a sphere as new cursor
        GameObject textObject = new GameObject();
        textObject.transform.parent = Bot.Instance.transform;
        textObject.transform.localPosition = new Vector3(0,1,0);

        // Resize the new cursor
        textObject.transform.localScale = new Vector3(0.1f, 0.1f, 0.1f);

        // Creating the text of the Label
        TextMesh textMesh = textObject.AddComponent<TextMesh>();
        textMesh.anchor = TextAnchor.MiddleCenter;
        textMesh.alignment = TextAlignment.Center;
        textMesh.fontSize = 50;
        textMesh.text = "Hi there, tap on me and I will start listening.";

        return textMesh;
    }
請務必先在Visual Studio中儲存變更,再返回 Unity。
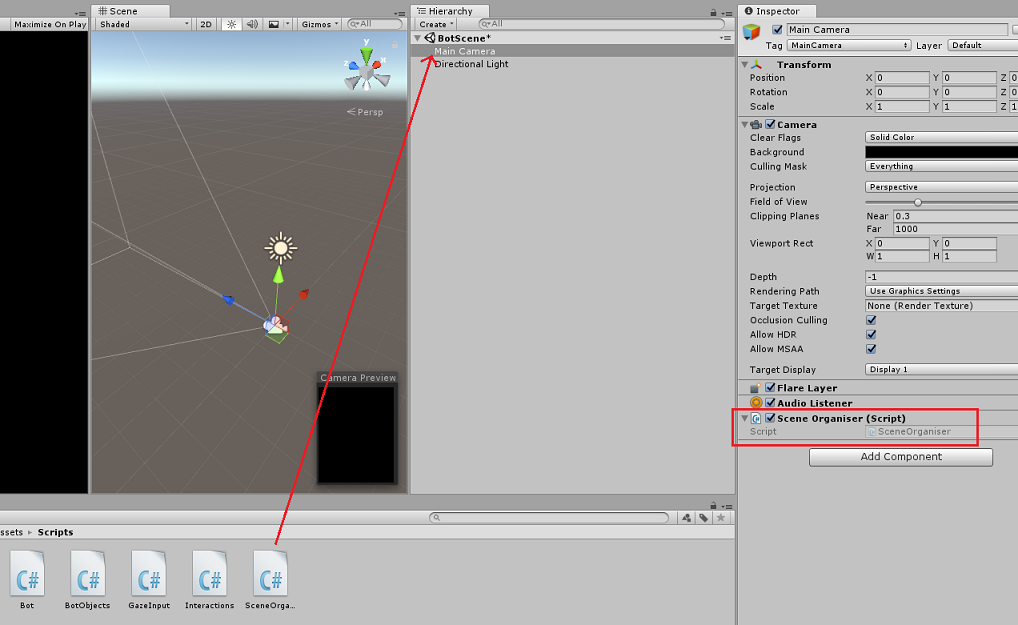
在 Unity 編輯器中,將 SceneOrganiser 腳本從 [腳本] 資料夾拖曳至主相機。 場景召集人元件現在應該會出現在主要相機物件上,如下圖所示。
第 13 章 – 建置前
若要對應用程式執行徹底測試,您必須將它側載至 HoloLens。 在您執行之前,請確定:
- 第 4 章中所述的所有設定都已正確設定。
- 腳本 SceneOrganiser 會附加至 Main Camera 物件。
- 在 Bot 類別中,確定您已將 Bot 秘密金鑰插入 botSecret 變數中。
第 14 章 – 建置和側載至 HoloLens
此專案的 Unity 區段已全部完成,因此是時候從 Unity 建置它了。
流覽至 [ 建置設定]、 [檔案 > 建置設定...]。
從 [ 建置設定] 視窗中,按兩下 [ 建置]。
如果還沒這麼做,請勾選 Unity C# 專案。
按兩下 [ 建置]。 Unity 會啟動 檔案總管 視窗,您需要在其中建立,然後選取要建置應用程式的資料夾。 立即建立該資料夾,並將它命名為 應用程式。 然後在選取 [應用程式] 資料夾後,按兩下 [選取資料夾]。
Unity 將會開始將您的專案建置至 App 資料夾。
一旦 Unity 完成建置(可能需要一些時間),它會在組建的位置開啟 檔案總管 視窗(請檢查您的任務列,因為它可能並不總是出現在您的視窗上方,但會通知您新增視窗)。
第 15 章 – 部署至 HoloLens
若要在 HoloLens 上部署:
您需要 HoloLens 的 IP 位址(適用於遠端部署),並確保 HoloLens 處於 開發人員模式。 若要這樣做:
- 使用 HoloLens 時,開啟 [ 設定]。
- 移至 網路和因特網 > Wi-Fi > 進階選項
- 記下 IPv4 位址。
- 接下來,流覽回 [設定],然後流覽至 [更新與開發人員的安全性>]
- 將開發人員模式設定為開啟。
流覽至新的 Unity 組建(應用程式資料夾),並使用 Visual Studio 開啟方案檔。
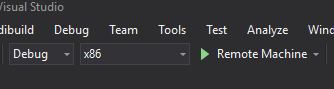
在 [解決方案組態] 中,選取 [偵錯]。
在 [解決方案平臺] 中,選取 [x86] [遠端計算機]。
移至 [ 建置] 功能表 ,然後按兩下 [ 部署解決方案],將應用程式側載至您的HoloLens。
您的應用程式現在應該會出現在 HoloLens 上安裝的應用程式清單中,準備好啟動!
注意
若要部署至沉浸式頭戴式裝置,請將 [解決方案平臺] 設定為 [本機計算機],並將 [組態] 設定為 [偵錯],並將 x86 設定為 [平臺]。 然後使用 [ 建置] 功能表,選取 [部署解決方案] 來部署至本機計算機。
第 16 章 – 在 HoloLens 上使用應用程式
啟動應用程式之後,您會看到 Bot 成為您面前的藍色球體。
當您凝視球體以起始交談時,請使用點選手勢。
等候交談開始(UI 會在發生時顯示訊息)。 一旦您收到來自 Bot 的簡介訊息,請再次點選 Bot,使其變成紅色,並開始聆聽您的語音。
停止交談之後,您的應用程式會將訊息傳送至 Bot,而您將會立即收到 UI 中顯示的回應。
重複此程式,將更多訊息傳送至 Bot(每次您想要傳送訊息時都必須點選)。
此交談示範 Bot 如何保留資訊(您的名稱),同時提供已知資訊(例如已儲存的專案)。
詢問 Bot 的一些問題:
what do you sell?

how much are umbrellas?

how much are raincoats?
您已完成的 Web 應用程式 Bot (v4) 應用程式
恭喜,您已建置混合實境應用程式,以利用 Azure Web 應用程式 Bot,Microsoft Bot Framework v4。
額外練習
練習 1
此實驗室中的交談結構非常基本。 使用 Microsoft LUIS 來提供 Bot 自然語言理解功能。
練習 2
此範例不包含終止交談並重新啟動新的交談。 若要讓 Bot 功能完成,請嘗試實作關閉對話。