重要 API
備註
本主題詳細說明資料繫結功能。 如需簡短、實用的介紹,請參閱 資料繫結概觀。
本主題是關於位於 Windows.UI.Xaml.Data 命名空間之 API 的資料繫結。
數據系結是應用程式 UI 顯示資料的方式,並選擇性地與該資料保持同步。 資料繫結可讓您將資料的關注點與 UI 的關注點分開,從而產生更簡單的概念模型,以及更好的應用程式可讀性、可測試性和可維護性。
您可以使用資料繫結,在第一次顯示 UI 時只顯示資料來源中的值,但不回應這些值的變更。 這是一種稱為 一次性的繫結模式,它適用於在執行階段期間不會變更的值。 或者,您可以選擇「觀察」值,並在值變更時更新 UI。 此模式稱為 單向,適用於唯讀資料。 最後,您可以選擇觀察和更新,讓使用者對 UI 中的值所做的變更會自動推送回資料來源。 這種模式稱為 雙向,它適用於讀寫資料。 以下是一些範例。
- 您可以使用一次性模式將 影像 繫結至目前使用者的相片。
- 您可以使用單向模式,將 ListView 繫結至依報紙區段分組的即時新聞文章集合。
- 您可以使用雙向模式,將 TextBox 繫結至表單中的客戶名稱。
與模式無關,有兩種繫結,而且它們通常都會在 UI 標記中宣告。 您可以選擇使用 {x:Bind} 標記延伸模組 或 {Binding} 標記延伸模組。 您甚至可以在同一個應用程式中混合使用兩者,甚至在同一個 UI 元素上。 {x:Bind} 是 Windows 10 的新功能,具有更好的效能。 本主題中所述的所有詳細資料都適用於這兩種繫結,除非我們明確說明其他說明。
示範 {x:Bind} 的範例應用程式
示範 {Binding} 的範例應用程式
- 下載 Bookstore1 應用程序。
- 下載 Bookstore2 應用程序。
每個裝訂都涉及這些部分
- 具有約束力的來源。 這是繫結之資料來源,而且可以是任何類別的實例,其成員之值要在 UI 中顯示。
- 繫結目標。 這是 UI 中 FrameworkElement 的 DependencyProperty,可顯示資料。
- 繫結物件。 這是將資料值從來源傳輸到目標,並選擇性地從目標傳輸回來源的片段。 繫結物件是在 XAML 載入時從 {x:Bind} 或 {Binding} 標記延伸模組建立。
在以下部分中,我們將仔細研究綁定源、綁定目標和綁定對象。 我們會將區段連結在一起,並將按鈕的內容繫結至名為 NextButtonText 的字串屬性,該屬性屬於名為 HostViewModel 的類別。
繫結來源
這是一個非常基本的類別實現,我們可以將其用作綁定來源。
如果您使用 C++/WinRT,請將新的 Midl 檔案 (.idl) 專案新增至專案,其名稱如下 C++/WinRT 程式碼範例清單所示。 將這些新檔案的內容取代為清單中顯示的 MIDL 3.0 程式代碼、建置要產生 HostViewModel.h 的專案 和 .cpp,然後將程式代碼新增至產生的檔案以符合清單。 如需這些產生檔案以及如何將它們複製到專案的詳細資訊,請參閱 XAML 控制項;繫結至 C++/WinRT 屬性。
public class HostViewModel
{
    public HostViewModel()
    {
        this.NextButtonText = "Next";
    }

    public string NextButtonText { get; set; }
}
// HostViewModel.idl
namespace DataBindingInDepth
{
    runtimeclass HostViewModel
    {
        HostViewModel();
        String NextButtonText;
    }
}

// HostViewModel.h
// Implement the constructor like this, and add this field:
...
HostViewModel() : m_nextButtonText{ L"Next" } {}
...
private:
    std::wstring m_nextButtonText;
...

// HostViewModel.cpp
// Implement like this:
...
hstring HostViewModel::NextButtonText()
{
    return hstring{ m_nextButtonText };
}

void HostViewModel::NextButtonText(hstring const& value)
{
    m_nextButtonText = value;
}
...
HostViewModel 的實作及其屬性 NextButtonText 僅適用於一次性系結。 但單向和雙向繫結非常常見,在這些繫結類型中,UI 會自動更新,以回應繫結來源資料值的變更。 為了讓這些類型的繫結正常運作,您必須讓繫結來源對繫結物件「可觀察」。 因此,在我們的範例中,如果我們想要單向或雙向繫結至 NextButtonText 屬性,則執行階段對該屬性值發生的任何變更都需要讓繫結物件可觀察。
其中一種方式是從 DependencyObject 衍生代表繫結來源的類別,並透過 DependencyProperty 公開資料值。 這就是 FrameworkElement 變成可觀察的方式。 FrameworkElements 是開箱即用的良好繫結來源。
使類別可觀察的一種更輕量級的方法(對於已經具有基類的類別來說是必要的方法)是實現 System.ComponentModel.INotifyPropertyChanged。 這實際上只涉及實作名為 PropertyChanged 的單一事件。 使用 HostViewModel 的範例如下。
...
using System.ComponentModel;
using System.Runtime.CompilerServices;
...
public class HostViewModel : INotifyPropertyChanged
{
    private string nextButtonText;

    public event PropertyChangedEventHandler PropertyChanged = delegate { };

    public HostViewModel()
    {
        this.NextButtonText = "Next";
    }

    public string NextButtonText
    {
        get { return this.nextButtonText; }
        set
        {
            this.nextButtonText = value;
            this.OnPropertyChanged();
        }
    }

    public void OnPropertyChanged([CallerMemberName] string propertyName = null)
    {
        // Raise the PropertyChanged event, passing the name of the property whose value has changed.
        this.PropertyChanged?.Invoke(this, new PropertyChangedEventArgs(propertyName));
    }
}
// HostViewModel.idl
namespace DataBindingInDepth
{
    runtimeclass HostViewModel : Windows.UI.Xaml.Data.INotifyPropertyChanged
    {
        HostViewModel();
        String NextButtonText;
    }
}

// HostViewModel.h
// Add this field:
...
    winrt::event_token PropertyChanged(Windows::UI::Xaml::Data::PropertyChangedEventHandler const& handler);
    void PropertyChanged(winrt::event_token const& token) noexcept;

private:
    winrt::event<Windows::UI::Xaml::Data::PropertyChangedEventHandler> m_propertyChanged;
...

// HostViewModel.cpp
// Implement like this:
...
void HostViewModel::NextButtonText(hstring const& value)
{
    if (m_nextButtonText != value)
    {
        m_nextButtonText = value;
        m_propertyChanged(*this, Windows::UI::Xaml::Data::PropertyChangedEventArgs{ L"NextButtonText" });
    }
}

winrt::event_token HostViewModel::PropertyChanged(Windows::UI::Xaml::Data::PropertyChangedEventHandler const& handler)
{
    return m_propertyChanged.add(handler);
}

void HostViewModel::PropertyChanged(winrt::event_token const& token) noexcept
{
    m_propertyChanged.remove(token);
}
...
現在 NextButtonText 屬性是可觀察的。 當您撰寫該屬性的單向或雙向繫結時 (稍後會示範如何),產生的繫結物件會訂閱 PropertyChanged 事件。 引發該事件時,繫結物件的處理常式會收到引數,其中包含已變更之屬性名稱。 這就是繫結物件知道要再次讀取哪個屬性值的方式。
因此,如果您使用 C#,則不需要多次實作上述模式,則只需從 QuizGame 範例 (在 “Common” 資料夾中) 中找到的 BindableBase 基類衍生。 這是一個看起來如何的範例。
public class HostViewModel : BindableBase
{
    private string nextButtonText;

    public HostViewModel()
    {
        this.NextButtonText = "Next";
    }

    public string NextButtonText
    {
        get { return this.nextButtonText; }
        set { this.SetProperty(ref this.nextButtonText, value); }
    }
}
// Your BindableBase base class should itself derive from Windows::UI::Xaml::DependencyObject. Then, in HostViewModel.idl, derive from BindableBase instead of implementing INotifyPropertyChanged.
備註
針對 C++/WinRT,您在應用程式中宣告的任何衍生自基底類別的執行階段類別稱為 可組合類別 。 可組合類別也有限制。 若要讓應用程式通過 Visual Studio 和 Microsoft Store 用來驗證提交的 Windows 應用程式認證套件 測試 (因此,若要將應用程式成功內嵌至 Microsoft Store),可組合類別最終必須衍生自 Windows 基類。 這表示繼承階層根目錄的類別必須是源自 Windows.* 命名空間的類型。 如果您確實需要從基類衍生運行時類別(例如,為要衍生的所有檢視模型實作 BindableBase 類別),則可以從 Windows.UI.Xaml.DependencyObject 衍生。
使用 String.Empty 或 null 引數引發 PropertyChanged 事件,表示應該重新讀取物件上的所有非索引子屬性。 您可以針對特定索引子使用「Item[indexer]」引數 (其中 索引子 是索引值) ,或針對所有索引子使用 「Item[]」 值,來引發事件,以指出物件上的索引子屬性已變更。
繫結來源可以視為屬性包含資料的單一物件,或視為物件的集合。 在 C# 和 Visual Basic 程式碼中,您可以一次性系結至實作 List(Of T) 的物件,以顯示在執行階段不會變更的集合。 針對可觀察的集合 (觀察何時將專案新增至集合和從集合中移除),請改為單向繫結至 ObservableCollection(Of T)。 在 C++/CX 程式碼中,您可以繫結至可觀察和不可觀察集合的向 量<T> ,而 C++/WinRT 有自己的類型。 若要系結至您自己的集合類別,請使用下表中的指引。
您可以使用累加載入,將清單控制項繫結至任意大型資料來源,但仍能達到高效能。 例如,您可以將清單控制項繫結至 Bing 影像查詢結果,而不需要一次載入所有結果。 相反地,您可以立即只載入部分結果,並視需要載入其他結果。 若要支援累加載入,您必須在支援集合變更通知的資料來源上實作 ISupportIncrementalLoading 。 當資料繫結引擎要求更多資料時,您的資料來源必須提出適當的要求、整合結果,然後傳送適當的通知,才能更新 UI。
綁定目標
在下列兩個範例中, Button.Content 屬性是繫結目標,其值會設定為宣告繫結物件的標記延伸模組。 首先顯示 {x:Bind} ,然後顯示 {Binding}。 在標記中宣告繫結是常見的案例 (方便、可讀且可工具)。 但是,您可以避免標記,並視需要以命令式 (程式設計方式) 建立 Binding 類別的實例。
<Button Content="{x:Bind ...}" ... />
<Button Content="{Binding ...}" ... />
如果您使用 C++/WinRT 或 Visual C++ 元件延伸模組 (C++/CX) ,則必須將 BindableAttribute 屬性新增至您想要使用 {Binding} 標記延伸模組的任何執行階段類別。
這很重要
如果您使用 C++/WinRT,則如果您已安裝 Windows SDK 10.0.17763.0 版 (Windows 10 1809 版) 或更新版本,則可以使用 BindableAttribute 屬性。 如果沒有該屬性,您必須實作 ICustomPropertyProvider 和 ICustomProperty 介面,才能使用 {Binding} 標記延伸模組。
使用 {x:Bind} 宣告的繫結物件
在撰寫 {x:Bind} 標記之前,我們需要執行一個步驟。 我們需要從代表標記頁面的類別中公開繫結來源類別。 我們藉由將屬性 (在本例中為 HostViewModel 類型) 新增至 MainPage 頁面類別來執行此動作。
namespace DataBindingInDepth
{
    public sealed partial class MainPage : Page
    {
        public MainPage()
        {
            this.InitializeComponent();
            this.ViewModel = new HostViewModel();
        }

        public HostViewModel ViewModel { get; set; }
    }
}
// MainPage.idl
import "HostViewModel.idl";

namespace DataBindingInDepth
{
    runtimeclass MainPage : Windows.UI.Xaml.Controls.Page
    {
        MainPage();
        HostViewModel ViewModel{ get; };
    }
}

// MainPage.h
// Include a header, and add this field:
...
#include "HostViewModel.h"
...
    DataBindingInDepth::HostViewModel ViewModel();

private:
    DataBindingInDepth::HostViewModel m_viewModel{ nullptr };
...

// MainPage.cpp
// Implement like this:
...
MainPage::MainPage()
{
    InitializeComponent();

}

DataBindingInDepth::HostViewModel MainPage::ViewModel()
{
    return m_viewModel;
}
...
完成後,我們現在可以仔細查看聲明綁定對象的標記。 下列範例會使用我們稍早在「繫結目標」一節中使用的相同 Button.Content 繫結目標,並顯示它系結至 HostViewModel.NextButtonText 屬性。
<!-- MainPage.xaml -->
<Page x:Class="DataBindingInDepth.Mainpage" ... >
    <Button Content="{x:Bind Path=ViewModel.NextButtonText, Mode=OneWay}" ... />
</Page>
請注意我們為 Path 指定的值。 此值會在頁面本身的內容中解譯,在此情況下,路徑會從參考我們剛新增至 MainPage 頁面的 ViewModel 屬性開始。 該屬性會傳回 HostViewModel 實例,因此我們可以點入該物件以存取 HostViewModel.NextButtonText 屬性。 我們指定 Mode,以覆寫 {x:Bind} 預設值的一次性。
Path 屬性支援各種語法選項,可系結至巢狀屬性、附加屬性,以及整數和字串索引子。 如需詳細資訊,請參閱 屬性路徑語法。 繫結至字串索引子可讓您取得系結至動態屬性的效果,而不需要實作 ICustomPropertyProvider。 如需其他設定,請參閱 {x:Bind} 標記延伸模組。
若要說明 HostViewModel.NextButtonText 屬性確實是可觀察的,請將 Click 事件處理常式新增至按鈕,並更新 HostViewModel.NextButtonText 的值。 建置、執行並按一下按鈕,以查看按鈕 的內容更新值 。
// MainPage.xaml.cs
private void Button_Click(object sender, RoutedEventArgs e)
{
    this.ViewModel.NextButtonText = "Updated Next button text";
}
// MainPage.cpp
void MainPage::ClickHandler(IInspectable const&, RoutedEventArgs const&)
{
    ViewModel().NextButtonText(L"Updated Next button text");
}
備註
當 TextBox 失去焦點時,TextBox.Text 的變更會傳送至雙向系結來源,而不是在每次使用者按鍵之後。
DataTemplate 和 x:DataType
在 DataTemplate 內 (無論是用作專案範本、內容範本或標頭範本), Path 的值不會在頁面的內容中解譯,而是在要範本化的資料物件內容中解譯。 在資料範本中使用 {x:Bind} 時,為了在編譯階段驗證其繫結 (並針對其產生有效率的程式碼), DataTemplate 必須使用 x:DataType 宣告其資料物件的類型。 下列範例可作為系結至 SampleDataGroup 物件集合之專案控制項的 ItemTemplate。
<DataTemplate x:Key="SimpleItemTemplate" x:DataType="data:SampleDataGroup">
    <StackPanel Orientation="Vertical" Height="50">
      <TextBlock Text="{x:Bind Title}"/>
      <TextBlock Text="{x:Bind Description}"/>
    </StackPanel>
  </DataTemplate>
路徑中的弱型別物件
例如,假設您有一個名為 SampleDataGroup 的類型,它會實作名為 Title 的字串屬性。 您有一個屬性 MainPage.SampleDataGroupAsObject,其類型為 object,但實際上會傳回 SampleDataGroup 的實例。 繫結 <TextBlock Text="{x:Bind SampleDataGroupAsObject.Title}"/> 會導致編譯錯誤,因為在類型物件上找不到 Title 屬性。 解決此問題的方法是將轉換新增至 Path 語法,如下所示: <TextBlock Text="{x:Bind ((data:SampleDataGroup)SampleDataGroupAsObject).Title}"/>。 這是另一個範例,其中 Element 宣告為物件,但實際上是 TextBlock: <TextBlock Text="{x:Bind Element.Text}"/>。 石膏解決了這個問題: <TextBlock Text="{x:Bind ((TextBlock)Element).Text}"/>。
如果您的資料以非同步方式載入
支援 {x:Bind} 的程式碼會在編譯階段在頁面的分部類別中產生。 這些檔案可以在您的 obj 資料夾中找到,名稱類似於 (對於 C#) <view name>.g.cs。 產生的程式碼包含頁面 Loading 事件的處理常式,而該處理常式會在代表頁面繫結的產生類別上呼叫 Initialize 方法。
Initialize 接著呼叫 Update ,以開始在繫結來源與目標之間移動資料。
載入會在 頁面或使用者控制項的第一個量值傳遞之前引發。 因此,如果您的資料是非同步載入的,則在呼叫 Initialize 時可能尚未準備就緒。 因此,載入資料之後,您可以呼叫 this.Bindings.Update();來強制初始化一次性繫結。 如果您只需要非同步載入資料的一次性繫結,則以這種方式初始化它們比單向繫結和接聽變更便宜得多。 如果您的資料未進行精細變更,而且可能會在特定動作中更新,則您可以一次性進行繫結,並隨時呼叫 Update 來強制手動更新。
備註
{x:Bind} 不適合延遲繫結案例,例如流覽 JSON 物件的字典結構,也不適合鴨子類型。 「鴨子類型」是一種基於屬性名稱詞彙匹配的弱類型形式(例如,「如果它像鴨子一樣走路、游泳和嘎嘎叫,那麼它就是鴨子」)。 使用鴨子類型時,對 Age 屬性的繫結將同樣滿足於 Person 或 Wine 物件(假設這些類型各有一個 Age 屬性)。 針對這些案例,請使用 {Binding} 標記延伸模組。
使用 {Binding} 宣告的繫結物件
如果您使用 C++/WinRT 或 Visual C++ 元件延伸模組 (C++/CX),則若要使用 {Binding} 標記延伸模組,您必須將 BindableAttribute 屬性新增至您想要系結的任何執行階段類別。 若要使用 {x:Bind},您不需要該屬性。
// HostViewModel.idl
// Add this attribute:
[Windows.UI.Xaml.Data.Bindable]
runtimeclass HostViewModel : Windows.UI.Xaml.Data.INotifyPropertyChanged
...
這很重要
如果您使用 C++/WinRT,則如果您已安裝 Windows SDK 10.0.17763.0 版 (Windows 10 1809 版) 或更新版本,則可以使用 BindableAttribute 屬性。 如果沒有該屬性,您必須實作 ICustomPropertyProvider 和 ICustomProperty 介面,才能使用 {Binding} 標記延伸模組。
根據預設,{Binding} 假設您要繫結至標記頁面的 DataContext。 因此,我們會將頁面的 DataContext 設定為繫結來源類別的實例 (在本例中為 HostViewModel 類型) 。 下列範例顯示宣告繫結物件的標記。 我們使用稍早在「繫結目標」一節中使用的相同 Button.Content 繫結目標,並系結至 HostViewModel.NextButtonText 屬性。
<Page xmlns:viewmodel="using:DataBindingInDepth" ... >
    <Page.DataContext>
        <viewmodel:HostViewModel x:Name="viewModelInDataContext"/>
    </Page.DataContext>
    ...
    <Button Content="{Binding Path=NextButtonText}" ... />
</Page>
// MainPage.xaml.cs
private void Button_Click(object sender, RoutedEventArgs e)
{
    this.viewModelInDataContext.NextButtonText = "Updated Next button text";
}
// MainPage.cpp
void MainPage::ClickHandler(IInspectable const&, RoutedEventArgs const&)
{
    viewModelInDataContext().NextButtonText(L"Updated Next button text");
}
請注意我們為 Path 指定的值。 此值會在頁面 DataContext 的內容中解譯,在此範例中,該內容會設定為 HostViewModel 的實例。 路徑會參考 HostViewModel.NextButtonText 屬性。 我們可以省略 Mode,因為 {Binding} 預設值的單向在這裡有效。
UI 元素的 DataContext 預設值是其父元素的繼承值。 當然,您可以透過明確設定 DataContext 來覆寫該預設值,而 DataContext 則預設由子項繼承。 當您想要有多個使用相同來源的繫結時,在元素上明確設定 DataContext 很有用。
繫結物件具有 Source 屬性,預設為宣告繫結之 UI 元素的 DataContext 。 您可以在繫結上明確設定 Source、 RelativeSource 或 ElementName 來覆寫此預設值 (如需詳細資訊,請參閱 {Binding} ) 。
在 DataTemplate 內, DataContext 會自動設定為要範本化的資料物件。 下列範例可作為繫結至任何類型集合的專案控制項的 ItemTemplate ,而這些集合具有名為 Title 和 Description 的字串屬性。
<DataTemplate x:Key="SimpleItemTemplate">
    <StackPanel Orientation="Vertical" Height="50">
      <TextBlock Text="{Binding Title}"/>
      <TextBlock Text="{Binding Description"/>
    </StackPanel>
  </DataTemplate>
備註
根據預設,當 TextBox 失去焦點時,TextBox.Text 的變更會傳送至雙向系結來源。 若要在每次使用者按鍵之後傳送變更,請在標記中的繫結上將 UpdateSourceTrigger 設定為 PropertyChanged 。 您也可以將 UpdateSourceTrigger 設定為 Explicit,以完全控制何時將變更傳送至來源。 然後,您可以處理文字方塊上的事件 (通常是 TextBox.TextChanged) ,在目標上呼叫 GetBindingExpression 以取得 BindingExpression 物件,最後呼叫 BindingExpression.UpdateSource 以程式設計方式更新資料來源。
Path 屬性支援各種語法選項,可系結至巢狀屬性、附加屬性,以及整數和字串索引子。 如需詳細資訊,請參閱 屬性路徑語法。 繫結至字串索引子可讓您取得系結至動態屬性的效果,而不需要實作 ICustomPropertyProvider。 ElementName 屬性對於元素對元素繫結很有用。 RelativeSource 屬性有數個用途,其中一個是作為 ControlTemplate 內範本系結的更強大替代方案。 如需其他設定,請參閱 {Binding} 標記延伸模組 和 Binding 類別。
如果來源和目標不是同一類型怎麼辦?
如果您想要根據布林屬性的值來控制 UI 元素的可見度,或者如果您想要轉譯 UI 元素,其色彩是數值範圍或趨勢的函數,或者如果您想要在預期字串的 UI 元素屬性中顯示日期和/或時間值, 然後,您需要將值從一種類型轉換為另一種類型。 在某些情況下,正確的解決方案是從繫結來源類別中公開另一個正確類型的屬性,並在那裡封裝轉換邏輯並可測試。 但是,當您有大量或大量來源和目標屬性組合時,這既不靈活也不可擴展。 在這種情況下,您有幾個選擇:
- 如果使用 {x:Bind},則您可以直接綁定到函數來進行轉換
- 或者,您可以指定值轉換器,這是設計用來執行轉換的物件
價值轉換器
這是一個值轉換器,適用於一次性或單向繫結,可將 DateTime 值轉換為包含月份的字串值。 類別會實作 IValueConverter。
public class DateToStringConverter : IValueConverter
{
    // Define the Convert method to convert a DateTime value to
    // a month string.
    public object Convert(object value, Type targetType,
        object parameter, string language)
    {
        // value is the data from the source object.
        DateTime thisdate = (DateTime)value;
        int monthnum = thisdate.Month;
        string month;
        switch (monthnum)
        {
            case 1:
                month = "January";
                break;
            case 2:
                month = "February";
                break;
            default:
                month = "Month not found";
                break;
        }
        // Return the value to pass to the target.
        return month;
    }

    // ConvertBack is not implemented for a OneWay binding.
    public object ConvertBack(object value, Type targetType,
        object parameter, string language)
    {
        throw new NotImplementedException();
    }
}
// See the "Formatting or converting data values for display" section in the "Data binding overview" topic.
以下是您在繫結物件標記中使用該值轉換器的方式。
<UserControl.Resources>
  <local:DateToStringConverter x:Key="Converter1"/>
</UserControl.Resources>
...
<TextBlock Grid.Column="0"
  Text="{x:Bind ViewModel.Month, Converter={StaticResource Converter1}}"/>
<TextBlock Grid.Column="0"
  Text="{Binding Month, Converter={StaticResource Converter1}}"/>
如果繫結已定義 Converter 參數,繫結引擎會呼叫 Convert 和 ConvertBack 方法。 從來源傳遞資料時,繫結引擎會呼叫 Convert ,並將傳回的資料傳遞至目標。 當資料從目標傳遞時 (針對雙向繫結) ,繫結引擎會呼叫 ConvertBack ,並將傳回的資料傳遞至來源。
轉換器也有可選參數: ConverterLanguage,允許指定轉換中使用的語言,以及 ConverterParameter,允許傳遞轉換邏輯的參數。 如需使用轉換器參數的範例,請參閱 IValueConverter。
備註
如果轉換中發生錯誤,請勿擲回例外狀況。 相反地,傳回 DependencyProperty.UnsetValue,這會停止資料傳輸。
若要顯示每當無法解析繫結來源時要使用的預設值,請在標記中的繫結物件上設定 FallbackValue 屬性。 這對於處理轉換和格式錯誤很有用。 繫結至非異質類型系結集合中所有物件上可能不存在的來源屬性也很有用。
如果您將文字控制項繫結至非字串的值,資料繫結引擎會將值轉換成字串。 如果值是參考類型,資料繫結引擎會呼叫 ICustomPropertyProvider.GetStringRepresentation 或 IStringable.ToString (如果有的話) 來擷取字串值,否則會呼叫 Object.ToString。 不過請注意,繫結引擎會忽略任何隱藏基底類別實作的 ToString 實作。 子類別實作應該改為覆寫基底類別 ToString 方法。 同樣地,在原生語言中,所有 Managed 物件似乎都會實作 ICustomPropertyProvider 和 IStringable。 不過,所有對 GetStringRepresentation 和 IStringable.ToString 的呼叫都會路由傳送至 Object.ToString 或該方法的覆寫,而且永遠不會路由傳送至隱藏基類實作的新 ToString 實作。
備註
從 Windows 10 版本 1607 開始,XAML 架構提供內建的布林值到可見度轉換器。 轉換器會將 true 對應至 Visible 列舉值,並將 false 對應 至 Collapsed ,因此您可以將 Visibility 屬性繫結至布林值,而不需要建立轉換器。 如要使用內建轉換器,應用程式的最低目標 SDK 版本必須為 14393 以上版本。 當您的應用程式以舊版 Windows 10 為目標時,您無法使用它。 如需目標版本的詳細資訊,請參閱 版本調適型程式碼。
{x:Bind} 中的函式繫結
{x:Bind} 可讓繫結路徑中的最後一個步驟成為函式。 這可用來執行轉換,以及執行相依於多個屬性的繫結。 請參閱 x:Bind 中的函數
元素對元素繫結
您可以將一個 XAML 元素的屬性系結至另一個 XAML 元素的屬性。 以下是標記中的範例。
<TextBox x:Name="myTextBox" />
<TextBlock Text="{x:Bind myTextBox.Text, Mode=OneWay}" />
這很重要
如需使用 C++/WinRT 進行元素對元素繫結的必要工作流程,請參閱 元素對元素繫結。
具有 {x:Bind} 的資源字典
{x:Bind} 標記延伸模組取決於程式碼產生,因此它需要程式碼後置檔案,其中包含呼叫 InitializeComponent (以初始化產生的程式碼) 的建構函式。 您可以藉由具現化資源字典的類型 (以便呼叫 InitializeComponent ) 來重複使用資源字典,而不是參考其檔案名稱。 以下是如果您有現有資源字典且想要在其中使用 {x:Bind} 時該怎麼做的範例。
TemplatesResourceDictionary.xaml
<ResourceDictionary
    x:Class="ExampleNamespace.TemplatesResourceDictionary"
    .....
    xmlns:examplenamespace="using:ExampleNamespace">

    <DataTemplate x:Key="EmployeeTemplate" x:DataType="examplenamespace:IEmployee">
        <Grid>
            <TextBlock Text="{x:Bind Name}"/>
        </Grid>
    </DataTemplate>
</ResourceDictionary>
TemplatesResourceDictionary.xaml.cs
using Windows.UI.Xaml.Data;

namespace ExampleNamespace
{
    public partial class TemplatesResourceDictionary
    {
        public TemplatesResourceDictionary()
        {
            InitializeComponent();
        }
    }
}
MainPage.xaml
<Page x:Class="ExampleNamespace.MainPage"
    ....
    xmlns:examplenamespace="using:ExampleNamespace">

    <Page.Resources>
        <ResourceDictionary>
            ....
            <ResourceDictionary.MergedDictionaries>
                <examplenamespace:TemplatesResourceDictionary/>
            </ResourceDictionary.MergedDictionaries>
        </ResourceDictionary>
    </Page.Resources>
</Page>
在可重複使用的樣式中混合 {x:Bind} 和 {Binding}
雖然上一個範例顯示在 DataTemplates 中使用 {x:Bind},但您也可以建立可重複使用的樣式,以結合 {x:Bind} 和 {Binding} 標記延伸模組。 當您想要使用 {x:Bind} 將某些屬性繫結至編譯階段已知值,以及使用 {Binding} 將其他屬性繫結至執行階段 DataContext 值時,這很有用。
以下範例顯示如何建立使用這兩種繫結方法的可重複使用的 Button 樣式:
TemplatesResourceDictionary.xaml
<ResourceDictionary
    x:Class="ExampleNamespace.TemplatesResourceDictionary"
    .....
    xmlns:examplenamespace="using:ExampleNamespace">

    <!-- DataTemplate using x:Bind -->
    <DataTemplate x:Key="EmployeeTemplate" x:DataType="examplenamespace:IEmployee">
        <Grid>
            <TextBlock Text="{x:Bind Name}"/>
        </Grid>
    </DataTemplate>

    <!-- Style that mixes x:Bind and Binding -->
    <Style x:Key="CustomButtonStyle" TargetType="Button">
        <Setter Property="Background" Value="{Binding ButtonBackgroundBrush}"/>
        <Setter Property="Foreground" Value="{Binding ButtonForegroundBrush}"/>
        <Setter Property="FontSize" Value="16"/>
        <Setter Property="Margin" Value="4"/>
        <Setter Property="Template">
            <Setter.Value>
                <ControlTemplate TargetType="Button">
                    <Border x:Name="RootBorder"
                            Background="{TemplateBinding Background}"
                            BorderBrush="{TemplateBinding BorderBrush}"
                            BorderThickness="{TemplateBinding BorderThickness}"
                            CornerRadius="4">
                        <StackPanel Orientation="Horizontal"
                                    HorizontalAlignment="Center"
                                    VerticalAlignment="Center">
                            <!-- x:Bind to a static property or page-level property -->
                            <Ellipse Width="8" Height="8"
                                     Fill="{x:Bind DefaultIndicatorBrush}"
                                     Margin="0,0,8,0"/>
                            <!-- Binding to DataContext -->
                            <ContentPresenter x:Name="ContentPresenter"
                                              Content="{TemplateBinding Content}"
                                              Foreground="{TemplateBinding Foreground}"
                                              FontSize="{TemplateBinding FontSize}"/>
                        </StackPanel>
                        <VisualStateManager.VisualStateGroups>
                            <VisualStateGroup x:Name="CommonStates">
                                <VisualState x:Name="Normal"/>
                                <VisualState x:Name="PointerOver">
                                    <VisualState.Setters>
                                        <!-- Binding to DataContext for hover color -->
                                        <Setter Target="RootBorder.Background"
                                                Value="{Binding ButtonHoverBrush}"/>
                                    </VisualState.Setters>
                                </VisualState>
                                <VisualState x:Name="Pressed">
                                    <VisualState.Setters>
                                        <!-- x:Bind to a compile-time known resource -->
                                        <Setter Target="RootBorder.Background"
                                                Value="{x:Bind DefaultPressedBrush}"/>
                                    </VisualState.Setters>
                                </VisualState>
                            </VisualStateGroup>
                        </VisualStateManager.VisualStateGroups>
                    </Border>
                </ControlTemplate>
            </Setter.Value>
        </Setter>
    </Style>
</ResourceDictionary>
TemplatesResourceDictionary.xaml.cs
using Windows.UI;
using Windows.UI.Xaml;
using Windows.UI.Xaml.Data;
using Windows.UI.Xaml.Media;

namespace ExampleNamespace
{
    public partial class TemplatesResourceDictionary
    {
        public TemplatesResourceDictionary()
        {
            InitializeComponent();
        }

        // Properties for x:Bind - these are compile-time bound
        public SolidColorBrush DefaultIndicatorBrush { get; } =
            new SolidColorBrush(Colors.Green);

        public SolidColorBrush DefaultPressedBrush { get; } =
            new SolidColorBrush(Colors.DarkGray);
    }
}
在 MainPage.xaml 中搭配提供執行階段值的 ViewModel 使用方式:
<Page x:Class="ExampleNamespace.MainPage"
    ....
    xmlns:examplenamespace="using:ExampleNamespace">

    <Page.Resources>
        <ResourceDictionary>
            <ResourceDictionary.MergedDictionaries>
                <examplenamespace:TemplatesResourceDictionary/>
            </ResourceDictionary.MergedDictionaries>
        </ResourceDictionary>
    </Page.Resources>

    <Page.DataContext>
        <examplenamespace:ButtonThemeViewModel/>
    </Page.DataContext>

    <StackPanel Margin="20">
        <!-- This button uses the mixed binding style -->
        <Button Content="Save" Style="{StaticResource CustomButtonStyle}"/>
        <Button Content="Cancel" Style="{StaticResource CustomButtonStyle}"/>
    </StackPanel>
</Page>
ButtonThemeViewModel.cs (提供執行階段繫結值的 DataContext):
using System.ComponentModel;
using Windows.UI;
using Windows.UI.Xaml.Media;

namespace ExampleNamespace
{
    public class ButtonThemeViewModel : INotifyPropertyChanged
    {
        private SolidColorBrush _buttonBackgroundBrush = new SolidColorBrush(Colors.LightBlue);
        private SolidColorBrush _buttonForegroundBrush = new SolidColorBrush(Colors.DarkBlue);
        private SolidColorBrush _buttonHoverBrush = new SolidColorBrush(Colors.LightCyan);

        public SolidColorBrush ButtonBackgroundBrush
        {
            get => _buttonBackgroundBrush;
            set
            {
                _buttonBackgroundBrush = value;
                PropertyChanged?.Invoke(this, new PropertyChangedEventArgs(nameof(ButtonBackgroundBrush)));
            }
        }

        public SolidColorBrush ButtonForegroundBrush
        {
            get => _buttonForegroundBrush;
            set
            {
                _buttonForegroundBrush = value;
                PropertyChanged?.Invoke(this, new PropertyChangedEventArgs(nameof(ButtonForegroundBrush)));
            }
        }

        public SolidColorBrush ButtonHoverBrush
        {
            get => _buttonHoverBrush;
            set
            {
                _buttonHoverBrush = value;
                PropertyChanged?.Invoke(this, new PropertyChangedEventArgs(nameof(ButtonHoverBrush)));
            }
        }

        public event PropertyChangedEventHandler PropertyChanged;
    }
}
在此範例中:
- {Binding} 用於相依於 DataContext (ButtonBackgroundBrush、ButtonForegroundBrush、ButtonHoverBrush) 的屬性
- {x:Bind} 用於編譯階段已知且屬於 ResourceDictionary 本身的屬性 (DefaultIndicatorBrush、DefaultPressedBrush)
- 該樣式可重複使用,並且可以應用於任何按鈕
- 執行階段主題可透過 DataContext 進行,同時仍受益於靜態元素的 {x:Bind} 效能
事件繫結和 ICommand
{x:Bind} 支援稱為事件繫結的功能。 透過這項功能,您可以使用繫結來指定事件的處理常式,這是使用程式碼後置檔案上的方法處理事件之上的附加選項。 假設您的 MainPage 類別上有一個 RootFrame 屬性。
public sealed partial class MainPage : Page
{
    ...
    public Frame RootFrame { get { return Window.Current.Content as Frame; } }
}
然後,您可以將按鈕的 Click 事件系結至 RootFrame 屬性所傳回的 Frame 物件上的方法,如下所示。 請注意,我們也會將按鈕的 IsEnabled 屬性系結至相同 Frame 的另一個成員。
<AppBarButton Icon="Forward" IsCompact="True"
IsEnabled="{x:Bind RootFrame.CanGoForward, Mode=OneWay}"
Click="{x:Bind RootFrame.GoForward}"/>
重載的方法無法用來處理具有此技術的事件。 此外,如果處理事件的方法具有參數,則它們都必須分別從所有事件參數的類型中指派。 在此情況下, Frame.GoForward 不會多載,而且沒有參數 (,但即使採用兩個 物件 參數,它仍然有效)。 不過,Frame.GoBack 已重載,因此我們無法將該方法與此技術搭配使用。
事件系結技術類似於實作和取用命令 (命令是傳回實作 ICommand 介面之物件的屬性) 。 {x:Bind} 和 {Binding} 都適用於命令。 因此,您不需要多次實作命令模式,您可以使用 DelegateCommand 協助程式類別,您可以在 QuizGame 範例中找到 (在 “Common” 資料夾中) 。
繫結至資料夾或檔案的集合
您可以使用 Windows.Storage 命名空間中的 API 來擷取資料夾和檔案資料。 不過,各種 GetFilesAsync、 GetFoldersAsync 和 GetItemsAsync 方法不會傳回適合系結至清單控制項的值。 相反地,您必須系結至 FileInformationFactory 類別的 GetVirtualizedFilesVector、GetVirtualizedFoldersVector 和 GetVirtualizedItemsVector 方法的傳回值。 下列來自 StorageDataSource 和 GetVirtualizedFilesVector 範例 的程式碼範例顯示一般使用模式。 請記得在應用程式套件資訊清單中宣告 picturesLibrary 功能,並確認 Pictures 文件庫資料夾中有圖片。
protected override void OnNavigatedTo(NavigationEventArgs e)
{
    var library = Windows.Storage.KnownFolders.PicturesLibrary;
    var queryOptions = new Windows.Storage.Search.QueryOptions();
    queryOptions.FolderDepth = Windows.Storage.Search.FolderDepth.Deep;
    queryOptions.IndexerOption = Windows.Storage.Search.IndexerOption.UseIndexerWhenAvailable;

    var fileQuery = library.CreateFileQueryWithOptions(queryOptions);

    var fif = new Windows.Storage.BulkAccess.FileInformationFactory(
        fileQuery,
        Windows.Storage.FileProperties.ThumbnailMode.PicturesView,
        190,
        Windows.Storage.FileProperties.ThumbnailOptions.UseCurrentScale,
        false
        );

    var dataSource = fif.GetVirtualizedFilesVector();
    this.PicturesListView.ItemsSource = dataSource;
}
您通常會使用此方法來建立檔案和資料夾資訊的唯讀檢視。 您可以建立檔案和資料夾屬性的雙向繫結,例如讓使用者在音樂檢視中對歌曲進行評分。 不過,在您呼叫適當的 SavePropertiesAsync 方法之前,不會保留任何變更 (例如, MusicProperties.SavePropertiesAsync) 。 當項目失去焦點時,您應該認可變更,因為這會觸發選取重設。
請注意,使用此技術的雙向繫結僅適用於索引位置,例如音樂。 您可以呼叫 FolderInformation.GetIndexedStateAsync 方法來判斷位置是否已編製索引。
另請注意,虛擬化向量在填入某些專案的值之前,可能會傳回 null 。 例如,您應該先檢查 null ,再使用繫結至虛擬化向量之清單控制項的 SelectedItem 值,或改用 SelectedIndex 。
繫結至依索引鍵分組的資料
如果您採用專案的平面集合 (例如,書籍,由 BookSku 類別表示),並使用通用屬性作為索引鍵 (例如 BookSku.AuthorName 屬性) 來分組專案,則結果稱為分組資料。 當您將資料分組時,它不再是平面集合。 分組資料是群組物件的集合,其中每個群組物件都有
- 一個鍵,以及
- 屬性符合該索引鍵的專案集合。
再次以書籍為例,依作者姓名將書籍分組的結果會產生作者姓名群組的集合,其中每個群組都有
- 鍵,即作者名稱,以及
- BookSku的集合,其 AuthorName 屬性符合群組的索引鍵。
一般而言,若要顯示集合,您可以將專案控制項的 ItemsSource (例如 ListView 或 GridView) 直接系結至傳回集合的屬性。 如果這是一個平坦的項目集合,那麼您不需要做任何特別的事情。 但是,如果它是群組物件的集合 (就像繫結至群組資料時一樣),則您需要稱為 CollectionViewSource 的中介物件的服務,該物件位於專案控制項和繫結來源之間。 您可以將 CollectionViewSource 繫結至傳回分組資料的屬性,並將專案控制項繫結至 CollectionViewSource。 CollectionViewSource 的額外加值是它會追蹤目前的專案,因此您可以將多個專案控制項繫結至相同的 CollectionViewSource,讓它們保持同步處理。 您也可以透過 CollectionViewSource.View 屬性所傳回物件的 ICollectionView.CurrentItem 屬性,以程式設計方式存取目前的專案。
若要啟用 CollectionViewSource 的分組工具,請將 IsSourceGrouped 設定為 true。 您是否也需要設定 ItemsPath 屬性,取決於您撰寫群組物件的確切方式。 有兩種方式可以編寫群組物件:「is-a-group」模式和「has-a-group」模式。 在「is-a-group」模式中,群組物件衍生自集合類型 (例如清單 <T>) ,因此群組物件本身本身就是專案群組。 使用此模式時,您不需要設定 ItemsPath。 在「has-a-group」模式中,群組物件具有一或多個集合類型的屬性 (例如 清單<T>) ,因此群組「具有」屬性形式的專案群組 (或數個屬性形式的數組專案) 。 使用此模式時,您必須將 ItemsPath 設定為包含專案群組的屬性名稱。
下列範例說明「has-a-group」模式。 頁面類別有一個名為 ViewModel 的屬性,它傳回了我們視圖模型的實例。 CollectionViewSource 系結至檢視模型的 Authors 屬性 (Authors 是群組物件的集合) ,也指定它是包含群組專案的 Author.BookSkus 屬性。 最後, GridView 會系結至 CollectionViewSource,並定義其群組樣式,以便可以轉譯群組中的專案。
<Page.Resources>
    <CollectionViewSource
    x:Name="AuthorHasACollectionOfBookSku"
    Source="{x:Bind ViewModel.Authors}"
    IsSourceGrouped="true"
    ItemsPath="BookSkus"/>
</Page.Resources>
...
<GridView
ItemsSource="{x:Bind AuthorHasACollectionOfBookSku}" ...>
    <GridView.GroupStyle>
        <GroupStyle
            HeaderTemplate="{StaticResource AuthorGroupHeaderTemplateWide}" ... />
    </GridView.GroupStyle>
</GridView>
您可以使用以下兩種方式之一實作「is-a-group」模式。 一種方法是編寫您自己的小組課程。 從 清單<T> 衍生類別 (其中 T 是專案的類型) 。 例如: public class Author : List<BookSku> 。 第二種方式是使用 LINQ 運算式,從 BookSku 專案的類似屬性值動態建立群組物件 (和群組類別) 。 這種方法(僅維護項目的平面清單並將它們動態分組在一起)是從雲端服務存取資料的應用程式的典型做法。 您可以靈活地按作者或類型(例如)對書籍進行分組,而無需特殊的組類別,例如 作者 和 流派。
下列範例說明使用 LINQ 的「is-a-group」模式。 這次我們按類型對書籍進行分組,並在組標題中顯示類型名稱。 這由參考群組 Key 值的 “Key” 屬性路徑所指出。
using System.Linq;
...
private IOrderedEnumerable<IGrouping<string, BookSku>> genres;

public IOrderedEnumerable<IGrouping<string, BookSku>> Genres
{
    get
    {
        if (this.genres == null)
        {
            this.genres = from book in this.bookSkus
                          group book by book.genre into grp
                          orderby grp.Key
                          select grp;
        }
        return this.genres;
    }
}
請記住,當將 {x:Bind} 與資料範本搭配使用時,我們需要透過設定 x:DataType 值來指示要綁定的類型。 如果類型是泛型的,那麼我們就無法在標記中表達它,所以我們需要在群組樣式標頭範本中使用 {Binding} 來代替。
    <Grid.Resources>
        <CollectionViewSource x:Name="GenreIsACollectionOfBookSku"
        Source="{x:Bind Genres}"
        IsSourceGrouped="true"/>
    </Grid.Resources>
    <GridView ItemsSource="{x:Bind GenreIsACollectionOfBookSku}">
        <GridView.ItemTemplate x:DataType="local:BookTemplate">
            <DataTemplate>
                <TextBlock Text="{x:Bind Title}"/>
            </DataTemplate>
        </GridView.ItemTemplate>
        <GridView.GroupStyle>
            <GroupStyle>
                <GroupStyle.HeaderTemplate>
                    <DataTemplate>
                        <TextBlock Text="{Binding Key}"/>
                    </DataTemplate>
                </GroupStyle.HeaderTemplate>
            </GroupStyle>
        </GridView.GroupStyle>
    </GridView>
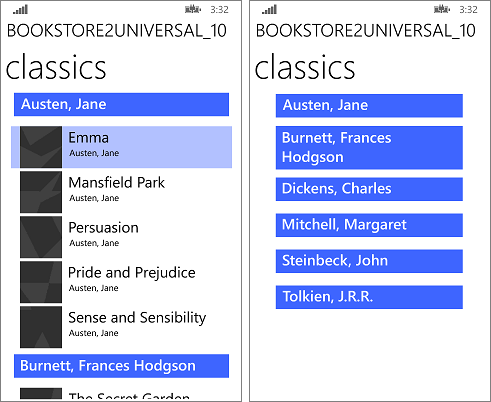
SemanticZoom 控制項是使用者檢視和流覽分組資料的絕佳方式。 Bookstore2 範例應用程式說明如何使用 SemanticZoom。 在該應用程式中,您可以檢視依作者分組的書籍清單(放大視圖),也可以縮小以查看作者跳躍清單(縮小視圖)。 跳轉列表提供的導航速度比滾動瀏覽書籍列表要快得多。 放大和縮小檢視實際上是系結至相同 CollectionViewSource 的 ListView 或 GridView 控制項。
當您繫結至階層式資料 (例如類別內的子類別) 時,您可以選擇在 UI 中顯示階層層級,其中包含一系列專案控制項。 一個項目控制項中的選取範圍會決定後續項目控制項的內容。 您可以藉由將每個清單繫結至自己的 CollectionViewSource ,並將 CollectionViewSource 實例繫結在鏈結中,以保持清單同步處理。 這稱為主要/詳細資料 (或清單/詳細資料) 檢視。 如需詳細資訊,請參閱 如何系結至階層式資料並建立主要/詳細資料檢視。
診斷及除錯資料繫結問題
繫結標記包含屬性名稱 (對於 C#,有時還包含欄位和方法)。 因此,當您重新命名屬性時,您也必須變更參考它的任何繫結。 忘記這樣做會導致資料繫結錯誤的典型範例,您的應用程式將無法編譯或無法正確執行。
{x:Bind} 和 {Binding} 所建立的繫結物件在功能上基本上是等效的。 但 {x:Bind} 具有繫結來源的類型資訊,而且會在編譯階段產生原始程式碼。 使用 {x:Bind},您可以獲得與其餘程式碼相同的問題偵測。 這包括繫結運算式的編譯階段驗證,以及透過在原始程式碼中設定中斷點來偵錯,以產生為頁面的部分類別。 這些類別可以在資料夾 obj 中的檔案中找到,名稱類似於 (對於 C#) <view name>.g.cs)。 如果您有繫結問題,請在 Microsoft Visual Studio 偵錯工具中開啟 [中斷未處理的例外狀況 ]。 偵錯工具會在此時中斷執行,然後您可以偵錯錯誤的內容。 {x:Bind} 所產生的程式碼會針對繫結來源節點圖形的每個部分遵循相同的模式,而且您可以使用 [呼叫堆疊 ] 視窗中的資訊來協助判斷導致問題的呼叫順序。
{Binding} 沒有繫結來源的類型資訊。 但是,當您在附加偵錯工具的情況下執行應用程式時,任何繫結錯誤都會出現在 Visual Studio 的 [輸出] 視窗中。
在程式碼中建立繫結
便條 本節僅適用於 {Binding},因為您無法在程式碼中建立 {x:Bind} 繫結。 不過,您可以使用 DependencyObject.RegisterPropertyChangedCallback 來達成 {x:Bind} 的一些相同優點,這可讓您註冊任何相依性屬性的變更通知。
您也可以使用程序程式碼 (而非 XAML) 將 UI 元素連線到資料。 若要這樣做,請建立新的 Binding 物件、設定適當的屬性,然後呼叫 FrameworkElement.SetBinding 或 BindingOperations.SetBinding。 當您想要在執行階段選擇繫結屬性值,或在多個控制項之間共用單一繫結時,以程式設計方式建立繫結很有用。 不過請注意,呼叫 SetBinding 之後,您無法變更繫結屬性值。
下列範例示範如何在程式碼中實作繫結。
<TextBox x:Name="MyTextBox" Text="Text"/>
// Create an instance of the MyColors class
// that implements INotifyPropertyChanged.
MyColors textcolor = new MyColors();

// Brush1 is set to be a SolidColorBrush with the value Red.
textcolor.Brush1 = new SolidColorBrush(Colors.Red);

// Set the DataContext of the TextBox MyTextBox.
MyTextBox.DataContext = textcolor;

// Create the binding and associate it with the text box.
Binding binding = new Binding() { Path = new PropertyPath("Brush1") };
MyTextBox.SetBinding(TextBox.ForegroundProperty, binding);
' Create an instance of the MyColors class
' that implements INotifyPropertyChanged.
Dim textcolor As New MyColors()

' Brush1 is set to be a SolidColorBrush with the value Red.
textcolor.Brush1 = New SolidColorBrush(Colors.Red)

' Set the DataContext of the TextBox MyTextBox.
MyTextBox.DataContext = textcolor

' Create the binding and associate it with the text box.
Dim binding As New Binding() With {.Path = New PropertyPath("Brush1")}
MyTextBox.SetBinding(TextBox.ForegroundProperty, binding)
{x:Bind} 和 {Binding} 功能比較
| 特徵 / 功能 | {x:Bind} 與 {Binding} | 註釋 |
|---|---|---|
| 路徑是預設屬性 | {x:Bind a.b.c}- {Binding a.b.c} |
|
| Path 屬性 | {x:Bind Path=a.b.c}- {Binding Path=a.b.c} |
在 x:Bind 中,Path 預設以 Page 為根目錄,而不是 DataContext。 |
| Indexer | {x:Bind Groups[2].Title}- {Binding Groups[2].Title} |
繫結至集合中的指定專案。 僅支援整數型索引。 |
| 附加屬性 | {x:Bind Button22.(Grid.Row)}- {Binding Button22.(Grid.Row)} |
附加屬性是使用括弧指定。 如果屬性未在 XAML 命名空間中宣告,請以 xml 命名空間為前置詞,該命名空間應該對應至文件頭頭的程式碼命名空間。 |
| 選角 | {x:Bind groups[0].(data:SampleDataGroup.Title)}- {Binding} 不需要。 |
使用括號指定轉換。 如果屬性未在 XAML 命名空間中宣告,請以 xml 命名空間為前置詞,該命名空間應該對應至文件頭頭的程式碼命名空間。 |
| 轉換器 | {x:Bind IsShown, Converter={StaticResource BoolToVisibility}}- {Binding IsShown, Converter={StaticResource BoolToVisibility}} |
轉換器必須在 Page/ResourceDictionary 的根目錄或 App.xaml 中宣告。 |
| 轉換器參數、轉換器語言 | {x:Bind IsShown, Converter={StaticResource BoolToVisibility}, ConverterParameter=One, ConverterLanguage=fr-fr}- {Binding IsShown, Converter={StaticResource BoolToVisibility}, ConverterParameter=One, ConverterLanguage=fr-fr} |
轉換器必須在 Page/ResourceDictionary 的根目錄或 App.xaml 中宣告。 |
| TargetNull值 | {x:Bind Name, TargetNullValue=0}- {Binding Name, TargetNullValue=0} |
當繫結運算式的分葉為 null 時使用。 對字串值使用單引號。 |
| 後援值 | {x:Bind Name, FallbackValue='empty'}- {Binding Name, FallbackValue='empty'} |
當繫結路徑的任何部分 (分葉除外) 為 Null 時使用。 |
| 元素名稱 | {x:Bind slider1.Value}- {Binding Value, ElementName=slider1} |
使用 {x:Bind} 時,您會繫結至欄位;路徑預設以頁面為根目錄,因此可以透過其欄位存取任何具名元素。 |
| RelativeSource:自我 | <Rectangle x:Name="rect1" Width="200" Height="{x:Bind rect1.Width}" ... />- <Rectangle Width="200" Height="{Binding Width, RelativeSource={RelativeSource Self}}" ... /> |
使用 {x:Bind},命名元素並在 Path 中使用其名稱。 |
| RelativeSource:TemplatedParent | {x:Bind} 不需要 - {Binding <path>, RelativeSource={RelativeSource TemplatedParent}} |
使用 {x:Bind} 的 TargetType 在 ControlTemplate 上表示系結至範本父系。 對於 {Binding} 一般範本繫結可用於大部分用途的控制項範本中。 但是,在您需要使用轉換器或雙向綁定的地方使用 TemplatedParent。< |
| 來源 | {x:Bind} 不需要 - <ListView ItemsSource="{Binding Orders, Source={StaticResource MyData}}"/> |
對於 {x:Bind},您可以直接使用命名元素,使用屬性或靜態路徑。 |
| Mode | {x:Bind Name, Mode=OneWay}- {Binding Name, Mode=TwoWay} |
模式可以是 OneTime、OneWay 或 TwoWay。 {x:Bind} 預設為 OneTime;{Binding} 預設為 OneWay。 |
| UpdateSource觸發程式 | {x:Bind Name, Mode=TwoWay, UpdateSourceTrigger=PropertyChanged}- {Binding UpdateSourceTrigger=PropertyChanged} |
UpdateSourceTrigger 可以是 Default、LostFocus 或 PropertyChanged。 {x:Bind} 不支援 UpdateSourceTrigger=Explicit。 {x:Bind} 會針對 TextBox.Text 以外的所有案例使用 PropertyChanged 行為,其中它會使用 LostFocus 行為。 |