Xamarin.Forms命令介面
在 Model-View-ViewModel (MVVM) 架構中,資料繫結是在 ViewModel (這通常是衍生自 INotifyPropertyChanged 的類別) 中屬性與檢視 (這通常是 XAML 檔案) 的屬性之間定義。 有時候應用程式需要超越這些屬性繫結,方法是要求使用者起始會影響 ViewModel 某些項目的命令。 這些命令通常是透過按鈕點擊或手指點選發出訊號,傳統上會以 Button 的 Clicked 事件處理常式或 TapGestureRecognizer 的 Tapped 事件處理常式在程式碼後置檔案中加以處理。
命令介面可針對比較適合 MVVM 架構的命令實作,提供一種替代方法。 ViewModel 本身可以包含命令,這些命令是為了反應檢視中的特定活動 (例如 Button 點擊) 而執行的方法。 資料繫結會定義在這些命令與 Button 之間。
為了允許 Button 與 ViewModel 之間的資料繫結,Button 會定義兩個屬性:
- 型別
Command的System.Windows.Input.ICommand - 型別
CommandParameter的Object
若要使用命令介面,您需要定義以 Button 的 Command 屬性為目標的資料繫結,其中來源是類型為 ICommand 的 ViewModel。 ViewModel 包含程式碼,這些程式碼與點擊按鈕時即會執行的 ICommand 屬性建立關聯。 如果程式碼全都繫結至 ViewModel 中的相同 ICommand 屬性,則您可將 CommandParameter 設定為任意資料來區別多個按鈕。
下列類別也會定義 Command 和 CommandParameter 屬性:
MenuItem以及衍生自MenuItem的ToolbarItemTextCell以及衍生自TextCell的ImageCellTapGestureRecognizer
SearchBar 會定義類型為 ICommand 的 SearchCommand 屬性以及 SearchCommandParameter 屬性。 ListView 的 RefreshCommand 屬性類型也是 ICommand。
所有這些命令都可以用不相依於檢視中特定使用者介面物件的方式,在 ViewModel 中進行處理。
ICommand 介面
System.Windows.Input.ICommand介面不是的一Xamarin.Forms部分。 它改為在 System.Windows.Input 命名空間中定義,而且包含兩個方法和一個事件:
public interface ICommand
{
    public void Execute (Object parameter);

    public bool CanExecute (Object parameter);

    public event EventHandler CanExecuteChanged;
}
為了使用命令介面,您的 ViewModel 包含類型為 ICommand 的屬性:
public ICommand MyCommand { private set; get; }
ViewModel 還必須參考實作 ICommand 介面的類別。 稍後即會描述這個類別。 在檢視中,Button 的 Command 屬性繫結至該屬性:
<Button Text="Execute command"
        Command="{Binding MyCommand}" />
當使用者按下 Button 時,Button 會呼叫 ICommand 物件中繫結至其 Command 屬性的 Execute 方法。 這是命令介面的最簡單部分。
CanExecute 方法更複雜。 第一次在 Button 的 Command 屬性上定義繫結時,若資料繫結以某種方式變更,Button 就會呼叫 ICommand 物件中的 CanExecute 方法。 如果 CanExecute 傳回 false,則 Button 會停用其本身。 這表示,特定命令目前無法使用或無效。
Button 也會在 ICommand 的 CanExecuteChanged 事件上附加處理常式。 該事件是從 ViewModel 內引發。 當引發該事件時,Button 會再次呼叫 CanExecute。 若 CanExecute 傳回 true,Button 即會啟用其本身;若 CanExecute 傳回 false,則會停用其本身。
重要
如果您要使用命令介面,請勿使用 Button 的 IsEnabled 屬性。
命令類別
當您的 ViewModel 定義類型為 ICommand 的屬性時,ViewModel 必須也包含或參考實作 ICommand 介面的類別。 這個類別必須包含或參考 Execute 和 CanExecute 方法,而且只要 CanExecute 方法可能傳回不同的值時,就會引發 CanExecuteChanged 事件。
您可以自行撰寫這種類別,也可以使用其他人所撰寫的類別。 由於 ICommand 屬於 Microsoft Windows 的一部分,因此它已在 Windows MVVM 應用程式中使用多年。 使用實作的 ICommand Windows 類別可讓您在 Windows 應用程式和應用程式 Xamarin.Forms 之間共用 ViewModel。
如果共用 Windows 與 Xamarin.Forms 之間的 ViewModel 並不相關,您可以使用 Command 中包含的 Xamarin.Forms 或 Command<T> 類別來實作 ICommand 介面。 這些類別可讓您在類別建構函式中指定 Execute 和 CanExecute 方法的主體。 當您使用 CommandParameter 屬性來區別多個繫結至相同 ICommand 屬性的檢視時,請使用 Command<T>,而在不需要這麼做時,請使用更簡單的 Command 類別。
基本命令
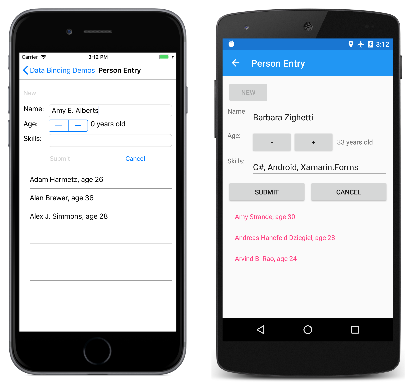
資料繫結示範程式中之 Person Entry (人員輸入) 頁面會示範 ViewModel 中實作的一些簡單命令。
PersonViewModel 會定義三個定義人員的屬性,名稱為 Name、Age 和 Skills。 此類別「不」包含任何 ICommand 屬性:
public class PersonViewModel : INotifyPropertyChanged
{
    string name;
    double age;
    string skills;

    public event PropertyChangedEventHandler PropertyChanged;

    public string Name
    {
        set { SetProperty(ref name, value); }
        get { return name; }
    }

    public double Age
    {
        set { SetProperty(ref age, value); }
        get { return age; }
    }

    public string Skills
    {
        set { SetProperty(ref skills, value); }
        get { return skills; }
    }

    public override string ToString()
    {
        return Name + ", age " + Age;
    }

    bool SetProperty<T>(ref T storage, T value, [CallerMemberName] string propertyName = null)
    {
        if (Object.Equals(storage, value))
            return false;

        storage = value;
        OnPropertyChanged(propertyName);
        return true;
    }

    protected void OnPropertyChanged([CallerMemberName] string propertyName = null)
    {
        PropertyChanged?.Invoke(this, new PropertyChangedEventArgs(propertyName));
    }
}
以下顯示的 PersonCollectionViewModel 會建立類型為 PersonViewModel 的新物件,並允許使用者填入資料。 基於該目的,此類別會定義類型為 bool 的 IsEditing 屬性和類型為 PersonViewModel 的 PersonEdit 屬性。 此外,此類別還會定義類型為 ICommand 的三個屬性和名為 Persons 且類型為 IList<PersonViewModel> 的屬性:
public class PersonCollectionViewModel : INotifyPropertyChanged
{
    PersonViewModel personEdit;
    bool isEditing;

    public event PropertyChangedEventHandler PropertyChanged;

    ···

    public bool IsEditing
    {
        private set { SetProperty(ref isEditing, value); }
        get { return isEditing; }
    }

    public PersonViewModel PersonEdit
    {
        set { SetProperty(ref personEdit, value); }
        get { return personEdit; }
    }

    public ICommand NewCommand { private set; get; }

    public ICommand SubmitCommand { private set; get; }

    public ICommand CancelCommand { private set; get; }

    public IList<PersonViewModel> Persons { get; } = new ObservableCollection<PersonViewModel>();

    bool SetProperty<T>(ref T storage, T value, [CallerMemberName] string propertyName = null)
    {
        if (Object.Equals(storage, value))
            return false;

        storage = value;
        OnPropertyChanged(propertyName);
        return true;
    }

    protected void OnPropertyChanged([CallerMemberName] string propertyName = null)
    {
        PropertyChanged?.Invoke(this, new PropertyChangedEventArgs(propertyName));
    }
}
此縮寫清單未包含類別的建構函式,它是定義三個屬性 (類型為 ICommand) 的位置,稍後將會加以說明。 請注意,變更三個類型為 ICommand 的屬性和 Persons 屬性不會導致引發 PropertyChanged 事件。 這些屬性都是在第一次建立類別時設定,之後不會變更。
在檢查 PersonCollectionViewModel 類別的建構函式之前,讓我們看看 XAML 檔案中的 Person Entry 程式。 這包含其 BindingContext 屬性設定為 PersonCollectionViewModel 的 Grid。 Grid 包含具有文字 New 且其 Command 屬性繫結至 ViewModel 之 NewCommand 屬性的 Button、所含屬性繫結至 IsEditing 屬性以及 PersonViewModel 之屬性的項目表單,和兩個以上繫結至 ViewMode 之 SubmitCommand 和 CancelCommand 的按鈕。 最終的 ListView 會顯示已輸入人員的集合:
<ContentPage xmlns="http://xamarin.com/schemas/2014/forms"
             xmlns:x="http://schemas.microsoft.com/winfx/2009/xaml"
             xmlns:local="clr-namespace:DataBindingDemos"
             x:Class="DataBindingDemos.PersonEntryPage"
             Title="Person Entry">
    <Grid Margin="10">
        <Grid.BindingContext>
            <local:PersonCollectionViewModel />
        </Grid.BindingContext>

        <Grid.RowDefinitions>
            <RowDefinition Height="Auto" />
            <RowDefinition Height="Auto" />
            <RowDefinition Height="Auto" />
            <RowDefinition Height="*" />
        </Grid.RowDefinitions>

        <!-- New Button -->
        <Button Text="New"
                Grid.Row="0"
                Command="{Binding NewCommand}"
                HorizontalOptions="Start" />

        <!-- Entry Form -->
        <Grid Grid.Row="1"
              IsEnabled="{Binding IsEditing}">

            <Grid BindingContext="{Binding PersonEdit}">
                <Grid.RowDefinitions>
                    <RowDefinition Height="Auto" />
                    <RowDefinition Height="Auto" />
                    <RowDefinition Height="Auto" />
                </Grid.RowDefinitions>

                <Grid.ColumnDefinitions>
                    <ColumnDefinition Width="Auto" />
                    <ColumnDefinition Width="*" />
                </Grid.ColumnDefinitions>

                <Label Text="Name: " Grid.Row="0" Grid.Column="0" />
                <Entry Text="{Binding Name}"
                       Grid.Row="0" Grid.Column="1" />

                <Label Text="Age: " Grid.Row="1" Grid.Column="0" />
                <StackLayout Orientation="Horizontal"
                             Grid.Row="1" Grid.Column="1">
                    <Stepper Value="{Binding Age}"
                             Maximum="100" />
                    <Label Text="{Binding Age, StringFormat='{0} years old'}"
                           VerticalOptions="Center" />
                </StackLayout>

                <Label Text="Skills: " Grid.Row="2" Grid.Column="0" />
                <Entry Text="{Binding Skills}"
                       Grid.Row="2" Grid.Column="1" />

            </Grid>
        </Grid>

        <!-- Submit and Cancel Buttons -->
        <Grid Grid.Row="2">
            <Grid.ColumnDefinitions>
                <ColumnDefinition Width="*" />
                <ColumnDefinition Width="*" />
            </Grid.ColumnDefinitions>

            <Button Text="Submit"
                    Grid.Column="0"
                    Command="{Binding SubmitCommand}"
                    VerticalOptions="CenterAndExpand" />

            <Button Text="Cancel"
                    Grid.Column="1"
                    Command="{Binding CancelCommand}"
                    VerticalOptions="CenterAndExpand" />
        </Grid>

        <!-- List of Persons -->
        <ListView Grid.Row="3"
                  ItemsSource="{Binding Persons}" />
    </Grid>
</ContentPage>
以下是其運作方式:使用者第一次按下 New 按鈕。 這會啟用項目表單,但停用 New 按鈕。 使用者接著輸入姓名、年齡和技能。 在編輯期間的任何時間,使用者可以按下 Cancel (取消) 按鈕,以便從頭開始。 只有在已輸入姓名和有效的年齡時,才會啟用 Submit (提交) 按鈕。 按下此 Submit 按鈕,就會將人員資料傳送到 ListView 所顯示的集合。 按下 Cancel 或 Submit 按鈕之後,系統會清除項目表單,並再次啟用 New 按鈕。
左側的 iOS 畫面會顯示輸入有效年齡之前的配置。 Android 畫面會顯示在設定存留期之後啟用的 [提交 ] 按鈕:
此程式沒有任何可編輯現有項目的設備,當您離開該頁面時,也不會儲存項目。
[新增]、[提交] 和 [取消] 按鈕的所有邏輯是透過 NewCommand、SubmitCommand 和 CancelCommand 屬性的定義在 PersonCollectionViewModel 中加以處理。 PersonCollectionViewModel 的建構函式會將這三個屬性設定為 Command 類型的物件。
Command 類別的建構函式可讓您傳遞類型為 Action 和 Func<bool> (對應於 Execute 和 CanExecute 方法) 的引數。 最簡單的方式是在直接 Command 建構函式中定義這些動作和函式作為 Lambda 函式。 以下是 NewCommand 屬性的 Command 物件定義:
public class PersonCollectionViewModel : INotifyPropertyChanged
{

    ···

    public PersonCollectionViewModel()
    {
        NewCommand = new Command(
            execute: () =>
            {
                PersonEdit = new PersonViewModel();
                PersonEdit.PropertyChanged += OnPersonEditPropertyChanged;
                IsEditing = true;
                RefreshCanExecutes();
            },
            canExecute: () =>
            {
                return !IsEditing;
            });

        ···

    }

    void OnPersonEditPropertyChanged(object sender, PropertyChangedEventArgs args)
    {
        (SubmitCommand as Command).ChangeCanExecute();
    }

    void RefreshCanExecutes()
    {
        (NewCommand as Command).ChangeCanExecute();
        (SubmitCommand as Command).ChangeCanExecute();
        (CancelCommand as Command).ChangeCanExecute();
    }

    ···

}
當使用者按一下 New 按鈕時,即會執行傳遞至 Command 建構函式的 execute 函式。 這會建立新的 PersonViewModel 物件、在該物件的 PropertyChanged 事件上設定處理常式、將 IsEditing 設定為 true,以及呼叫建構函式之後定義的 RefreshCanExecutes 方法。
除了實作 ICommand 介面,Command 類別還會定義名為 ChangeCanExecute 的方法。 只要發生任何可能會變更 CanExecute 方法傳回值的事情。您的 ViewModel 就應該為 ICommand 屬性呼叫 ChangeCanExecute。 呼叫 ChangeCanExecute 會導致 Command 類別引發 CanExecuteChanged 方法。 Button 已附加該事件的處理常式,並透過再次呼叫 CanExecute,然後根據該方法的傳回值啟用其本身來回應。
當 NewCommand 的 execute 方法呼叫 RefreshCanExecutes 時,則 NewCommand 屬性會呼叫 ChangeCanExecute,而 Button 會呼叫 canExecute 方法,它現在會傳回 false,因為 IsEditing 內容目前是 true。
新 PersonViewModel 物件的 PropertyChanged 處理常式會呼叫 SubmitCommand 的 ChangeCanExecute 方法。 以下是實作該命令屬性的方法:
public class PersonCollectionViewModel : INotifyPropertyChanged
{

    ···

    public PersonCollectionViewModel()
    {

        ···

        SubmitCommand = new Command(
            execute: () =>
            {
                Persons.Add(PersonEdit);
                PersonEdit.PropertyChanged -= OnPersonEditPropertyChanged;
                PersonEdit = null;
                IsEditing = false;
                RefreshCanExecutes();
            },
            canExecute: () =>
            {
                return PersonEdit != null &&
                       PersonEdit.Name != null &&
                       PersonEdit.Name.Length > 1 &&
                       PersonEdit.Age > 0;
            });

        ···
    }

    ···

}
每次所編輯的 PersonViewModel 物件有屬性變更時,即會呼叫 SubmitCommand 的 canExecute 函式。 只有在 Name 屬性長度至少是 1 個字元,且 Age 大於 0 時,它才會傳回 true。 此時,[提交] 按鈕會變成啟用狀態。
[提交] 的 execute 函式會從 PersonViewModel 移除屬性變更處理常式,將物件新增至 Persons 集合,然後讓所有項目回到初始狀況。
[取消] 按鈕的 execute 函式會執行 Submit 按鈕執行的所有作業,但將物件新增至集合除外:
public class PersonCollectionViewModel : INotifyPropertyChanged
{

    ···

    public PersonCollectionViewModel()
    {

        ···

        CancelCommand = new Command(
            execute: () =>
            {
                PersonEdit.PropertyChanged -= OnPersonEditPropertyChanged;
                PersonEdit = null;
                IsEditing = false;
                RefreshCanExecutes();
            },
            canExecute: () =>
            {
                return IsEditing;
            });
    }

    ···

}
在編輯 PersonViewModel 的任何時候,canExecute 方法都會傳回 true。
這些技術可調整以符合更複雜的案例:PersonCollectionViewModel 中的屬性無法繫結至 ListView 的 SelectedItem 屬性來編輯現有項目,因此可能會新增 [刪除] 按鈕來刪除這些項目。
不需要將 execute 和 canExecute 方法定義為 Lambda 函式。 您可以在 ViewModel 中將其撰寫為一般的私用方法,並在 Command 建構函式中加以參考。 不過,這種方式通常會導致大量的方法只會在 ViewModel 中參考一次。
使用命令參數
對於一或多個按鈕 (或其他使用者介面物件) 來說,在 ViewModel 中共用相同的 ICommand 屬性有時很方便。 在此情況下,請使用 CommandParameter 屬性來區別按鈕。
您可以針對這些共用的 ICommand 屬性繼續使用 Command 類別。 此類別可定義替代的建構函式,以接受所含參數的類型為 Object 的 execute 和 canExecute 方法。 這是 CommandParameter 傳遞給這些方法的方式。
不過,使用 CommandParameter 時,最簡單的方式是使用泛型 Command<T> 類別,來指定設定為 CommandParameter 的物件類型。 您指定的 execute 和 canExecute 方法具有該類型的參數。
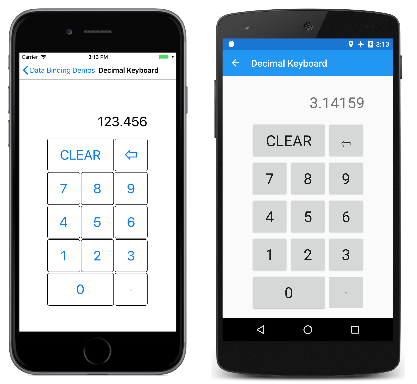
Decimal Keyboard (十進位鍵台) 頁面示範如何實作輸入十進位數字的鍵台,藉以說明這項技巧。 Grid 的 BindingContext 是 DecimalKeypadViewModel。 此 ViewModel 的 Entry 屬性會繫結至 Label 的 Text 屬性。 所有 Button 物件都會繫結至 ViewModel 中的各種命令:ClearCommand、BackspaceCommand 和 DigitCommand:
<ContentPage xmlns="http://xamarin.com/schemas/2014/forms"
xmlns:x="http://schemas.microsoft.com/winfx/2009/xaml"
xmlns:local="clr-namespace:DataBindingDemos"
x:Class="DataBindingDemos.DecimalKeypadPage"
Title="Decimal Keyboard">
<Grid WidthRequest="240"
HeightRequest="480"
ColumnSpacing="2"
RowSpacing="2"
HorizontalOptions="Center"
VerticalOptions="Center">
<Grid.BindingContext>
<local:DecimalKeypadViewModel />
</Grid.BindingContext>
<Grid.Resources>
<ResourceDictionary>
<Style TargetType="Button">
<Setter Property="FontSize" Value="32" />
<Setter Property="BorderWidth" Value="1" />
<Setter Property="BorderColor" Value="Black" />
</Style>
</ResourceDictionary>
</Grid.Resources>
<Label Text="{Binding Entry}"
Grid.Row="0" Grid.Column="0" Grid.ColumnSpan="3"
FontSize="32"
LineBreakMode="HeadTruncation"
VerticalTextAlignment="Center"
HorizontalTextAlignment="End" />
<Button Text="CLEAR"
Grid.Row="1" Grid.Column="0" Grid.ColumnSpan="2"
Command="{Binding ClearCommand}" />
<Button Text="⇦"
Grid.Row="1" Grid.Column="2"
Command="{Binding BackspaceCommand}" />
<Button Text="7"
Grid.Row="2" Grid.Column="0"
Command="{Binding DigitCommand}"
CommandParameter="7" />
<Button Text="8"
Grid.Row="2" Grid.Column="1"
Command="{Binding DigitCommand}"
CommandParameter="8" />
<Button Text="9"
Grid.Row="2" Grid.Column="2"
Command="{Binding DigitCommand}"
CommandParameter="9" />
<Button Text="4"
Grid.Row="3" Grid.Column="0"
Command="{Binding DigitCommand}"
CommandParameter="4" />
<Button Text="5"
Grid.Row="3" Grid.Column="1"
Command="{Binding DigitCommand}"
CommandParameter="5" />
<Button Text="6"
Grid.Row="3" Grid.Column="2"
Command="{Binding DigitCommand}"
CommandParameter="6" />
<Button Text="1"
Grid.Row="4" Grid.Column="0"
Command="{Binding DigitCommand}"
CommandParameter="1" />
<Button Text="2"
Grid.Row="4" Grid.Column="1"
Command="{Binding DigitCommand}"
CommandParameter="2" />
<Button Text="3"
Grid.Row="4" Grid.Column="2"
Command="{Binding DigitCommand}"
CommandParameter="3" />
<Button Text="0"
Grid.Row="5" Grid.Column="0" Grid.ColumnSpan="2"
Command="{Binding DigitCommand}"
CommandParameter="0" />
<Button Text="·"
Grid.Row="5" Grid.Column="2"
Command="{Binding DigitCommand}"
CommandParameter="." />
</Grid>
</ContentPage>
10 個數字和小數點的 11 個按鈕共用與 DigitCommand 的繫結。 CommandParameter 可區分這些按鈕。 設定為 CommandParameter 的值通常會與按鈕所顯示的文字相同,但小數點除外,為了清楚起見,小數點會以中間點字元顯示。
以下是運作中的程式:
請注意,所有三個螢幕擷取畫面中小數點的按鈕已被停用,因為輸入的數字已包含小數點。
DecimalKeypadViewModel 會定義類型為 string 的 Entry 屬性 (這是觸發 PropertyChanged 事件的唯一屬性) 和三個類型為 ICommand 的屬性:
public class DecimalKeypadViewModel : INotifyPropertyChanged
{
    string entry = "0";

    public event PropertyChangedEventHandler PropertyChanged;

    ···

    public string Entry
    {
        private set
        {
            if (entry != value)
            {
                entry = value;
                PropertyChanged?.Invoke(this, new PropertyChangedEventArgs("Entry"));
            }
        }
        get
        {
            return entry;
        }
    }

    public ICommand ClearCommand { private set; get; }

    public ICommand BackspaceCommand { private set; get; }

    public ICommand DigitCommand { private set; get; }
}
對應至 ClearCommand 的按鈕一律會啟用,且只會將項目設回 "0":
public class DecimalKeypadViewModel : INotifyPropertyChanged
{

    ···

    public DecimalKeypadViewModel()
    {
        ClearCommand = new Command(
            execute: () =>
            {
                Entry = "0";
                RefreshCanExecutes();
            });

        ···

    }

    void RefreshCanExecutes()
    {
        ((Command)BackspaceCommand).ChangeCanExecute();
        ((Command)DigitCommand).ChangeCanExecute();
    }

    ···

}
因為一律會啟用按鈕,所以不需要在 Command 建構函式中指定 canExecute 引數。
輸入數字和退格的邏輯有點難以處理,因為如果尚未輸入任何數字,則 Entry 屬性是字串 "0"。 如果使用者鍵入多個零,則 Entry 仍然只包含一個零。 如果使用者鍵入任何其他數字,該數字就會取代零。 但是,如果使用者在任何其他數字之前鍵入小數點,則 Entry 為字串 "0."。
只有在項目的長度大於 1,或 Entry 不等於字串 "0" 時,才會啟用 [退格鍵]Backspace 按鈕:
public class DecimalKeypadViewModel : INotifyPropertyChanged
{

    ···

    public DecimalKeypadViewModel()
    {

        ···

        BackspaceCommand = new Command(
            execute: () =>
            {
                Entry = Entry.Substring(0, Entry.Length - 1);
                if (Entry == "")
                {
                    Entry = "0";
                }
                RefreshCanExecutes();
            },
            canExecute: () =>
            {
                return Entry.Length > 1 || Entry != "0";
            });

        ···

    }

    ···

}
[退格鍵] 按鈕的 execute 函式邏輯可確保 Entry 至少是一個字串 "0"。
DigitCommand 屬性繫結至 11 個按鈕,其中每個按鈕都會利用 CommandParameter 屬性識別其本身。 DigitCommand 可以設定為一般 Command 類別的執行個體,但使用 Command<T> 泛型類別更加容易。 使用命令介面與 XAML 搭配時,CommandParameter 屬性通常是字串,而且其為泛型引數的類型。 execute 和 canExecute 函式則會有類型為 string 的引數:
public class DecimalKeypadViewModel : INotifyPropertyChanged
{

    ···

    public DecimalKeypadViewModel()
    {

        ···

        DigitCommand = new Command<string>(
            execute: (string arg) =>
            {
                Entry += arg;
                if (Entry.StartsWith("0") && !Entry.StartsWith("0."))
                {
                    Entry = Entry.Substring(1);
                }
                RefreshCanExecutes();
            },
            canExecute: (string arg) =>
            {
                return !(arg == "." && Entry.Contains("."));
            });
    }

    ···

}
execute 方法會將字串引數附加至 Entry 屬性。 不過,如果結果是以零開始 (但不是零值和小數點),則必須使用 Substring 函式來移除該初始零。
只有在引數是小數點 (表示按下小數點) 和 Entry 已包含小數點時,canExecute 方法才會傳回 false。
所有 execute 方法都會呼叫 RefreshCanExecutes,後者接著會針對 DigitCommand 和 ClearCommand 這兩者呼叫 ChangeCanExecute。 這可確保小數點和退格鍵按鈕,都會根據目前的輸入數字序列啟用或停用。
導覽功能表的非同步命令
命令可讓實作導覽功能表更加方便,例如資料繫結示範程式本身的導覽功能表。 以下是 MainPage.xaml 的一部分:
<?xml version="1.0" encoding="utf-8" ?>
<ContentPage xmlns="http://xamarin.com/schemas/2014/forms"
             xmlns:x="http://schemas.microsoft.com/winfx/2009/xaml"
             xmlns:local="clr-namespace:DataBindingDemos"
             x:Class="DataBindingDemos.MainPage"
             Title="Data Binding Demos"
             Padding="10">
    <TableView Intent="Menu">
        <TableRoot>
            <TableSection Title="Basic Bindings">

                <TextCell Text="Basic Code Binding"
                          Detail="Define a data-binding in code"
                          Command="{Binding NavigateCommand}"
                          CommandParameter="{x:Type local:BasicCodeBindingPage}" />

                <TextCell Text="Basic XAML Binding"
                          Detail="Define a data-binding in XAML"
                          Command="{Binding NavigateCommand}"
                          CommandParameter="{x:Type local:BasicXamlBindingPage}" />

                <TextCell Text="Alternative Code Binding"
                          Detail="Define a data-binding in code without a BindingContext"
                          Command="{Binding NavigateCommand}"
                          CommandParameter="{x:Type local:AlternativeCodeBindingPage}" />

                ···

            </TableSection>
        </TableRoot>
    </TableView>
</ContentPage>
使用命令與 XAML 搭配時,CommandParameter 屬性通常會設定為字串。 不過,在此情況會使用 XAML 標記延伸,因此 CommandParameter 的類型為 System.Type。
每個 Command 屬性都會繫結至名為 NavigateCommand 的屬性。 該屬性定義於程式碼後置檔案 MainPage.xaml.cs 中:
public partial class MainPage : ContentPage
{
    public MainPage()
    {
        InitializeComponent();

        NavigateCommand = new Command<Type>(
            async (Type pageType) =>
            {
                Page page = (Page)Activator.CreateInstance(pageType);
                await Navigation.PushAsync(page);
            });

        BindingContext = this;
    }

    public ICommand NavigateCommand { private set; get; }
}
建構函式會將 NavigateCommand 屬性設定為 execute 方法,以具現化 System.Type 參數,然後巡覽至該參數。 由於 PushAsync 呼叫需要 await 運算子,因此 execute 方法必須標示為非同步。 這可透過參數清單之前的 async 關鍵字來完成。
建構函式還會將頁面的 BindingContext 設定為其本身,以便繫結參考此類別中的 NavigateCommand。
此建構函式中的程式碼順序有所不同:InitializeComponent 呼叫會導致剖析 XAML,但該時間無法解析名為 NavigateCommand 的屬性繫結,因為 BindingContext 設定為 null。 如果在設定 NavigateCommand「之前」於建構函式中設定 BindingContext,則可在設定 BindingContext 後解析繫結,但此時 NavigateCommand 仍為 null。 在 BindingContext 之後設定 NavigateCommand 不會影響繫結,因為變更 NavigateCommand 並不會引發 PropertyChanged 事件,且繫結不知道 NavigateCommand 現在是有效的。
在呼叫 InitializeComponent 之前同時設定 NavigateCommand 和 BindingContext (依任意順序) 可正常運作,因為 XAML 剖析器遇到繫結定義時,已設定繫結的這兩個元件。
資料繫結有時可能需要一些技巧,但正如您在這一系列的文章中所見,這些資料繫結功能強大且靈活,透過將基礎邏輯與使用者介面分隔開,對組織程式碼方面大有幫助。
相關連結
- Data Binding Demos (Samples) (資料繫結示範 (範例))
- 書籍 Xamarin.Forms 中的數據系結章節
 下載範例
下載範例
