البرنامج التعليمي: إرسال البيانات إلى Azure Monitor باستخدام واجهة برمجة تطبيقات استيعاب السجلات (قوالب Resource Manager)
تسمح لك واجهة برمجة تطبيقات استيعاب السجلات في Azure Monitor بإرسال بيانات مخصصة إلى مساحة عمل Log Analytics. يستخدم هذا البرنامج التعليمي قوالب Azure Resource Manager (قوالب ARM) للتنقل عبر تكوين المكونات المطلوبة لدعم واجهة برمجة التطبيقات ثم يوفر نموذج تطبيق باستخدام كل من REST API ومكتبات العميل ل .NET وGo وJava وJavaScript وPython.
إشعار
يستخدم هذا البرنامج التعليمي قوالب ARM لتكوين المكونات المطلوبة لدعم واجهة برمجة تطبيقات استيعاب السجلات. راجع البرنامج التعليمي: إرسال البيانات إلى سجلات Azure Monitor باستخدام واجهة برمجة تطبيقات استيعاب السجلات (مدخل Azure) للحصول على برنامج تعليمي مشابه يستخدم واجهة مستخدم مدخل Microsoft Azure لتكوين هذه المكونات.
الخطوات المطلوبة لتكوين واجهة برمجة تطبيقات استيعاب السجلات هي كما يلي:
- إنشاء تطبيق Microsoft Entra للمصادقة مقابل واجهة برمجة التطبيقات.
- إنشاء جدول مخصص في مساحة عمل Log Analytics. هذا هو الجدول الذي سترسل البيانات إليه.
- إنشاء قاعدة تجميع بيانات (DCR) لتوجيه البيانات إلى الجدول الهدف.
- منح تطبيق Microsoft Entra حق الوصول إلى DCR.
- راجع نموذج التعليمات البرمجية لإرسال البيانات إلى Azure Monitor باستخدام واجهة برمجة تطبيقات استيعاب السجلات للحصول على نموذج التعليمات البرمجية لإرسال البيانات إلى باستخدام واجهة برمجة تطبيقات استيعاب السجلات.
إشعار
تتضمن هذه المقالة خيارات لاستخدام نقطة نهاية استيعاب DCR أو نقطة نهاية تجميع البيانات (DCE). يمكنك اختيار مستخدم أي منهما، ولكن مطلوب DCE مع واجهة برمجة تطبيقات استيعاب السجلات إذا تم استخدام ارتباط خاص. راجع متى يكون DCE مطلوبا؟.
المتطلبات الأساسية
لإكمال هذا البرنامج التعليمي، تحتاج إلى:
- مساحة عمل Log Analytics حيث لديك حقوق المساهم على الأقل.
- أذونات لإنشاء كائنات DCR في مساحة العمل.
جمع تفاصيل مساحة العمل
ابدأ بجمع المعلومات التي ستحتاج إليها من مساحة العمل الخاصة بك.
انتقل إلى مساحة العمل الخاصة بك في قائمة مساحات عمل Log Analytics في مدخل Microsoft Azure. في صفحة Properties، انسخ Resource ID واحفظه لاستخدامه لاحقا.
إنشاء تطبيق Microsoft Entra
ابدأ بتسجيل تطبيق Microsoft Entra للمصادقة مقابل واجهة برمجة التطبيقات. يتم دعم أي نظام مصادقة Resource Manager، ولكن يتبع هذا البرنامج التعليمي مخطط تدفق منح بيانات اعتماد العميل.
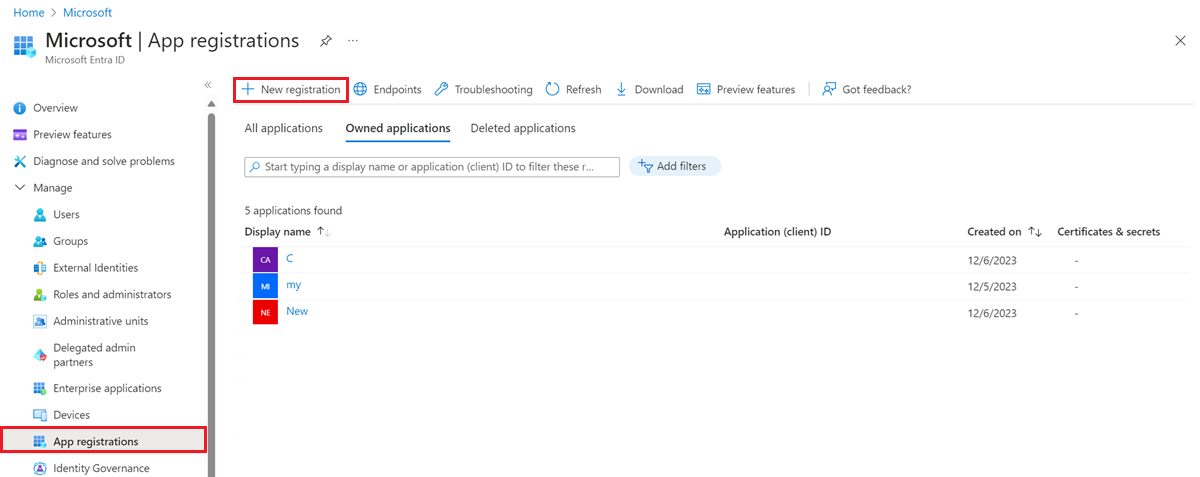
في قائمة Microsoft Entra ID في مدخل Microsoft Azure، حدد App registrations>New registration.
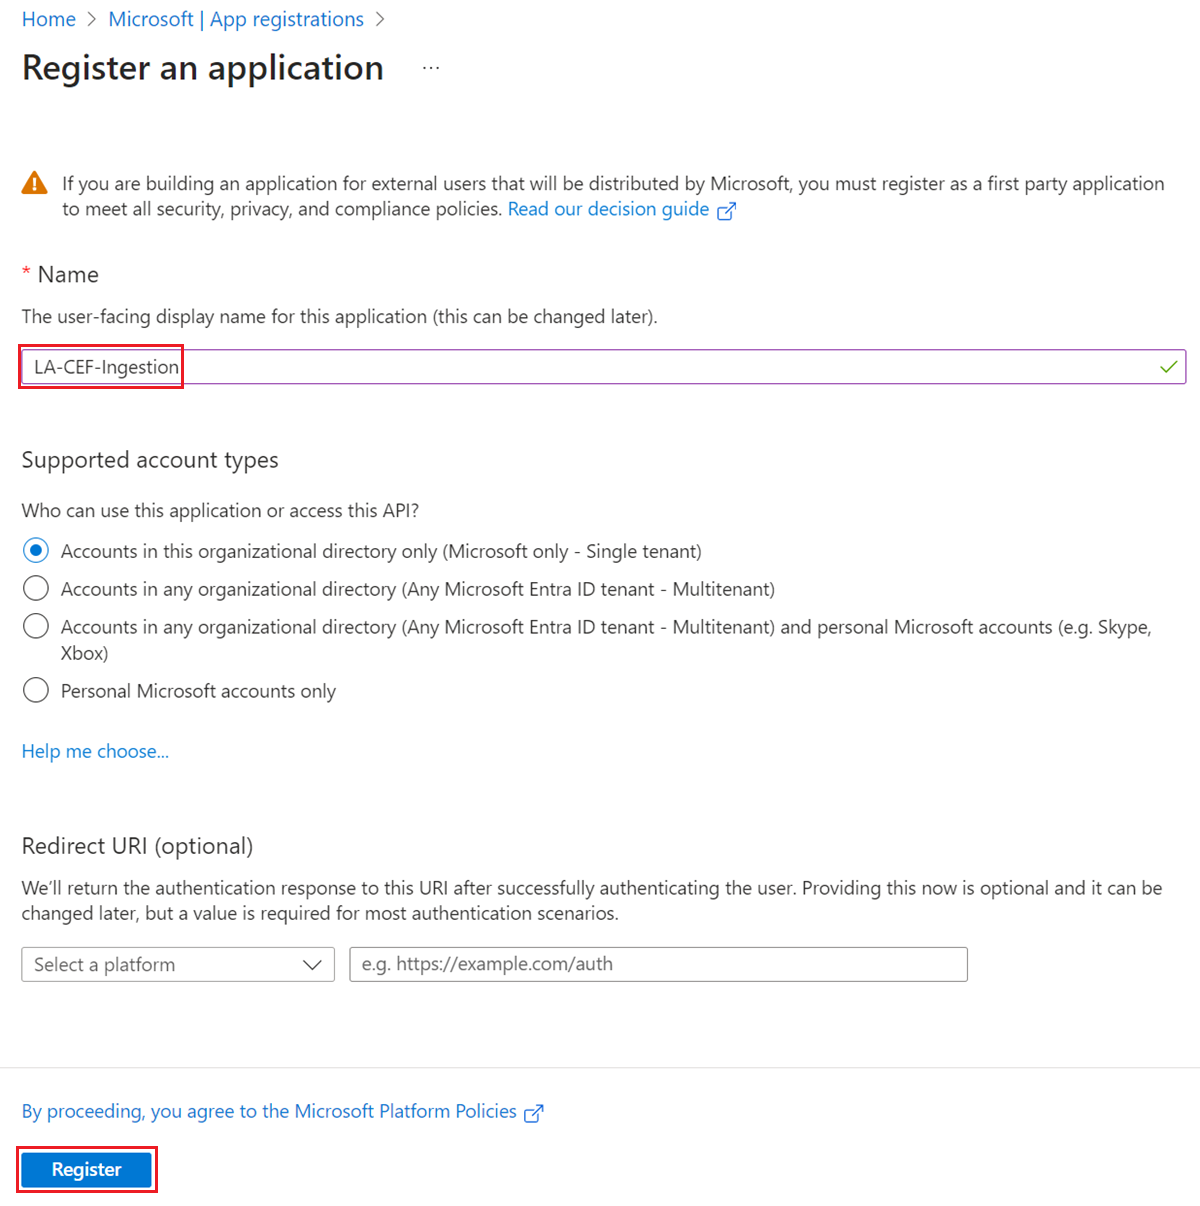
امنح التطبيق اسما وغير نطاق الإيجار إذا كان الافتراضي غير مناسب للبيئة الخاصة بك. عنوان URI لإعادة التوجيه غير مطلوب.
بعد التسجيل، يمكنك عرض تفاصيل التطبيق. لاحظ معرف التطبيق (العميل) ومعرف الدليل (المستأجر). ستحتاج إلى هذه القيم لاحقًا في العملية.
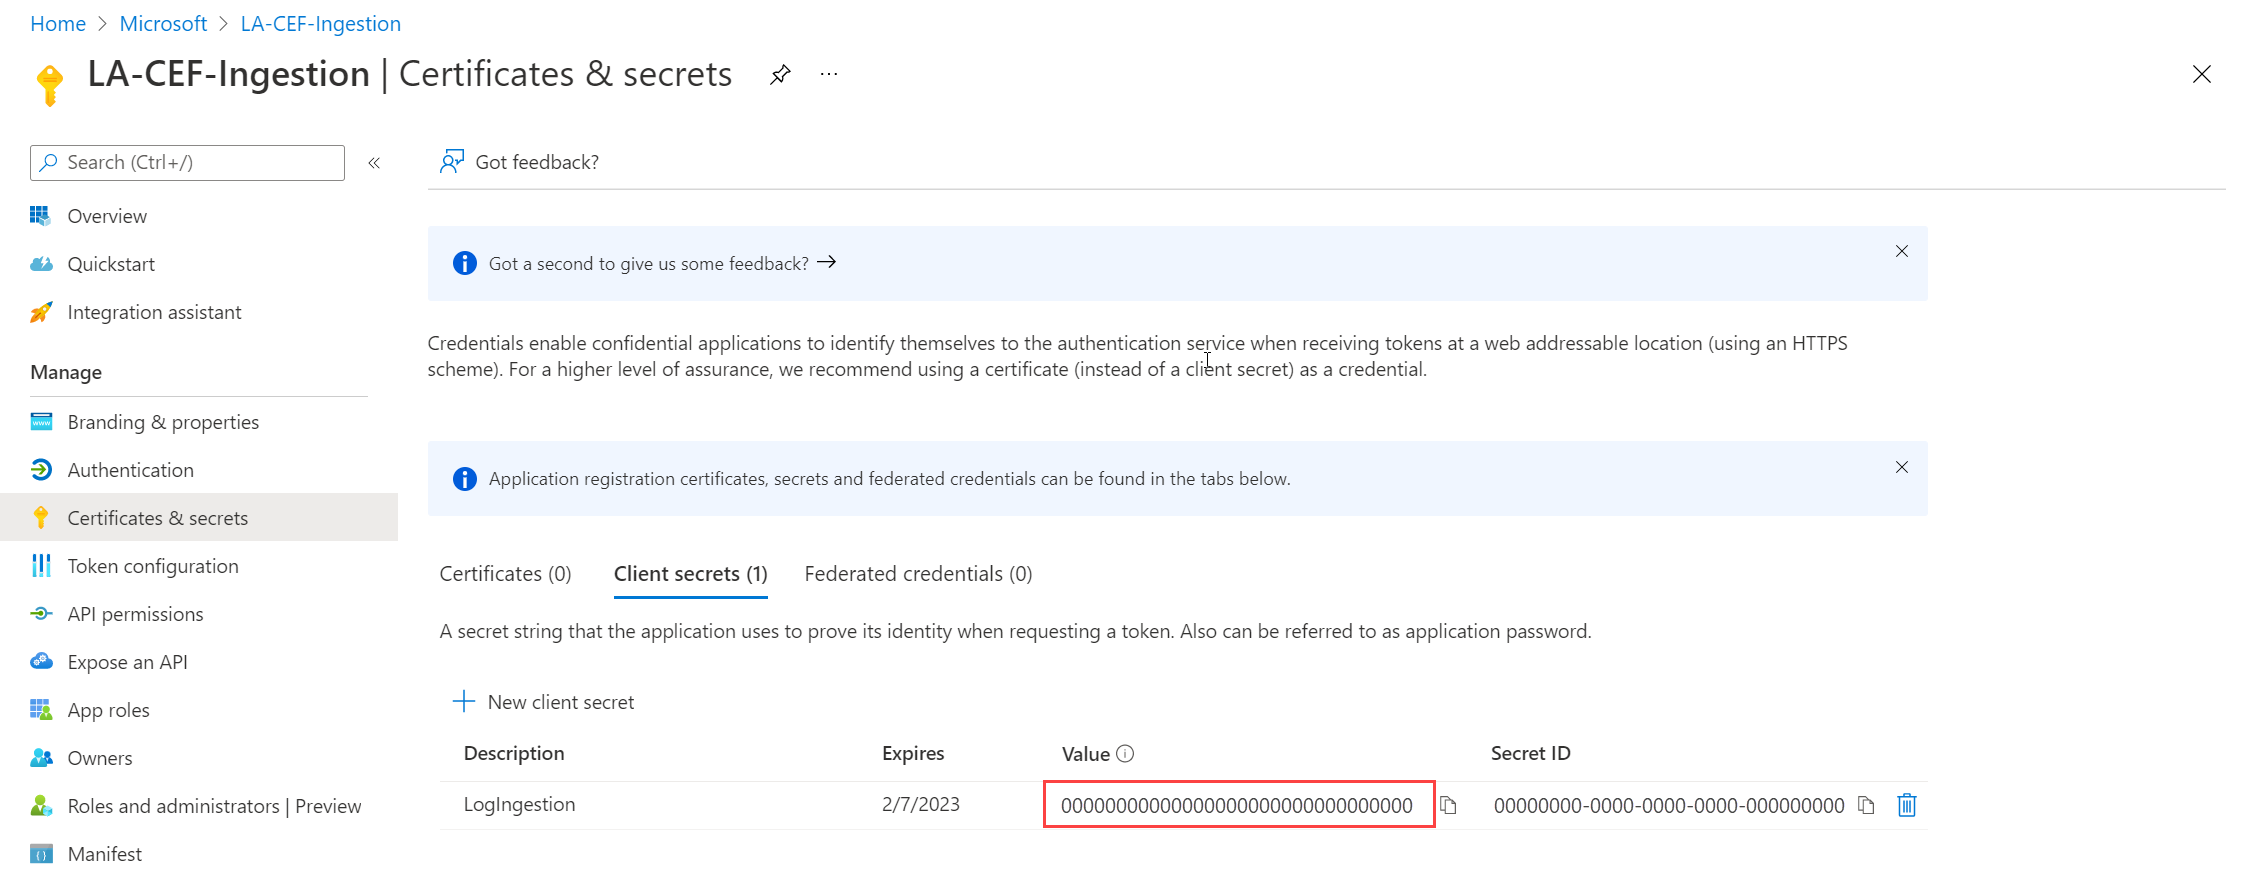
إنشاء سر عميل تطبيق، وهو مشابه لإنشاء كلمة مرور لاستخدامها مع اسم مستخدم. حدد Certificates & secrets>New client secret. امنح السر اسماً لتحديد الغرض منه وحدد مدة انتهاء الصلاحية. الخيار 12 شهرا محدد هنا. لتنفيذ الإنتاج، يمكنك اتباع أفضل الممارسات لإجراء تدوير سري أو استخدام وضع مصادقة أكثر أمانا، مثل الشهادة.
حدد إضافة لحفظ السر ثم لاحظ القيمة. تأكد من تسجيل هذه القيمة لأنه لا يمكنك استردادها بعد مغادرة هذه الصفحة. استخدم نفس إجراءات الأمان كما تفعل لحفظ كلمة المرور لأنها المكافئ الوظيفي.
إنشاء نقطة نهاية تجميع البيانات
DCE غير مطلوب إذا كنت تستخدم نقطة نهاية استيعاب DCR.
أنشئ جدولًا جديدًا في مساحة عمل Log Analytics
يجب إنشاء الجدول المخصص قبل أن تتمكن من إرسال البيانات إليه. سيتضمن جدول هذا البرنامج التعليمي خمسة أعمدة موضحة في المخطط أدناه. الخصائص name وtype وdescription إلزامية لكل عمود. الخصائص isHidden وisDefaultDisplay كلاهما افتراضي لـfalse إذا لم يتم تحديده بشكل صريح. أنواع البيانات المحتملة هي stringوint وlong وreal وboolean وdateTime وguid وdynamic.
إشعار
يستخدم هذا البرنامج التعليمي PowerShell من Azure Cloud Shell لإجراء استدعاءات REST API باستخدام Azure Monitor Tables API. يمكنك استخدام أي أسلوب صالح آخر لإجراء هذه المكالمات.
هام
يجب أن تستخدم الجداول المخصصة لاحقة من _CL.
حدد زر Cloud Shell في مدخل Microsoft Azure وتأكد من تعيين البيئة إلى PowerShell.
انسخ التعليمات البرمجية PowerShell التالية واستبدل المتغيرات في المعلمة Path بالقيم المناسبة لمساحة العمل الخاصة بك في
Invoke-AzRestMethodالأمر . الصقه في موجه Cloud Shell لتشغيله.$tableParams = @' { "properties": { "schema": { "name": "MyTable_CL", "columns": [ { "name": "TimeGenerated", "type": "datetime", "description": "The time at which the data was generated" }, { "name": "Computer", "type": "string", "description": "The computer that generated the data" }, { "name": "AdditionalContext", "type": "dynamic", "description": "Additional message properties" }, { "name": "CounterName", "type": "string", "description": "Name of the counter" }, { "name": "CounterValue", "type": "real", "description": "Value collected for the counter" } ] } } } '@ Invoke-AzRestMethod -Path "/subscriptions/{subscription}/resourcegroups/{resourcegroup}/providers/microsoft.operationalinsights/workspaces/{workspace}/tables/MyTable_CL?api-version=2022-10-01" -Method PUT -payload $tableParams
إنشاء قاعدة جمع البيانات
يحدد DCR كيفية معالجة البيانات بمجرد استلامها. يتضمن هذا:
- مخطط البيانات التي يتم إرسالها إلى نقطة النهاية
- التحويل الذي سيتم تطبيقه على البيانات قبل إرسالها إلى مساحة العمل
- سيتم إرسال مساحة عمل الوجهة وجدول البيانات المحولة إلى
في مربع البحث في مدخل Microsoft Azure، أدخل قالب ثم حدد نشر قالب مخصص.
حدد Build your own template in the editor.
الصق قالب ARM التالي في المحرر ثم حدد حفظ.
لاحظ التفاصيل التالية في DCR المحدد في هذا القالب:
streamDeclarations: تعريفات الأعمدة للبيانات الواردة.destinations: مساحة عمل الوجهة.dataFlows: يطابق الدفق مع مساحة العمل الوجهة ويحدد استعلام التحويل وجدول الوجهة. إخراج الاستعلام الوجهة هو ما سيتم إرساله إلى الجدول الوجهة.
{
    "$schema": "https://schema.management.azure.com/schemas/2019-08-01/deploymentTemplate.json#",
    "contentVersion": "1.0.0.0",
    "parameters": {
        "dataCollectionRuleName": {
            "type": "string",
            "metadata": {
                "description": "Specifies the name of the Data Collection Rule to create."
            }
        },
        "location": {
            "type": "string",
            "metadata": {
                "description": "Specifies the location in which to create the Data Collection Rule."
            }
        },
        "workspaceResourceId": {
            "type": "string",
            "metadata": {
                "description": "Specifies the Azure resource ID of the Log Analytics workspace to use."
            }
        }
    },
    "resources": [
        {
            "type": "Microsoft.Insights/dataCollectionRules",
            "name": "[parameters('dataCollectionRuleName')]",
            "location": "[parameters('location')]",
            "apiVersion": "2023-03-11",
            "kind": "Direct",
            "properties": {
                "streamDeclarations": {
                    "Custom-MyTableRawData": {
                        "columns": [
                            {
                                "name": "Time",
                                "type": "datetime"
                            },
                            {
                                "name": "Computer",
                                "type": "string"
                            },
                            {
                                "name": "AdditionalContext",
                                "type": "string"
                            },
                            {
                                "name": "CounterName",
                                "type": "string"
                            },
                            {
                                "name": "CounterValue",
                                "type": "real"
                            }
                        ]
                    }
                },
                "destinations": {
                    "logAnalytics": [
                        {
                            "workspaceResourceId": "[parameters('workspaceResourceId')]",
                            "name": "myworkspace"
                        }
                    ]
                },
                "dataFlows": [
                    {
                        "streams": [
                            "Custom-MyTableRawData"
                        ],
                        "destinations": [
                            "myworkspace"
                        ],
                        "transformKql": "source | extend jsonContext = parse_json(AdditionalContext) | project TimeGenerated = Time, Computer, AdditionalContext = jsonContext, CounterName=tostring(jsonContext.CounterName), CounterValue=toreal(jsonContext.CounterValue)",
                        "outputStream": "Custom-MyTable_CL"
                    }
                ]
            }
        }
    ],
    "outputs": {
        "dataCollectionRuleId": {
            "type": "string",
            "value": "[resourceId('Microsoft.Insights/dataCollectionRules', parameters('dataCollectionRuleName'))]"
        }
    }
}
في شاشة النشر المخصص، حدد مجموعة الاشتراك والموارد لتخزين DCR. ثم قم بتوفير القيم المعرفة في القالب. تتضمن القيم اسما ل DCR ومعرف مورد مساحة العمل الذي جمعته في خطوة سابقة. يجب أن يكون الموقع هو نفس موقع مساحة العمل. سيتم ملء المنطقة بالفعل وسيتم استخدامها لموقع DCR.
حدد Review + create ثم حدد Create بعد مراجعة التفاصيل.
عند اكتمال النشر، قم بتوسيع مربع Deployment details وحدد DCR لعرض تفاصيله. حدد طريقة عرض JSON.
انسخ معرف غير قابل للتغيير وURI استيعاب السجلات ل DCR. ستستخدم هذه عند إرسال البيانات إلى Azure Monitor باستخدام واجهة برمجة التطبيقات.
تعيين أذونات إلى DCR
بعد إنشاء DCR، يجب منح التطبيق الإذن له. سيسمح الإذن لأي تطبيق يستخدم معرف التطبيق الصحيح ومفتاح التطبيق بإرسال البيانات إلى DCR الجديد.
من DCR في مدخل Microsoft Azure، حدد Access Control (IAM)>Add role assignment.
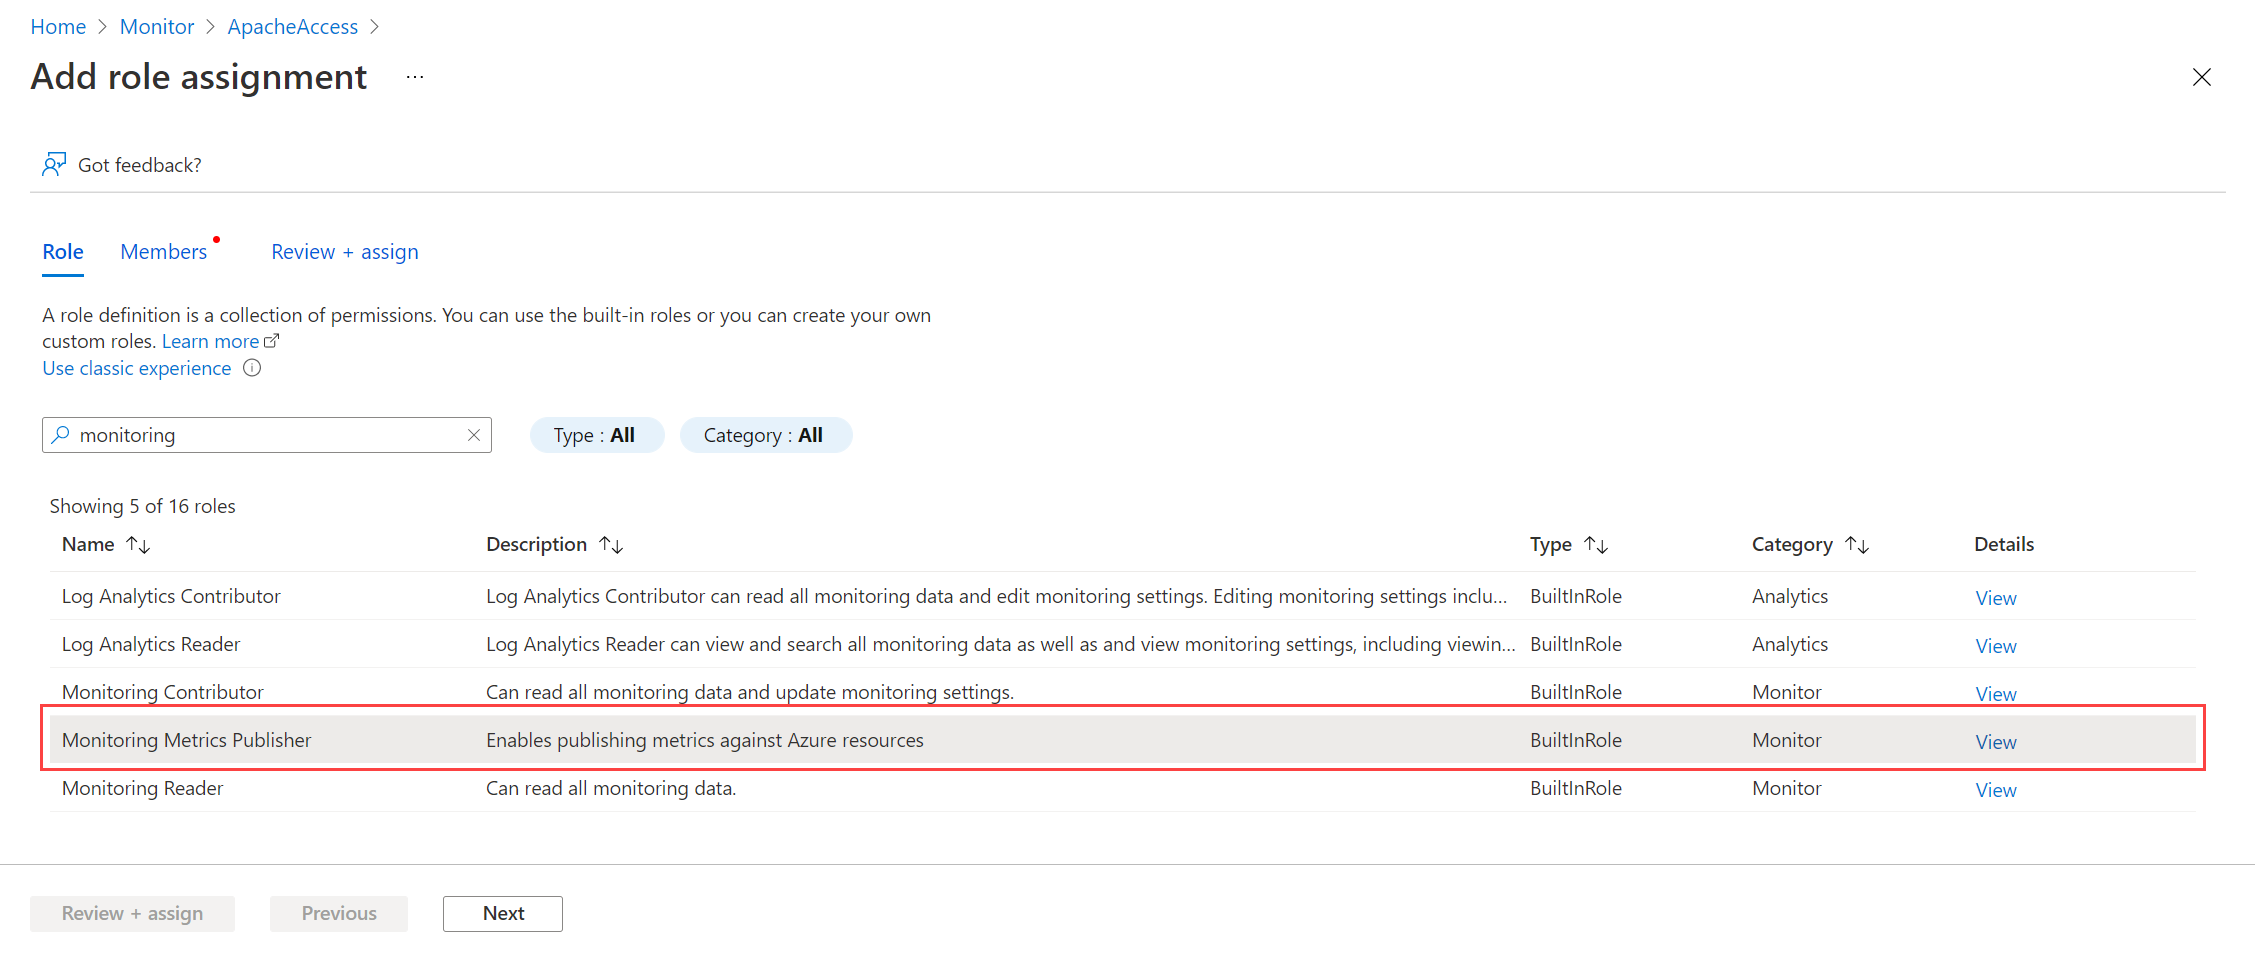
حدد Monitoring Metrics Publisher وحدد Next. يمكنك بدلاً من ذلك إنشاء إجراء مخصص باستخدام
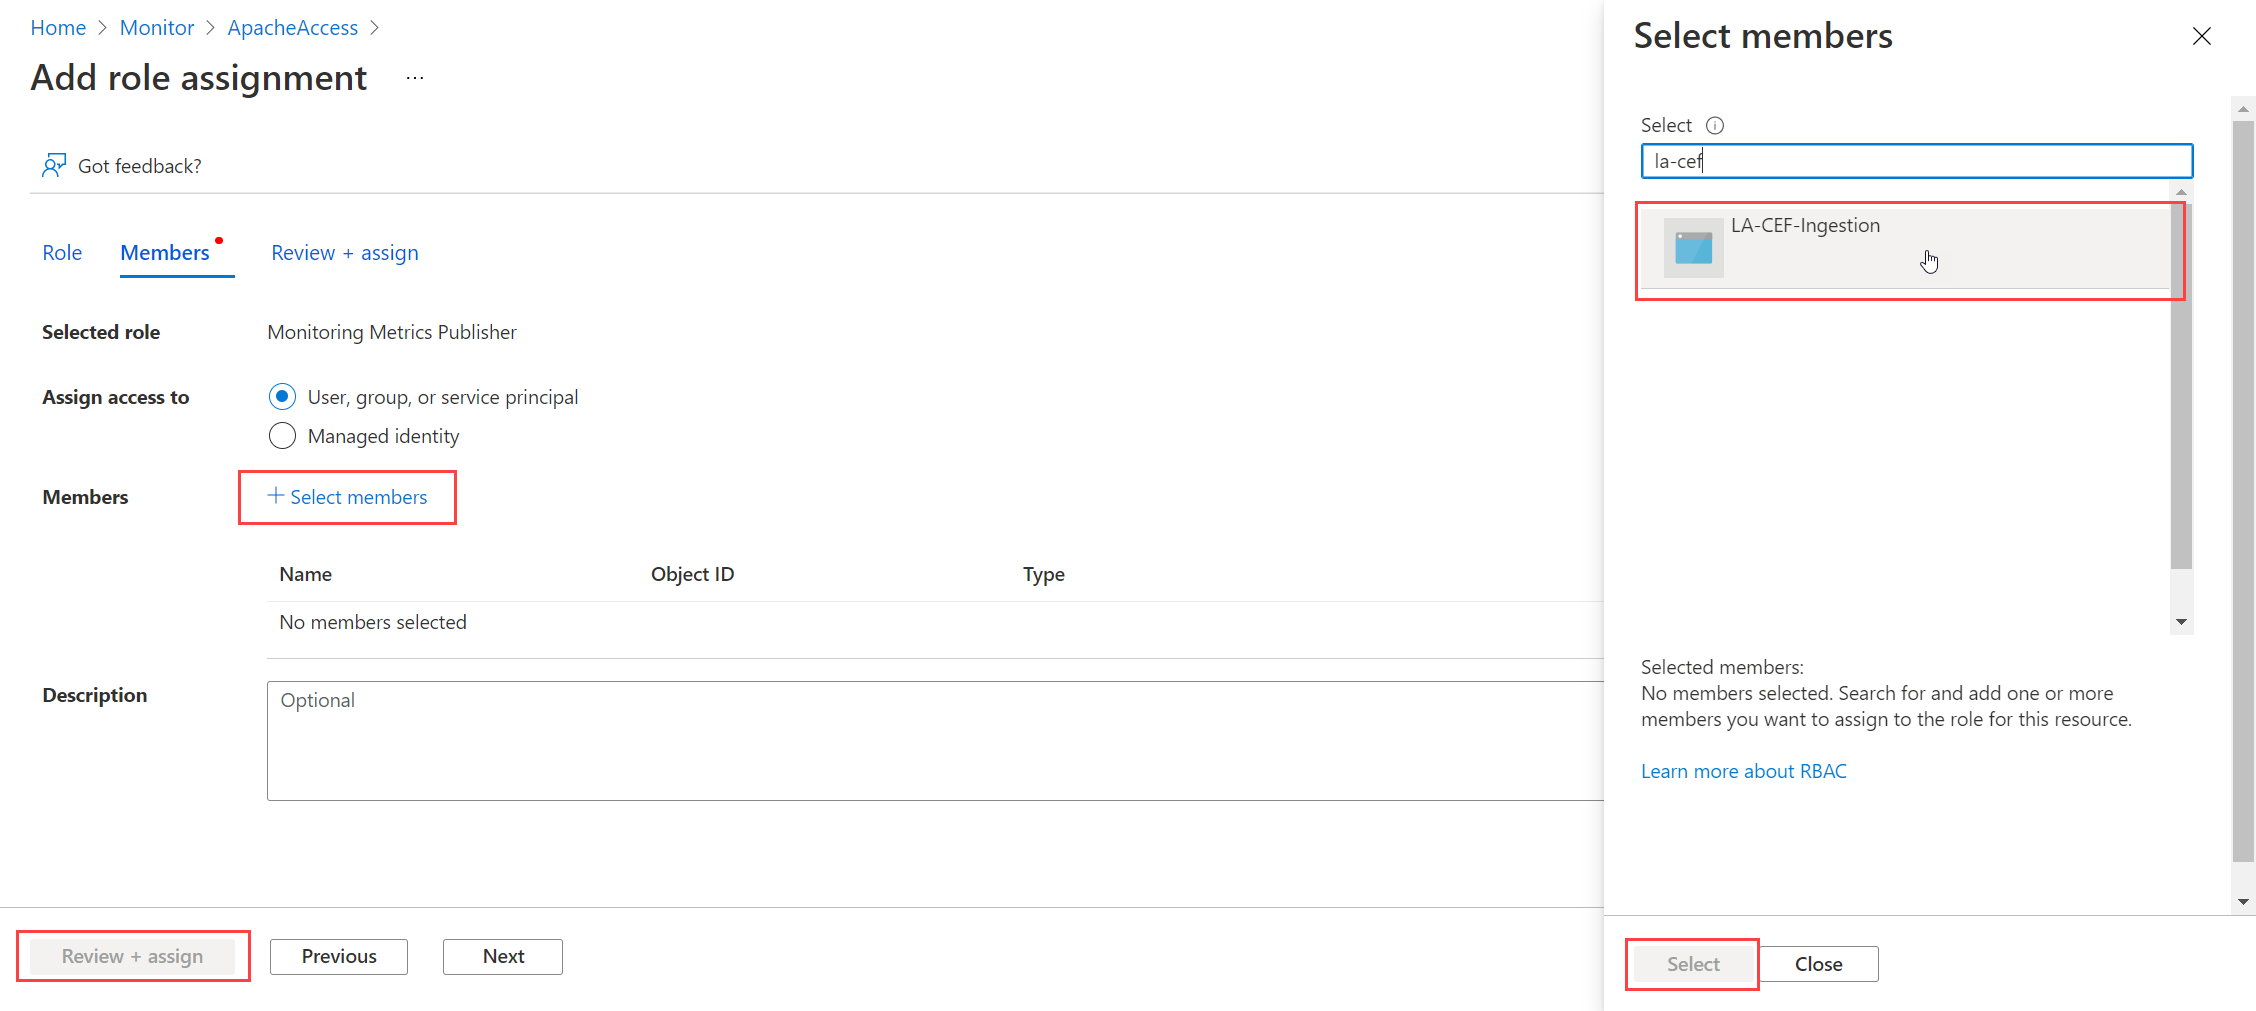
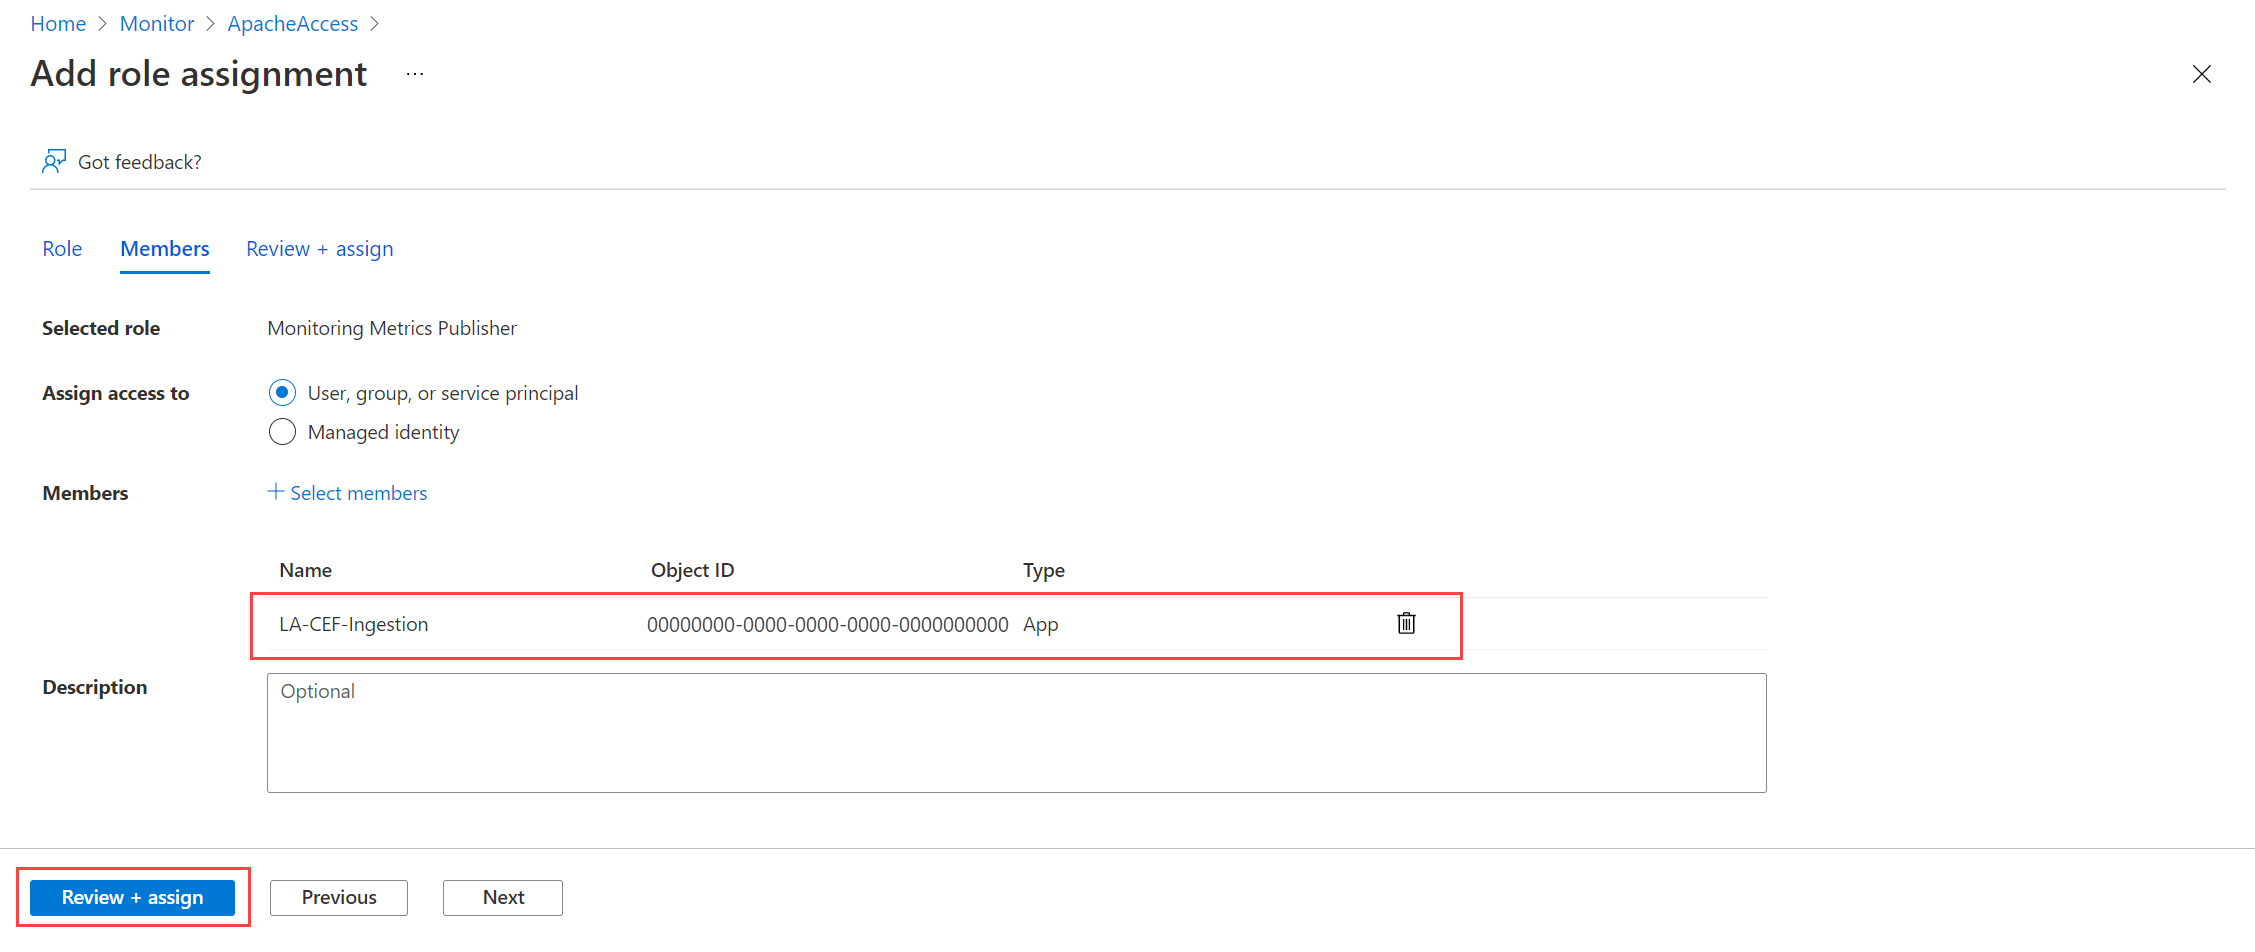
Microsoft.Insights/Telemetry/Writeإجراء البيانات.حدد المستخدم أو المجموعة أو كيان الخدمة لتعيين الوصول إلى واختر تحديد أعضاء. حدد التطبيق الذي أنشأته واختر تحديد.
حدد Review + assign وتحقق من التفاصيل قبل حفظ تعيين الدور.
التعليمة البرمجية العينة
راجع نموذج التعليمات البرمجية لإرسال البيانات إلى Azure Monitor باستخدام واجهة برمجة تطبيقات استيعاب السجلات للحصول على نموذج التعليمات البرمجية باستخدام المكونات التي تم إنشاؤها في هذا البرنامج التعليمي.

