Run desktop flows in picture-in-picture
Power Automate enables you to run attended desktop flows within a virtual window that replicates your desktop, so that you can continue working on your machine while the automation is running in parallel.
This attended run mode is called picture-in-picture and uses the Child Sessions technology.
Here's a quick video tutorial about running desktop flows in picture-in-picture.
Prerequisites
Power Automate for desktop needs to be installed on the machine.
The user must be signed in to use Power Automate.
The user needs a Power Automate Premium plan or access to a pay-as-you-go environment.
The user running flows in picture-in-picture should be part of the following Windows policies:
Computer Configuration\Windows Settings\Security Settings\Local Policies\User Rights Assignment\Allow Log On LocallyComputer Configuration\Windows Settings\Security Settings\Local Policies\User Rights Assignment\Access this computer from the network
A device that runs Windows 10 (Pro or Enterprise), Windows 11 (Pro or Enterprise), Windows Server 2016, Windows Server 2019, or Windows Server 2022.
Enable picture-in-picture on the machine
To enable the picture-in-picture run mode on the machine, follow one of the methods described here.
Important
Administrator rights on the local machine are required for all methods. For Microsoft Store installations, only the manual method is available.
| Method | Description |
|---|---|
| Manually | Run a desktop flow in picture-in-picture mode on the machine. You're asked to enable the feature. |
| MSI installer | Install Power Automate with the MSI installer and select the Enable picture-in-picture mode option during the installation process. |
| Silent installation | Install Power Automate with silent installation. During silent installation, picture-in-picture is enabled by default on the machine. To skip the enablement, add the -SKIPENABLEPIPMODE argument. More information: Command line arguments |
| Command | Update an existing installation and enable or disable the picture-in-picture run mode on the machine with a command. Open the Start menu, search for Command Prompt, right-click it, and then select Run as administrator. Go to the installation directory of Power Automate, by default cd C:\Program Files (x86)\Power Automate Desktop and run the command PAD.ChildSession.Installer.Host.exe to enable picture-in-picture or PAD.ChildSession.Installer.Host.exe -d to disable it. |
Trigger a desktop flow from Power Automate console in picture-in-picture
You can trigger a desktop flow in picture-in-picture mode through the Power Automate console.
Select the target flow, open the More actions menu, and then select Run in picture-in-picture.

Alternatively, enable the Run in picture-in-picture flow property so that the flow always runs in picture-in-picture mode when triggered locally.


When you authenticate on the picture-in-picture session, the flow starts running within the picture-in-picture window.

Enable options View only to block user input, and Always on top to always keep the window on the foreground.
Tip
When running multiple flows in picture-in-picture mode one after the other, it's recommended to keep the picture-in-picture window open. This ensures faster flow execution, as user authentication and session loading will only happen once.
Trigger a desktop flow from a cloud flow in picture-in-picture
You can trigger a desktop flow in picture-in-picture mode from a cloud flow.
Triggering desktop flows from cloud flows enables you to run desktop flows in attended or unattended mode.
Important
- Running flows in picture-in-picture is available only for attended runs.
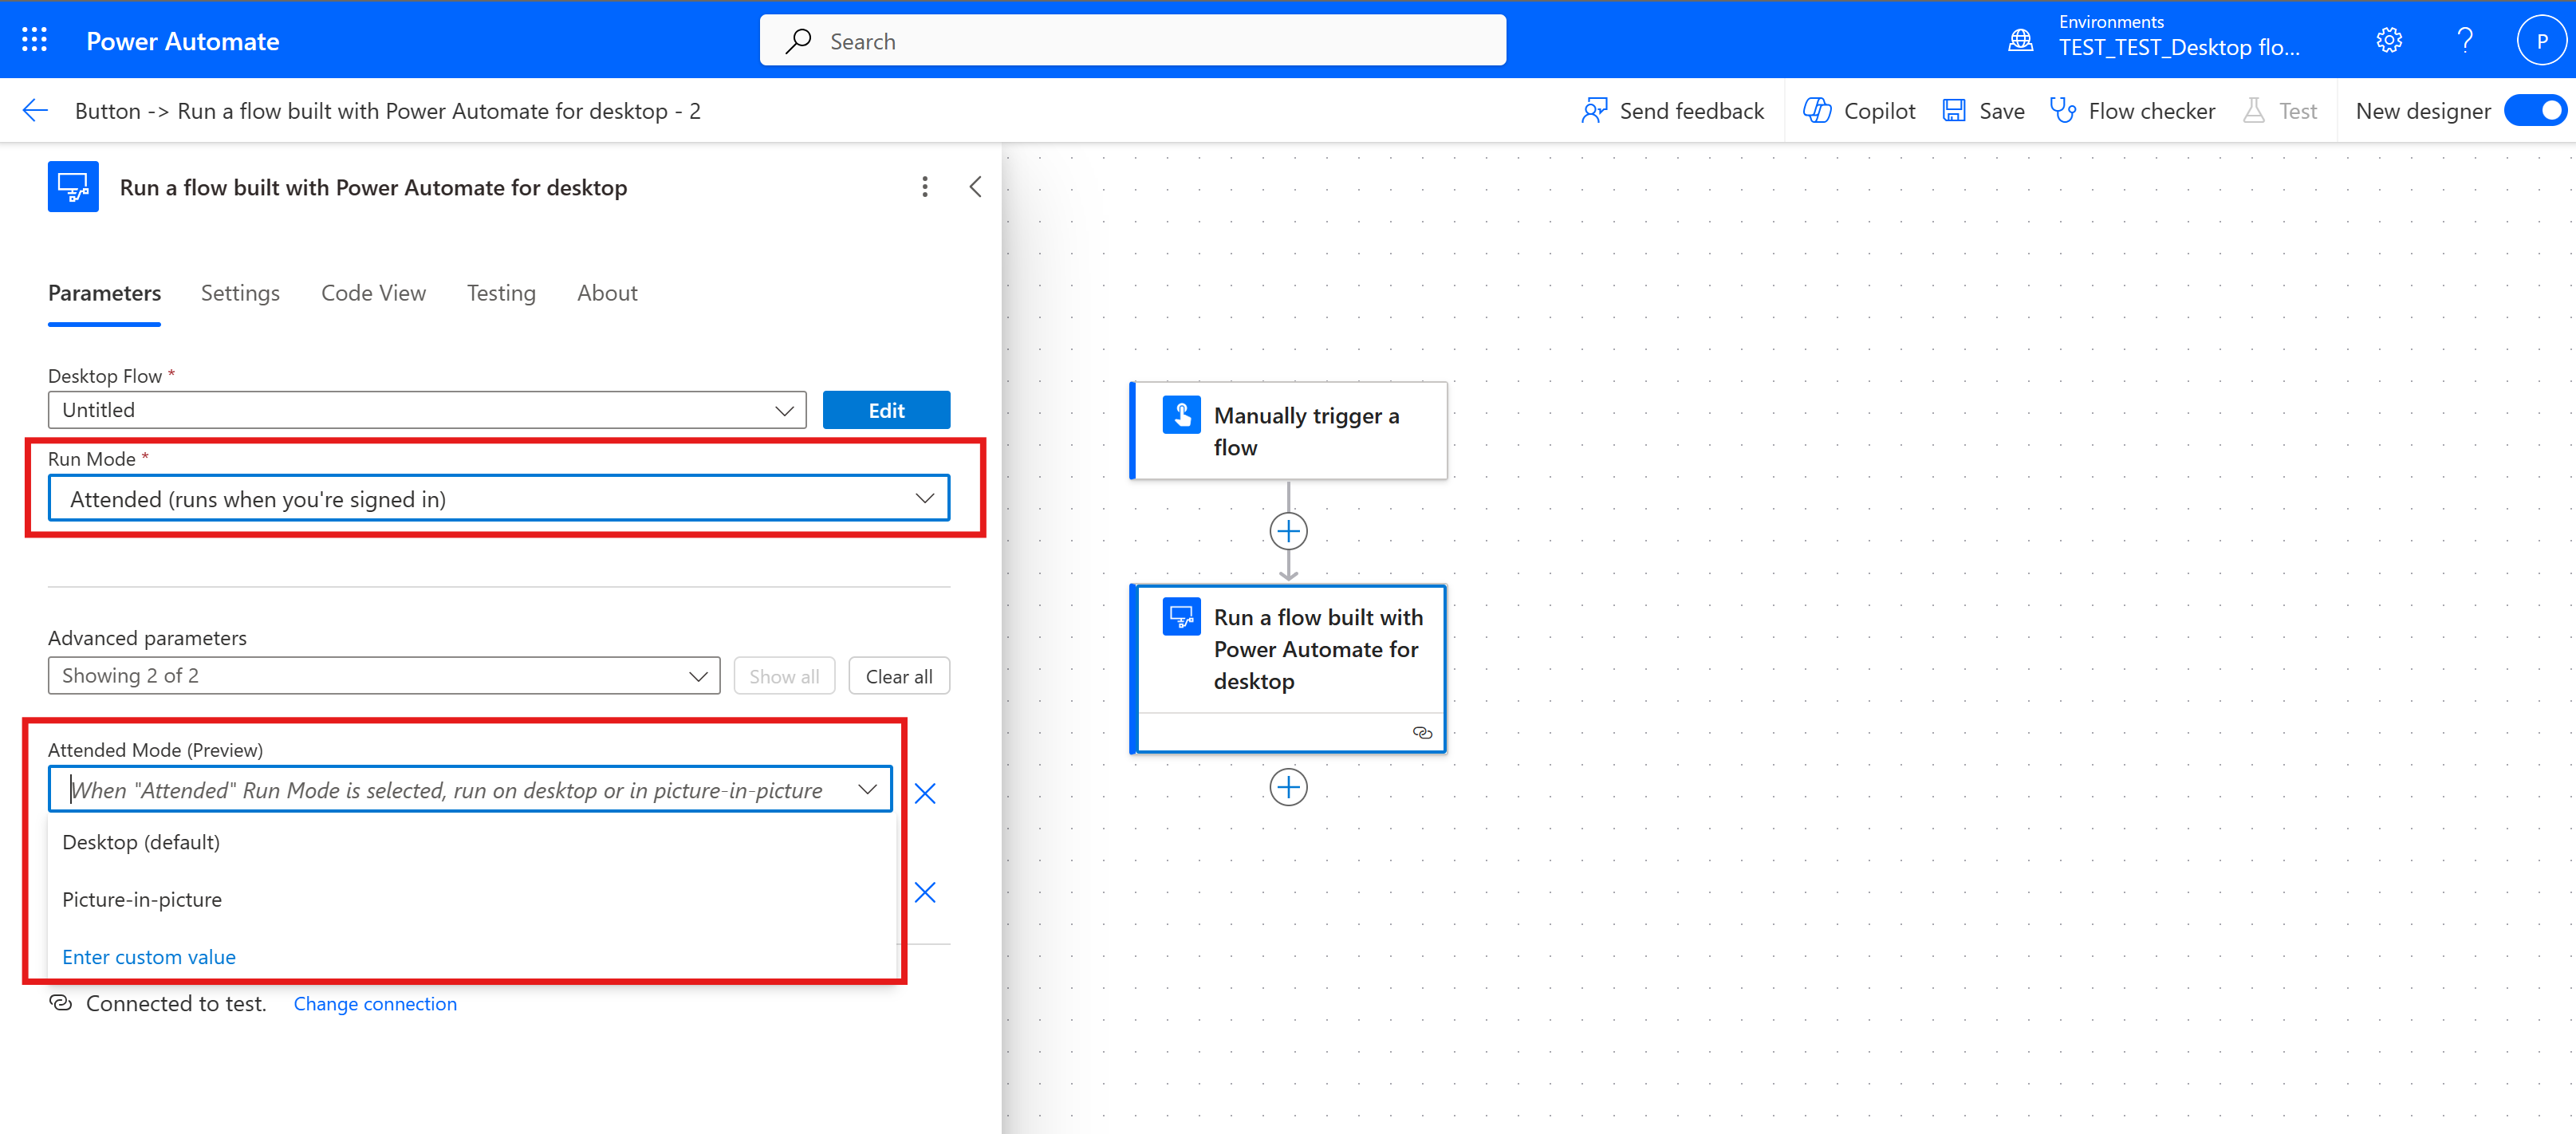
To trigger a desktop flow in Picture-in-Picture, open the action configuration pane of the Run a flow built with Power Automate for desktop cloud action. Set the Run Mode field to Attended, and in the Advanced parameters section, set the Attended Mode field to Picture-in-picture.

When you trigger the desktop flow, the Picture-in-picture window appears, prompting you for authentication. Once authenticated, the flow starts running, similar to when you trigger a desktop flow from Power Automate console in picture-in-picture.
Debug a desktop flow in picture-in-picture
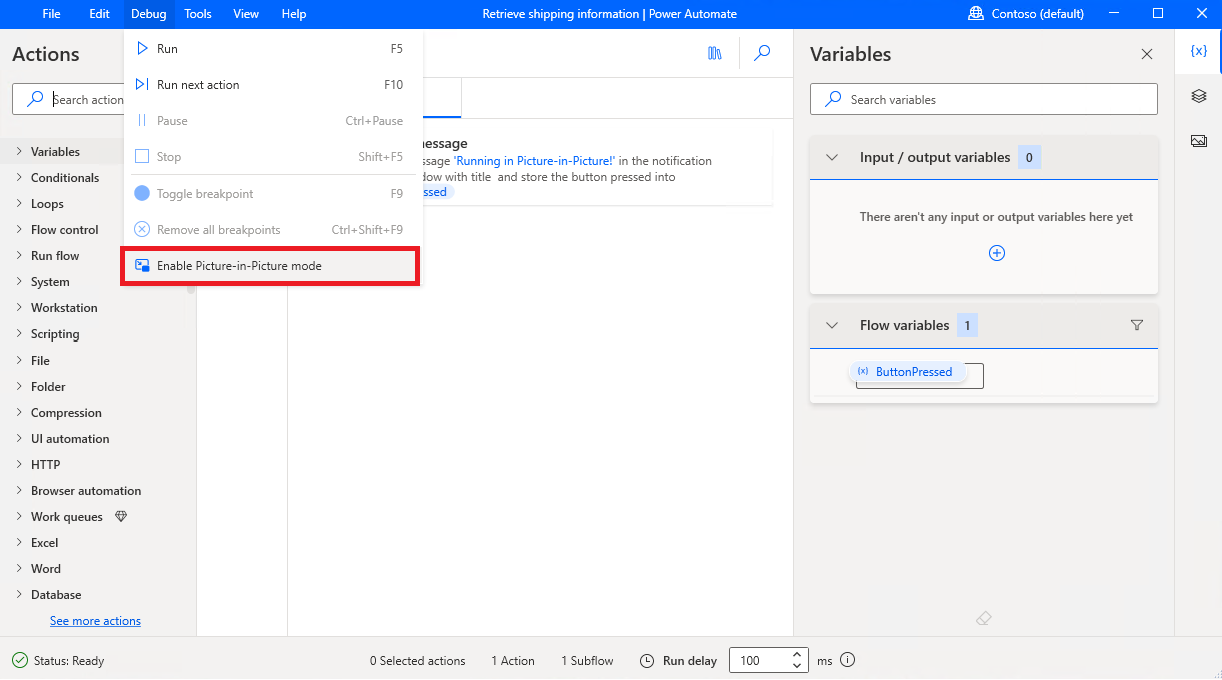
You can debug a desktop flow in a picture-in-picture session directly through the Power Automate flow designer.
To enable the picture-in-picture run mode in the designer, select Debug > Enable picture-in-picture mode.

Limitations of Browser automation in picture-in-picture
Two instances of a web browser (Chrome, Firefox, or Microsoft Edge) can't open concurrently with the same user data folder in both main and picture-in-picture sessions.
If a web browser is already open on the desktop with a user data folder, then it opens in picture-in-picture with another user data folder, and vice versa.
This limitation is handled automatically with the User data folder parameter in the launch browser actions in the Power Automate designer. For more information, see Launch new Microsoft Edge.
The User data folder parameter has the following options:
- Picture-in-picture default (default option)
- Browser default
- Custom
When set to Picture-in-picture default, Power Automate creates a new user data folder for the browser to use when the flow runs in picture-in-picture mode.
Important
- For browser automation to work successfully, use a launch browser action to open your web browser within the picture-in-picture window and enable the Power Automate browser extension on the Picture-in-picture user data folder.
- Use the troubleshooter in Power Automate for desktop to diagnose issues related to picture-in-picture.
If set to Browser default, the browser within the picture-in-picture session uses the default user data folder, which is the same as the one used when the flow runs in the main session.
Important
- When User data folder is set to Browser default, the web browser can only open in one session at a time.
When set to Custom, you can enter a custom user data folder to be used by the browser in picture-in-picture flow runs.
Known issues and limitations
- If you're using a PIN to sign in to Windows, PIN authentication only works the first time the picture-in-picture session is opened. After that, it can only be authenticated with username and password.
- Applications that start on Windows startup are automatically opened within the picture-in-picture session as well. This might cause a conflict between the two sessions, as two instances of an application are running concurrently. To avoid this issue, don't set the applications to start automatically on Windows startup. To resolve this issue, it might be required to sign out and sign in again or restart the machine.
- Windows Home editions aren't supported.
- The machine can't be restarted or shut down while the picture-in-picture session is open.
- The clipboard is shared between the picture-in-picture session and the main session.
- With Windows Server, if multiple users are connected concurrently to the server, only one picture-in-picture session can be opened at a time.
- The default timeout to start a process in a picture-in-picture is 120 seconds. If the sign in takes longer than that, a timeout error is thrown.
- Picture-in-picture asks for credentials every time it starts in case the following Windows policy is set to Disabled:
Local Group Policy\Computer Configuration\Administrative Templates\System\Credential Delegation\Allow delegating default credentials
- If smartcard is used to sign in to Windows, the following policy should be set to Not Configured or Disabled:
Computer Configuration\Administrative Templates\Windows Components\Remote Desktop Services\Remote Desktop Session Host\Device and Resource Redirection\Do not allow smart card device redirection