إضافة إعلامات مؤقتة إلى تطبيق Xamarin.Android
نظرة عامة
في هذا البرنامج التعليمي، يمكنك إضافة إعلامات الدفع إلى مشروع التشغيل السريع Xamarin.Android بحيث يتم إرسال إعلام دفع إلى الجهاز في كل مرة يتم فيها إدراج سجل.
إذا لم تستخدم مشروع خادم التشغيل السريع الذي تم تنزيله، فستحتاج إلى حزمة ملحق الإعلامات المؤقتة. لمزيد من المعلومات، راجع دليل Work with the .NET backend server SDK for Azure Mobile Apps .
المتطلبات الأساسية
يتطلب هذا البرنامج التعليمي الإعداد:
- حساب Google نشط. يمكنك التسجيل للحصول على حساب Google في accounts.google.com.
- مكون عميل المراسلة السحابية من Google.
تكوين مركز الإعلامات
تستخدم ميزة تطبيقات الأجهزة المحمولة في Azure App Service Azure Notification Hubs لإرسال الدفعات، لذلك ستقوم بتكوين مركز إعلام لتطبيق الأجهزة المحمولة.
في مدخل Microsoft Azure، انتقل إلى App Services، ثم حدد النهاية الخلفية للتطبيق. ضمن Settings، حدد Push.
لإضافة مورد مركز إعلام إلى التطبيق، حدد اتصال. يمكنك إما إنشاء مركز أو الاتصال بمركز موجود.
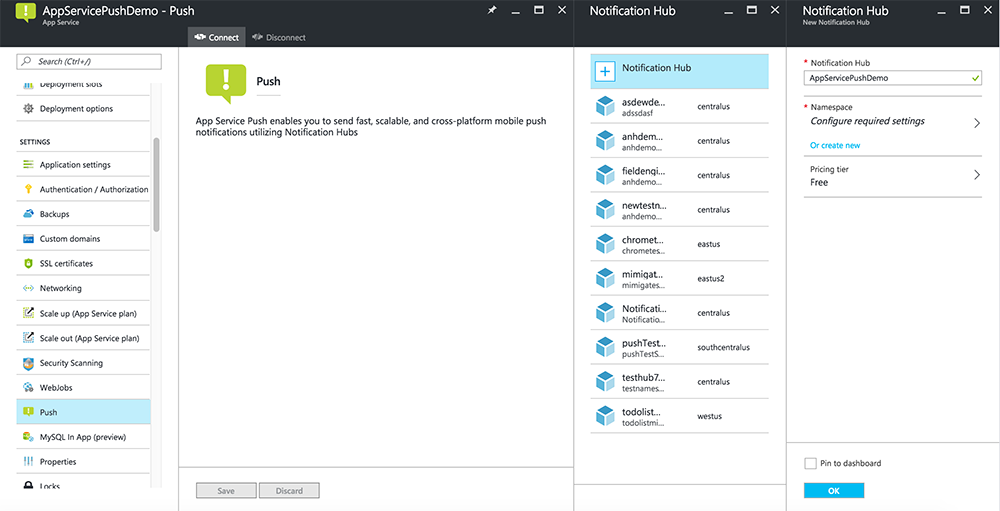
لقد قمت الآن بتوصيل مركز إعلام بمشروع الخلفية لتطبيقات الأجهزة المحمولة. يمكنك لاحقا تكوين مركز الإعلامات هذا للاتصال بنظام إعلام النظام الأساسي (PNS) للدفع إلى الأجهزة.
تمكين Firebase Cloud Messaging
تسجيل الدخول إلىوحدة تحكم Firebase. إنشاء مشروع Firebase جديد إذا لم يكن لديك بالفعل واحد.
بعد إنشاء المشروع حدد إضافة Firebase إلى تطبيق Android.
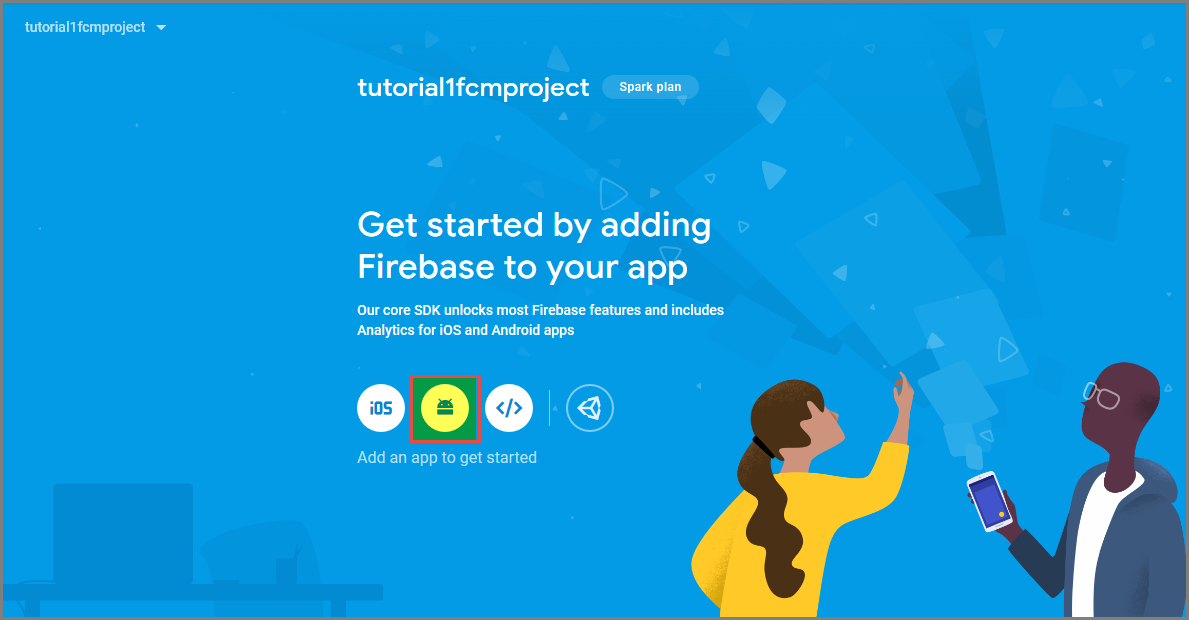
في صفحة إضافة مشروع Firebase إلى تطبيق Android، اتخذ الخطوات التالية:
للحصول على اسم حزمة الروبوت، نسخ قيمة التطبيق الخاص بك في ملف build.gradle التطبيق الخاص بك. في هذا المثال، هو
com.fabrikam.fcmtutorial1app.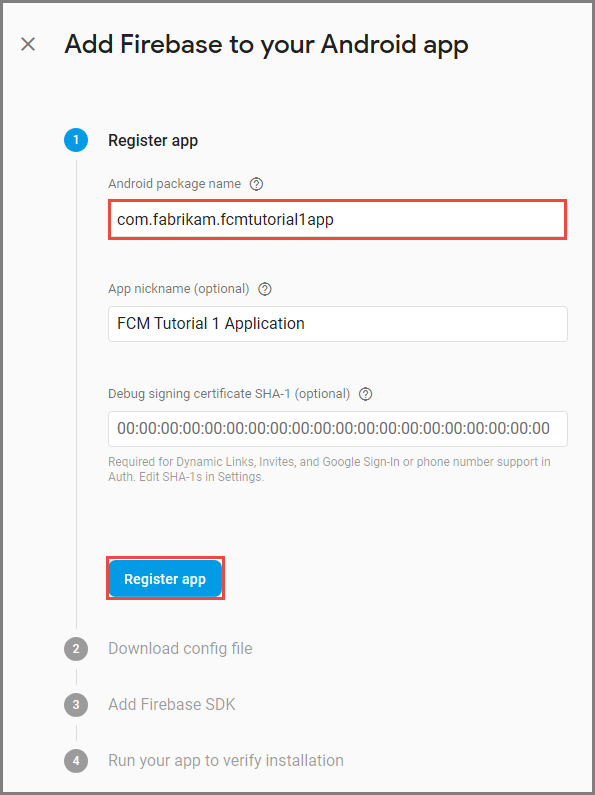
حدد Register app.
حدد تنزيل google-services.json، ثم احفظ الملف في مجلد التطبيق الخاص بالمشروع، ثم حدد التالي.
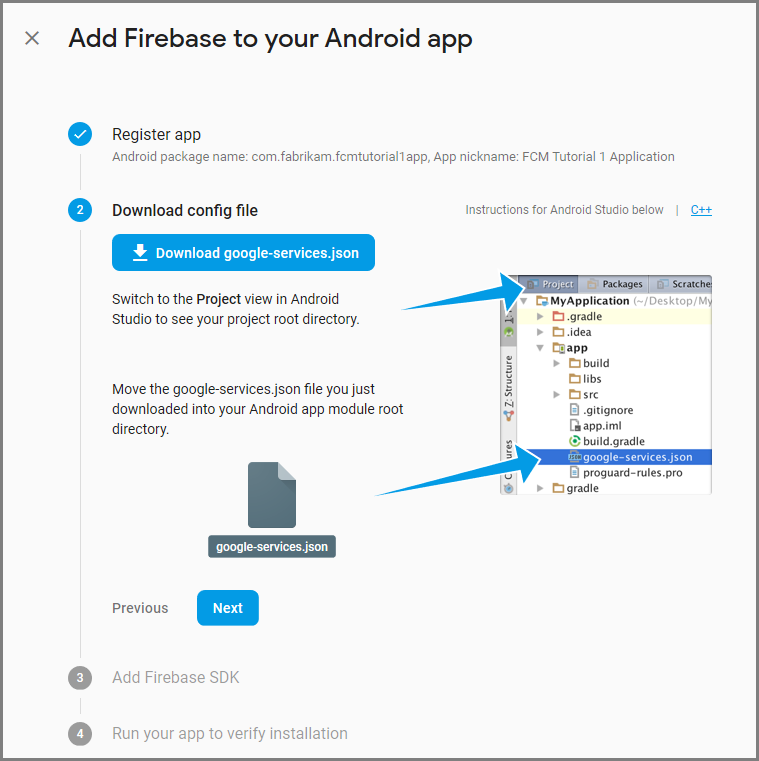
قم بإجراء تغييرات التكوين التالية على مشروعك في Android Studio.
في ملف build.gradle مستوى المشروع < (مشروع > /build.gradle)، إضافة العبارة التالية إلى قسم التبعيات.
classpath 'com.google.gms:google-services:4.0.1'في ملف build.gradle على مستوى التطبيق (<مشروع> /< app-module> /build.gradle)، أضف العبارات التالية إلى قسم التبعيات.
implementation 'com.google.firebase:firebase-core:16.0.8'
implementation 'com.google.firebase:firebase-messaging:17.3.4'
إضافة السطر التالي إلى نهاية الملف build.gradle مستوى التطبيق بعد قسم التبعيات.
apply plugin: 'com.google.gms.google-services'حدد أيقونة المزامنة الآن في شريط الأدوات.
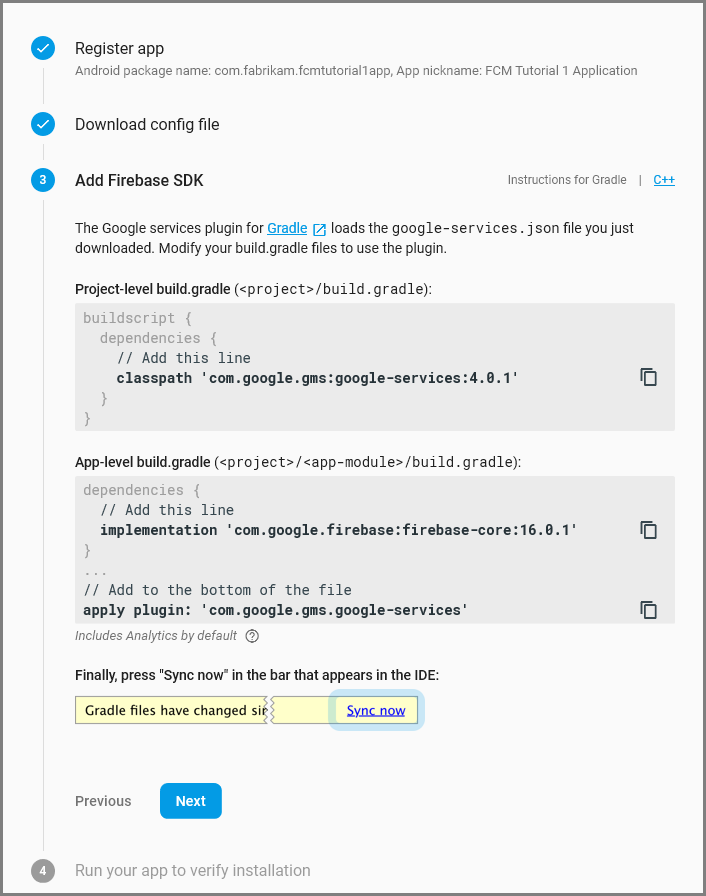
حدد "Next".
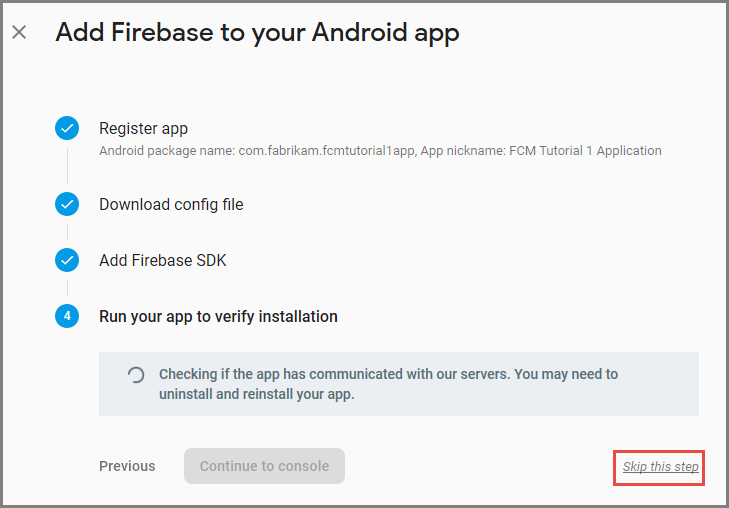
حدد تخطي هذه الخطوة.
في وحدة تحكم Firebase حدد ترس للمشروع الخاص بك. ثم حدد إعدادات المشروع.

إذا لم تكن قد قمت بتنزيل الملف google-services.json إلى مجلد التطبيق لمشروع Android Studio، يمكنك القيام بذلك على هذه الصفحة.
انتقل إلى علامة التبويب Cloud Messaging في الأعلى.
انسخكلمة مرور الخادم واحفظه للاستخدام لاحقًا. يمكنك استخدام هذه القيمة لتكوين لوحة الوصل الخاصة بك.
تكوين Azure لإرسال طلبات الدفع
في مدخل Microsoft Azure، انقر فوق استعراض جميع>خدمات التطبيقات، ثم انقر فوق النهاية الخلفية لتطبيقات الأجهزة المحمولة. ضمن الإعدادات، انقر فوق دفع خدمة التطبيقات، ثم انقر فوق اسم مركز الإعلامات.
انتقل إلى Google (GCM)، وأدخل قيمة مفتاح الخادم التي حصلت عليها من Firebase في الإجراء السابق، ثم انقر فوق حفظ.

تم الآن تكوين الواجهة الخلفية لتطبيقات الأجهزة المحمولة لاستخدام Firebase Cloud Messaging. يمكنك هذا من إرسال إعلامات مؤقتة إلى تطبيقك الذي يعمل على جهاز Android، باستخدام مركز الإعلامات.
تحديث مشروع الخادم لإرسال إعلامات مؤقتة
في هذا القسم، يمكنك تحديث التعليمات البرمجية في مشروع الواجهة الخلفية ل Mobile Apps الحالي لإرسال إعلام دفع في كل مرة تتم فيها إضافة عنصر جديد. يتم تشغيل هذه العملية بواسطة ميزة القالب لمراكز إعلامات Azure، والتي تمكن الدفعات عبر الأنظمة الأساسية. يتم تسجيل العملاء المتنوعين للإشعارات المؤقتة باستخدام القوالب، ويمكن أن تصل دفعة عالمية واحدة إلى جميع الأنظمة الأساسية للعميل.
اختر أحد الإجراءات التالية التي تطابق نوع المشروع الخلفي — إما النهاية الخلفية ل .NET أو Node.js الخلفية.
مشروع .NET الخلفي
في Visual Studio، انقر بزر الماوس الأيمن فوق مشروع الخادم. ثم حدد إدارة حزم NuGet. ابحث
Microsoft.Azure.NotificationHubsعن ، ثم حدد تثبيت. تثبت هذه العملية مكتبة مراكز الإعلامات لإرسال الإعلامات من النهاية الخلفية.في مشروع الخادم، افتح Controllers>TodoItemController.cs. ثم أضف عبارات الاستخدام التالية:
using System.Collections.Generic;
using Microsoft.Azure.NotificationHubs;
using Microsoft.Azure.Mobile.Server.Config;
في أسلوب PostTodoItem ، أضف التعليمات البرمجية التالية بعد استدعاء InsertAsync:
// Get the settings for the server project.
HttpConfiguration config = this.Configuration;
MobileAppSettingsDictionary settings =
    this.Configuration.GetMobileAppSettingsProvider().GetMobileAppSettings();

// Get the Notification Hubs credentials for the mobile app.
string notificationHubName = settings.NotificationHubName;
string notificationHubConnection = settings
    .Connections[MobileAppSettingsKeys.NotificationHubConnectionString].ConnectionString;

// Create a new Notification Hub client.
NotificationHubClient hub = NotificationHubClient
.CreateClientFromConnectionString(notificationHubConnection, notificationHubName);

// Send the message so that all template registrations that contain "messageParam"
// receive the notifications. This includes APNS, GCM, WNS, and MPNS template registrations.
Dictionary<string,string> templateParams = new Dictionary<string,string>();
templateParams["messageParam"] = item.Text + " was added to the list.";

try
{
    // Send the push notification and log the results.
    var result = await hub.SendTemplateNotificationAsync(templateParams);

    // Write the success result to the logs.
    config.Services.GetTraceWriter().Info(result.State.ToString());
}
catch (System.Exception ex)
{
    // Write the failure result to the logs.
    config.Services.GetTraceWriter()
        .Error(ex.Message, null, "Push.SendAsync Error");
}
ترسل هذه العملية إعلام قالب يحتوي على العنصر. نص عند إدراج عنصر جديد.
إعادة نشر مشروع الخادم.
Node.js مشروع خلفي
إعداد مشروع الواجهة الخلفية.
استبدل التعليمات البرمجية الموجودة في todoitem.js بالتعليمات البرمجية التالية:
var azureMobileApps = require('azure-mobile-apps'),
promises = require('azure-mobile-apps/src/utilities/promises'),
logger = require('azure-mobile-apps/src/logger');

var table = azureMobileApps.table();

table.insert(function (context) {
// For more information about the Notification Hubs JavaScript SDK,
// see https://aka.ms/nodejshubs.
logger.info('Running TodoItem.insert');

// Define the template payload.
var payload = '{"messageParam": "' + context.item.text + '" }';

// Execute the insert. The insert returns the results as a promise.
// Do the push as a post-execute action within the promise flow.
return context.execute()
    .then(function (results) {
        // Only do the push if configured.
        if (context.push) {
            // Send a template notification.
            context.push.send(null, payload, function (error) {
                if (error) {
                    logger.error('Error while sending push notification: ', error);
                } else {
                    logger.info('Push notification sent successfully!');
                }
            });
        }
        // Don't forget to return the results from the context.execute().
        return results;
    })
    .catch(function (error) {
        logger.error('Error while running context.execute: ', error);
    });
});

module.exports = table;
ترسل هذه العملية إعلام قالب يحتوي على item.text عند إدراج عنصر جديد.
عند تحرير الملف على الكمبيوتر المحلي، أعد نشر مشروع الخادم.
تكوين مشروع العميل للإعلامات المنبثقة
في طريقة عرض الحل (أو مستكشف الحلول في Visual Studio)، انقر بزر الماوس الأيمن فوق مجلد المكونات، وانقر فوق الحصول على المزيد من المكونات...، وابحث عن مكون عميل المراسلة السحابية من Google وأضفه إلى المشروع.
افتح ملف مشروع ToDoActivity.cs وأضف ما يلي باستخدام العبارة إلى الفئة:
using Gcm.Client;في فئة ToDoActivity ، أضف التعليمات البرمجية الجديدة التالية:
// Create a new instance field for this activity.
static ToDoActivity instance = new ToDoActivity();

// Return the current activity instance.
public static ToDoActivity CurrentActivity
{
    get
    {
        return instance;
    }
}
// Return the Mobile Services client.
public MobileServiceClient CurrentClient
{
    get
    {
        return client;
    }
}
يمكنك هذا من الوصول إلى مثيل عميل الهاتف المحمول من عملية خدمة معالج الدفع.
أضف التعليمات البرمجية التالية إلى أسلوب OnCreate ، بعد إنشاء MobileServiceClient :
// Set the current instance of TodoActivity.
instance = this;

// Make sure the GCM client is set up correctly.
GcmClient.CheckDevice(this);
GcmClient.CheckManifest(this);

// Register the app for push notifications.
GcmClient.Register(this, ToDoBroadcastReceiver.senderIDs);
تم الآن إعداد ToDoActivity لإضافة إعلامات مؤقتة.
إضافة رمز الإعلامات المؤقت إلى تطبيقك
إنشاء فئة جديدة في المشروع يسمى
ToDoBroadcastReceiver.أضف عبارات الاستخدام التالية إلى فئة ToDoBroadcastReceiver :
using Gcm.Client;
using Microsoft.WindowsAzure.MobileServices;
using Newtonsoft.Json.Linq;
أضف طلبات الأذونات التالية بين عبارات الاستخدام وإعلان مساحة الاسم :
[assembly: Permission(Name = "@PACKAGE_NAME@.permission.C2D_MESSAGE")]
[assembly: UsesPermission(Name = "@PACKAGE_NAME@.permission.C2D_MESSAGE")]
[assembly: UsesPermission(Name = "com.google.android.c2dm.permission.RECEIVE")]
//GET_ACCOUNTS is only needed for android versions 4.0.3 and below
[assembly: UsesPermission(Name = "android.permission.GET_ACCOUNTS")]
[assembly: UsesPermission(Name = "android.permission.INTERNET")]
[assembly: UsesPermission(Name = "android.permission.WAKE_LOCK")]
استبدل تعريف الفئة ToDoBroadcastReceiver الحالي بما يلي:
[BroadcastReceiver(Permission = Gcm.Client.Constants.PERMISSION_GCM_INTENTS)]
[IntentFilter(new string[] { Gcm.Client.Constants.INTENT_FROM_GCM_MESSAGE },
    Categories = new string[] { "@PACKAGE_NAME@" })]
[IntentFilter(new string[] { Gcm.Client.Constants.INTENT_FROM_GCM_REGISTRATION_CALLBACK },
    Categories = new string[] { "@PACKAGE_NAME@" })]
[IntentFilter(new string[] { Gcm.Client.Constants.INTENT_FROM_GCM_LIBRARY_RETRY },
Categories = new string[] { "@PACKAGE_NAME@" })]
public class ToDoBroadcastReceiver : GcmBroadcastReceiverBase<PushHandlerService>
{
    // Set the Google app ID.
    public static string[] senderIDs = new string[] { "<PROJECT_NUMBER>" };
}
في التعليمات البرمجية أعلاه، يجب استبدال
<PROJECT_NUMBER>برقم المشروع المعين من قبل Google عند توفير تطبيقك في مدخل مطور Google.في ملف مشروع ToDoBroadcastReceiver.cs، أضف التعليمات البرمجية التالية التي تحدد فئة PushHandlerService :
// The ServiceAttribute must be applied to the class.
[Service]
public class PushHandlerService : GcmServiceBase
{
    public static string RegistrationID { get; private set; }
    public PushHandlerService() : base(ToDoBroadcastReceiver.senderIDs) { }
}
لاحظ أن هذه الفئة مشتقة من GcmServiceBase وأنه يجب تطبيق سمة الخدمة على هذه الفئة.
ملاحظة
تطبق فئة GcmServiceBase أساليب OnRegistered()و OnUnRegistered()و OnMessage() و OnError(). يجب تجاوز هذه الأساليب في فئة PushHandlerService .
أضف التعليمات البرمجية التالية إلى فئة PushHandlerService التي تتجاوز معالج الأحداث OnRegistered .
protected override void OnRegistered(Context context, string registrationId)
{
    System.Diagnostics.Debug.WriteLine("The device has been registered with GCM.", "Success!");

    // Get the MobileServiceClient from the current activity instance.
    MobileServiceClient client = ToDoActivity.CurrentActivity.CurrentClient;
    var push = client.GetPush();

    // Define a message body for GCM.
    const string templateBodyGCM = "{\"data\":{\"message\":\"$(messageParam)\"}}";

    // Define the template registration as JSON.
    JObject templates = new JObject();
    templates["genericMessage"] = new JObject
    {
        {"body", templateBodyGCM }
    };

    try
    {
        // Make sure we run the registration on the same thread as the activity,
        // to avoid threading errors.
        ToDoActivity.CurrentActivity.RunOnUiThread(

            // Register the template with Notification Hubs.
            async () => await push.RegisterAsync(registrationId, templates));

        System.Diagnostics.Debug.WriteLine(
            string.Format("Push Installation Id", push.InstallationId.ToString()));
    }
    catch (Exception ex)
    {
        System.Diagnostics.Debug.WriteLine(
            string.Format("Error with Azure push registration: {0}", ex.Message));
    }
}
يستخدم هذا الأسلوب معرف تسجيل GCM الذي تم إرجاعه للتسجيل مع Azure للإشعارات المنبثقة. يمكن إضافة العلامات إلى التسجيل فقط بعد إنشائها. لمزيد من المعلومات، راجع كيفية: إضافة علامات إلى تثبيت جهاز لتمكين الدفع إلى العلامات.
تجاوز أسلوب OnMessage في PushHandlerService بالتعليمات البرمجية التالية:
protected override void OnMessage(Context context, Intent intent)
{
    string message = string.Empty;

    // Extract the push notification message from the intent.
    if (intent.Extras.ContainsKey("message"))
    {
        message = intent.Extras.Get("message").ToString();
        var title = "New item added:";

        // Create a notification manager to send the notification.
        var notificationManager =
            GetSystemService(Context.NotificationService) as NotificationManager;

        // Create a new intent to show the notification in the UI.
        PendingIntent contentIntent =
            PendingIntent.GetActivity(context, 0,
            new Intent(this, typeof(ToDoActivity)), 0);

        // Create the notification using the builder.
        var builder = new Notification.Builder(context);
        builder.SetAutoCancel(true);
        builder.SetContentTitle(title);
        builder.SetContentText(message);
        builder.SetSmallIcon(Resource.Drawable.ic_launcher);
        builder.SetContentIntent(contentIntent);
        var notification = builder.Build();

        // Display the notification in the Notifications Area.
        notificationManager.Notify(1, notification);

    }
}
تجاوز الأسلوبين OnUnRegistered() و OnError() مع التعليمات البرمجية التالية.
protected override void OnUnRegistered(Context context, string registrationId)
{
    throw new NotImplementedException();
}

protected override void OnError(Context context, string errorId)
{
    System.Diagnostics.Debug.WriteLine(
        string.Format("Error occurred in the notification: {0}.", errorId));
}
اختبار الإعلامات المنبثقة في تطبيقك
يمكنك اختبار التطبيق باستخدام جهاز ظاهري في المحاكي. هناك خطوات تكوين إضافية مطلوبة عند التشغيل على محاكي.
يجب أن يكون لدى الجهاز الظاهري واجهات برمجة تطبيقات Google كهدف في مدير جهاز Android الظاهري (AVD).

أضف حساب Google إلى جهاز Android بالنقر فوقإعدادات>التطبيقات>إضافة حساب، ثم اتبع المطالبات.

تشغيل تطبيق todolist كما كان من قبل وإدراج عنصر todo جديد. هذه المرة، يتم عرض أيقونة إعلام في منطقة الإعلام. يمكنك فتح درج الإعلام لعرض النص الكامل للإعلام.
