Configure strongSwan VPN for P2S certificate authentication IKEv2 connections - Linux
This article helps you connect to your Azure virtual network (VNet) using VPN Gateway point-to-site (P2S) VPN and Certificate authentication from an Ubuntu Linux client using strongSwan.
Before you begin
Before beginning, verify that you are on the correct article. The following table shows the configuration articles available for Azure VPN Gateway P2S VPN clients. Steps differ, depending on the authentication type, tunnel type, and the client OS.
| Authentication | Tunnel type | Client OS | VPN client |
|---|---|---|---|
| Certificate | |||
| IKEv2, SSTP | Windows | Native VPN client | |
| IKEv2 | macOS | Native VPN client | |
| IKEv2 | Linux | strongSwan | |
| OpenVPN | Windows | Azure VPN client OpenVPN client |
|
| OpenVPN | macOS | OpenVPN client | |
| OpenVPN | iOS | OpenVPN client | |
| OpenVPN | Linux | Azure VPN Client OpenVPN client |
|
| Microsoft Entra ID | |||
| OpenVPN | Windows | Azure VPN client | |
| OpenVPN | macOS | Azure VPN Client | |
| OpenVPN | Linux | Azure VPN Client |
Prerequisites
This article assumes that you've already performed the following prerequisites:
- The VPN gateway is configured for point-to-site certificate authentication and the IKEv2 tunnel type. See Configure server settings for P2S VPN Gateway connections - certificate authentication for steps.
- VPN client profile configuration files have been generated and are available. See Generate VPN client profile configuration files for steps.
Connection requirements
To connect to Azure using the strongSwan client and certificate authentication via IKEv2 tunnel type, each connecting client requires the following items:
- Each client must be configured to use strongSwan.
- The client must have the correct certificates installed locally.
Workflow
The workflow for this article is:
- Install strongSwan.
- View the VPN client profile configuration files contained in the VPN client profile configuration package that you generated.
- Locate any necessary client certificates.
- Configure strongSwan.
- Connect to Azure.
About certificates
For certificate authentication, a client certificate must be installed on each client computer. The client certificate you want to use must be exported with the private key, and must contain all certificates in the certification path. Additionally, for some configurations, you'll also need to install root certificate information.
For more information about certificates for Linux, see the following articles:
Install strongSwan
The following configuration was used when specifying commands:
- Computer: Ubuntu Server 18.04
- Dependencies: strongSwan
Use the following commands to install the required strongSwan configuration:
sudo apt-get update
sudo apt-get upgrade
sudo apt install strongswan
sudo apt install strongswan-pki
sudo apt install libstrongswan-extra-plugins
sudo apt install libtss2-tcti-tabrmd0
View VPN client profile configuration files
When you generate a VPN client profile configuration package, all the necessary configuration settings for VPN clients are contained in a VPN client profile configuration zip file. The VPN client profile configuration files are specific to the P2S VPN gateway configuration for the virtual network. If there are any changes to the P2S VPN configuration after you generate the files, such as changes to the VPN protocol type or authentication type, you need to generate new VPN client profile configuration files and apply the new configuration to all of the VPN clients that you want to connect.
Locate and unzip the VPN client profile configuration package you generated and downloaded. You can find all of the information that you need for configuration in the Generic folder. Azure doesn’t provide a mobileconfig file for this configuration.
If you don't see the Generic folder, check the following items, then generate the zip file again.
- Check the tunnel type for your configuration. It's likely that IKEv2 wasn’t selected as a tunnel type.
- On the VPN gateway, verify that the SKU isn’t Basic. The VPN Gateway Basic SKU doesn’t support IKEv2. Then, select IKEv2 and generate the zip file again to retrieve the Generic folder.
The Generic folder contains the following files:
- VpnSettings.xml, which contains important settings like server address and tunnel type.
- VpnServerRoot.cer, which contains the root certificate required to validate the Azure VPN gateway during P2S connection setup.
Configure the VPN client
After viewing the VPN client profile files, continue with the steps that you want to use:
GUI steps
This section walks you through the configuration using the strongSwan GUI. The following instructions were created on Ubuntu 18.0.4. Ubuntu 16.0.10 doesn’t support strongSwan GUI. If you want to use Ubuntu 16.0.10, you’ll have to use the command line. The following examples might not match screens that you see, depending on your version of Linux and strongSwan.
Open the Terminal to install strongSwan and its Network Manager by running the command in the example.
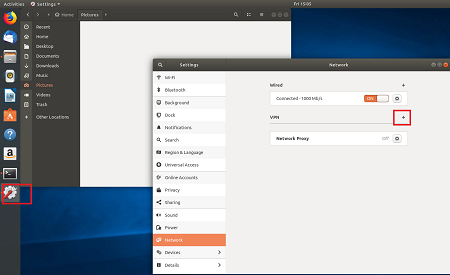
sudo apt install network-manager-strongswanSelect Settings, then select Network. Select the + button to create a new connection.
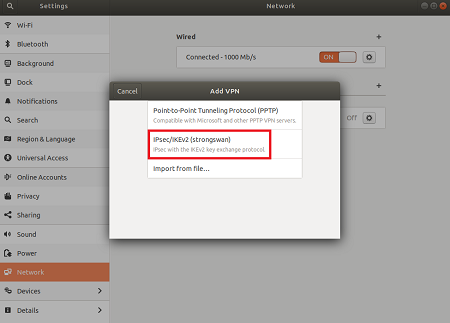
Select IPsec/IKEv2 (strongSwan) from the menu, and double-click.
On the Add VPN page, add a name for your VPN connection.
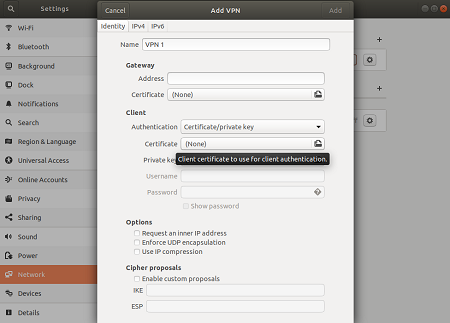
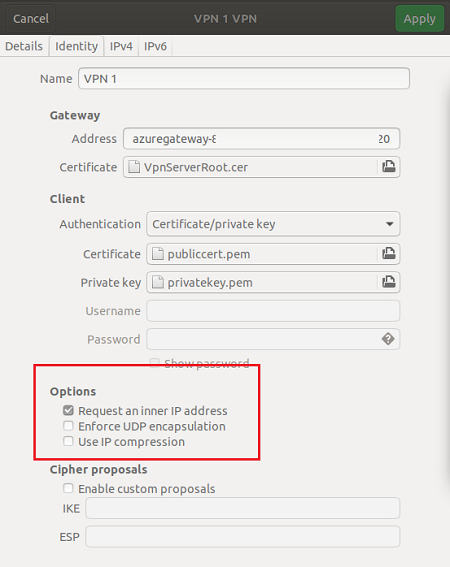
Open the VpnSettings.xml file from the Generic folder contained in the downloaded VPN client profile configuration files. Find the tag called VpnServer and copy the name, beginning with 'azuregateway' and ending with '.cloudapp.net'.
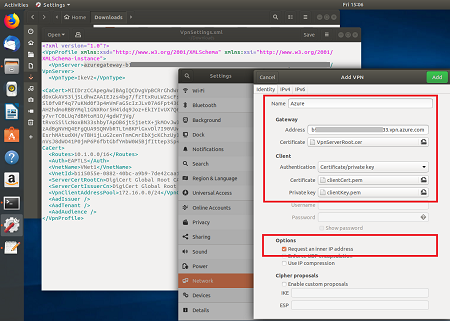
Paste the name in the Address field of your new VPN connection in the Gateway section. Next, select the folder icon at the end of the Certificate field, browse to the Generic folder, and select the VpnServerRoot file.
In the Client section of the connection, for Authentication, select Certificate/private key. For Certificate and Private key, choose the certificate and the private key that were created earlier. In Options, select Request an inner IP address. Then, select Add.
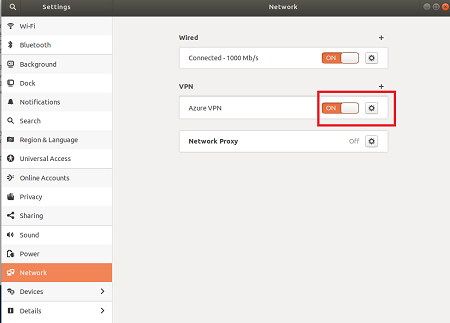
Turn the connection On.


CLI steps
This section walks you through the configuration using the strongSwan CLI.
From the VPN client profile configuration files Generic folder, copy or move the VpnServerRoot.cer to /etc/ipsec.d/cacerts.
Copy or move the files you generated to /etc/ipsec.d/certs and /etc/ipsec.d/private/ respectively. These files are the client certificate and the private key, they need to be located in their corresponding directories. Use the following commands:
sudo cp ${USERNAME}Cert.pem /etc/ipsec.d/certs/
sudo cp ${USERNAME}Key.pem /etc/ipsec.d/private/
sudo chmod -R go-rwx /etc/ipsec.d/private /etc/ipsec.d/certs
Run the following command to take note of your hostname. You’ll use this value in the next step.
hostnamectl --staticOpen the VpnSettings.xml file and copy the
<VpnServer>value. You’ll use this value in the next step.Adjust the values in the following example, then add the example to the /etc/ipsec.conf configuration.
conn azure
      keyexchange=ikev2
      type=tunnel
      leftfirewall=yes
      left=%any
      # Replace ${USERNAME}Cert.pem with the key filename inside /etc/ipsec.d/certs  directory.
      leftcert=${USERNAME}Cert.pem
      leftauth=pubkey
      leftid=%client # use the hostname of your machine with % character prepended. Example: %client
      right= #Azure VPN gateway address. Example: azuregateway-xxx-xxx.vpn.azure.com
      rightid=% #Azure VPN gateway FQDN with % character prepended. Example: %azuregateway-xxx-xxx.vpn.azure.com
      rightsubnet=0.0.0.0/0
      leftsourceip=%config
      auto=add
      esp=aes256gcm16
Add the secret values to /etc/ipsec.secrets.
The name of the PEM file must match what you have used earlier as your client key file.
: RSA ${USERNAME}Key.pem # Replace ${USERNAME}Key.pem with the key filename inside /etc/ipsec.d/private directory.Run the following commands:
sudo ipsec restart
sudo ipsec up azure
Next steps
For more steps, return to the P2S Azure portal article.
Povratne informacije
Uskoro: tokom 2024. postepeno ćemo ukidati probleme s uslugom GitHub kao mehanizam povratnih informacija za sadržaj i zamijeniti ga novim sistemom povratnih informacija. Za više informacija, pogledajte https://aka.ms/ContentUserFeedback.
Pošalјite i prikažite povratne informacije za