Get started with the Azure CDN Library for .NET
Important
Azure CDN Standard from Microsoft (classic) will be retired on September 30, 2027. To avoid any service disruption, it is important that you migrate your Azure CDN Standard from Microsoft (classic) profiles to Azure Front Door Standard or Premium tier by September 30, 2027. For more information, see Azure CDN Standard from Microsoft (classic) retirement.
You can use the Azure CDN Library for .NET to automate creation and management of CDN profiles and endpoints. This tutorial walks through the creation of a simple .NET console application that demonstrates several of the available operations. This tutorial isn't intended to describe all aspects of the Azure CDN Library for .NET in detail.
You need Visual Studio 2015 to complete this tutorial. Visual Studio Community 2015 is freely available for download.
Tip
The completed project from this tutorial is available for download on MSDN.
Prerequisites
Before writing CDN management code, you must do some preparation to enable the code to interact with the Azure Resource Manager. To do this preparation, you need to:
- Create a resource group to contain the CDN profile created in this tutorial
- Configure Microsoft Entra ID to provide authentication for the application
- Apply permissions to the resource group so that only authorized users from your Microsoft Entra tenant can interact with the CDN profile
Creating the resource group
Sign in to the Azure Portal.
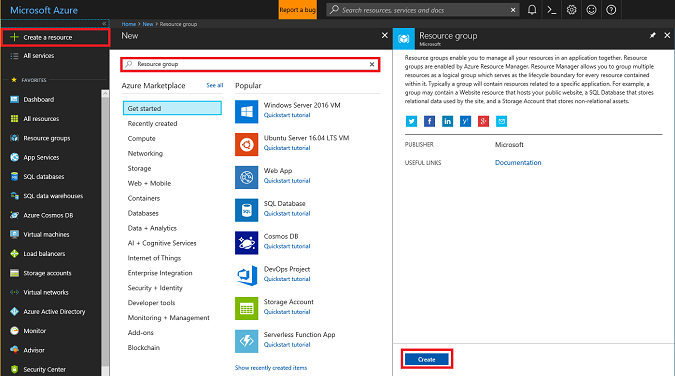
Click Create a resource.
Search for Resource group and in the Resource group pane, click Create.
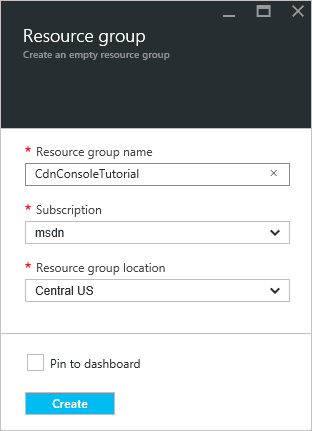
Name your resource group CdnConsoleTutorial. Select your subscription and choose a location near you. If you wish, you can click the Pin to dashboard checkbox to pin the resource group to the dashboard in the portal. Pinning makes it easier to find later. After you've made your selections, click Create.
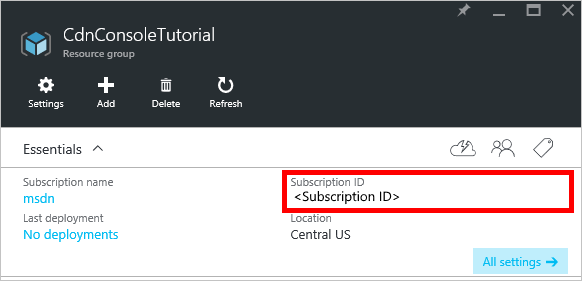
After the resource group is created, if you didn't pin it to your dashboard, you can find it by clicking Browse, then Resource Groups. To open it, click the resource group. Make a note of your Subscription ID. We need it later.
Creating the Microsoft Entra application and applying permissions
There are two approaches to app authentication with Microsoft Entra ID: Individual users or a service principal. A service principal is similar to a service account in Windows. Instead of granting a particular user permissions to interact with the CDN profiles, permissions are instead granted to the service principal. Service principals are typically used for automated, non-interactive processes. Even though this tutorial is writing an interactive console app, we'll focus on the service principal approach.
Creating a service principal consists of several steps, including creating a Microsoft Entra application. To create it, we're going to follow this tutorial.
Important
Be sure to follow all the steps in the linked tutorial. It is important that you complete it exactly as described. Make sure to note your tenant ID, tenant domain name (commonly a .onmicrosoft.com domain unless you've specified a custom domain), client ID, and client authentication key, as we need this information later. Be careful to guard your client ID and client authentication key, as these credentials can be used by anyone to execute operations as the service principal.
When you get to the step named Configure multi-tenant application, select No.
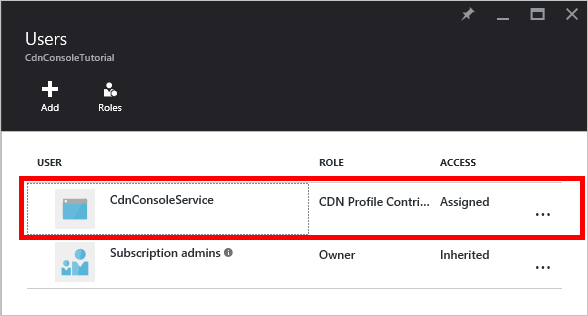
When you get to the step Assign the application to a role, use the resource group created earlier, CdnConsoleTutorial, but instead of the Reader role, assign the CDN Profile Contributor role. After you assign the application the CDN Profile Contributor role on your resource group, return to this tutorial.
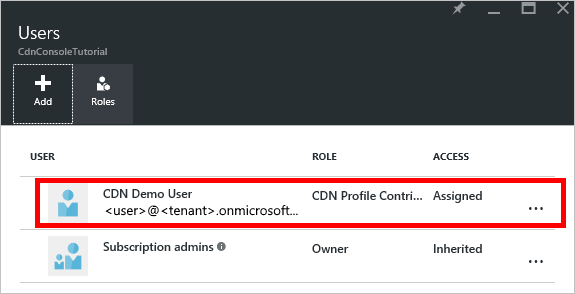
Once you've created your service principal and assigned the CDN Profile Contributor role, the Users blade for your resource group should look similar to the following image.
Interactive user authentication
If, instead of a service principal, you'd rather have interactive individual user authentication, the process is similar to that for a service principal. In fact, you need to follow the same procedure, but make a few minor changes.
Important
Only follow these next steps if you are choosing to use individual user authentication instead of a service principal.
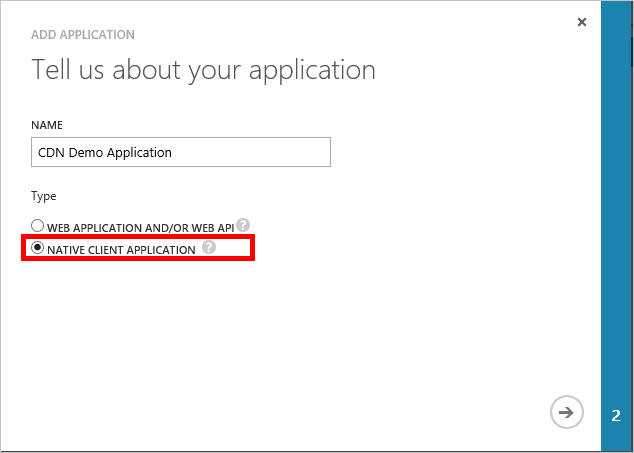
When creating your application, instead of Web Application, choose Native application.
On the next page, you are prompted for a redirect URI. The URI won't be validated, but remember what you entered. You need it later.
There is no need to create a client authentication key.
Instead of assigning a service principal to the CDN Profile Contributor role, we're going to assign individual users or groups. In this example, you can see that I've assigned CDN Demo User to the CDN Profile Contributor role.
Create your project and add NuGet packages
Now that we've created a resource group for our CDN profiles and given our Microsoft Entra application permission to manage CDN profiles and endpoints within that group, we can start creating our application.
Important
The Microsoft.IdentityModel.Clients.ActiveDirectory NuGet package and Azure AD Authentication Library (ADAL) have been deprecated. No new features have been added since June 30, 2020. We strongly encourage you to upgrade. For more information, see the migration guide.
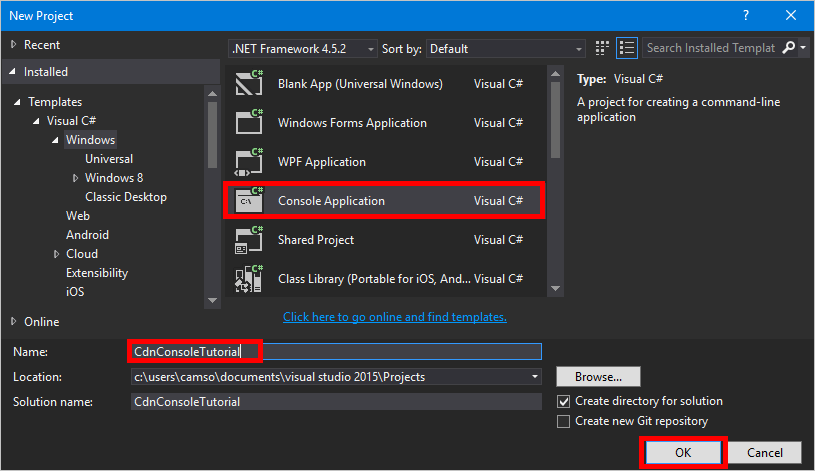
From within Visual Studio 2015, select File, New, Project... to open the new project dialog. Expand Visual C#, then select Windows in the pane on the left. Select Console Application in the center pane. Name your project, then select OK.
Our project is going to use some Azure libraries contained in NuGet packages. Let's add those libraries to the project.
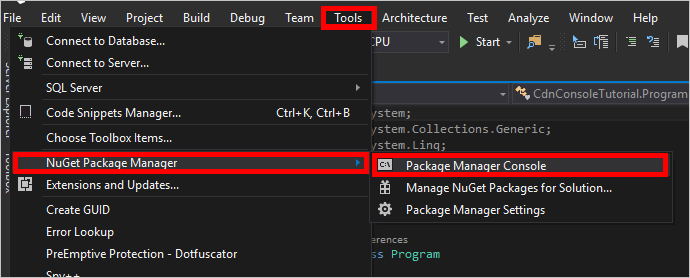
Select the Tools menu, Nuget Package Manager, then Package Manager Console.
In the Package Manager Console, execute the following command to install the Active Directory Authentication Library (ADAL):
Install-Package Microsoft.Identity.ClientExecute the following to install the Azure CDN Management Library:
Install-Package Microsoft.Azure.Management.Cdn
Directives, constants, main method, and helper methods
Let's get the basic structure of our program written.
Back in the Program.cs tab, replace the
usingdirectives at the top with the following command:using System; using System.Collections.Generic; using Microsoft.Azure.Management.Cdn; using Microsoft.Azure.Management.Cdn.Models; using Microsoft.Azure.Management.Resources; using Microsoft.Azure.Management.Resources.Models; using Microsoft.Identity.Client; using Microsoft.Rest;We need to define some constants our methods use. In the
Programclass, but before theMainmethod, add the following code blocks. Be sure to replace the placeholders, including the <angle brackets>, with your own values as needed.//Tenant app constants private const string clientID = "<YOUR CLIENT ID>"; private const string clientSecret = "<YOUR CLIENT AUTHENTICATION KEY>"; //Only for service principals private const string authority = "https://login.microsoftonline.com/<YOUR TENANT ID>/<YOUR TENANT DOMAIN NAME>"; //Application constants private const string subscriptionId = "<YOUR SUBSCRIPTION ID>"; private const string profileName = "CdnConsoleApp"; private const string endpointName = "<A UNIQUE NAME FOR YOUR CDN ENDPOINT>"; private const string resourceGroupName = "CdnConsoleTutorial"; private const string resourceLocation = "<YOUR PREFERRED AZURE LOCATION, SUCH AS Central US>";Also at the class level, define these two variables. We use these variables later to determine whether our profile and endpoint already exist.
static bool profileAlreadyExists = false;
static bool endpointAlreadyExists = false;
Replace the
Mainmethod as follows:static void Main(string[] args) { //Get a token AuthenticationResult authResult = GetAccessToken(); // Create CDN client CdnManagementClient cdn = new CdnManagementClient(new TokenCredentials(authResult.AccessToken)) { SubscriptionId = subscriptionId }; ListProfilesAndEndpoints(cdn); // Create CDN Profile CreateCdnProfile(cdn); // Create CDN Endpoint CreateCdnEndpoint(cdn); Console.WriteLine(); // Purge CDN Endpoint PromptPurgeCdnEndpoint(cdn); // Delete CDN Endpoint PromptDeleteCdnEndpoint(cdn); // Delete CDN Profile PromptDeleteCdnProfile(cdn); Console.WriteLine("Press Enter to end program."); Console.ReadLine(); }Some of our other methods are going to prompt the user with "Yes/No" questions. Add the following method to make that a little easier:
private static bool PromptUser(string Question)
{
    Console.Write(Question + " (Y/N): ");
    var response = Console.ReadKey();
    Console.WriteLine();
    if (response.Key == ConsoleKey.Y)
    {
        return true;
    }
    else if (response.Key == ConsoleKey.N)
    {
        return false;
    }
    else
    {
        // They pressed something other than Y or N.  Let's ask them again.
        return PromptUser(Question);
    }
}
Now that the basic structure of our program is written, we should create the methods called by the Main method.
Authentication
Before we can use the Azure CDN Management Library, we need to authenticate our service principal and obtain an authentication token. This method uses Active Directory Authentication Library to retrieve the token.
private static AuthenticationResult GetAccessToken()
{
    AuthenticationContext authContext = new AuthenticationContext(authority);
    ClientCredential credential = new ClientCredential(clientID, clientSecret);
    AuthenticationResult authResult =
        authContext.AcquireTokenAsync("https://management.core.windows.net/", credential).Result;

    return authResult;
}
If you're using individual user authentication, the GetAccessToken method looks slightly different.
Important
Only use this code sample if you are choosing to have individual user authentication instead of a service principal.
private static AuthenticationResult GetAccessToken()
{
    AuthenticationContext authContext = new AuthenticationContext(authority);
    AuthenticationResult authResult = authContext.AcquireTokenAsync("https://management.core.windows.net/",
        clientID, new Uri("http://<redirect URI>"), new PlatformParameters(PromptBehavior.RefreshSession)).Result;

    return authResult;
}
Be sure to replace <redirect URI> with the redirect URI you entered when you registered the application in Microsoft Entra ID.
List CDN profiles and endpoints
Now we're ready to perform CDN operations. The first thing our method does is list all the profiles and endpoints in our resource group, and if it finds a match for the profile and endpoint names specified in our constants, makes a note for later so we don't try to create duplicates.
private static void ListProfilesAndEndpoints(CdnManagementClient cdn)
{
    // List all the CDN profiles in this resource group
    var profileList = cdn.Profiles.ListByResourceGroup(resourceGroupName);
    foreach (Profile p in profileList)
    {
        Console.WriteLine("CDN profile {0}", p.Name);
        if (p.Name.Equals(profileName, StringComparison.OrdinalIgnoreCase))
        {
            // Hey, that's the name of the CDN profile we want to create!
            profileAlreadyExists = true;
        }

        //List all the CDN endpoints on this CDN profile
        Console.WriteLine("Endpoints:");
        var endpointList = cdn.Endpoints.ListByProfile(p.Name, resourceGroupName);
        foreach (Endpoint e in endpointList)
        {
            Console.WriteLine("-{0} ({1})", e.Name, e.HostName);
            if (e.Name.Equals(endpointName, StringComparison.OrdinalIgnoreCase))
            {
                // The unique endpoint name already exists.
                endpointAlreadyExists = true;
            }
        }
        Console.WriteLine();
    }
}
Create CDN profiles and endpoints
Next, we create a profile.
private static void CreateCdnProfile(CdnManagementClient cdn)
{
    if (profileAlreadyExists)
    {
        Console.WriteLine("Profile {0} already exists.", profileName);
    }
    else
    {
        Console.WriteLine("Creating profile {0}.", profileName);
        ProfileCreateParameters profileParms =
            new ProfileCreateParameters() { Location = resourceLocation, Sku = new Sku(SkuName.StandardVerizon) };
        cdn.Profiles.Create(profileName, profileParms, resourceGroupName);
    }
}
Once the profile is created, we create an endpoint.
private static void CreateCdnEndpoint(CdnManagementClient cdn)
{
    if (endpointAlreadyExists)
    {
        Console.WriteLine("Profile {0} already exists.", profileName);
    }
    else
    {
        Console.WriteLine("Creating endpoint {0} on profile {1}.", endpointName, profileName);
        EndpointCreateParameters endpointParms =
            new EndpointCreateParameters()
            {
                Origins = new List<DeepCreatedOrigin>() { new DeepCreatedOrigin("Contoso", "www.contoso.com") },
                IsHttpAllowed = true,
                IsHttpsAllowed = true,
                Location = resourceLocation
            };
        cdn.Endpoints.Create(endpointName, endpointParms, profileName, resourceGroupName);
    }
}
Note
The example above assigns the endpoint an origin named Contoso with a hostname www.contoso.com. You should change this to point to your own origin's hostname.
Purge an endpoint
Assuming the endpoint has been created, one common task that we might want to perform in our program is purging the content in our endpoint.
private static void PromptPurgeCdnEndpoint(CdnManagementClient cdn)
{
    if (PromptUser(String.Format("Purge CDN endpoint {0}?", endpointName)))
    {
        Console.WriteLine("Purging endpoint. Please wait...");
        cdn.Endpoints.PurgeContent(resourceGroupName, profileName, endpointName, new List<string>() { "/*" });
        Console.WriteLine("Done.");
        Console.WriteLine();
    }
}
Note
In the example previously, the string /* denotes that I want to purge everything in the root of the endpoint path. This is equivalent to checking Purge All in the Azure portal's "purge" dialog. In the CreateCdnProfile method, I created our profile as an Azure CDN from Edgio profile using the code Sku = new Sku(SkuName.StandardVerizon), so this will be successful.
Delete CDN profiles and endpoints
The last methods delete our endpoint and profile.
private static void PromptDeleteCdnEndpoint(CdnManagementClient cdn)
{
    if(PromptUser(String.Format("Delete CDN endpoint {0} on profile {1}?", endpointName, profileName)))
    {
        Console.WriteLine("Deleting endpoint. Please wait...");
        cdn.Endpoints.DeleteIfExists(endpointName, profileName, resourceGroupName);
        Console.WriteLine("Done.");
        Console.WriteLine();
    }
}

private static void PromptDeleteCdnProfile(CdnManagementClient cdn)
{
    if(PromptUser(String.Format("Delete CDN profile {0}?", profileName)))
    {
        Console.WriteLine("Deleting profile. Please wait...");
        cdn.Profiles.DeleteIfExists(profileName, resourceGroupName);
        Console.WriteLine("Done.");
        Console.WriteLine();
    }
}
Running the program
We can now compile and run the program by clicking the Start button in Visual Studio.
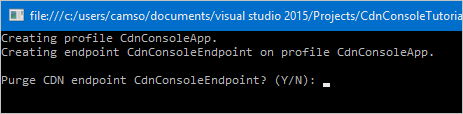
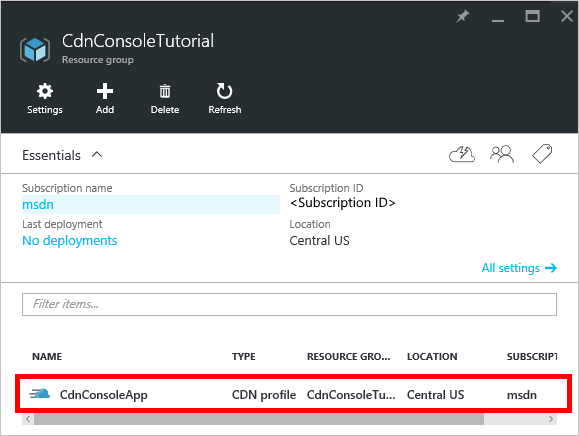
When the program reaches the above prompt, you should be able to return to your resource group in the Azure portal and see that the profile has been created.
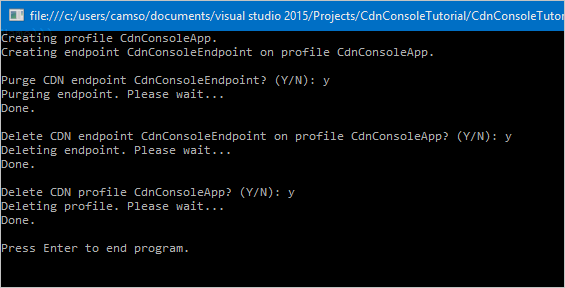
We can then confirm the prompts to run the rest of the program.
Next Steps
To see the completed project from this walkthrough, download the sample.
To find more documentation on the Azure CDN Management Library for .NET, view the reference on MSDN.
Manage your CDN resources with PowerShell.