Configure public IP network rules
An Azure container registry by default accepts connections over the internet from hosts on any network. This article shows how to configure your container registry to allow access from only specific public IP addresses or address ranges. Equivalent steps using the Azure CLI and Azure portal are provided.
IP network rules are configured on the public registry endpoint. IP network rules do not apply to private endpoints configured with Private Link
Configuring IP access rules is available in the Premium container registry service tier. For information about registry service tiers and limits, see Azure Container Registry tiers.
Each registry supports a maximum of 100 IP access rules.
Important
Some functionality may be unavailable or require more configuration in a container registry that restricts access to private endpoints, selected subnets, or IP addresses.
- When public network access to a registry is disabled, registry access by certain trusted services including Azure Security Center requires enabling a network setting to bypass the network rules.
- Once the public network access is disabled, instances of certain Azure services including Azure DevOps Services are currently unable to access the container registry.
- Private endpoints are not currently supported with Azure DevOps managed agents. You will need to use a self-hosted agent with network line of sight to the private endpoint.
- If the registry has an approved private endpoint and public network access is disabled, repositories and tags can't be listed outside the virtual network using the Azure portal, Azure CLI, or other tools.
Access from selected public network - CLI
Change default network access to registry
To limit access to a selected public network, first change the default action to deny access. Substitute the name of your registry in the following az acr update command:
az acr update --name myContainerRegistry --default-action Deny
Add network rule to registry
Use the az acr network-rule add command to add a network rule to your registry that allows access from a public IP address or range. For example, substitute the container registry's name and the public IP address of a VM in a virtual network.
az acr network-rule add \
  --name mycontainerregistry \
  --ip-address <public-IP-address>
Note
After adding a rule, it takes a few minutes for the rule to take effect.
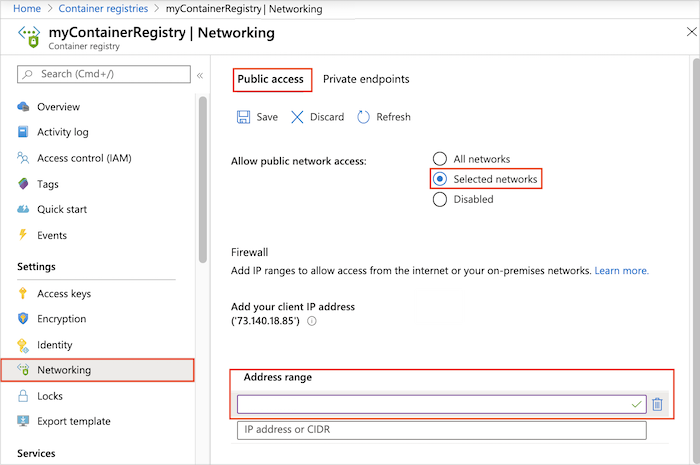
Access from selected public network - portal
- In the portal, navigate to your container registry.
- Under Settings, select Networking.
- On the Public access tab, select to allow public access from Selected networks.
- Under Firewall, enter a public IP address, such as the public IP address of a VM in a virtual network. Or, enter an address range in CIDR notation that contains the VM's IP address.
- Select Save.
Note
After adding a rule, it takes a few minutes for the rule to take effect.
Tip
Optionally, enable registry access from a local client computer or IP address range. To allow this access, you need the computer's public IPv4 address. You can find this address by searching "what is my IP address" in an internet browser. The current client IPv4 address also appears automatically when you configure firewall settings on the Networking page in the portal.
Disable public network access
Optionally, disable the public endpoint on the registry. Disabling the public endpoint overrides all firewall configurations. For example, you might want to disable public access to a registry secured in a virtual network using Private Link.
Note
If the registry is set up in a virtual network with a service endpoint, disabling access to the registry's public endpoint also disables access to the registry within the virtual network.
Disable public access - CLI
To disable public access using the Azure CLI, run az acr update and set --public-network-enabled to false. The public-network-enabled argument requires Azure CLI 2.6.0 or later.
az acr update --name myContainerRegistry --public-network-enabled false
Disable public access - portal
- In the portal, navigate to your container registry and select Settings > Networking.
- On the Public access tab, in Allow public network access, select Disabled. Then select Save.

Restore public network access
To re-enable the public endpoint, update the networking settings to allow public access. Enabling the public endpoint overrides all firewall configurations.
Restore public access - CLI
Run az acr update and set --public-network-enabled to true.
Note
The public-network-enabled argument requires Azure CLI 2.6.0 or later.
az acr update --name myContainerRegistry --public-network-enabled true
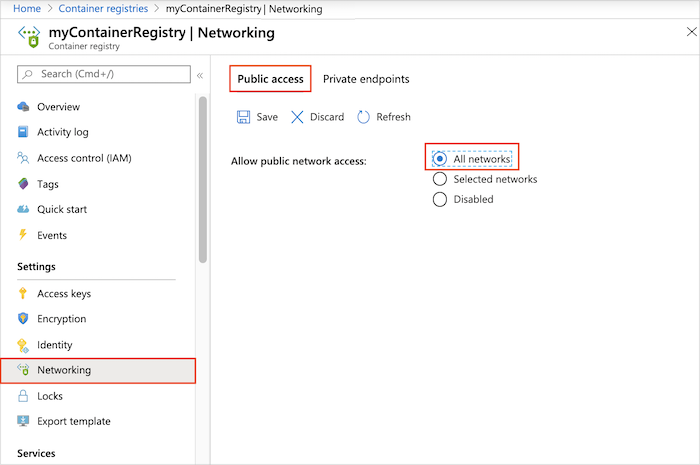
Restore public access - portal
- In the portal, navigate to your container registry and select Settings > Networking.
- On the Public access tab, in Allow public network access, select All networks. Then select Save.
Troubleshoot
Access behind HTTPS proxy
If a public network rule is set, or public access to the registry is denied, attempts to login to the registry from a disallowed public network will fail. Client access from behind an HTTPS proxy will also fail if an access rule for the proxy is not set. You will see an error message similar to Error response from daemon: login attempt failed with status: 403 Forbidden or Looks like you don't have access to registry.
These errors can also occur if you use an HTTPS proxy that is allowed by a network access rule, but the proxy isn't properly configured in the client environment. Check that both your Docker client and the Docker daemon are configured for proxy behavior. For details, see HTTP/HTTPS proxy in the Docker documentation.
Access from Azure Pipelines
If you use Azure Pipelines with an Azure container registry that limits access to specific IP addresses, the pipeline may be unable to access the registry, because the outbound IP address from the pipeline is not fixed. By default, the pipeline runs jobs using a Microsoft-hosted agent on a virtual machine pool with a changing set of IP addresses.
One workaround is to change the agent used to run the pipeline from Microsoft-hosted to self-hosted. With a self-hosted agent running on a Windows or Linux machine that you manage, you control the outbound IP address of the pipeline, and you can add this address in a registry IP access rule.
Access from AKS
If you use Azure Kubernetes Service (AKS) with an Azure container registry that limits access to specific IP addresses, you can't configure a fixed AKS IP address by default. The egress IP address from the AKS cluster is randomly assigned.
To allow the AKS cluster to access the registry, you have these options:
- If you use the Azure Basic Load Balancer, set up a static IP address for the AKS cluster.
- If you use the Azure Standard Load Balancer, see guidance to control egress traffic from the cluster.
Next steps
- To restrict access to a registry using a private endpoint in a virtual network, see Configure Azure Private Link for an Azure container registry.
- If you need to set up registry access rules from behind a client firewall, see Configure rules to access an Azure container registry behind a firewall.
- For more troubleshooting guidance, see Troubleshoot network issues with registry.
Povratne informacije
Uskoro: tokom 2024. postepeno ćemo ukidati probleme s uslugom GitHub kao mehanizam povratnih informacija za sadržaj i zamijeniti ga novim sistemom povratnih informacija. Za više informacija, pogledajte https://aka.ms/ContentUserFeedback.
Pošalјite i prikažite povratne informacije za