Connect privately to an Azure container registry using Azure Private Link
Limit access to a registry by assigning virtual network private IP addresses to the registry endpoints and using Azure Private Link. Network traffic between the clients on the virtual network and the registry's private endpoints traverses the virtual network and a private link on the Microsoft backbone network, eliminating exposure from the public internet. Private Link also enables private registry access from on-premises through Azure ExpressRoute, private peering, or a VPN gateway.
You can configure DNS settings for the registry's private endpoints, so that the settings resolve to the registry's allocated private IP address. With DNS configuration, clients and services in the network can continue to access the registry at the registry's fully qualified domain name, such as myregistry.azurecr.io.
This article shows how to configure a private endpoint for your registry using the Azure portal (recommended) or the Azure CLI. This feature is available in the Premium container registry service tier. For information about registry service tiers and limits, see Azure Container Registry tiers.
Important
Some functionality may be unavailable or require more configuration in a container registry that restricts access to private endpoints, selected subnets, or IP addresses.
- When public network access to a registry is disabled, registry access by certain trusted services including Azure Security Center requires enabling a network setting to bypass the network rules.
- Once the public network access is disabled, instances of certain Azure services including Azure DevOps Services are currently unable to access the container registry.
- Private endpoints are not currently supported with Azure DevOps managed agents. You will need to use a self-hosted agent with network line of sight to the private endpoint.
- If the registry has an approved private endpoint and public network access is disabled, repositories and tags can't be listed outside the virtual network using the Azure portal, Azure CLI, or other tools.
Note
Starting from October 2021, new container registries allow a maximum of 200 private endpoints. Registries created earlier allow a maximum of 10 private endpoints. Use the az acr show-usage command to see the limit for your registry. Please open a support ticket to increase the limit to 200 private endpoints.
Prerequisites
- A virtual network and subnet in which to set up the private endpoint. If needed, create a new virtual network and subnet.
- For testing, it's recommended to set up a VM in the virtual network. For steps to create a test virtual machine to access your registry, see Create a Docker-enabled virtual machine.
- To use the Azure CLI steps in this article, Azure CLI version 2.6.0 or later is recommended. If you need to install or upgrade, see Install Azure CLI. Or run in Azure Cloud Shell.
- If you don't already have a container registry, create one (Premium tier required) and import a sample public image such as
mcr.microsoft.com/hello-worldfrom Microsoft Container Registry. For example, use the Azure portal or the Azure CLI to create a registry.
Register container registry resource provider
To configure registry access using a private link in a different Azure subscription or tenant, you need to register the resource provider for Azure Container Registry in that subscription. Use the Azure portal, Azure CLI, or other tools.
Example:
az account set --subscription <Name or ID of subscription of private link>

az provider register --namespace Microsoft.ContainerRegistry
Set up private endpoint - portal (recommended)
Set up a private endpoint when you create a registry, or add a private endpoint to an existing registry.
Create a private endpoint - new registry
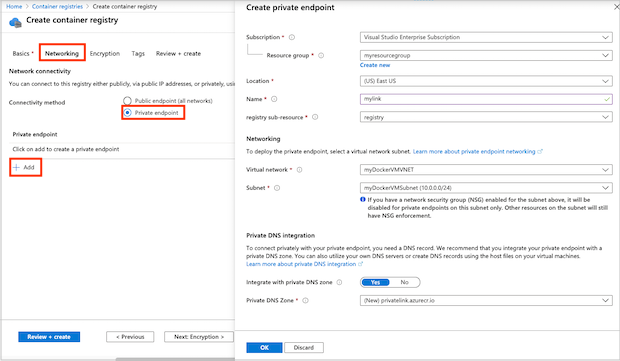
When creating a registry in the portal, on the Basics tab, in SKU, select Premium.
Select the Networking tab.
In Network connectivity, select Private endpoint > + Add.
Enter or select the following information:
Setting Value Subscription Select your subscription. Resource group Enter the name of an existing group or create a new one. Name Enter a unique name. Registry subresource Select registry Networking Virtual network Select the virtual network for the private endpoint. Example: myDockerVMVNET. Subnet Select the subnet for the private endpoint. Example: myDockerVMSubnet. Private DNS integration Integrate with private DNS zone Select Yes. Private DNS Zone Select (New) privatelink.azurecr.io Configure the remaining registry settings, and then select Review + create.
Your private link is now configured and ready for use.
Create a private endpoint - existing registry
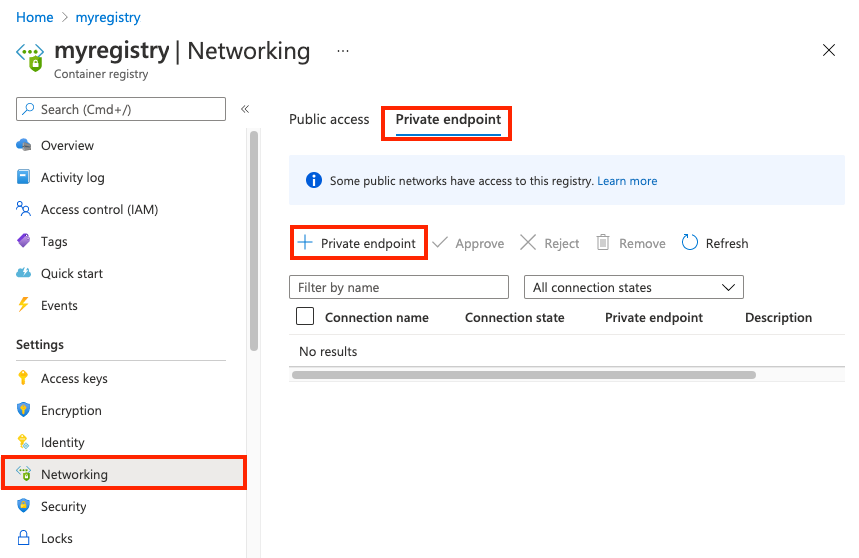
In the portal, navigate to your container registry.
Under Settings, select Networking.
On the Private endpoints tab, select + Private endpoint.
In the Basics tab, enter or select the following information:
Setting Value Project details Subscription Select your subscription. Resource group Enter the name of an existing group or create a new one. Instance details Name Enter a name. Region Select a region. Select Next: Resource.
Enter or select the following information:
Setting Value Connection method For this example, select Connect to an Azure resource in my directory. Subscription Select your subscription. Resource type Select Microsoft.ContainerRegistry/registries. Resource Select the name of your registry Target subresource Select registry Select Next: Configuration.
Enter or select the information:
Setting Value Networking Virtual network Select the virtual network for the private endpoint Subnet Select the subnet for the private endpoint Private DNS Integration Integrate with private DNS zone Select Yes. Private DNS Zone Select (New) privatelink.azurecr.io Select Review + create. You're taken to the Review + create page where Azure validates your configuration.
When you see the Validation passed message, select Create.
Confirm endpoint configuration
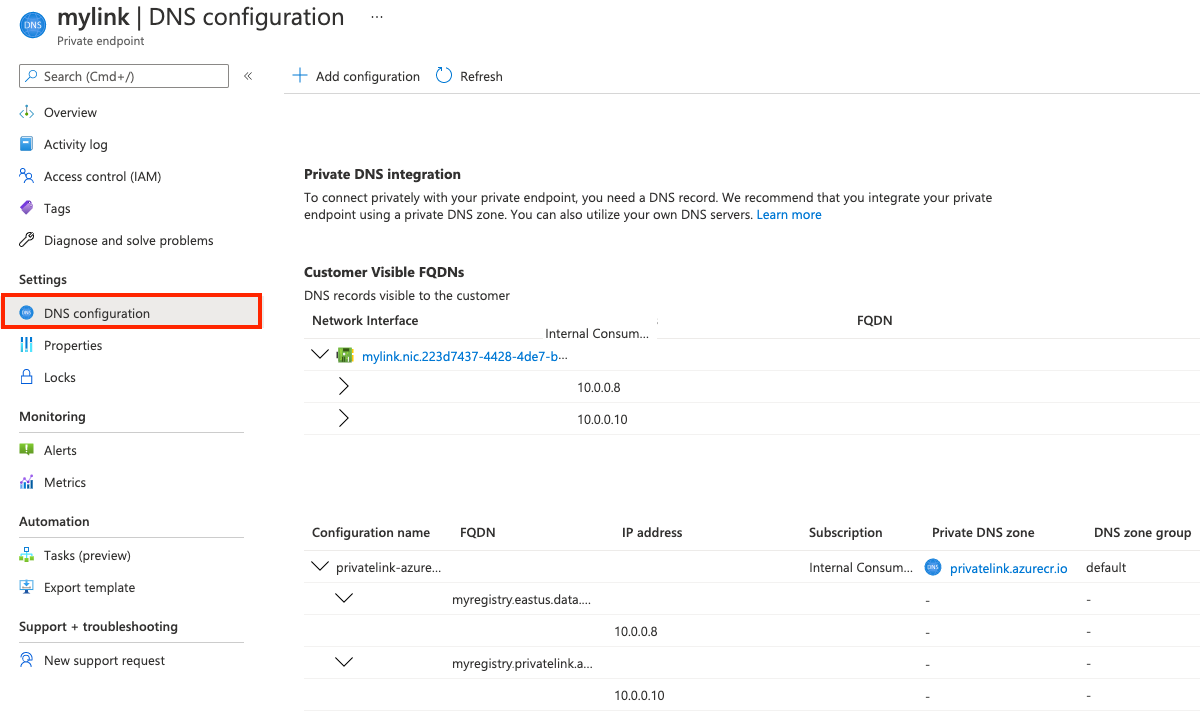
After the private endpoint is created, DNS settings in the private zone appear with the Private endpoints settings in the portal:
- In the portal, navigate to your container registry and select Settings > Networking.
- On the Private endpoints tab, select the private endpoint you created.
- Select DNS configuration.
- Review the link settings and custom DNS settings.
Set up private endpoint - CLI
The Azure CLI examples in this article use the following environment variables. You'll need the names of an existing container registry, virtual network, and subnet to set up a private endpoint. Substitute values appropriate for your environment. All examples are formatted for the Bash shell:
REGISTRY_NAME=<container-registry-name>
REGISTRY_LOCATION=<container-registry-location> # Azure region such as westeurope where registry created
RESOURCE_GROUP=<resource-group-name> # Resource group for your existing virtual network and subnet
NETWORK_NAME=<virtual-network-name>
SUBNET_NAME=<subnet-name>
Disable network policies in subnet
Disable network policies such as network security groups in the subnet for the private endpoint. Update your subnet configuration with az network vnet subnet update:
az network vnet subnet update \
 --name $SUBNET_NAME \
 --vnet-name $NETWORK_NAME \
 --resource-group $RESOURCE_GROUP \
 --disable-private-endpoint-network-policies
Configure the private DNS zone
Create a private Azure DNS zone for the private Azure container registry domain. In later steps, you create DNS records for your registry domain in this DNS zone. For more information, see DNS configuration options, later in this article.
To use a private zone to override the default DNS resolution for your Azure container registry, the zone must be named privatelink.azurecr.io. Run the following az network private-dns zone create command to create the private zone:
az network private-dns zone create \
  --resource-group $RESOURCE_GROUP \
  --name "privatelink.azurecr.io"
Create an association link
Run az network private-dns link vnet create to associate your private zone with the virtual network. This example creates a link called myDNSLink.
az network private-dns link vnet create \
  --resource-group $RESOURCE_GROUP \
  --zone-name "privatelink.azurecr.io" \
  --name MyDNSLink \
  --virtual-network $NETWORK_NAME \
  --registration-enabled false
Create a private registry endpoint
In this section, create the registry's private endpoint in the virtual network. First, get the resource ID of your registry:
REGISTRY_ID=$(az acr show --name $REGISTRY_NAME \
  --query 'id' --output tsv)
Run the az network private-endpoint create command to create the registry's private endpoint.
The following example creates the endpoint myPrivateEndpoint and service connection myConnection. To specify a container registry resource for the endpoint, pass --group-ids registry:
az network private-endpoint create \
    --name myPrivateEndpoint \
    --resource-group $RESOURCE_GROUP \
    --vnet-name $NETWORK_NAME \
    --subnet $SUBNET_NAME \
    --private-connection-resource-id $REGISTRY_ID \
    --group-ids registry \
    --connection-name myConnection
Get endpoint IP configuration
To configure DNS records, get the IP configuration of the private endpoint. Associated with the private endpoint's network interface in this example are two private IP addresses for the container registry: one for the registry itself, and one for the registry's data endpoint. If your registry is geo-replicated, an additional IP address is associated with each replica.
First, run az network private-endpoint show to query the private endpoint for the network interface ID:
NETWORK_INTERFACE_ID=$(az network private-endpoint show \
  --name myPrivateEndpoint \
  --resource-group $RESOURCE_GROUP \
  --query 'networkInterfaces[0].id' \
  --output tsv)
The following az network nic show commands get the private IP addresses and FQDNs for the container registry and the registry's data endpoint:
REGISTRY_PRIVATE_IP=$(az network nic show \
  --ids $NETWORK_INTERFACE_ID \
  --query "ipConfigurations[?privateLinkConnectionProperties.requiredMemberName=='registry'].privateIPAddress" \
  --output tsv)

DATA_ENDPOINT_PRIVATE_IP=$(az network nic show \
  --ids $NETWORK_INTERFACE_ID \
  --query "ipConfigurations[?privateLinkConnectionProperties.requiredMemberName=='registry_data_$REGISTRY_LOCATION'].privateIPAddress" \
  --output tsv)

# An FQDN is associated with each IP address in the IP configurations

REGISTRY_FQDN=$(az network nic show \
  --ids $NETWORK_INTERFACE_ID \
  --query "ipConfigurations[?privateLinkConnectionProperties.requiredMemberName=='registry'].privateLinkConnectionProperties.fqdns" \
  --output tsv)

DATA_ENDPOINT_FQDN=$(az network nic show \
  --ids $NETWORK_INTERFACE_ID \
  --query "ipConfigurations[?privateLinkConnectionProperties.requiredMemberName=='registry_data_$REGISTRY_LOCATION'].privateLinkConnectionProperties.fqdns" \
  --output tsv)
Additional endpoints for geo-replicas
If your registry is geo-replicated, query for the additional data endpoint for each registry replica. For example, in the eastus region:
REPLICA_LOCATION=eastus
GEO_REPLICA_DATA_ENDPOINT_PRIVATE_IP=$(az network nic show \
  --ids $NETWORK_INTERFACE_ID \
  --query "ipConfigurations[?privateLinkConnectionProperties.requiredMemberName=='registry_data_$REPLICA_LOCATION'].privateIPAddress" \
  --output tsv)

GEO_REPLICA_DATA_ENDPOINT_FQDN=$(az network nic show \
  --ids $NETWORK_INTERFACE_ID \
  --query "ipConfigurations[?privateLinkConnectionProperties.requiredMemberName=='registry_data_$REPLICA_LOCATION'].privateLinkConnectionProperties.fqdns" \
  --output tsv)
Once a new geo-replication is added, a private endpoint connection is set to be pending. To approve a private endpoint connection configured manually run az acr private-endpoint-connection approve command.
Create DNS records in the private zone
The following commands create DNS records in the private zone for the registry endpoint and its data endpoint. For example, if you have a registry named myregistry in the westeurope region, the endpoint names are myregistry.azurecr.io and myregistry.westeurope.data.azurecr.io.
First run az network private-dns record-set a create to create empty A-record sets for the registry endpoint and data endpoint:
az network private-dns record-set a create \
  --name $REGISTRY_NAME \
  --zone-name privatelink.azurecr.io \
  --resource-group $RESOURCE_GROUP

# Specify registry region in data endpoint name
az network private-dns record-set a create \
  --name ${REGISTRY_NAME}.${REGISTRY_LOCATION}.data \
  --zone-name privatelink.azurecr.io \
  --resource-group $RESOURCE_GROUP
Run the az network private-dns record-set a add-record command to create the A-records for the registry endpoint and data endpoint:
az network private-dns record-set a add-record \
  --record-set-name $REGISTRY_NAME \
  --zone-name privatelink.azurecr.io \
  --resource-group $RESOURCE_GROUP \
  --ipv4-address $REGISTRY_PRIVATE_IP

# Specify registry region in data endpoint name
az network private-dns record-set a add-record \
  --record-set-name ${REGISTRY_NAME}.${REGISTRY_LOCATION}.data \
  --zone-name privatelink.azurecr.io \
  --resource-group $RESOURCE_GROUP \
  --ipv4-address $DATA_ENDPOINT_PRIVATE_IP
Additional records for geo-replicas
If your registry is geo-replicated, create additional DNS settings for each replica. Continuing the example in the eastus region:
az network private-dns record-set a create \
  --name ${REGISTRY_NAME}.${REPLICA_LOCATION}.data \
  --zone-name privatelink.azurecr.io \
  --resource-group $RESOURCE_GROUP

az network private-dns record-set a add-record \
  --record-set-name ${REGISTRY_NAME}.${REPLICA_LOCATION}.data \
  --zone-name privatelink.azurecr.io \
  --resource-group $RESOURCE_GROUP \
  --ipv4-address $GEO_REPLICA_DATA_ENDPOINT_PRIVATE_IP
The private link is now configured and ready for use.
Disable public access
For many scenarios, disable registry access from public networks. This configuration prevents clients outside the virtual network from reaching the registry endpoints.
Disable public access - portal
- In the portal, navigate to your container registry and select Settings > Networking.
- On the Public access tab, in Allow public network access, select Disabled. Then select Save.
Disable public access - CLI
Note
If the public access is disabled, the az acr build commands will no longer work.
To disable public access using the Azure CLI, run az acr update and set --public-network-enabled to false.
az acr update --name $REGISTRY_NAME --public-network-enabled false
Execute the az acr build with private endpoint and private registry
Note
Once you disable public network access here, then az acr build commands will no longer work.
Unless you are utilizing dedicated agent pools, it's typically require the public IP's. Tasks reserve a set of public IPs in each region for outbound requests. If needed, we have the option to add these IPs to our firewall's allowed list for seamless communication.az acr build command uses the same set of IPs as the tasks.
Consider the following options to execute the az acr build successfully.
- Assign a dedicated agent pool.
- If agent pool is not available in the region, add the regional Azure Container Registry Service Tag IPv4 to the firewall access rules.. Tasks reserve a set of public IPs in each region (a.k.a. AzureContainerRegistry Service Tag) for outbound requests. You can choose to add the IPs in the firewall allowed list.
- Create an ACR task with a managed identity, and enable trusted services to access network restricted ACR.
Disable access to a container registry using a service endpoint
Important
The container registry does not support enabling both private link and service endpoint features configured from a virtual network.
Once the registry has public access disabled and private link configured, you can disable the service endpoint access to a container registry from a virtual network by removing virtual network rules.
- Run
az acr network-rule listcommand to list the existing network rules. - Run
az acr network-rule removecommand to remove the network rule.
Validate private link connection
You should validate that the resources within the subnet of the private endpoint connect to your registry over a private IP address, and have the correct private DNS zone integration.
To validate the private link connection, connect to the virtual machine you set up in the virtual network.
Run a utility such as nslookup or dig to look up the IP address of your registry over the private link. For example:
dig $REGISTRY_NAME.azurecr.io
Example output shows the registry's IP address in the address space of the subnet:
[...]
; <<>> DiG 9.11.3-1ubuntu1.13-Ubuntu <<>> myregistry.azurecr.io
;; global options: +cmd
;; Got answer:
;; ->>HEADER<<- opcode: QUERY, status: NOERROR, id: 52155
;; flags: qr rd ra; QUERY: 1, ANSWER: 2, AUTHORITY: 0, ADDITIONAL: 1

;; OPT PSEUDOSECTION:
; EDNS: version: 0, flags:; udp: 65494
;; QUESTION SECTION:
;myregistry.azurecr.io.         IN      A

;; ANSWER SECTION:
myregistry.azurecr.io.  1783    IN      CNAME   myregistry.privatelink.azurecr.io.
myregistry.privatelink.azurecr.io. 10 IN A      10.0.0.7

[...]
Compare this result with the public IP address in dig output for the same registry over a public endpoint:
[...]
;; ANSWER SECTION:
myregistry.azurecr.io.	2881	IN	CNAME	myregistry.privatelink.azurecr.io.
myregistry.privatelink.azurecr.io. 2881	IN CNAME xxxx.xx.azcr.io.
xxxx.xx.azcr.io.	300	IN	CNAME	xxxx-xxx-reg.trafficmanager.net.
xxxx-xxx-reg.trafficmanager.net. 300 IN	CNAME	xxxx.westeurope.cloudapp.azure.com.
xxxx.westeurope.cloudapp.azure.com. 10	IN A 20.45.122.144

[...]
Registry operations over private link
Also verify that you can perform registry operations from the virtual machine in the network. Make an SSH connection to your virtual machine, and run az acr login to login to your registry. Depending on your VM configuration, you might need to prefix the following commands with sudo.
az acr login --name $REGISTRY_NAME
Perform registry operations such as docker pull to pull a sample image from the registry. Replace hello-world:v1 with an image and tag appropriate for your registry, prefixed with the registry login server name (all lowercase):
docker pull myregistry.azurecr.io/hello-world:v1
Docker successfully pulls the image to the VM.
Manage private endpoint connections
Manage a registry's private endpoint connections using the Azure portal, or by using commands in the az acr private-endpoint-connection command group. Operations include approve, delete, list, reject, or show details of a registry's private endpoint connections.
For example, to list the private endpoint connections of a registry, run the az acr private-endpoint-connection list command. For example:
az acr private-endpoint-connection list \
  --registry-name $REGISTRY_NAME
When you set up a private endpoint connection using the steps in this article, the registry automatically accepts connections from clients and services that have Azure RBAC permissions on the registry. You can set up the endpoint to require manual approval of connections. For information about how to approve and reject private endpoint connections, see Manage a Private Endpoint Connection.
Important
Currently, if you delete a private endpoint from a registry, you might also need to delete the virtual network's link to the private zone. If the link isn't deleted, you may see an error similar to unresolvable host.
DNS configuration options
The private endpoint in this example integrates with a private DNS zone associated with a basic virtual network. This setup uses the Azure-provided DNS service directly to resolve the registry's public FQDN to its private IP addresses in the virtual network.
Private link supports additional DNS configuration scenarios that use the private zone, including with custom DNS solutions. For example, you might have a custom DNS solution deployed in the virtual network, or on-premises in a network you connect to the virtual network using a VPN gateway or Azure ExpressRoute.
To resolve the registry's public FQDN to the private IP address in these scenarios, you need to configure a server-level forwarder to the Azure DNS service (168.63.129.16). Exact configuration options and steps depend on your existing networks and DNS. For examples, see Azure Private Endpoint DNS configuration.
Important
If for high availability you created private endpoints in several regions, we recommend that you use a separate resource group in each region and place the virtual network and the associated private DNS zone in it. This configuration also prevents unpredictable DNS resolution caused by sharing the same private DNS zone.
Manually configure DNS records
For some scenarios, you may need to manually configure DNS records in a private zone instead of using the Azure-provided private zone. Be sure to create records for each of the following endpoints: the registry endpoint, the registry's data endpoint, and the data endpoint for any additional regional replica. If all records aren't configured, the registry may be unreachable.
Important
If you later add a new replica, you need to manually add a new DNS record for the data endpoint in that region. For example, if you create a replica of myregistry in the northeurope location, add a record for myregistry.northeurope.data.azurecr.io.
The FQDNs and private IP addresses you need to create DNS records are associated with the private endpoint's network interface. You can obtain this information using the Azure portal or Azure CLI.
- In the portal, navigate to your private endpoint, and select DNS configuration.
- Using the Azure CLI, run the az network nic show command. For example commands, see Get endpoint IP configuration, earlier in this article.
After creating DNS records, make sure that the registry FQDNs resolve properly to their respective private IP addresses.
Clean up resources
To clean up your resources in the portal, navigate to your resource group. Once the resource group is loaded, click on Delete resource group to remove the resource group and the resources stored there.
If you created all the Azure resources in the same resource group and no longer need them, you can optionally delete the resources by using a single az group delete command:
az group delete --name $RESOURCE_GROUP
Integrating with a registry with private link enabled
To pull content from a registry with private link enabled, clients must allow access to the registry REST endpoint, as well as all regional data endpoints. The client proxy or firewall must allow access to
REST endpoint: {REGISTRY_NAME}.azurecr.io
Data endpoint(s): {REGISTRY_NAME}.{REGISTRY_LOCATION}.data.azurecr.io
For a geo-replicated registry, customer needs to configure access to the data endpoint for each regional replica.
You have to update the routing configuration for the client proxy and client firewall with the data endpoints to handle the pull requests successfully. A client proxy will provide central traffic control to the outbound requests. To handle local traffic a client proxy is not required, you can add into noProxy section to bypass the proxy. Learn more about HTTP proxy doc to integrate with AKS.
Requests to token server over private endpoint connection doesn't require the data endpoint configuration.
Next steps
To learn more about Private Link, see the Azure Private Link documentation.
To verify DNS settings in the virtual network that route to a private endpoint, run the az acr check-health command with the
--vnetparameter. For more information, see Check the health of an Azure container registry.If you need to set up registry access rules from behind a client firewall, see Configure rules to access an Azure container registry behind a firewall.
If you need to deploy Azure Container Instances that can pull images from an ACR through a private endpoint, see Deploy to Azure Container Instances from Azure Container Registry using a managed identity.