Provision agents for deployment groups
Azure DevOps Services | Azure DevOps Server 2022 - Azure DevOps Server 2019
A deployment group is a logical group of deployment target machines for Classic release pipelines in Azure Pipelines. Every target server in a deployment group requires a deployment agent installed. This article explains how to install and provision the deployment agent on each physical or virtual machine (VM) in a deployment group.
You can install the agent on a target machine in any one of the following ways:
- Run the script that generates when you create the deployment group.
- Install the Azure Pipelines Agent Azure VM extension on the VM.
- Use the AzureResourceGroupDeploymentV2 task in your release pipeline to create a deployment group and provision agents dynamically.
The following sections provide steps to implement each method.
Prerequisites
- An Azure DevOps organization and project. To create an organization or project, see Create a new organization or Create a project in Azure DevOps.
- Access to at least one Windows or Linux deployment target machine with the appropriate permissions.
- For the Azure Pipelines Agent installation methods, an Azure account and subscription with permissions to create and manage Azure VMs. If you don't have an Azure account, sign up for a free account.
Run the installation script on the target servers
When you create a deployment group, a script is generated that you can run on each target machine to register the server and install the agent. To install the agent by using the generated registration script:
From your Azure DevOps project, select Pipelines > Deployment groups.
On the Deployment groups screen, select New, or select Add a deployment group if this deployment group is the first one in the project.
Enter a Deployment group name and optional Description, and then select Create.
On the next screen, select Windows or Linux for the Type of target to register. A registration script is generated.
Select Use a personal access token in the script for authentication. For more information, see Use personal access tokens.
Select Copy script to the clipboard.
On each target machine, sign in using an account with administrative permissions.
Run the copied script to register the machine and install the agent. For Windows machines, use an elevated PowerShell command prompt.
As the script runs:
To assign tags that let you limit deployments to certain servers in a deployment group job, enter Y when prompted to enter tags, and then enter a tag or tags for this VM.
Tags are limited to 256 characters each, are case insensitive, and there's no limit to the number of tags you can use.
When prompted for a user account, accept the defaults.
Note
If you get an error when running the script that a secure channel couldn't be created, run the following command at the Administrator PowerShell prompt:
[Net.ServicePointManager]::SecurityProtocol = [Net.SecurityProtocolType]::Tls12
After you set up each target server, the script should return the message Service vstsagent.{organization-name}.{computer-name} started successfully.
On the Targets tab of the Azure Pipelines Deployment groups page, you can verify that the agent is running. Refresh the page if necessary.
Install the Azure Pipelines Agent Azure VM extension
If you use Azure VMs as your deployment machines, you can install the Azure Pipelines Agent extension on each VM. The extension automatically registers the agent with the specified deployment group in your Azure DevOps project.
To install the agent by using the extension, first create the deployment group:
- From your Azure DevOps project, select Pipelines > Deployment groups.
- On the Deployment groups screen, select New, or select Add a deployment group if this deployment group is the first one in the project.
- Enter a Deployment group name and optional Description, and then select Create.
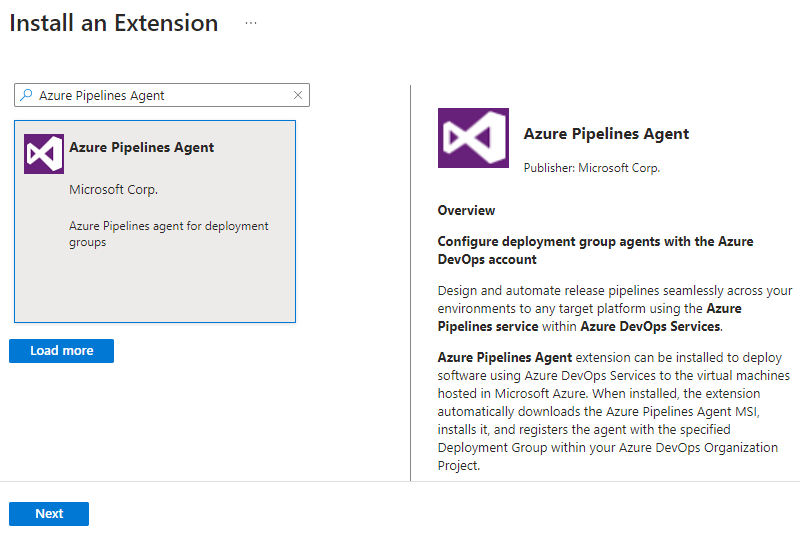
In the Azure portal, install the Azure Pipelines Agent extension on each target VM:
On the VM page, select Settings > Extensions + Applications in the left navigation.
On the Extension tab, select Add.
On the Install an Extension page, search for and select Azure Pipelines Agent, and then select Next.
On the Configure Azure Pipelines Agent Extension screen, specify the following information:
- Azure DevOps Organization Url: Enter the URL of your Azure DevOps organization, such as
https://dev.azure.com/contoso. - Team Project: Enter your project name, such as myProject.
- Deployment Group: Enter the name of the deployment group you created.
- Agent Name: Optionally, enter a name for the agent. If you don't enter anything, the agent is named the VM name appended with
-DG. - Personal Access Token: Enter the Personal Access Token (PAT) to use for authenticating to Azure Pipelines.
- Tags: Optionally, specify a comma-separated list of tags to configure on the agent. Tags are limited to 256 characters each, are case insensitive, and there's no limit to the number of tags you can use.
- Azure DevOps Organization Url: Enter the URL of your Azure DevOps organization, such as
Select Review + create, and when validation passes, select Create.
Use the AzureResourceGroupDeploymentV2 task
You can use the AzureResourceGroupDeploymentV2 task to deploy an Azure Resource Manager (ARM) template. The template can install the Azure Pipelines Agent extension while creating an Azure VM, or can update the resource group to apply the extension after a VM is created.
Alternatively, you can use the advanced deployment options of the AzureResourceGroupDeployment task to deploy the agent.
Create a deployment group
First create the deployment group:
- From your Azure DevOps project, select Pipelines > Deployment groups.
- On the Deployment groups screen, select New, or select Add a deployment group if this deployment group is the first one in the project.
- Enter a Deployment group name and optional Description, and then select Create.
Use an ARM template to install the agent
An ARM template is a JSON file that declaratively defines a set of Azure resources. Azure automatically reads the template and provisions the resources. You can deploy multiple services and their dependencies in a single template.
To register and install the deployment agent by using an ARM template, add a resources element under the Microsoft.Compute/virtualMachine resource, as shown in the following code.
"resources": [
  {
    "name": "[concat(parameters('vmNamePrefix'),copyIndex(),'/TeamServicesAgent')]",
    "type": "Microsoft.Compute/virtualMachines/extensions",
    "location": "[parameters('location')]",
    "apiVersion": "2015-06-15",
    "dependsOn": [
        "[resourceId('Microsoft.Compute/virtualMachines/',
                      concat(parameters('vmNamePrefix'),copyindex()))]"
    ],
    "properties": {
      "publisher": "Microsoft.VisualStudio.Services",
      "type": "TeamServicesAgent",
      "typeHandlerVersion": "1.0",
      "autoUpgradeMinorVersion": true,
      "settings": {
        "VSTSAccountName": "[parameters('VSTSAccountName')]",
        "TeamProject": "[parameters('TeamProject')]",
        "DeploymentGroup": "[parameters('DeploymentGroup')]",
        "AgentName": "[parameters('AgentName')]",
        "AgentMajorVersion": "auto|2|3",
        "Tags": "[parameters('Tags')]"
      },
      "protectedSettings": {
      "PATToken": "[parameters('PATToken')]"
     }
   }
  }
]
Note
For a Linux VM, the type parameter under properties in the code should be TeamServicesAgentLinux.
Note
In Azure DevOps Server 2022.1 and higher, the allowable values for AgentMajorVersion are auto|2|3. In Azure DevOps Server 2022.0 and earlier, the allowable values for AgentMajorVersion are auto|N.
"resources": [
  {
    "name": "[concat(parameters('vmNamePrefix'),copyIndex(),'/TeamServicesAgent')]",
    "type": "Microsoft.Compute/virtualMachines/extensions",
    "location": "[parameters('location')]",
    "apiVersion": "2015-06-15",
    "dependsOn": [
        "[resourceId('Microsoft.Compute/virtualMachines/',
                      concat(parameters('vmNamePrefix'),copyindex()))]"
    ],
    "properties": {
      "publisher": "Microsoft.VisualStudio.Services",
      "type": "TeamServicesAgent",
      "typeHandlerVersion": "1.0",
      "autoUpgradeMinorVersion": true,
      "settings": {
        "VSTSAccountName": "[parameters('VSTSAccountName')]",
        "TeamProject": "[parameters('TeamProject')]",
        "DeploymentGroup": "[parameters('DeploymentGroup')]",
        "AgentName": "[parameters('AgentName')]",
        "AgentMajorVersion": "auto|N",
        "Tags": "[parameters('Tags')]"
      },
      "protectedSettings": {
      "PATToken": "[parameters('PATToken')]"
     }
   }
  }
]
In the preceding code:
VSTSAccountNameis the required Azure Pipelines organization to use. For example, if your Azure DevOps URL ishttps://dev.azure.com/contoso, just specifycontosoTeamProjectis the required project that has the deployment group defined in it.DeploymentGroupis the required deployment group to register the agent to.AgentNameis an optional agent name. If not specified, the agent is given the VM name with-DGappended.Tagsis an optional, comma-separated list of tags to be set on the agent. Tags are limited to 256 characters each, are case insensitive, and there's no limit to the number of tags you can use.PATTokenis the required PAT to authenticate to Azure Pipelines for downloading and configuring the agent.
For more information about ARM templates, see Define resources in Azure Resource Manager templates.
Use the template in a release pipeline
Create a release pipeline:
- Select Pipelines > Releases from the left menu, and then select New > New release pipeline.
- In the Releases tab of Azure Pipelines, create a release pipeline with a stage that contains the ARM template deployment task.
- This template uses version 2 of the task, so on the Azure resource group deployment settings screen, change the Task version from 3.* to 2.*.
- Provide the parameters required for the task, such as the Azure subscription, resource group name, location, template information, and action to take.
- Save the release pipeline, and create a release from the pipeline to install the agents.
Install agents using the advanced deployment options
Alternatively, you can install the agent by using advanced deployment options. Follow the preceding steps, but on the Azure resource group deployment settings screen, expand the Advanced deployment options for virtual machines section.
Under Enable prerequisites, select Configure with Deployment Group agent.
Provide the following required parameters and settings:
Azure Pipelines service connection: Select an existing service connection that points to your target.
If you don't have an existing service connection, select New and create one. For more information, see Create a service connection. Configure the service connection to use a PAT with scope restricted to Deployment Group.
Team project: Select the project that contains the deployment group.
Deployment Group: Select the deployment group to register the agents to.
Select Copy Azure VM tags to agents to copy any tags already configured on the Azure VM to the corresponding deployment group agent.
By default, all Azure tags are copied using the
Key: Valueformat, for exampleRole: Web.
Save the pipeline, and create a release to install the agents.
Troubleshoot the extension
There are some known issues with the Azure Pipelines Agent extension.
Status file is too large
This issue can occur on Windows VMs. The status file contains a JSON object that describes the current status of the extension. The object is a placeholder to list the operations performed so far.
Azure reads this status file and passes the status object as response to API requests. The file has a maximum allowed size. If the size exceeds the maximum, Azure can't read it completely and gives an error for the status.
Even though the extension might install initially, every time the machine reboots the extension performs some operations that append to the status file. If the machine reboots many times, the status file size can exceed the threshold, causing the error Handler Microsoft.VisualStudio.Services.TeamServicesAgent:1.27.0.2 status file 0.status size xxxxxx bytes is too big. Max Limit allowed: 131072 bytes. Although extension installation might succeed, this error hides the actual state of the extension.
This machine reboot issue is fixed starting with version 1.27.0.2 for the Windows extension and 1.21.0.1 for the Linux extension. A reboot now adds nothing to the status file. However, if you had this issue with an earlier version of the extension and your extension was autoupdated to the fixed version, the issue can persist. Newer versions of the extension can still work with an earlier status file.
You could face this issue if you're using an earlier version of the extension with the flag to turn off minor version autoupdates, or if a large status file was carried from an earlier version to a fixed version. If so, you can solve the issue by uninstalling and reinstalling the extension. Uninstalling the extension cleans up the entire extension directory and creates a new status file for a fresh install of the latest version.
Custom data issue
Python 2 is deprecated, and the Azure Pipelines Agent extension works with Python 3. If you still use OS versions that don't have Python 3 installed by default, to run the extension you should either install Python 3 on the VM or switch to an OS version that has Python 3 installed by default. Otherwise, there can be confusion regarding the custom data location on the VM when you switch OS versions.
On Linux VMs, custom data copies to /var/lib/waagent/ovf-env.xml for earlier agent versions, and to /var/lib/waagent/CustomData for newer versions. If you hardcode only one of these two paths, you might face issues when switching OS versions because one of the paths doesn't exist on the new OS version, although the other path is present. To avoid breaking the VM provisioning, consider using both paths in the template so that if one fails, the other should succeed.
Help and support
- Explore troubleshooting tips.
- Get advice on Stack Overflow.
- Post your questions, search for answers, or suggest a feature in the Azure DevOps Developer Community.
- Get support for Azure DevOps.