Poznámka:
Přístup k této stránce vyžaduje autorizaci. Můžete se zkusit přihlásit nebo změnit adresáře.
Přístup k této stránce vyžaduje autorizaci. Můžete zkusit změnit adresáře.
LCD character displays are useful for displaying information without the need for an external monitor. Common LCD character displays can be connected directly to the GPIO pins, but such an approach requires the use of up to 10 GPIO pins. For scenarios that require connecting to a combination of devices, devoting so much of the GPIO header to a character display is often impractical.
Many manufacturers sell 20x4 LCD character displays with an integrated GPIO expander. The character display connects directly to the GPIO expander, which then connects to the Raspberry Pi via the Inter-Integrated Circuit (I2C) serial protocol.
In this topic, you will use .NET to display text on an LCD character display using an I2C GPIO expander.
Požadavky
- Počítač s jednou deskou (SBC) založený na ARM (ARMv7 nebo novější)
- 20x4 LCD Character Display with I2C interface
- Jumper wires
- Breadboard (optional/recommended)
- Raspberry Pi GPIO breakout board (optional/recommended)
- .NET SDK 8 nebo novější
Poznámka:
Tento kurz je napsán za předpokladu, že cílové zařízení je Raspberry Pi. Tento kurz však lze použít pro jakýkoli linuxový SBC, který podporuje .NET, jako je Orange Pi, ODROID a další.
Poznámka:
There are many manufacturers of LCD character displays. Most designs are identical, and the manufacturer shouldn't make any difference to the functionality. For reference, this tutorial was developed with the SunFounder LCD2004.
Prepare the SBC
Ujistěte se, že je vaše SBC nakonfigurovaná tak, aby podporovala následující služby:
- SSH
- I2C
U mnoha zařízení není nutná žádná další konfigurace. V případě Raspberry Pi použijte raspi-config příkaz. Další informace najdete raspi-configv dokumentaci k Raspberry Pi.
Příprava hardwaru
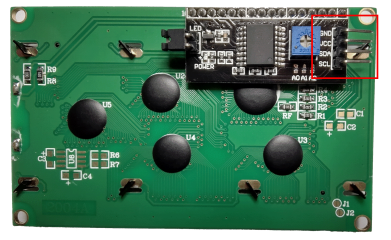
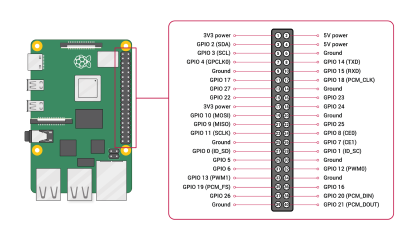
Use jumper wires to connect the four pins on the I2C GPIO expander to the Raspberry Pi as follows:
- GND to ground
- VCC to 5V
- SDA to SDA (GPIO 2)
- SCL to SCL (GPIO 3)
Refer to the following figures as needed:
| I2C interface (back of display) | Raspberry Pi GPIO |
|---|---|

|

Obrázek se svolením Raspberry Pi Foundation. |
Návod
A GPIO breakout board in conjunction with a breadboard is recommended to streamline connections to the GPIO header.
Vytvoření aplikace
V upřednostňovaném vývojovém prostředí proveďte následující kroky:
Vytvořte novou konzolovou aplikaci .NET pomocí .NET CLI nebo Visual Studio. Name it LcdTutorial.
dotnet new console -o LcdTutorial
cd LcdTutorial
Přidejte do projektu balíček Iot.Device.Bindings . Použijte .NET CLI z adresáře projektu nebo sady Visual Studio.
dotnet add package Iot.Device.Bindings --version 3.2.0-*Obsah souboru Program.cs nahraďte tímto kódem:
using System;
using System.Device.Gpio;
using System.Device.I2c;
using System.Threading;
using Iot.Device.CharacterLcd;
using Iot.Device.Pcx857x;

Console.WriteLine("Displaying current time. Press Ctrl+C to end.");

using I2cDevice i2c = I2cDevice.Create(new I2cConnectionSettings(1, 0x27));
using var driver = new Pcf8574(i2c);
using var lcd = new Lcd2004(registerSelectPin: 0,
                        enablePin: 2,
                        dataPins: new int[] { 4, 5, 6, 7 },
                        backlightPin: 3,
                        backlightBrightness: 0.1f,
                        readWritePin: 1,
                        controller: new GpioController(PinNumberingScheme.Logical, driver));
int currentLine = 0;

while (true)
{
    lcd.Clear();
    lcd.SetCursorPosition(0,currentLine);
    lcd.Write(DateTime.Now.ToShortTimeString());
    currentLine = (currentLine == 3) ? 0 : currentLine + 1;
    Thread.Sleep(1000);
}
V předchozím kódu:
A using declaration creates an instance of
I2cDeviceby callingI2cDevice.Createand passing in a newI2cConnectionSettingswith thebusIdanddeviceAddressparameters. ToI2cDevicepředstavuje autobus I2C. Deklaraceusingzajišťuje, že objekt je ukončen a hardwarové prostředky jsou uvolněny správně.Výstraha
The device address for the GPIO expander depends on the chip used by the manufacturer. GPIO expanders equipped with a PCF8574 use the address
0x27, while those using PCF8574A chips use0x3F. Consult your LCD's documentation.Další
usingdeklarace vytvoří instanciPcf8574a předáI2cDevicedo konstruktoru. This instance represents the GPIO expander.Another
usingdeclaration creates an instance ofLcd2004to represent the display. Several parameters are passed to the constructor describing the settings to use to communicate with the GPIO expander. The GPIO expander is passed as thecontrollerparameter.A
whileloop runs indefinitely. Každá iterace:- Clears the display.
- Sets the cursor position to the first position on the current line.
- Writes the current time to the display at the current cursor position.
- Iterates the current line counter.
- Sleeps 1000 ms.
Sestavení aplikace Pokud používáte .NET CLI, spusťte
dotnet build. Pokud chcete sestavovat v sadě Visual Studio, stiskněte kombinaci kláves Ctrl+Shift+B.Nasaďte aplikaci do SBC jako samostatnou aplikaci. Pokyny najdete v tématu Nasazení aplikací .NET do Raspberry Pi. Ujistěte se, že spustitelnému souboru udělíte oprávnění execute pomocí
chmod +x.Spusťte aplikaci na Raspberry Pi přepnutím do adresáře nasazení a spuštěním spustitelného souboru.
./LcdTutorialObserve the LCD character display as the current time displays on each line.
Návod
If the display is lit but you don't see any text, try adjusting the contrast dial on the back of the display.
Ukončete program stisknutím kláves Ctrl+C.
Gratulujeme! You've displayed text on an LCD using a I2C and a GPIO expander!
Získání zdrojového kódu
Zdroj pro tento kurz je k dispozici na GitHubu.
