Poznámka:
Přístup k této stránce vyžaduje autorizaci. Můžete se zkusit přihlásit nebo změnit adresáře.
Přístup k této stránce vyžaduje autorizaci. Můžete zkusit změnit adresáře.
The Microsoft Purview portal supports direct management of permissions for users who perform tasks within Microsoft Purview. By using the Roles and scopes area in Settings for the portal, you can manage permissions for users across your Purview data security, data governance, and risk and compliance solutions. You can limit users to perform only specific tasks that you explicitly grant them access to.
Important
To view Role groups in the Roles and scopes area in the Microsoft Purview portal, users need to be a global administrator or need to be assigned the Role Management role (assigned only to the Organization Management role group). The Role Management role allows users to view, create, and modify role groups.
Important
Microsoft recommends that you use roles with the fewest permissions. Minimizing the number of users with the Global Administrator role helps improve security for your organization. When planning your access control strategy, follow the best practice to manage access with the least privilege for your users.
Microsoft Purview permissions
The Microsoft Purview portal uses the role-based access control (RBAC) permissions model. Most Microsoft 365 services use RBAC, so if you're familiar with the permission structure in these services, granting permissions in the Microsoft Purview portal is similar. The permissions you manage in the Microsoft Purview portal don't cover the management of all the permissions needed in each individual service. You still need to manage certain service-specific permissions in the admin center for the specific service. For example, if you need to assign permissions for archiving, auditing, and MRM retention policies, you need to manage these permissions in the Exchange admin center.
Solution-specific permissions
For specific Microsoft Purview solution permission guidance, see the following articles:
Data security
- Data Loss Prevention
- Data Security Investigations
- Data Security Posture Management
- Device Onboarding
- Sensitive Information Types - Custom
- Sensitive Information Types - Exact Data Match
- Sensitivity Labels
Data governance
- Collection Policies
- Data Classification - Activity Explorer
- Data Classification - Content Explorer
- Data Classification - Data Explorer
- Data governance - Classic Data Catalog
- Data governance - Unified Catalog
- Data Lifecycle Management
- Records Management
Risk and compliance
- Adaptive Protection - Insider Risk Management
- Administrative Units
- Audit
- Communication Compliance
- Compliance Manager
- eDiscovery
- Information Barriers
- Insider Risk Management
- Privileged Access Management
AI and Copilot
- Data Security Posture Management for AI
- Security Copilot for Purview
- Triage Agent in Data Loss Prevention
- Triage Agent in Insider Risk Management
To view all of the default role groups that are available in the Microsoft Purview portal and the roles that are assigned to the role groups by default, see Roles and role groups in the Microsoft Defender XDR and Microsoft Purview portals.
Managing permissions in the Microsoft Purview portal only gives users access to the compliance and governance features that are available within the Microsoft Purview portal. To grant permissions to other features that aren't in the Microsoft Purview portal, such as Exchange mail flow rules (also known as transport rules), use the Exchange admin center.
The current governance roles and role groups cover only broad access to the Microsoft Purview Data Map and Unified Catalog. For more access, Microsoft Purview governance uses a combination of role groups, data access, and solution-specific permissions.
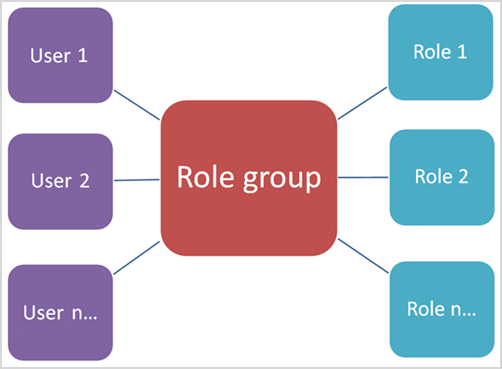
Relationship of members, roles, and role groups
A role grants permissions to perform a set of tasks. For example, the Case Management role lets users work with eDiscovery cases.
A role group is a set of roles that enable users to do their jobs across compliance and governance solutions in the Microsoft Purview portal. For example, by adding users to the Insider Risk Management role group, designated administrators, analysts, investigators, and auditors get the necessary insider risk management permissions in a single group. The Microsoft Purview portal includes default role groups for tasks and functions for each compliance and governance solution that you need to assign people to. Generally, add individual users as members to the default role groups as needed.
Microsoft Entra roles in the Microsoft Purview portal
The roles that appear in the Microsoft Entra ID section of the Roles and scopes area are Microsoft Entra roles, and global administrators can see this section. These roles align with job functions in your organization's IT group, making it easy to give a person all the permissions necessary to get their job done. You can view the users currently assigned to each role by selecting an admin role and viewing the role panel details. To manage members of a Microsoft Entra role, select Manage members in Microsoft Entra ID. This choice redirects you to the Azure management portal.
For more information about Microsoft Entra roles, see Microsoft Entra built-in roles.
| Role | Description |
|---|---|
| Attack Payload Author | Create attack payloads but not actually launch or schedule them. For more information, see Attack Payload Author. |
| Attack Simulation Administrator | Create and manage all aspects of attack simulation creation, launch/scheduling of a simulation, and the review of simulation results. For more information, see Attack Simulation Administrator. |
| Compliance Administrator | Help your organization stay compliant with any regulatory requirements, manage eDiscovery cases, and maintain data governance policies across Microsoft 365 locations, identities, and apps. For more information, see Compliance Administrator. |
| Compliance Data Administrator | Keep track of your organization's data across Microsoft 365, make sure it's protected, and get insights into any issues to help mitigate risks. For more information, see Compliance Data Administrator. |
| Global Administrator | Access to all administrative features in all Microsoft 365 services. Only global administrators can assign other administrator roles. For more information, see Global Administrator / Company Administrator. |
| Global Reader | The read-only version of the Global administrator role. View all settings and administrative information across Microsoft 365. For more information, see Global Reader. |
| Security Administrator | Control your organization's overall security by managing security policies, reviewing security analytics and reports across Microsoft 365 products, and staying up-to-speed on the threat landscape. For more information, see Security Administrator. |
| Security Operator | View, investigate, and respond to active threats to your Microsoft 365 users, devices, and content. For more information, see Security Operator. |
| Security Reader | View and investigate active threats to your Microsoft 365 users, devices, and content, but (unlike the Security operator) they don't have permissions to respond by taking action. For more information, see Security Reader. |
Role precedence and scope behavior
If you assign both an Entra role and a scoped Microsoft Purview role group assignment to a user or group (for example, a role group scoped to an Administrative Unit), the Entra role takes precedence at runtime. As a result, the user's effective permissions are unscoped, even if a scoped role assignment also exists.
- Example 1: If you assign the Compliance Administrator role in Entra to a user and also assign a scoped Compliance Administrator role in Microsoft Purview, the Entra role overrides the scoped assignment. The user's effective access is unscoped, and they can access all entities available to that role without Administrative Unit scoping.
- Example 2: If you assign the Global Reader role in Entra to a user and assign a scoped DLP Compliance Management role in Microsoft Purview, any features or APIs that overlap between these roles grant the user unscoped access to the corresponding data.
- Example 3: When both scoped Microsoft Purview role assignments and Entra roles are present, Entra roles always take precedence, and scoping applied through Administrative Units doesn't restrict the user's effective permissions for overlapping capabilities.
Manage role groups
Add users or groups to a Microsoft Purview built-in role group
Complete the following steps to add users or groups to a Microsoft Purview role group:
Sign in to the Microsoft Purview portal by using credentials for an admin account assigned the Role management role. Go to Settings > Roles and scopes to view and manage compliance and governance roles in your organization.
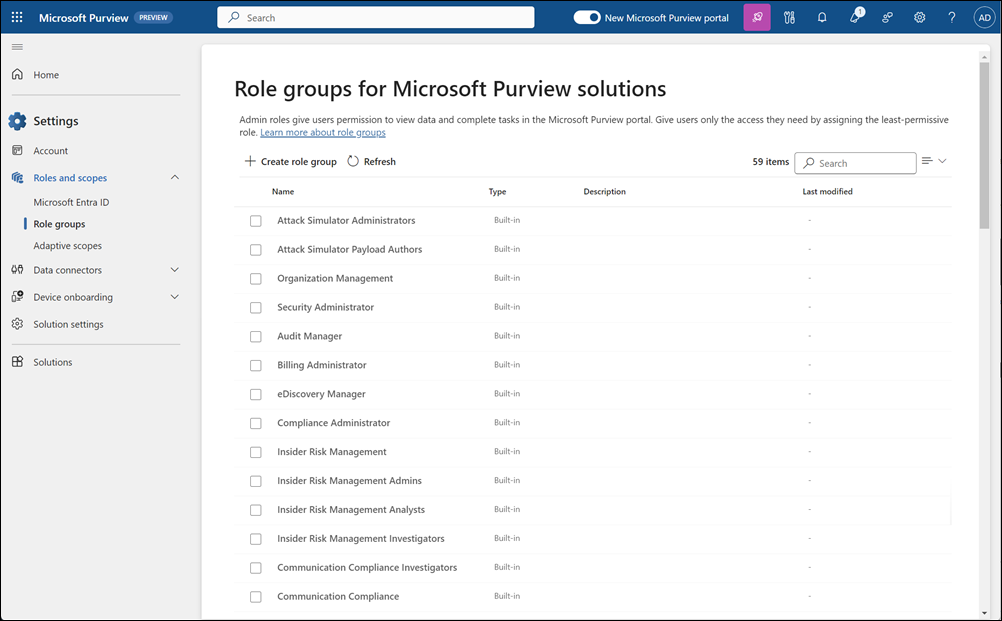
Select Role groups.
On Role groups for Microsoft Purview solutions, select a Microsoft Purview role group you want to add users to. Select Edit on the control bar.
On Edit members of the role group, select Choose users or Choose groups.
Important
Security groups are supported only in Microsoft 365 commercial cloud organizations.
Select the check box for all users or groups you want to add to the role group.
Select Select.
If the selected users or groups need organization-wide access as part of this role group assignment, go to step 10.
If the selected users or groups need to be assigned to administrative units, select the users or groups and select Assign admin units.
On Assign admin units, select the check box for all the administrative units you want to assign to the users or groups. Select Select.
Select Next and Save to add the users or groups to the role group. Select Done to complete the steps.
Remove users or groups from a Microsoft Purview built-in role group
Complete the following steps to remove users or groups from a Microsoft Purview role group:
- Sign in to the Microsoft Purview portal by using credentials for an admin account assigned the Role management role. Go to Settings > Roles and scopes to view and manage compliance and governance roles in your organization.
- Select Role groups.
- On Role groups for Microsoft Purview solutions, select a Microsoft Purview role group that you want to remove users or groups from. Select Edit on the control bar.
- On Edit members of the role group, select the check box for all users or groups you want to remove from the role group.
- Select Remove members, and then select Next.
- Select Save to remove the users or groups from the role group. Select Done to complete the steps.
Create a custom Microsoft Purview role group
Complete the following steps to create a custom Microsoft Purview role group:
Sign in to the Microsoft Purview portal by using credentials for an admin account assigned the Role management role. Go to Settings > Roles and scopes to view and manage compliance and governance roles in your organization.
Select Role groups.
On Role groups for Microsoft Purview solutions, select Create role group.
On Name the role group, enter a name for the custom role group in the Name field. You can't change the name of the role group after you create it. If needed, enter a description for the custom role group in the Description field. Select Next to continue.
On Add roles to the role group, select Choose roles.
Select the checkboxes for the roles to add to the custom role group. Select Select.
Select Next to continue.
On Add members to the role group, select Choose users (or Choose groups if applicable).
Important
Security groups are supported only in Microsoft 365 commercial cloud organizations.
Select the checkboxes for the users (or groups) to add to the custom role group. Select Select.
Select Next to continue.
If the selected users or groups need organization-wide access as part of this role group assignment, go to Step 14.
If the selected users or groups need to be assigned to administrative units, select the users or groups and select Assign admin units.
On Assign admin units, select the check box for all the administrative units you want to assign to the users or groups. Select Select.
Select Next.
On Review the role group and finish, review the details for the custom role group. If you need to edit the information, select Edit in the appropriate section. When all the settings are correct, select Create to create the custom role group or select Cancel to discard the changes and not create the custom role group.
Update a custom Microsoft Purview role group
Complete the following steps to update a custom Microsoft Purview role group:
- Sign in to the Microsoft Purview portal by using credentials for an admin account assigned the Role management role. Go to Settings > Roles and scopes to view and manage compliance and governance roles in your organization.
- Select Role groups.
- On Role groups for Microsoft Purview solutions, select a Microsoft Purview role group you want to update, and then select Edit on the control bar.
- On Name the role group, update the description for the custom role group in the Description field. You can't change the name of the custom role group. Select Next.
- On Edit roles of the role group, select Choose roles to add roles to update the roles assigned to the role group. You can also select any of the currently assigned roles and select Remove roles to remove the roles from the role group. After you update the roles, select Next.
- On Edit members of the role group, select Choose users or Choose groups to add users or groups assigned to the role group. To update the administrative units for users or groups, select any of the currently assigned user or groups and select Assign admin units. You can also select any of the currently assigned users and groups and select Remove members to remove the users or groups from the role group. After you update the members, select Next.
- On Review the role group and finish, review the details for the custom role group. If you need to edit the information, select Edit in the appropriate section. When all the settings are correct, select Save to update the custom role group or select Cancel to discard the changes and not update the custom role group.
Delete a custom Microsoft Purview role group
Complete the following steps to delete a custom Microsoft Purview role group:
- Sign in to the Microsoft Purview portal by using credentials for an admin account assigned the Role management role. Go to Settings > Roles and scopes to view and manage compliance and governance roles in your organization.
- Select Role groups.
- On Role groups for Microsoft Purview solutions, select a Microsoft Purview role group you want to delete, then select Delete on the control bar.
- On Delete role group, select Delete to delete the role group or select Cancel to cancel the deletion process.