Classify and protect sensitive information
One of the key elements of the Defender for Cloud Apps framework is protecting your sensitive information. Sensitivity is a subjective phrase, as this can vary from one organization to another.
Here, you'll understand how to find which apps are accessing your data, how to classify which information is sensitive, how to protect it from illegal access, and how to monitor and report on the overall health of your environment.
What is Information Protection?
An employee might accidentally upload a file to the wrong place. Or they could send confidential information to someone who shouldn't have it. As a result, information could be lost or made accessible to the wrong person. Any lost or wrongfully exposed information can have serious legal, financial, or reputational consequences for your organization. Information is vital to any modern organization, and you want to ensure that it's protected at all times.
To help you, Microsoft Defender for Cloud Apps natively integrates with Azure Information Protection, a cloud-based service that helps classify and protect files and emails across your organization.
Note
You have to enable the app connector for Microsoft 365 to take advantage of Azure Information Protection
You enforce information protection with Microsoft Defender for Cloud Apps through phases:
Phase 1: Discover data
During this phase, you make sure apps are connected to Microsoft Defender for Cloud Apps so it can scan for and classify data, then apply policies and controls. You can do this in two different ways: use an app connector, or use Conditional Access App Control.
Phase 2: Classify sensitive information
In this phase, you'll do the following:
Decide what counts as sensitive in the context of your organization. Microsoft Defender for Cloud Apps includes more than 100 predefined sensitive information types, and default labels in Azure Information Protection. Sensitive information types and labels define how to handle, for example, passport numbers and national/regional identity numbers. You can also use default labels in Azure Information Protection. These labels will be used by Microsoft Defender for Cloud Apps when scanning, to classify information. The labels are:
- Personal: Data for personal, nonbusiness use only.
- Public: Data that can be shared for public consumption, such as marketing posters and blog posts.
- General: Data that can't be shared for public consumption, but can be shared with external partners. For example, project timelines and organizational charts.
- Confidential: Data that could damage the organization if it's shared with unauthorized people. For example, sales account data and forecasts.
- Highly confidential: Very sensitive data that will cause serious damage if shared with unauthorized people. For example, customer details, passwords and source code.
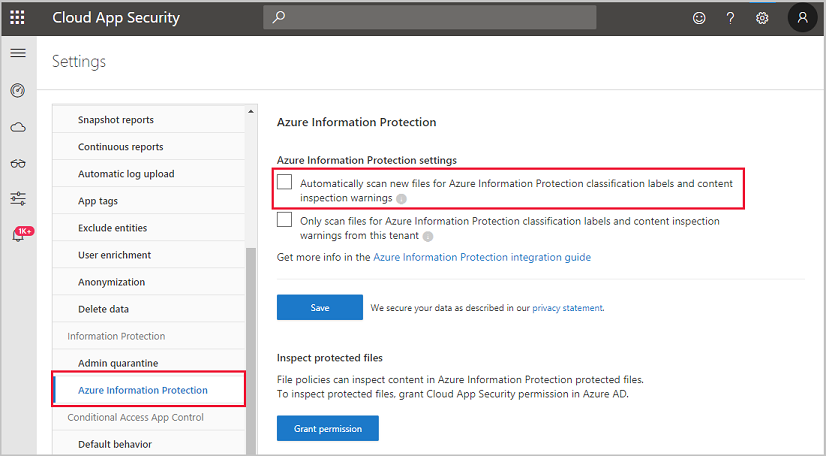
Enable Azure Information Protection integration in Microsoft Defender for Cloud Apps by selecting Automatically scan new files for Azure Information Protection classification labels in the Settings pane:
Phase 3: Protect data
There are different types of policies you can create to detect sensitive information and act accordingly. For example, you can create a File policy to scan the content of files in your apps in real time, and for data at rest. File policies let you apply governance actions. You can then automatically:
- Trigger alerts and email notifications.
- Change sharing access for files.
- Quarantine files.
- Remove file or folder permissions.
- Move files to a trash folder.
To create a file policy
Open Microsoft Defender for Cloud Apps
Select the Control pane
Select Policies > Create policy
Select File policy
When the form that appears, you'll fill in the following fields:
Field Description Policy severity Defines how important the policy is and whether to trigger a notification. The severity of the policy can be customized to quickly identify the risk associated with a policy match. Category This is an informative label that you assign to the policy to help locate it later. By default, for File policies is DLP. Create a filter for the files this policy will act on It is used to decide which apps will trigger the policy. Ideally this should be defined to be as narrow as possible to avoid false positives. Apply to (1st) Select which discovered apps will trigger the policy. There are two choices: · All files excluding selected folders: to apply the policy to all files. · Selected folders: to apply the policy to apps like Box, SharePoint, OneDrive, and Dropbox. Apply to (2nd) Select which users and groups should be included in this policy. There are three options: · All file owners · File owners from selected user groups · All file owners excluding selected groups Content inspection method Select how you want files to be inspected. There are two options: · Built-in DLP · Data Classification Services (DCS) Microsoft recommends DCS as this will allow you to use a unified labeling experience across Microsoft 365, Azure Information Protection, and Microsoft Defender for Cloud Apps. Governance Select which governance actions you want Microsoft Defender for Cloud Apps to perform when a match is detected. When you're done, select Create to create your file policy.
Phase 4: Monitor and report
Check your dashboard to monitor for alerts and the overall health of your environment. For example, to review file-related alerts, go to the Alerts pane, and select DLP in the Category field.
You can investigate a file-related alert to better understand what caused it to be triggered. Or you can dismiss an alert that you determine could be ignored. You can also export your alerts to a CSV file for further analysis.

