Poznámka:
Přístup k této stránce vyžaduje autorizaci. Můžete se zkusit přihlásit nebo změnit adresáře.
Přístup k této stránce vyžaduje autorizaci. Můžete zkusit změnit adresáře.
Průvodce, který vám pomůže s instalací webové architektury Nuxt.js a zprovozněním ve Windows.
Nuxt.js je architektura pro vytváření serverově vykreslených javascriptových aplikací založených na Vue.js, Node.js, webpacku a Babel.js. Inspirovalo ji Next.js. V podstatě se jedná o šablonu projektu pro Vue. Stejně jako Next.js, je vytvořen s důrazem na osvědčené postupy a umožňuje vytvářet "univerzální" webové aplikace jednoduchým, konzistentním způsobem, s minimální konfigurací. Tyto "univerzální" webové aplikace vykreslené serverem se také někdy nazývají "isomorfní", což znamená, že kód se sdílí mezi klientem a serverem.
Další informace o Vue najdete na stránce přehledu Vue .
Požadavky
V této příručce se předpokládá, že jste už dokončili kroky nastavení Node.js vývojového prostředí, včetně těchto:
-
nainstalovat subsystém Windows pro Linux (WSL), včetně distribuce Linuxu (například Ubuntu) a ujistěte se, že je spuštěný v režimu WSL 2. Můžete to zkontrolovat tak, že otevřete PowerShell a zadáte:
wsl -l -v - Nainstalujte Node.js do WSL 2: To zahrnuje správce verzí, správce balíčků, Visual Studio Code a rozšíření pro vzdálený vývoj.
Při práci s aplikacemi NodeJS doporučujeme používat subsystém Windows pro Linux, aby se zlepšila rychlost výkonu, kompatibilita volání systému a parody při spouštění linuxových serverů nebo kontejnerů Dockeru.
Důležité
Instalace linuxové distribuce pomocí WSL vytvoří adresář pro ukládání souborů: \\wsl\Ubuntu-20.04 (nahraďte Ubuntu-20.04 libovolnou distribucí Linuxu, kterou používáte). Pokud chcete tento adresář otevřít v Průzkumníku souborů Windows, otevřete příkazový řádek WSL, vyberte svůj domovský adresář pomocí cd ~a pak zadejte příkaz explorer.exe . Dávejte pozor, abyste nenainstalovali NodeJS nebo ukládal soubory, se kterými budete pracovat na připojené jednotce C (/mnt/c/Users/yourname$). Tím se výrazně zpomalí doba instalace a sestavení.
Instalace Nuxt.js
Pokud chcete nainstalovat Nuxt.js, budete muset odpovědět na řadu otázek týkajících se toho, jakého typu integrované architektury na straně serveru, architektury uživatelského rozhraní, testovací architektury, režimu, modulů a linteru byste chtěli nainstalovat:
Otevřete příkazový řádek WSL (tj. Ubuntu).
Vytvořte novou složku projektu:
mkdir NuxtProjectsa zadejte tento adresář:cd NuxtProjects.Nainstalujte Nuxt.js a vytvořte projekt (nahraďte 'my-nuxt-app' libovolným názvem, který chcete použít pro vaši aplikaci):
npm create nuxt-app my-nuxt-appInstalační program Nuxt.js vás teď bude ptát na následující otázky:
- Název projektu: my-nuxtjs-app
- Popis projektu: Popis aplikace Nuxt.js
- Jméno autora: Používám svůj alias GitHubu.
- Zvolte správce balíčků: Yarn nebo Npm – pro naše příklady používáme NPM .
- Zvolte architekturu uživatelského rozhraní: None, Ant Design Vue, Bootstrap Vue atd. Pojďme si pro tento příklad vybrat Vuetify, ale komunita Vue vytvořila pěkný souhrn porovnání těchto architektur uživatelského rozhraní , které vám pomůžou zvolit nejvhodnější pro váš projekt.
- Zvolte vlastní serverové architektury: None, AdonisJs, Express, Fastify atd. V tomto příkladu zvolíme None, ale na webu Dev.to můžete najít porovnání serverových frameworků z let 2019–2020.
- Zvolte Nuxt.js moduly (pomocí mezerníku vyberte moduly nebo stiskněte Enter, pokud nechcete žádné): Axios (pro zjednodušení požadavků HTTP) nebo podporu PWA (pro přidání service workeru, souboru manifest.json atd.). V tomto příkladu nepřidáme modul.
- Zvolte nástroje pro lintování: ESLint, Prettier, Lint staged files. Pojďme si vybrat ESLint (nástroj pro analýzu kódu a upozornění na potenciální chyby).
- Zvolte testovací architekturu: None, Jest, AVA. Pojďme si vybrat Žádné, protože v tomto rychlém úvodu nepokrýváme testování.
- Zvolte režim vykreslování: Univerzální (SSR) nebo Single Page Application (SPA). V našem příkladu zvolíme Universal (SSR), ale Nuxt.js dokumentaci upozornit na některé rozdíly – SSR vyžaduje Node.js server spuštěný pro vykreslení serveru a SPA pro statické hostování.
- Zvolte vývojové nástroje: jsconfig.json (doporučeno pro VS Code, aby dokončování kódu IntelliSense fungovalo)
Po vytvoření projektu přejděte do adresáře
cd my-nuxtjs-appNuxt.js projektu a poté jej otevřete vcode .prostředí VS Code WSL-Remote.
Po instalaci Nuxt.js potřebujete vědět 3 příkazy:
-
npm run devpro spuštění vývojové instance s automatickým načítáním změn, sledováním souborů a opakovaným spouštěním úloh. -
npm run buildpro kompilaci projektu. -
npm startpro spuštění aplikace v produkčním režimu.
Otevřete terminál WSL integrovaný ve VS Code (Zobrazení > Terminál). Ujistěte se, že cesta terminálu odkazuje na adresář projektu (tj.
~/NuxtProjects/my-nuxt-app$). Pak zkuste spustit instanci vývoje nové aplikace Nuxt.js pomocí:npm run dev-
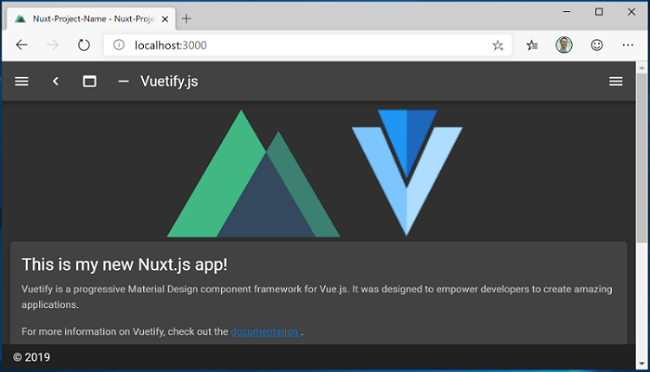
Spustí se místní vývojový server (zobrazí se nějaký atraktivní typ indikátorů průběhu pro kompilace klienta a serveru). Po sestavení projektu se v terminálu zobrazí "Zkompilováno úspěšně" spolu s tím, kolik času trvalo kompilaci. Nasměrujte svůj webový prohlížeč na
http://localhost:3000, abyste otevřeli svou novou aplikaci Nuxt.js.
Otevřete soubor v editoru
pages/index.vueVS Code. Najděte název<v-card-title class="headline">Welcome to the Vuetify + Nuxt.js template</v-card-title>stránky a změňte ho na<v-card-title class="headline">This is my new Nuxt.js app!</v-card-title>. Když máte webový prohlížeč stále otevřený na localhost:3000, uložte změnu a všimněte si, že funkce automatického načítání okamžitě zkompiluje a aktualizuje vaši změnu v prohlížeči.Podívejme se, jak Nuxt.js zpracovává chyby. Odeberte konečnou značku
</v-card-title>, aby váš kód nadpisu teď vypadal takto:<v-card-title class="headline">This is my new Nuxt.js app!. Uložte tuto změnu a všimněte si, že se v prohlížeči zobrazí chyba kompilace a v terminálu se zobrazí zpráva, že chybí zavírací značka<v-card-title>, spolu s čísly řádků, ve kterých se chyba nachází ve vašem kódu. Nahraďte uzavírací značku</v-card-title>, uložte a stránka se znovu načte.
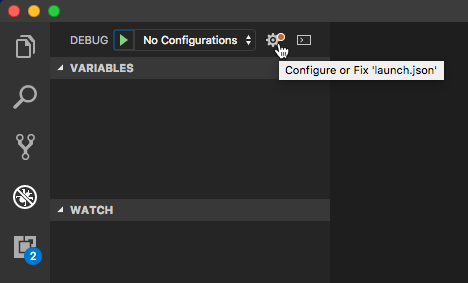
Ladicí program VS Code můžete použít s Nuxt.js aplikací tak, že vyberete klávesu F5, nebo přejdete na Zobrazit > Ladění (Ctrl+Shift+D) a Zobrazit > Ladicí konzoli (Ctrl+Shift+Y) v nabídce. Pokud v okně Ladění vyberete ikonu ozubeného kola, vytvoří se soubor konfigurace spuštění (launch.json), který uloží podrobnosti o nastavení procesu ladění. Další informace o ladění ve VS Code najdete v tématu .

Další informace o Nuxt.jsnajdete v průvodci Nuxt.js.
Windows developer
