Begivenhed
31. mar., 23 - 2. apr., 23
Den største Fabric-, Power BI- og SQL-læringshændelse. 31. marts - 2. april. Brug koden FABINSIDER til at gemme $400.
Tilmeld dig i dagDenne browser understøttes ikke længere.
Opgrader til Microsoft Edge for at drage fordel af de nyeste funktioner, sikkerhedsopdateringer og teknisk support.
Cirrus Migrate Cloud (CMC) enables disk migration from an existing storage system or cloud to Azure. Migration proceeds while the original system is still in operation. This article presents the methodology to successfully configure and execute the migration.
The solution uses distributed Migration Agents that run on every host. The agents allow direct Host-to-Host connections. Each Host-to-Host migration is independent, which makes the solution infinitely scalable. There are no central bottlenecks for the dataflow. The migration uses cMotion™ technology to ensure no effect on production.
This document covers a generic migration case for moving an application from one virtual machine to a virtual machine in Azure. The virtual machine can be on-premises or in another cloud provider. For step-by-step guides in various use cases, see the following links:
Cirrus Migrate Cloud consists of multiple components:
The cMotion™ feature of CMC does a storage-level cut-over from a source to the target cloud without downtime to the source host. cMotion™ is used to swing the workload over from the original FC or iSCSI source disk to the new destination Azure Managed Disk.
Web-based Management Portal is web-based management as a service. It allows users to manage migration and protect any block storage. Web-based Management Portal provides interfaces for all CMC application configurations, management, and administrative tasks.

Follow the Azure best practices to implement a new virtual machine. For more information, see quick start guide.
Before starting the migration, make sure the following prerequisites have been met:
Follow these implementation steps:
Prepare the Azure virtual machine. The virtual machine must be fully implemented. Once the data disks are migrated, the destination host can immediately start the application and bring it online. State of the data is the same as the source when it was shut down seconds ago. CMC doesn't migrate the OS disk from source to destination.
Prepare the application in the Azure virtual machine. In this example, the source is Linux host. It can run any user application accessing the respective BSD storage. This example uses a database application running at the source using a 1-GiB disk as a source storage device. However, any application can be used instead. Set up a virtual machine in Azure ready to be used as the destination virtual machine. Make sure that resource configuration and operating system are compatible with the application, and ready to receive the migration from the source using CMC portal. The destination block storage devices are automatically allocated and created during the migration process.
Sign up for CMC account. To obtain a CMC account, follow the support page for instructions on how to get an account. For more information, see Licensing Model.
Create a Migration Project. The project reflects the specific migration characteristics, type, owner of the migration, and any details needed to define the operations.

Define the migration project parameters. Use the CMC web-based portal to configure the migration by defining the parameters: source, destination, and other parameters.
Install the migration CMC agents on source and destination hosts. Using the CMC web-based management portal, select Deploy Cirrus Migrate Cloud to get the curl command for New Installation. Run the command on the source and destination command-line interface.
Create a bidirectional connection between source and destination hosts. Use H2H tab in the CMC web-based management portal. Select Create New Connection. Select the device used by the application, not the device used by the Linux operating system.


Start the migration to the destination virtual machine using Migrate Host Volumes from the CMC web-based management portal. Follow the instructions for remote location. Use the CMC portal to Auto allocate destination volumes on the right of the screen.
Add Azure Credentials to allow connectivity and disk provisioning using the Integrations tab on the CMC portal. Fill in the required fields using your private company’s values for Azure: Integration Name, Tenant ID, Client/Application ID, and Secret. Select Save.
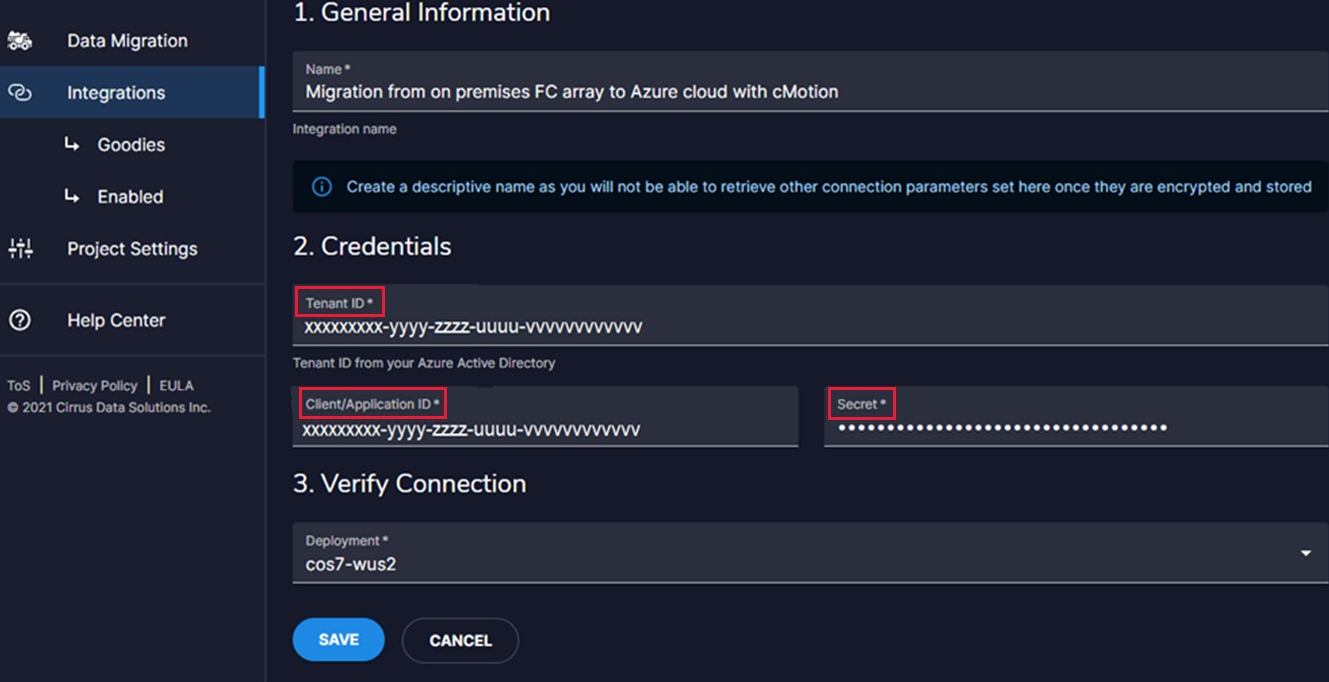
For details on creating Microsoft Entra application, see the step-by-step instructions. By creating and registering Microsoft Entra application for CMC, you enable automatic creation of Azure Managed Disks on the target virtual machine.
Bemærk
Since you selected Auto allocate destination volumes on the previous step, don't select it again for a new allocation. Instead, select Continue.
After selecting Save in the previous step, the New Migration Session window appears. Fill in the fields:
Minimum throttles migration rate to 25% of the available bandwidth.
Moderate throttles migration rate to 50% of the available bandwidth.
Aggressive throttles migration rate to 75% of the available bandwidth.
Relentless doesn't throttle the migration.

Select Create Session to start the migration.
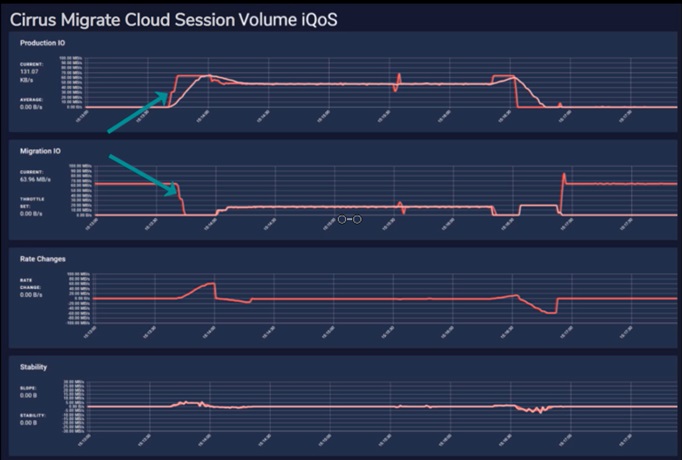
From the start of the migration initial sync until cMotion starts, there's no need for you to interact with CMC. You can monitor current status, session volumes, and track the changes using the dashboard.

During the migration, you can observe the blocks changed on the source device by selecting the Changed Data Map.

Details on iQoS show synchronized blocks and migration status. It also shows that there's no effect on production IO.
After the initial synchronization finishes, prepare to move the workload from the source disk to the destination Azure Managed Disk using cMotion™.
At this point, the systems are ready for cMotion™ migration cut-over.
In the CMS portal, select Trigger cMotion™ using Session to switch the workload from the source to the destination disk. To check if the process finished, you can use iostat, or equivalent command. Go to the terminal in the Azure virtual machine, and run iostat /dev/<device_name>, for example /dev/sdc. Observe that the IOs are written by the application on the destination disk in Azure cloud.

In this state, the workload can be moved back to the source disk at any time. If you want to revert the production virtual machine, select Session Actions and select the Revert cMotion™ option. You can swing back and forth as many times we want while the application is running at source host/VM.
When the final cut-over to the destination virtual machine is required, follow these steps:
Once the cut-over has been done, application needs to be switched over to the new virtual machine. To do that, do the following steps:
Verify that here are no IOs going to source hosts devices by running the iostat command in the source host. Running iostat in Azure virtual machine shows that IO is running on the Azure virtual machine terminal.
The migration step is complete when all the IOs were redirected to the destination devices after triggering cMotion™. You can now close the session using Session Actions. Select Delete Session to close the migration session. As a last step, remove the Cirrus Migrate Cloud Agents from both source host and Azure virtual machine. To perform uninstall, get the Uninstall curl command from Deploy Cirrus Migrate Cloud button. Option is in the Hosts section of the portal.
After the agents are removed, migration is fully complete. Now the source application is running in production on the destination Azure virtual machine with locally mounted disks.
In the Azure portal search for support in the search bar at the top. Select Help + support > New Support Request.
In the CMC portal, select Help Center tab on the CMC portal to contact Cirrus Data Solutions support, or go to CDSI website, and file a support request.
Begivenhed
31. mar., 23 - 2. apr., 23
Den største Fabric-, Power BI- og SQL-læringshændelse. 31. marts - 2. april. Brug koden FABINSIDER til at gemme $400.
Tilmeld dig i dag