Use a custom connector in a logic app workflow
This article is part of a tutorial series on creating and using custom connectors in Azure Logic Apps, Power Automate, and Power Apps. To understand the process, make sure you read Custom connector overview.
In this article, you build an example Consumption logic app workflow that shows how to use the custom connector that you created in a previous tutorial. This example workflow triggers when an item is added to a SharePoint Online list. The workflow then uses the custom connector to call the Cognitive Services Text Analytics API. The connector returns the sentiment score (0 to 1) for the text in the list item, and the workflow writes the score back to the list.
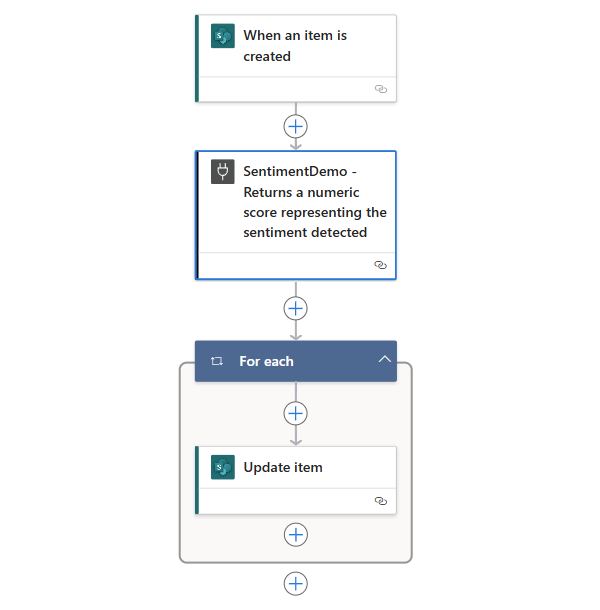
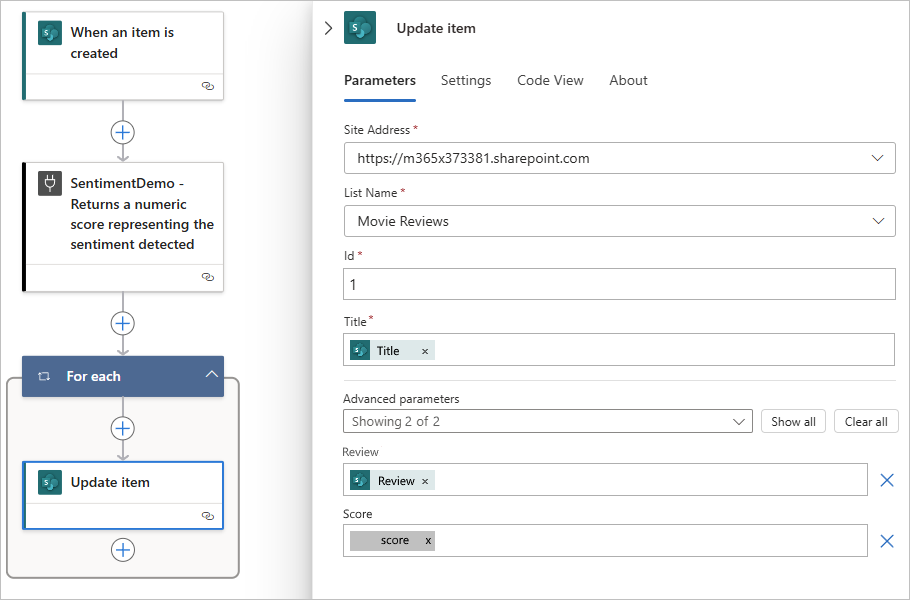
The following example shows the finished logic app workflow:
Prerequisites
An Office 365 Business Premium subscription, or sign up for a free trial.
An Azure account and subscription.
Basic experience building logic apps. Learn more in Build your first logic app workflow.
The custom connector that you created in one of these articles:
(If your custom connector accesses on-premises resources by using the on-premises data gateway) Set up the gateway installation to allow outbound access for the corresponding prebuilt connectors outbound IP addresses. All logic apps in the same region use the same IP address ranges.
Learn more in Adjust communication settings for the on-premises data gateway and Configure proxy settings for the on-premises data gateway.
Create the SharePoint Online list
First, create a three-column list in SharePoint Online. This list stores movie review data that the logic app workflow analyzes for sentiment. Learn more about SharePoint Online lists in Introduction to lists.
In your SharePoint Online site, select New > List to create a new list.
In the Name field, type Movie Reviews
Select Create.
By default, Sharepoint Online creates the list with a Title column.
Select the plus sign
 > Single line of text.
Enter the name Review, and select Save.
To add another column using Number as the data type and Score as the name, repeat steps 3 and 4.
Create logic app resource
Now that you have a list, create a Consumption logic app resource and workflow in the Azure portal.
Sign in to the Azure portal with your Azure account credentials.
In the portal search box, enter logic app, and select Logic apps.
Select the Consumption plan.
Enter the following information for your logic app resource:
Property Value Description Subscription <Azure-subscription-name> The name for your Azure subscription. Resource Group <resource-group-name> The name for the Azure resource group used to organize related resources. This example uses My-First-LA-RG. Logic App name <logic-app-name> The name for your logic app. This exmaple uses SentimentAnalysis. Region <Azure-region> The Azure region for hosting your logic app.
Note: Your logic app resource and custom connector must exist in the same region. This example uses East US 2.Enable log analytics No Keep diagnostic logging disabled. Finish creating your logic app.
After Azure deploys your app, select Go to resource.
Alternatively, find and select your logic app by entering the name in the Azure search box.
Add a trigger
As the first step in your workflow, add a SharePoint trigger. This trigger fires when an item is added to the specified SharePoint Online list.
On the logic app menu, under Development Tools, select Logic app designer, if not selected already.
On the designer, select Add a trigger.
In the connector gallery pane search box, enter SharePoint, and select the SharePoint trigger named When an item is created. If the trigger doesn't appear in the list, in the upper-right corner of the SharePoint triggers list, select See more.
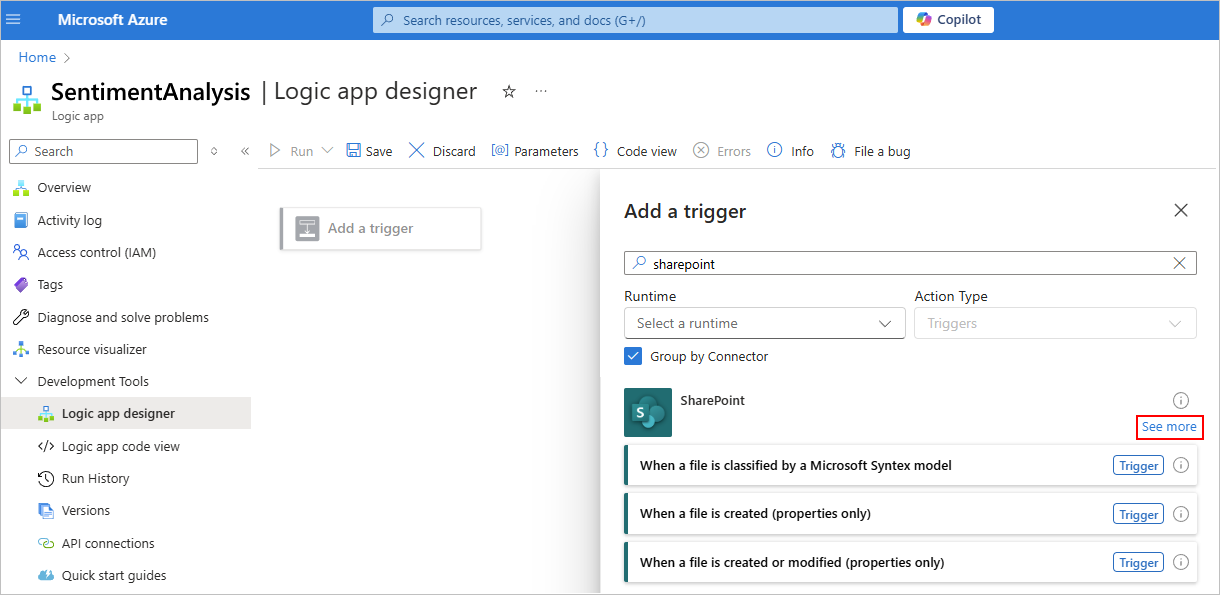
After the Create Connection pane opens, sign in with your SharePoint credentials.
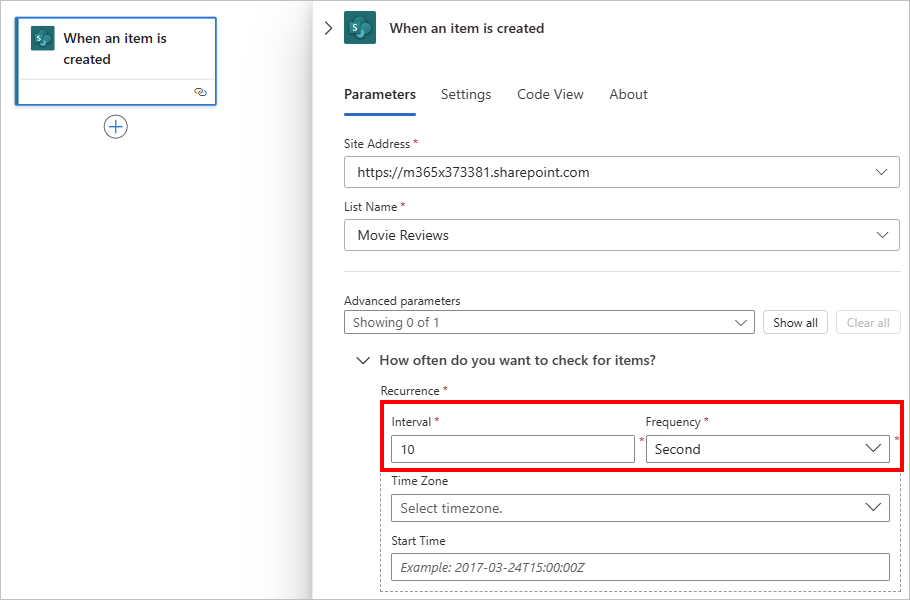
Provide the following information for the SharePoint trigger:
Parameter Value Site Address <SharePoint-site-address> List Name Movie Reviews Expand the section named How often do you want to check for items to finish setting up the trigger:
Parameter Value Interval 10 Frequency Second When you finish, your trigger looks like the following example:
Add an action from custom connector
Following the trigger, you can add one or more actions to perform. To add an action from your custom connector, follow these steps:
Under the trigger, select the plus sign (+), and select Add an action.
In the connector gallery pane search box, enter the name for your custom connector, which is SentimentDemo in this example, and select the action that you want.
Tip
For easier searching, under Runtime, select Custom.
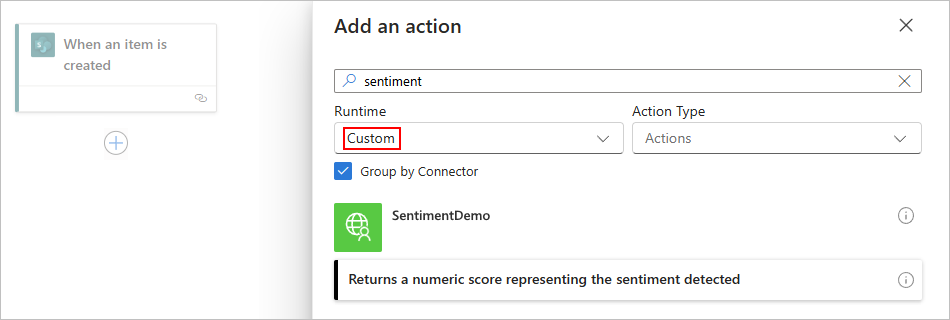
The action name and description come from information provided when you created the connector.
Enter a name for the connection and the API key.
Parameter Value Connection Name A name for the connection, for example, SentimentDemoConnection. API key The API key for the Text Analytics API. To learn more, see Get an API key. Provide the information for the action, for example:
Parameter Value documents ID 1
This value is required because the connector can handle multiple documents. This example sends one document at a time. However, in production, the documents Language and documents ID values might come from a list or another data source.documents Language en documents Text The SharePoint Review field. To enter this value, follow these steps:
1. Select inside the documents Text box, and select the lightning icon to open the dynamic content list.
2. From the list, in the SharePoint trigger section, select Review.Add the SharePoint action named Update item to your workflow, and provide the following values:
Parameter Value Site Address <SharePoint-site-address> List Name Movie Reviews Id The SharePoint ID field Title The SharePoint trigger output named Title.
To enter this value, follow these steps:
1. Select inside the Title box, and select the lightning icon to open the dynamic content list.
2. From the list, in the SharePoint trigger section, select Title.In the Update item action pane, open the Advanced parameters list, select the desired parameters, which vary based on the SharePoint Online list, to add them to the action. For each added parameter, open the dynamic content list, and select the corresponding output from the SharePoint trigger named When an item is created and from the custom connector action.
This example adds the following parameters and the corresponding trigger and action outputs:
Advanced parameter Trigger or action output Review The SharePoint trigger output named Review Score The custom connector action output named score.
When you select the trigger output to use in this field, the designer automatically adds a For each action because the custom connector action can accept multiple documents. Although the custom connection action sends only one document at a time, the designer matches the connector's capabilities.When you finish, the Update item action looks like the following example:
When you finish, save your workflow. On the designer toolbar, select Save.
Test the workflow
To test the workflow, add reviews to your SharePoint Online list, and check how the workflow responds.
On the designer toolbar, select Run > Run.
In your SharePoint Online list, choose Quick Edit.
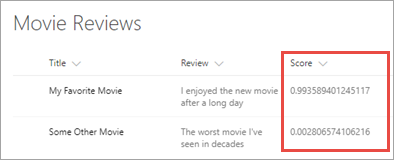
Add two reviews to the list, one negative and one positive, based on the following values, and select Done.
Parameter Suggested value Title (positive) My Favorite Movie Review (positive) I enjoyed the new movie after a long day. Title (negative) Some Other Movie Review (negative) The worst movie I've seen in decades. In the Azure portal, on the logic app menu, choose Overview to review the workflow run history. On the Overview page, select Runs history.
The Runs history tab shows two workflow runs, one for each review that you added to the list.
To save on resource consumption after you're done with this workflow, on the Overview page toolbar, choose Disable.
Back on the SharePoint Online list page, refresh the browser to see the scores that the workflow added.
Congratulations! Although this example is a basic workflow, the custom connector adds powerful functionality with the capability to call Cognitive Services.
Related content
You can share your custom connector within your organization, or you can get the connector certified for people outside your organization to use:
Provide feedback
We greatly appreciate feedback on issues with our connector platform, or new feature ideas. To provide feedback, go to Submit issues or get help with connectors and select your feedback type.