Authentication
The authentication setting in Microsoft Copilot Studio impacts how you can manage access to the agent. It allows you to verify a user's identity during a conversation, which enables:
Further personalization of the conversation
The ability for the agent to execute actions on the user's behalf
The ability to skip dialogs in the conversation by prefilling user data and going straight to the point
Variables such as the user's ID and display name available to use within topics
It's a flexible experience. You can mark some parts of the conversation that require the user to sign in, while some other parts don't require the user to sign in.
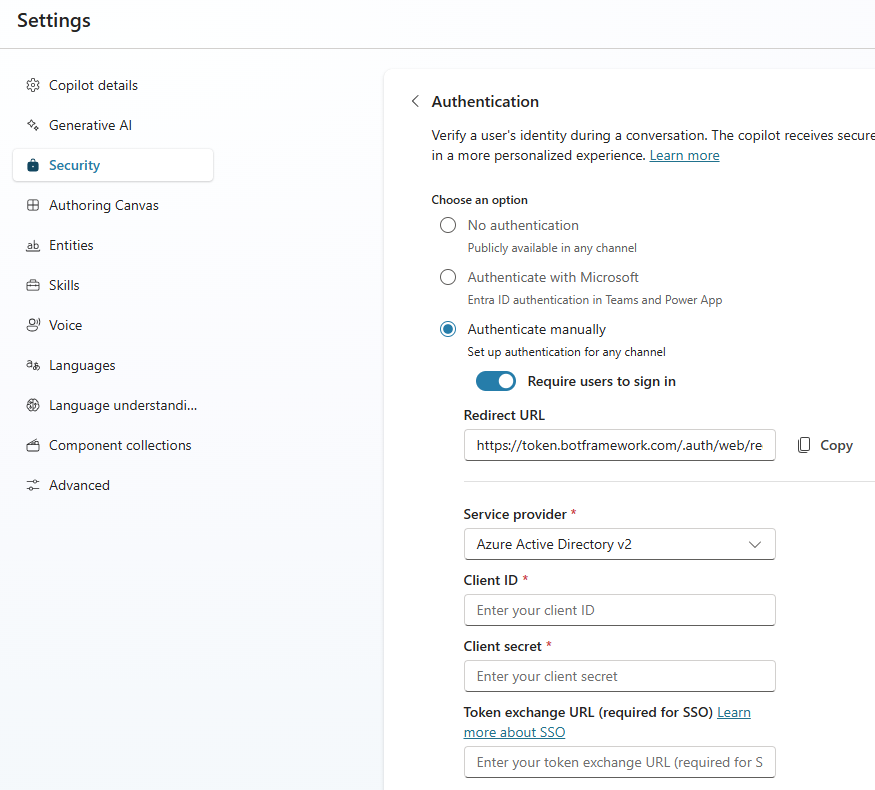
Authentication settings are found in Microsoft Copilot Studio by selecting Settings on the side navigation pane, then going to Settings > Security > Authentication.
The options for authentication are:
No authentication
Authenticate with Microsoft
Authenticate manually
You need to publish your agent for changes in the authentication setting to occur.
No authentication
No authentication means your agent doesn't require your users to sign in when interacting with the agent. An unauthenticated configuration means your agent can only access public information and resources. Classic agents are configured by default to not require authentication.
Authenticate with Microsoft
This configuration automatically sets up Microsoft Entra ID authentication for Teams without the need for any manual configuration. Since Teams authentication itself identifies the user, users aren't prompted to sign in while they're in Teams, unless your agent requires an expanded scope.
Only the Teams channel is available if you select this option. If you need to publish your agent to other channels but still want authentication for your agent, choose Authenticate manually.
Authenticate Manually
Microsoft Copilot Studio supports identity providers that are compliant with the OAuth2 standard. This means that you can enable users to sign in with any OAuth2 identity provider. OAuth2 identity providers include:
Microsoft Entra ID
Microsoft account
Google
Facebook
Custom authentication service that you create for your company.
You can call on the Authenticate action during a conversation, which prompts the user with a sign-in card. Alternatively, you can select the Require users to sign in option, which creates a system topic for Require user to sign in. This prompts the user to sign in as soon as they begin the conversation with the agent. This screenshot shows the Require user to sign in system topic, and the variables stored. The variables obtained are User. Id, User.FirstName, User.Email, User.DisplayName, User. PrincipalName, User.IsLoggedIn, and User.Lastname.

Configure manual authentication
To configure a manual authentication in Microsoft Copilot Studio, register a new app with your identity provider and get a Client ID and Client Secret. The details below show you how you can do this from the Azure portal for Microsoft Entra ID.
To register an application, you can go to App registrations
from the Azure portal and create a new registration. You need to
provide a name for the registration, such as the agent name, then
specify which accounts can access the agent. For example, the
option selected here allows users from any Microsoft Entra ID
directory or personal Microsoft account to sign in and talk to
the agent. The Redirect URI should be https://token.botframework.com/.auth/web/redirect with Web as the platform.

Next, you need to add a new client secret. You can go to Certificates & secrets area of the app registration and select +New client secret. Here, you can provide a description and select an expiry period.

The client secret value should be noted as it's used for the configuration.
You also need the Application (client) ID, which can be found in the Overview area of the app registration.
Now that Azure is configured, the Microsoft Copilot Studio Authentication settings can be populated. You can open your agent in Microsoft Copilot Studio and go to Settings > Security > Authentication.
Authentication Option should be Manual. If you select Require users to sign in, a system topic is created which prompts users to sign in at the beginning of the conversation. Otherwise, if unselected, you can call on the authentication action at any point in the conversation.
Service Provider should be Azure Active Directory v2. The Client ID and Client secret fields are where you can enter in the Application ID and client secret value obtained earlier. Token exchange URL is an optional field used when configuring single sign-on. Scope refers to the access you want to give authenticated users once signed in. For more information, see Scopes.
Once the authentication settings are saved and the agent is published, you can use Call an action > Authenticate in your topics. If multiple topics require authentication, the user is only prompted to sign in once throughout the session.

This automatically sets up conditional branching, with messages and variables related to the authentication. There's a variable that stores the authentication token when the user logs in. It's a Boolean variable that stores whether the user is logged in, and variables for the user's ID and display name.
