Get started with Electronic invoicing for Denmark
This article provides information to help you get started with Electronic invoicing for Denmark. It includes information about how to configure the system so that you can generate, submit, and receive electronic invoices in the Denmark-specific OIOUBL format and, if necessary, in Pan-European Public Procurement Online (PEPPOL) format. The steps in this article are general and country/region-dependent in Regulatory Configuration Service (RCS) and Microsoft Dynamics 365 Finance.
Prerequisites
Before you begin the procedures in this article, the following prerequisites must be met:
The company must be registered in the Danish Central Business Register (CVR) and in the Danish electronic invoicing infrastructure, NemHandel.
The company must have a signed agreement with the provider of electronic document delivery service that secures electronic document interchange in the OIOUBL and PEPPOL formats.
Among the registered profile IDs, the company should have the following profiles that Finance uses for electronic document interchange:
- Procurement-BilSim-1.0 – This profile is used to interchange documents in OIOUBL format.
- urn:fdc:peppol.eu:2017:poacc:billing:01:1.0 – This profile is used to interchange documents in PEPPOL format.
The company must obtain, from the service provider, the required credentials to enable integration of the Electronic Invoicing service with the Electronic Invoicing service independent software vendor (ISV) last-mile connector.
Become familiar with Electronic invoicing as described in Electronic invoicing overview and Electronic invoicing components.
Sign up for RCS, and set up Electronic invoicing. For more information, see the following articles:
Activate the integration between Finance and the Electronic Invoicing service as described in Activate and setup integration with Electronic invoicing.
In the Azure key vault, create the secret for the token that grants authorization to access the infrastructure of the provider of electronic document delivery service, and set up Key Vault as described in Customer certificates and secrets.
Country-specific configuration for the Danish electronic invoice (DK) feature
Some parameters for the Danish electronic invoice (DK) electronic invoicing feature have default values. Before you deploy the feature to the service environment, review the default values, and update them as required, so that they better reflect your business operations.
Import the latest version of the Danish electronic invoice (DK) Globalization feature, version 4 or later. For more information, see Import features from the Global repository.
Create a copy of the imported Globalization feature, and select your configuration provider for it. For more information, see Create a Globalization feature.
On the Versions tab, verify that Draft is selected.
On the Setups tab, in the grid, select the Sales invoice OIOUBL feature setup, and then select Edit.
On the Processing pipeline tab, in the Processing pipeline section, select Integrate with Edicom.
In the Parameters section, select Domain, and then enter the service ID number that you obtained.
Select Application, and then enter the same service ID number.
Select Destination, and then enter the service ID number concatenated with the string _EDIWIN. For example, if the service ID number is 123456, enter 123456_EDIWIN.
Select Group, and then enter the group code that you obtained.
Select Auth token, and then select the name of the secret that you created for the token.
Select Save, and close the page.
Repeat steps 4 through 11 for each of the following feature setups if your business process assumes the involvement of the related types of documents:
- Sales credit note OIOUBL
- Project invoice OIOUBL
- Project credit note OIOUBL
- Sales invoice PEPPOL
- Sales credit note PEPPOL
- Project invoice PEPPOL
- Project credit PEPPOL
On the Setups tab, in the grid, select the Get status feature setup, and then select Edit.
On the Export channel tab, in the Parameters section, select Auth token, and then select the name of the secret that you created for the token.
Select Domain, and then enter the service ID number that you obtained.
Select Application, and then enter the same service ID number.
Select Group, and then enter the group code that you obtained.
Select Data channel, and then enter the name of the integration channel that's configured on the Electronic document parameters page in Finance.
Select Save, and close the page.
Finance configuration
Some additional parameters must be configured directly in Finance.
- In the Feature management workspace, make sure that the Export channels for electronic invoicing integration feature is enabled. For more information, see Feature management overview.
- Make sure that the country/region-specific Document context and Electronic document model mapping Electronic reporting (ER) configurations that are required for Denmark are imported. For more information, see Set up Electronic invoicing parameters.
- Go to Organization administration > Setup > Electronic document parameters.
- In the Electronic document section, add records for the Customer Invoice journal and Project invoice table names.
- For each table name, set the Document context and Electronic document model mapping fields in accordance with step 1.
- In the Integration channels section, add a record for the channel that's used for electronic invoice submission in batch mode.
- In the Channel column, enter EdiStatus. This channel name is used by default, but you can use a different channel name as you require. In this case, you must enter the same name in the value of the $Context_Channel variable in the DataChannel definition in the Customer invoice context model ER configuration. You must also enter it in the parameters and applicability rules of the related feature setup.
- In the Company column, select a required legal entity code.
- In the Document context column, refer to the Customer invoice context model configuration by using the Data channel context definition.
- In the Channel type column, select Export.
- Save your changes, and close the page.
Finance business data configuration
Follow the configuration steps in Customer electronic invoices in Denmark. Start from the Configure parameters section.
Seller identification
Companies that submit electronic invoices can be identified by their CVR number or their Global Location Number (GLN). The GLN is also known as a European article numbering (EAN) location number.
To identify a company by its CVR number, follow these steps.
Go to Organization administration > Organizations > Legal entities.
On the Bank account information FastTab, in the Codes section, in the Routing number field, make sure that a valid CVR number is entered for the legal entity.
The CVR number is entered in the Invoice\cac:AccountingSupplierParty\cac:Party\cbc:EndpointID element in the electronic invoice XML file that's generated. It's used as the seller's identification during the submission process.
To identify a company by its GLN, follow these steps.
Go to Organization administration > Global address book > Registration types > Registration types.
Define a new registration type for Denmark that has the name EAN. You must enter the name exactly as it appears here.
Go to Organization administration > Organizations > Legal entities, and select Registration IDs on the top menu.
On the Registration ID FastTab, add the EAN registration type that you created.
In the Registration number field, enter a valid GLN.
The GLN is entered in the Invoice\cac:AccountingSupplierParty\cac:Party\cbc:EndpointID element in the electronic invoice XML file that's generated. It's used as the seller's identification during the submission process.
Note
The GLN has higher priority than the CVR number. If both numbers are configured at the same time, the GLN is used.
Buyer identification
Go to Accounts receivable > Customers > All customers, and select a customer.
On the Invoice and delivery FastTab, in the EAN field, make sure that a valid GLN is entered for the customer.
The GLN is entered in the Invoice\cac:AccountingCustomerParty\cac:Party\cbc:EndpointID element in the electronic invoice XML file that's generated. It's used as the buyer's identification during the submission process.
Note
If no GLN is defined, the customer's tax exempt number is used.
Configure the output format type
By default, all outgoing electronic invoices are generated in OIOUBL format for all customers. However, by using configurable electronic document property types, you can configure electronic invoices so that they're generated in PEPPOL format for specific customers.
Note
Follow the configuration steps in this section only if you must also generate electronic invoices in PEPPOL format. If you generate them only in OIOUBL format, you can skip these steps.
Configure electronic document properties
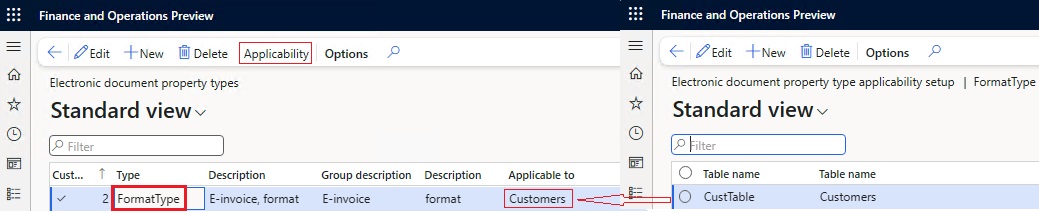
Go to Accounts receivable > Setup > Electronic document property types, and select New.
In the Type field, enter FormatType. You must enter the value exactly as it appears here.
Select Applicability to add an applicable table.
On the Electronic document property type applicability setup page, in the Table name field, select the Customers table name.
Save your changes, and return to the Electronic document property types page.
Enter the type of format
Follow these steps to enter the type of format for specific customers.
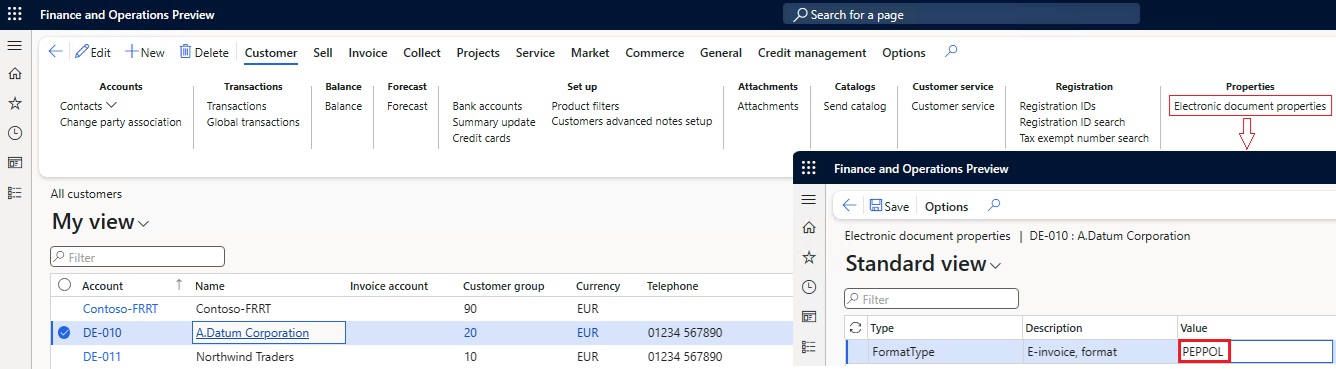
Go to Accounts receivable > Customers > All customers.
Select a specific customer in the list, and then, on the Action Pane, on the Customer tab, in the Properties group, select Electronic document properties.
In the Value column, enter PEPPOL. You must enter the value exactly as it appears here.
Note
The system generates electronic invoices in PEPPOL format only if the value PEPPOL is entered. If another value or no value is entered, electronic invoices are generated in the default OIOUBL format.
Issue electronic invoices
After you complete all the required configuration steps, you can generate and submit electronic invoices for posted invoices by going to Organization administration > Periodic > Electronic documents > Submit electronic documents. For more information about how to generate electronic invoices, see Submit electronic documents to Electronic invoicing.
Important
In current implementations, the standard submission procedure that was described earlier only generates electronic invoices and stores them on the service side. The invoices aren't submitted. Submission of Danish electronic invoices requires that you complete the following additional steps.
To submit the generated electronic invoices in batch mode, follow these steps.
- Go to Organization administration > Periodic > Electronic documents > Run submission process in export channels.
- In the Channel field, select the export channel that you previously created, and then select OK.
You can inquire about the results of the submission by going to Organization administration > Periodic > Electronic documents > Electronic document submission log). For more information, see Work with Electronic document submission log.
Receive incoming electronic invoices
To import incoming invoices in OIOUBL and PEPPOL formats, follow these additional configuration steps for the same version of the Danish electronic invoice (DK) electronic invoicing feature that's used for outgoing invoice submission.
- In RCS, on the Globalization features tile, on the Electronic invoicing tile, select the required version of the Danish electronic invoice (DK) electronic invoicing feature.
- On the Setups tab, in the grid, select Incoming OIOUBL, and then select Edit.
- On the Import channel tab, in the Parameters section, select the Data channel parameter. Then, in the Value field, define the name of the data channel. Alternatively, leave the default value unchanged. The default channel name for the OIOUBL format is EdiOIOUBL and for the PEPPOL format is EdiPEPPOL. In both cases, make a note of the value, because you'll use it in later configuration steps.
- Select the Service ID parameter, and then select the name of the secret that contains the service ID number.
- Select the Group parameter, and then select the name of the secret that contains the group code.
- Select the Token parameter, and then select the name of the secret that you created for the token.
- On the Applicability rules tab, in the Channel field, make sure that the Value column contains the same import channel name that you defined earlier.
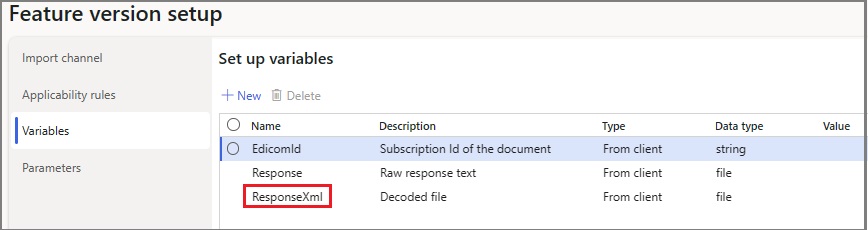
- On the Variables tab, make a note of the OutputFile name, because you'll use it in later configuration steps.
- Select Save, and close the page.
- If an import in the PEPPOL format is also required, repeat steps 2 through 10 for the Incoming PEPPOL feature setup.
- Complete and deploy the configured version of the Danish electronic invoice (DK) electronic invoicing feature.
Finance configuration
Some additional parameters must be configured directly in Finance.
Make sure that the latest version of the Vendor invoice import (DK) ER configuration is imported.
Note
The Vendor invoice import (DK) format configuration is used for import invoices in the OIOUBL format and based on the parent Vendor invoice import format configuration which implements invoices import in the PEPPOL format. The formats use the Invoice model and Vendor invoice Mapping to destination configurations. All required additional configurations are automatically imported.
In the Electronic reporting workspace, on the Reporting configurations tile, select Customer invoice context model.
Select Create configuration, and then, in the dropdown dialog box, select Derive from Name: Customer invoice context model, Microsoft to create a derived configuration.
Note
The derived configuration must differ from the configuration that's used for the invoice submission setup.
Open the derived configuration to edit it in the designer, and then select Map model to datasource.
Open the DataChannel definition to edit it in the designer.
In the Data sources tree, expand the $Context_Channel container.
In the Value field, select Edit, and then enter the import channel name.
Save your changes, and complete the derived configuration.
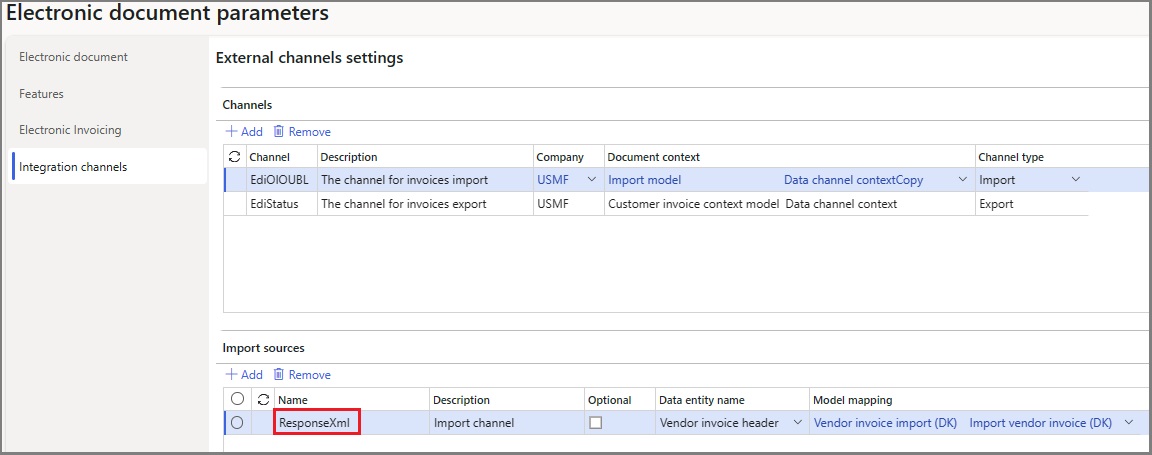
Go to Organization administration > Setup > Electronic document parameters.
On the Integration channels tab, in the Channels section, in the Channel field, enter the import channel name that you created earlier.
In the Channels section, in the Company field, select a required legal entity.
In the Document context field, select the Customer invoice context model configuration.
In the Import sources section, in the Name field, enter the same ResponseXml name that's used in the variable for Decoded file in the import feature setup.
In the Data entity name field, select Vendor invoice header.
In the Model mapping field, reference the Vendor invoice import (DK) configuration.
If an import in the PEPPOL format is also required, create another import channel, and repeat steps 3 through 15 for this channel. Use the Vendor invoice import configuration in step 15.
Select Save, and close the page.
Configure Finance business data
You must configure the following types of master data to provide a match for incoming electronic invoices:
- Vendors
- Products
- Units
Follow the configuration steps in Vendor electronic invoice import in Denmark. Start from the Configure vendor data section.
Receive electronic invoices
Follow these steps to receive electronic invoices.
- Go to Organization administration > Periodic > Electronic documents > Receive electronic documents.
- Select OK, and then close the page.
To view the receipt logs for electronic invoices, go to Organization administration > Periodic > Electronic documents > Electronic document receipt log.
To view successfully received invoices, go to Accounts payable > Invoices > Pending vendor invoices.
Send responses for received electronic invoices
After incoming vendor invoices are successfully received, you can respond to invoice issuers about the decision to accept or reject the received invoices. For both incoming invoice formats, OIOUBL and PEPPOL, a rejection response can be raised and sent back to the invoice issuers. Acceptance responses aren't assumed. If no rejection response was sent during an agreed-on time, the invoices are considered automatically accepted. For the PEPPOL format, a receipt acknowledgement message can also be sent. This message is a technical confirmation of invoice receipt. The invoices can still be rejected later from a business perspective.
Configure responses
Responses can be configured by using electronic document property types in the same manner as format types.
Configure electronic document properties
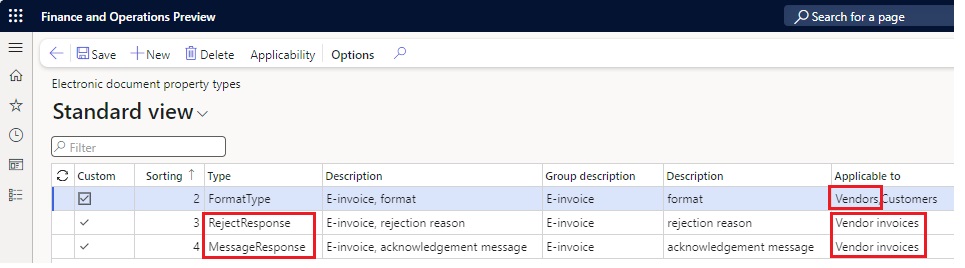
Go to Accounts receivable > Setup > Electronic document property types, and select New.
In the Type field, enter RejectResponse. You must enter the value exactly as it appears here.
Select Applicability to add an applicable table.
On the Electronic document property type applicability setup page, in the Table name field, select the VendInvoiceInfoTable table name.
Save your changes, and return to the Electronic document property types page.
Select New to create another electronic document property type.
In the Type field, enter MessageResponse. You must enter the value exactly as it appears here.
Select Applicability to add an applicable table.
On the Electronic document property type applicability setup page, in the Table name field, select the VendInvoiceInfoTable table name.
Save your changes, and return to the Electronic document property types page.
Select the existing FormatType electronic document property type.
Select Applicability to add an applicable table.
On the Electronic document property type applicability setup page, in the Table name field, select the Vendors table name.
Note
The same electronic document property type is used to determine which response type is generated for a specific vendor: OIOUBL application response or PEPPOL invoice level response.
Save your changes, and return to the Electronic document property types page.
Define responses formats
Follow these steps to identify which response format type is used for a specific vendor.
Go to Accounts payable > Vendors > All vendors.
Select a specific vendor in the list, and then, on the Action Pane, on the Vendor tab, in the Properties group, select Electronic document properties.
In the Value column, enter PEPPOL. You must enter the value exactly as it appears here.
Note
The system generates invoice-level responses in PEPPOL format only if you enter the value PEPPOL here. If you enter another value, or no value, application responses are generated in the default OIOUBL format.
Enter responses
Follow these steps to enter responses for specific pending vendor invoices.
- Go to Accounts payable > Invoices > Pending vendor invoices.
- Select a specific pending vendor invoice in the list, and then, on the Action Pane, on the Vendor invoice tab, in the Properties group, select Electronic document properties.
- Select the RejectResponse type.
- In the Value column, enter the rejection reason. This text is sent back to the invoice issuer as justification for the rejection. OIOUBL application response or PEPPOL invoice level response messages are generated and sent only if you enter a non-empty value.
- Select the MessageResponse type.
- In the Value column, enter any text that should be used as an acknowledgement message. This text is sent back to the invoice issuer as confirmation of invoice receipt. PEPPOL message level response messages are generated and sent only if you enter a non-empty value.
Configure electronic invoicing feature setups
Some parameters for the Danish electronic invoice (DK) electronic invoicing feature have default values. Before you deploy the feature to the service environment, review the default values, and update the authorization credential that's required for response submission via the ISV last-mile connector.
Import the latest version of the Danish electronic invoice (DK) Globalization feature, version 5 or later. For more information, see Import features from the Global repository.
Create a copy of the imported Globalization feature, and select your configuration provider for it. For more information, see Create a Globalization feature.
On the Versions tab, verify that Draft is selected.
On the Setups tab, in the grid, select the Application Response OIOUBL feature setup, and then select Edit.
On the Processing pipeline tab, in the Processing pipeline section, select Integrate with Edicom.
In the Parameters section, select Domain, and then enter the service ID number that you obtained.
Select Application, and then enter the same service ID number.
Select Destination, and then enter the service ID number concatenated with the string _EDIWIN. For example, if the service ID number is 123456, enter 123456_EDIWIN.
Select Group, and then enter the group code that you obtained.
Select Auth token, and then select the name of the secret that you created for the token.
Select Save, and close the page.
Repeat steps 4 through 11 for each of the following feature setups if your business process assumes that responses are sent in PEPPOL format:
- Invoice Response PEPPOL
- Message Response PEPPOL
Configure electronic document parameters
- Make sure that the latest country/region-specific Document context and Electronic document model mapping ER configurations that are required for Denmark are imported. For more information, see Set up Electronic invoicing parameters.
- Go to Organization administration > Setup > Electronic document parameters.
- In the Electronic document section, add a record for the VendInvoiceInfoTable table name.
- Set the Document context and Electronic document model mapping fields in accordance with step 1.
- In the Company column, you can select a legal entity code to limit the applicability of this electronic document type. If you don't select a value, electronic documents of this type are processed in all legal entities.
- Save your changes, and close the page.
Send responses
To generate and submit responses, follow these steps.
- Go to Organization administration > Periodic > Electronic documents > Submit electronic documents. For more information, see Submit electronic documents to Electronic invoicing.
- Go to Organization administration > Periodic > Electronic documents > Run submission process in export channels.
- In the Channel field, select the export channel that you previously created, and then select OK.
You can inquire about the results of the submission by going to Organization administration > Periodic > Electronic documents > Electronic document submission log. In the Document type field, select Vendor invoices to filter only responses submissions. For more information, see Work with Electronic document submission log.
Additional resources
Feedback
Bald verfügbar: Im Laufe des Jahres 2024 werden wir GitHub-Issues stufenweise als Feedbackmechanismus für Inhalte abbauen und durch ein neues Feedbacksystem ersetzen. Weitere Informationen finden Sie unter https://aka.ms/ContentUserFeedback.
Feedback senden und anzeigen für