Scheduling capabilities
The scheduling capabilities in the Intelligent appointments solution include the skill-based search for available advisors, contextual capabilities to enhance the matching algorithm, and meeting scheduling and management.
Advisor Availability
The core capability provided in the Intelligent appointments solution is the ability to search and find available slots of time where financial advisors can provide a specified service to a customer. The smart engine uses the search infrastructure provided by Universal Resource Scheduling(URS) to create a skills- and roles-based matching mechanism between a requested service, time, location, channel, and the relevant advisor. In addition to matching skills and roles, the solution considers the availability of the advisors based on both their Dynamics 365 and Exchange calendars.
For the engine to work, you need to follow the specified procedure to prepare the relevant meeting and service offerings of the financial institution.
1. Set up organizational units
4. Set up resource requirement group templates
8. Set up fulfillment preferences (Preview)
Note
Sample data, if deployed, covers steps 1 through 7. Step 7 does not have sample data as it is coupled tightly with Dynamics 365 users and must be set up for the availability search to provide advisor results.
1. Set up organizational units
Organizational units are business units used for grouping relevant advisors to match their location of service. In the financial sector, it helps to create organizational units corresponding to the branches that offer customer-facing meeting services.
The mapping of organizational units mapping is done directly through Dataverse. The only required input for each unit is the name (equivalent to the branch name) for easier mapping of an advisor to a branch.
Based on the organizational preferences, you can create a unit dedicated to online meetings and map the corresponding advisors. This recommendation applies to institutions that need to create a dedicated online advisor pool because they do not provide in-person services in any physical branches.
2. Set up advisor roles
Roles provide information about the applicable services an advisor can provide. For example, the roles in retail banking can be the following: relationship manager, loan advisor, mortgage expert, and so on. You can use the roles to match the appropriate advisor with the meeting type requested by customer.
Set up a role
Go to Scheduling administration > Settings > Advisory roles, and then select New.
Add the name and description.
Note
The advisor roles are based on the Bookable resource category entity from URS, and therefore, appear as the form’s underlying entity.
3. Set up skills
Skills are characteristics that an advisor resource can possess. For example, skills can indicate a license or certification required for certain types of services or suggest the languages in which an advisor can provide service.
Setting up skills is an optional step, as roles can provide the meeting requirements for an advisor. Skills provide an additional layer of personalization regarding the available advisors.
You can specify skills in the following ways:
Meeting type level: In the requirement group template, mention skills in addition to the required roles.
On-demand (per customer request): In the API integration as part of the experience, expose the list of available skills for the customer to apply as additional filters. You can perform this for customer-facing options such as languages, channel preferences, accessibility requirements, and so on. See Developer tools.
Set up a skill
Go to Scheduling administration > Settings > Skills\Credentials, and then select New.
Add the name and description, and indicate whether this is of type skill, or certification.
Note
The skills are based on the Characteristic entity from Universal Resource Scheduling (URS), and therefore, appear as the form’s underlying entity.
The scheduling solution includes an Online advisor skill, available with the default configuration on deployment. Use this skill to filter only the advisors that are equipped to handle online meetings. To enable this ability, see set up advisor resources. DO NOT REMOVE this skill from the solution.
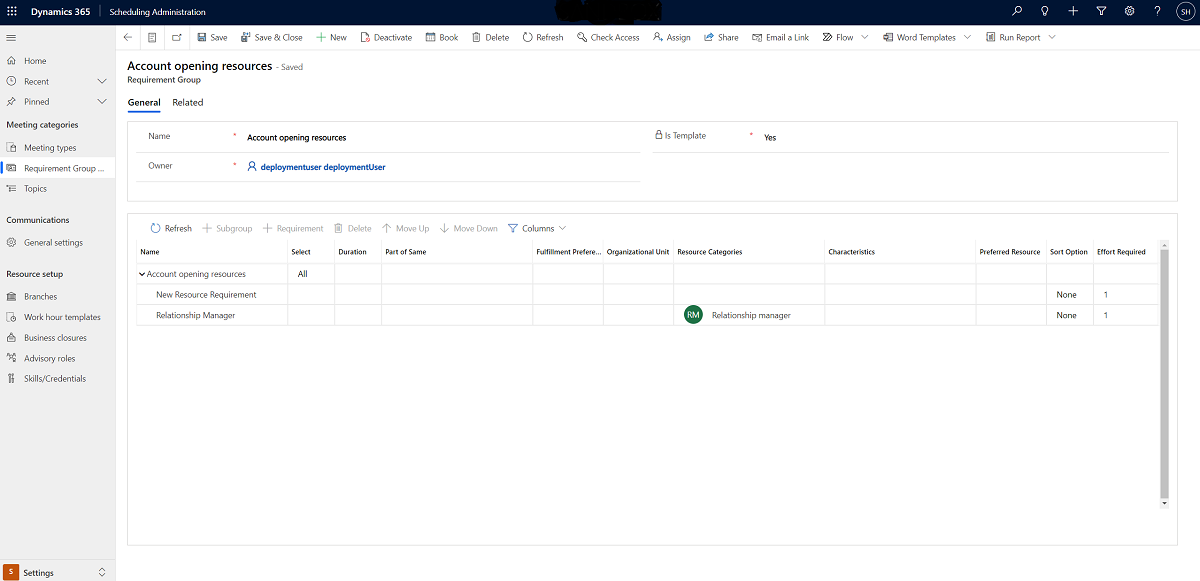
4. Set up resource requirement group templates
Requirement group templates enable you to define groups of advisor resources appropriate for a specific meeting type. Requirement groups allow either one or both of the following options: mapping of one or more requested roles for a meeting; fulfillment options between advisors, requested skills, and other preferences.
Create a resource requirement group template
Go to Scheduling administration > Settings > Requirement Group Templates, and then select New.
Enter a name for the template and ensure that the Is Template value is set to Yes.
In the root, set a duration for all the related requirements.
Note
You must specify only the Resource categories (advisory roles) value for the solution to work smoothly. All the other values are optional.
To filter additional skills, map Characteristics to the relevant advisor resource requirement.
You need not add duration in this template because you can determine the meeting duration at the meeting type setup stage.
Set the All or Any option. Setting All means that all the requirements must be fulfilled so that the system searches for resources for each requirement. Setting Any means that the system searches for resources that can fulfill any requirement and that fulfilling one requirement fulfills the entire requirement group.
Save the requirement group template.
5. Set up meeting topics
Meeting topics provide a high-level grouping of the different meeting services that the institution offers. They are not mandatory for setup but might prove useful for a shorter list of services offered before the customer proceeds to the second level. Additionally, they provide a reporting reference to group the different meeting telemetry data. You can map a meeting type may be mapped to more than one topic depending on the implementation.
Set up a meeting topic
Go to Scheduling administration > Settings > Topics, and then select New.
Add the name and description.
6. Set up meeting types
Meeting types are the manifestation of the appointment template that the customers can use to schedule meetings with the advisors. The meeting type links between the customer needs, the required advisor resources, and additional details required to best accomplish the meeting agenda. Examples of meeting types would be a loan consultation, opening an account, and so on.
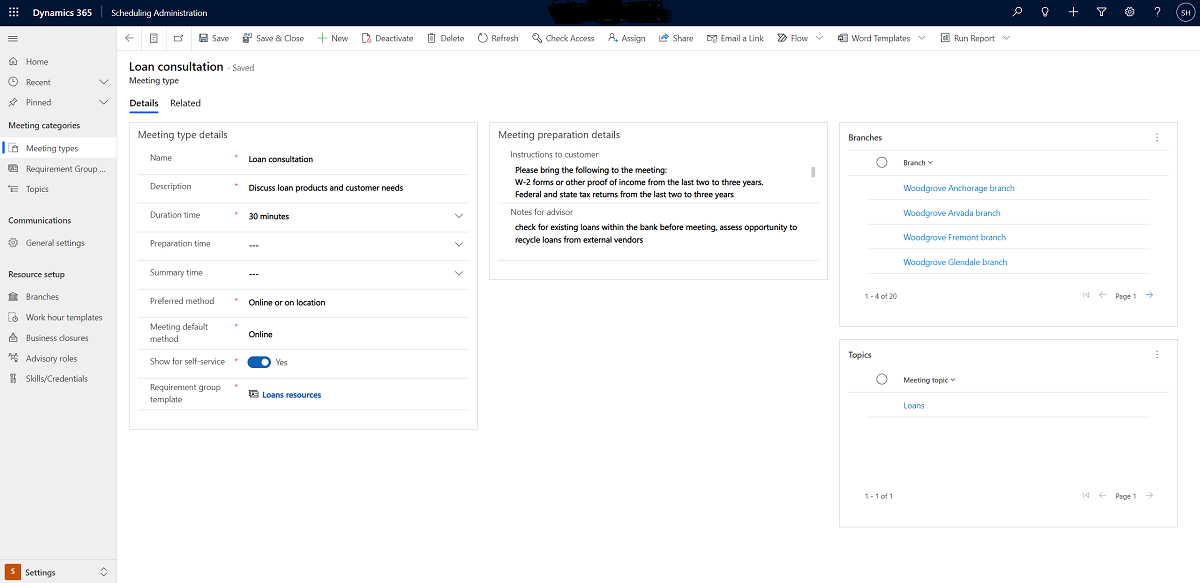
Set up a meeting type
Go to Scheduling administration > Settings > Meeting types, and then select New.
Set the meeting name and description as they should appear for the customer.
Add Duration time for the meeting. This will be the duration of the meeting sent to the customer.
In case the meeting requires extra Preparation time or Summary time from the advisors, you can specify their respective values. These fields are optional. If added, they create matching placeholder appointments in the advisors' calendars to block the time before and after the meeting. These blockers are not visible to the customer. These additional durations are considered when searching for the advisors' available time slots.
Choose the Preferred method of meeting the customer. This can be online, in-person, or both.
In case both online and in-person methods are enabled for the meeting, choose the default method offered to customers in the self-service experience.
Select whether the meeting is enabled in the self-service experience or should be used only by the institution to set up meetings.
Select the requirement group template set up in step 4. This template maps the advisor resources to call.
Add optional Instructions to customer for the meeting. This feature enables an efficient experience for the customer and is highly recommended. The information provided here appears on the self-service experience and in the communications sent out to the customer.
Add optional Notes to advisor, assisting them with specific instructions to follow while meeting with the customer. This information is not visible to the customer.
Map which Branches provide this meeting type. This information is used by the self-service experience to display the available branches for the selected meeting type.
Map which Topics are associated with this meeting type. This information is used by the self-service experience to navigate to the specific meeting type.
Note
Only registered bank customers' meetings and services are supported because a meeting is directly mapped to an existing contact.
7. Set up advisor resources
To introduce an agent of the institution as a servicing advisor, you can set them up as an advisor resource. Any bank agent included as part of the scheduling solution must be mapped as an advisor.
The Advisor entity is based on the Bookable resource category entity from URS.
Prerequisites to set up advisor resources
You need to perform the following steps as prerequisites for setting up the advisor resources:
Create a user for the advisor and validate that they are recognized as a Dataverse system user, before creating them as a resource.
Map the Scheduling advisor security role or its equivalent to enable the advisor user to set up meetings with customers.
Set up advisor resources
Go to Scheduling administration > Calendars > Advisors, and then select New.
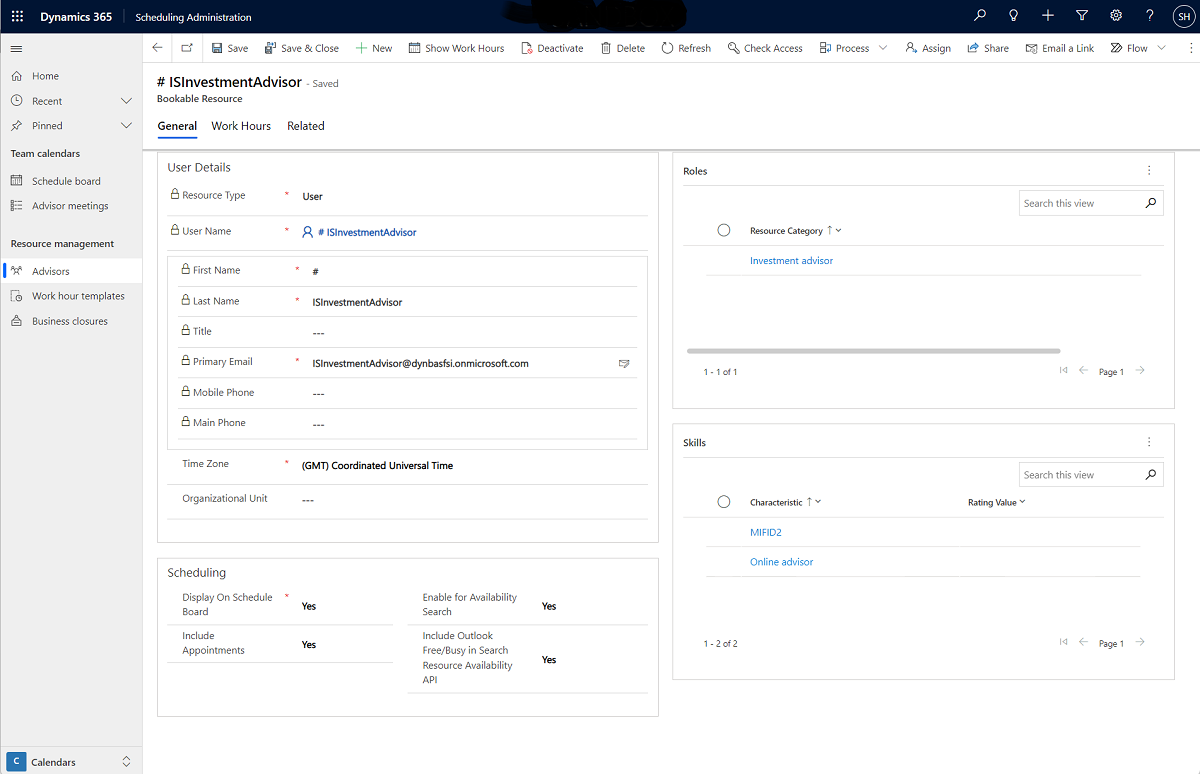
Against the User name, link the system user of the advisor. All the user details are automatically displayed.
Set the Time Zone of the user.
Map the user to an Organizational unit. This serves as the branch where the advisor can physically meet with the customer.
All the advisors enabled for availability search are considered relevant for scheduling in-person meetings in their organizational units. For limiting advisors to servicing only online meetings, you must set up a dedicated organizational unit.
You can control the visibility of the advisor in the schedule board, or disable the ability to schedule a meeting with advisor using the scheduling toggles.
Map one or more Roles for the advisor. You must have at least one user mapped to a role that is used by a requirement group template and a meeting type, for the solution to recognize the advisor as a relevant resource.
Map relevant Skills to the advisor.
Click the Work hours tab and set up working days and hours for the user. You can also use the working hour templates by creating a template from an existing advisor.
Set up business closures as required.
Map advisors from the physical branches for online meetings
Institutions that offer online meetings with their physical branch advisor must tag the advisors as available for online advisory.
Follow steps 1 through 5 for creating an advisor.
Map the Online advisor skill only to relevant advisors, in any of the organizational units.
Set up the set up working days and hours from the Work hours tab.
Map advisors for online meetings using a dedicated organizational unit
If the institution has a dedicated online advisory pool, you can create a dedicated organizational unit for that pool of advisors.
Follow steps 1 through 4 for creating an advisor.
Map the online organizational unit that is dedicated to online advisors.
Map the Roles as specified in Step 6.
Map the Online advisor skill to all the advisors in the pool.
Set up the set up working days and hours from the Work hours tab.
This approach requires indicating the online organizational unit clearly with the help of the GetAvailabilityTimeSlots API. Learn more: Developer tools.
8. Set up fulfillment preferences (Preview)
Important
Some or all of this functionality is available as part of a preview release. The content and the functionality are subject to change.
Note
This is an optional step.
Fulfillment preferences are customizable entities that help you decide how to display the availability details of the relevant financial advisors. By default, the Intelligent appointments solution displays the details depending on the advisors' schedules and the earliest available time in intervals of 30 minutes, rounded off to the nearest hour or half-hour.
Intervals determine the start time of subsequent bookings. The solution shows the available appointments based on the configured time interval. For example, when you configure an interval of 15 minutes, the available time slots for meetings will appear every 15 minutes.
Configure the fulfillment preference
Go to Scheduling administration > Settings > Fulfillment Preferences, and then select New.
Provide a name for the fulfillment preference.
Navigate to the Interval tab and select the duration between the available time slots.
Specify a value for Results per interval, which indicates how many options in terms of financial advisors will be made available to the meeting scheduler for each time slot. If left blank, the system defaults to 1.
Select Save and close.
Associate the fulfillment preference to a requirement group template
Navigate to the requirement group template you want to associate the fulfillment preference with. All the requirements within that requirement group will inherit the same fulfillment preferences.
Search your fulfillment preference and add it to the Fulfillment Preferences column.
Select Save and close.
Schedule meetings
After you have matched a relevant advisor to the customer, the Intelligent appointments engine supports scheduling a meeting depending on customer needs such as meeting type, location, channel, date, and time.
The meeting is set by calling a dedicated CreateMeeting API and is tagged as an Intelligent appointments meeting. Other appointments originating in Dynamics 365 Dataverse or Exchange are not considered part of the solution. They do not receive the solution communications and are not tracked for telemetry purposes. All meetings set through the Intelligent appointments engine will have a linked meeting type, determining the meeting subject, required advisors, meeting instructions for the customer and advisor, and the duration.
In-person meetings
The Intelligent appointments engine enables you to set in-person meetings and online meetings. In-person meetings are linked to a specific branch and use the address of the branch as the location.
Online meetings
A Microsoft Teams meeting is generated for any online meeting, which is tagged as an online appointment in Dataverse. In addition, a link is generated to join the online meeting. As a prerequisite, ensure that you have configured Microsoft Teams and set up advisor resources.
Preparation and summary appointments
The solution sets up dedicated summary and preparation appointments for the advisors. This capability provides the institution with the ability to allocate dedicated time in the advisor calendar to ensure the efficiency of the meeting.
The capability is optional and can be managed at the level of a meeting type. Learn more: Set up meeting types.
The preparation and summary appointments are automatically set up in the advisors' calendars as placeholders according to the duration determined by the administrator and contain the information of the original customer meeting. They are not visible to the customer.
These appointments are identifiable by the attribute Scheduling purpose with the values of Preparation or Post-appointment summary. If a meeting is canceled, the linked appointments are also canceled.
Customer notes
When scheduling any meeting, the customer can choose to add additional notes or request for the advisor. This allows the customer to inform the advisor before the meeting on what topics they would like to cover. For example, they might choose to disclose their loan target or request to discuss account programs. This helps the advisor prepare better for the meeting and provide improved service.
The customer notes are sent through the CreateMeeting API and saved in the appointment as part of Customer Notes. The notes are displayed in the default templates of communications sent out to the customer. They also appear in the appointment Description in Dynamics 365 default appointment form.
Cancel existing meetings
Meetings can be canceled through the CancelMeeting API call. After a meeting is canceled, the appointment entity is switched to canceled, communications, if enabled, are sent to the customer, and the advisor calendars are updated as free in both Dynamics 365 and Exchange calendars. Any preparation or summary appointments linked to the customer meeting are also removed.
Note
Only active meetings that take place in the future can be canceled.
Meetings canceled directly through the Dynamics 365 apps or the Exchange calendar are communicated to the customer as canceled using the Intelligent appointments communications. However, the cancellations are synchronized between Exchange and Dynamics 365, as server-side synchronization is activated as part of the solution deployment. Therefore, canceling through Dynamics 365 or Exchange frees up the advisors' calendars, and the corresponding time slots are considered available.
By default, if the appointment status in Dynamics 365 is Canceled, the appointment status synchronizes to Exchange as Free and still appears in Exchange as a canceled meeting. You can control this with the help of the SSSPropagateAppointmentCancellationsToExchange flag in OrgDbOrgSettings. For more information, go to Syncing canceled and deleted appointments from Dynamics 365 to Exchange.
To change this behavior so that the meeting automatically disappears from the Exchange calendar, you can change the value of the flag by using this editor tool.
Contextual intelligence
The intelligent appointments engine meets industry needs and presents contextualized results to the customer. This is reflected in the search algorithms, in the skill matching of the advisors based on a requested topic, and in the skill refinement layer that the institutions can add. Additionally, meeting types are mapped to specific branches, verifying that customers are not scheduling meetings in branches that cannot provide the relevant services they need.
In addition, the engine provides context and instructions to the customer on preparing for a meeting. You, as an administrator, can provide individual customer instructions for each meeting type. This allows the customer an understanding of what will happen in the meeting and what they should be prepared with so that the meeting process is efficient.
See also
Intelligent appointments Support Deploy Microsoft Cloud for Financial Services What is Microsoft Cloud for Financial Services?