Enable sign-in for Java Tomcat apps using Microsoft Entra ID
This article demonstrates a Java Tomcat app that signs in users to your Microsoft Entra ID tenant using the Microsoft Authentication Library (MSAL) for Java.
The following diagram shows the topology of the app:
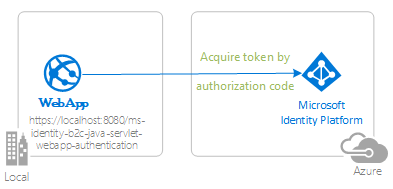
The client app uses MSAL for Java (MSAL4J) to sign in users to their own Microsoft Entra ID tenant and obtain an ID token from Microsoft Entra ID. The ID token proves that a user is authenticated with this tenant. The app protects its routes according to the user's authentication status.
Prerequisites
- JDK version 8 or higher
- Maven 3
- A Microsoft Entra ID tenant. For more information, see How to get a Microsoft Entra ID tenant.
- A user account in your own Microsoft Entra ID tenant if you want to work with accounts in your organizational directory only - that is, single-tenant mode. If you haven't created a user account in your Microsoft Entra ID tenant, you should do so before proceeding. For more information, see How to create, invite, and delete users.
- A user account in any organization's Microsoft Entra ID tenant if you want to work with accounts in any organizational directory - that is, multi-tenant mode. You must modify this sample to work with a personal Microsoft account. If you haven't created a user account in your Microsoft Entra ID tenant yet, you should do so before proceeding. For more information, see How to create, invite, and delete users.
- A personal Microsoft account - for example, Xbox, Hotmail, Live, and so on - if you want to work with personal Microsoft accounts.
Recommendations
- Some familiarity with the Java / Jakarta Servlets.
- Some familiarity with Linux/OSX terminal or Windows PowerShell.
- jwt.ms for inspecting your tokens.
- Fiddler for monitoring your network activity and troubleshooting.
- Follow the Microsoft Entra ID Blog to stay up-to-date with the latest developments.
Set up the sample
The following sections show you how to set up the sample application.
Clone or download the sample repository
To clone the sample, open a Bash window and use the following command:
git clone https://github.com/Azure-Samples/ms-identity-java-servlet-webapp-authentication.git
cd 1-Authentication/sign-in
Alternatively, navigate to the ms-identity-java-servlet-webapp-authentication repository, then download it as a .zip file and extract it to your hard drive.
Important
To avoid file path length limitations on Windows, clone or extract the repository into a directory near the root of your hard drive.
Register the sample application with your Microsoft Entra ID tenant
There's one project in this sample. To register the app on the Azure portal, you can either follow manual configuration steps or use a PowerShell script. The script does the following tasks:
- Creates the Microsoft Entra ID applications and related objects, such as passwords, permissions, and dependencies.
- Modifies the project configuration files.
- By default, sets up an application that works with accounts in your organizational directory only.
Use the following steps to run the PowerShell script:
On Windows, open PowerShell and navigate to the root of the cloned directory.
Use the following command to set the execution policy for PowerShell:
Set-ExecutionPolicy -ExecutionPolicy RemoteSigned -Scope Process -ForceUse the following commands to run the configuration script:
cd .\AppCreationScripts\
.\Configure.ps1
Note
Other ways of running the scripts are described in App Creation Scripts. The scripts also provide a guide to automated application registration, configuration, and removal, which can help in your CI/CD scenarios.
Configure the app to use your app registration
Use the following steps to configure the app:
Note
In the following steps, ClientID is the same as Application ID or AppId.
Open the project in your IDE.
Open the ./src/main/resources/authentication.properties file.
Find the string
{enter-your-tenant-id-here}. Replace the existing value with one of the following values:- Your Microsoft Entra ID tenant ID if you registered your app with the Accounts in this organizational directory only option.
- The word
organizationsif you registered your app with the Accounts in any organizational directory option. - The word
commonif you registered your app with the Accounts in any organizational directory and personal Microsoft accounts option. - The word
consumersif you registered your app with the Personal Microsoft accounts option.
Find the string
{enter-your-client-id-here}and replace the existing value with the application ID orclientIdof thejava-servlet-webapp-authenticationapplication copied from the Azure portal.Find the string
{enter-your-client-secret-here}and replace the existing value with the value you saved during the creation of thejava-servlet-webapp-authenticationapp, in the Azure portal.
Build the sample
To build the sample using Maven, navigate to the directory containing the pom.xml file for the sample, and then run the following command:
mvn clean package
This command generates a .war file that you can run on a variety of application servers.
Run the sample
The following sections show you how to deploy the sample to Azure App Service.
Prerequisites
Maven Plugin for Azure App Service apps
If Maven isn't your preferred development tool, see the following similar tutorials that use other tools:
Configure the Maven plugin
When you deploy to Azure App Service, the deployment automatically uses your Azure credentials from the Azure CLI. If the Azure CLI isn't installed locally, then the Maven plugin authenticates with OAuth or device sign-in. For more information, see authentication with Maven plugins.
Use the following steps to configure the plugin:
Run the following command to configure the deployment. This command helps you to set up the Azure App Service operating system, Java version, and Tomcat version.
mvn com.microsoft.azure:azure-webapp-maven-plugin:2.12.0:configFor Create new run configuration, press Y, then press Enter.
For Define value for OS, press 1 for Windows, or 2 for Linux, then press Enter.
For Define value for javaVersion, press 2 for Java 11, then press Enter.
For Define value for webContainer, press 4 for Tomcat 9.0, then press Enter.
For Define value for pricingTier, press Enter to select the default P1v2 tier.
For Confirm, press Y, then press Enter.
The following example shows the output of the deployment process:
Please confirm webapp properties
AppName : msal4j-servlet-auth-1707209552268
ResourceGroup : msal4j-servlet-auth-1707209552268-rg
Region : centralus
PricingTier : P1v2
OS : Linux
Java Version: Java 11
Web server stack: Tomcat 9.0
Deploy to slot : false
Confirm (Y/N) [Y]: [INFO] Saving configuration to pom.
[INFO] ------------------------------------------------------------------------
[INFO] BUILD SUCCESS
[INFO] ------------------------------------------------------------------------
[INFO] Total time:  37.112 s
[INFO] Finished at: 2024-02-06T08:53:02Z
[INFO] ------------------------------------------------------------------------
After you've confirmed your choices, the plugin adds the required plugin element and settings to your project's pom.xml file to configure your app to run in Azure App Service.
The relevant portion of the pom.xml file should look similar to the following example:
<build>
    <plugins>
        <plugin>
            <groupId>com.microsoft.azure</groupId>
            <artifactId>>azure-webapp-maven-plugin</artifactId>
            <version>x.xx.x</version>
            <configuration>
                <schemaVersion>v2</schemaVersion>
                <resourceGroup>your-resourcegroup-name</resourceGroup>
                <appName>your-app-name</appName>
            ...
            </configuration>
        </plugin>
    </plugins>
</build>
You can modify the configurations for App Service directly in your pom.xml. Some common configurations are listed in the following table:
| Property | Required | Description |
|---|---|---|
subscriptionId |
false | The subscription ID. |
resourceGroup |
true | The Azure resource group for your app. |
appName |
true | The name of your app. |
region |
false | The region in which to host your app. The default value is centralus. For valid regions, see Supported Regions. |
pricingTier |
false | The pricing tier for your app. The default value is P1v2 for a production workload. The recommended minimum value for Java development and testing is B2. For more information, see App Service Pricing. |
runtime |
false | The runtime environment configuration. For more information, see Configuration Details. |
deployment |
false | The deployment configuration. For more information, see Configuration Details. |
For the complete list of configurations, see the plugin reference documentation. All the Azure Maven plugins share a common set of configurations. For these configurations, see Common Configurations. For configurations specific to Azure App Service, see Azure app: Configuration Details.
Be sure to save aside the appName and resourceGroup values for later use.
Prepare the app for deployment
When you deploy your application to App Service, your redirect URL changes to the redirect URL of your deployed app instance. Use the following steps to change these settings in your properties file:
Navigate to your app's authentication.properties file and change the value of
app.homePageto your deployed app's domain name, as shown in the following example. For example, if you choseexample-domainfor your app name in the previous step, you must now usehttps://example-domain.azurewebsites.netfor theapp.homePagevalue. Be sure that you've also changed the protocol fromhttptohttps.# app.homePage is by default set to dev server address and app context path on the server # for apps deployed to azure, use https://your-sub-domain.azurewebsites.net app.homePage=https://<your-app-name>.azurewebsites.netAfter saving this file, use the following command to rebuild your app:
mvn clean package
Important
In this same authentication.properties file, you have a setting for your aad.secret. It isn't a good practice to deploy this value to App Service. Neither is it a good practice to leave this value in your code and potentially push it up to your git repository. For removing this secret value from your code, you can find more detailed guidance in the Deploy to App Service - Remove secret section. This guidance adds extra steps for pushing the secret value to Key Vault and to use Key Vault References.
Update your Microsoft Entra ID app registration
Because the redirect URI changes to your deployed app to Azure App Service, you also need to change the redirect URI in your Microsoft Entra ID app registration. Use the following steps to make this change:
Navigate to the Microsoft identity platform for developers App registrations page.
Use the search box to search for your app registration - for example,
java-servlet-webapp-authentication.Open your app registration by selecting its name.
Select Authentication from the menu.
In the Web - Redirect URIs section, select Add URI.
Fill out the URI of your app, appending
/auth/redirect- for example,https://<your-app-name>.azurewebsites.net/auth/redirect.Select Save.
Deploy the app
You're now ready to deploy your app to Azure App Service. Use the following command to make sure you're signed in to your Azure environment to execute the deployment:
az login
With all the configuration ready in your pom.xml file, you can now use the following command to deploy your Java app to Azure:
mvn package azure-webapp:deploy
After deployment is completed, your application is ready at http://<your-app-name>.azurewebsites.net/. Open the URL with your local web browser, where you should see the start page of the msal4j-servlet-auth application.
Explore the sample
Use the following steps to explore the sample:
- Notice the signed-in or signed-out status displayed at the center of the screen.
- Select the context-sensitive button in the corner. This button reads Sign In when you first run the app.
- On the next page, follow the instructions and sign in with an account in the Microsoft Entra ID tenant.
- On the consent screen, notice the scopes that are being requested.
- Notice that the context-sensitive button now says Sign out and displays your username.
- Select ID Token Details to see some of the ID token's decoded claims.
- Use the button in the corner to sign out.
- After signing out, select ID Token Details to observe that the app displays a
401: unauthorizederror instead of the ID token claims when the user isn't authorized.
About the code
This sample shows how to use MSAL for Java (MSAL4J) to sign in users into your Microsoft Entra ID tenant. If you'd like to use MSAL4J in your own applications, you must add it to your projects using Maven.
If you want to replicate this sample's behavior, you can copy the pom.xml file and the contents of the helpers and authservlets folders in the src/main/java/com/microsoft/azuresamples/msal4j folder. You also need the authentication.properties file. These classes and files contain generic code that you can use in a wide array of applications. You can copy the rest of the sample as well, but the other classes and files are built specifically to address this sample's objective.
Contents
The following table shows the contents of the sample project folder:
| File/folder | Description |
|---|---|
| AppCreationScripts/ | Scripts to automatically configure Microsoft Entra ID app registrations. |
| src/main/java/com/microsoft/azuresamples/msal4j/authwebapp/ | This directory contains the classes that define the app's backend business logic. |
| src/main/java/com/microsoft/azuresamples/msal4j/authservlets/ | This directory contains the classes that are used for sign in and sign out endpoints. |
| ____Servlet.java | All of the endpoints available are defined in .java classes ending in ____Servlet.java.. |
| src/main/java/com/microsoft/azuresamples/msal4j/helpers/ | Helper classes for authentication. |
| AuthenticationFilter.java | Redirects unauthenticated requests to protected endpoints to a 401 page. |
| src/main/resources/authentication.properties | Microsoft Entra ID and program configuration. |
| src/main/webapp/ | This directory contains the UI - JSP templates |
| CHANGELOG.md | List of changes to the sample. |
| CONTRIBUTING.md | Guidelines for contributing to the sample. |
| LICENSE | The license for the sample. |
ConfidentialClientApplication
A ConfidentialClientApplication instance is created in the AuthHelper.java file, as shown in the following example. This object helps craft the Microsoft Entra ID authorization URL and also helps exchange the authentication token for an access token.
// getConfidentialClientInstance method
IClientSecret secret = ClientCredentialFactory.createFromSecret(SECRET);
confClientInstance = ConfidentialClientApplication
                     .builder(CLIENT_ID, secret)
                     .authority(AUTHORITY)
                     .build();
The following parameters are used for instantiation:
- The client ID of the app.
- The client secret, which is a requirement for Confidential Client Applications.
- The Microsoft Entra ID Authority, which includes your Microsoft Entra ID tenant ID.
In this sample, these values are read from the authentication.properties file using a properties reader in the Config.java file.
Step-by-step walkthrough
The following steps provide a walkthrough of the app's functionality:
The first step of the sign-in process is to send a request to the
/authorizeendpoint on for your Microsoft Entra ID tenant. The MSAL4JConfidentialClientApplicationinstance is used to construct an authorization request URL. The app redirects the browser to this URL, which is where the user signs in.final ConfidentialClientApplication client = getConfidentialClientInstance(); AuthorizationRequestUrlParameters parameters = AuthorizationRequestUrlParameters.builder(Config.REDIRECT_URI, Collections.singleton(Config.SCOPES)) .responseMode(ResponseMode.QUERY).prompt(Prompt.SELECT_ACCOUNT).state(state).nonce(nonce).build(); final String authorizeUrl = client.getAuthorizationRequestUrl(parameters).toString(); contextAdapter.redirectUser(authorizeUrl);The following list describes the features of this code:
AuthorizationRequestUrlParameters: Parameters that must be set in order to build an AuthorizationRequestUrl.REDIRECT_URI: Where Microsoft Entra ID redirects the browser - along with the auth code - after collecting the user credentials. It must match the redirect URI in the Microsoft Entra ID app registration in the Azure portal.SCOPES: Scopes are permissions requested by the application. Normally, the three scopesopenid profile offline_accesssuffice for receiving an ID token response.You can find a full list of scopes requested by the app in the authentication.properties file. You can add more scopes, such as
User.Read.
The user is presented with a sign-in prompt by Microsoft Entra ID. If the sign-in attempt is successful, the user's browser is redirected to the app's redirect endpoint. A valid request to this endpoint contain an authorization code.
The
ConfidentialClientApplicationinstance then exchanges this authorization code for an ID token and access token from Microsoft Entra ID.// First, validate the state, then parse any error codes in response, then extract the authCode. Then: // build the auth code params: final AuthorizationCodeParameters authParams = AuthorizationCodeParameters .builder(authCode, new URI(Config.REDIRECT_URI)).scopes(Collections.singleton(Config.SCOPES)).build(); // Get a client instance and leverage it to acquire the token: final ConfidentialClientApplication client = AuthHelper.getConfidentialClientInstance(); final IAuthenticationResult result = client.acquireToken(authParams).get();The following list describes the features of this code:
AuthorizationCodeParameters: Parameters that must be set in order to exchange the Authorization Code for an ID and/or access token.authCode: The authorization code that was received at the redirect endpoint.REDIRECT_URI: The redirect URI used in the previous step must be passed again.SCOPES: The scopes used in the previous step must be passed again.
If
acquireTokenis successful, the token claims are extracted. If the nonce check passes, the results are placed incontext- an instance ofIdentityContextData- and saved to the session. The application can then instantiate theIdentityContextDatafrom the session by way of an instance ofIdentityContextAdapterServletwhenever it needs access to it, as shown in the following code:// parse IdToken claims from the IAuthenticationResult: // (the next step - validateNonce - requires parsed claims) context.setIdTokenClaims(result.idToken()); // if nonce is invalid, stop immediately! this could be a token replay! // if validation fails, throws exception and cancels auth: validateNonce(context); // set user to authenticated: context.setAuthResult(result, client.tokenCache().serialize());
Protect the routes
For information about how the sample app filters access to routes, see AuthenticationFilter.java. In the authentication.properties file, the app.protect.authenticated property contains the comma-separated routes that only authenticated users can access, as shown in the following example:
# for example, /token_details requires any user to be signed in and does not require special roles claim(s)
app.protect.authenticated=/token_details
Scopes
Scopes tell Microsoft Entra ID the level of access that the application is requesting.
Based on the requested scopes, Microsoft Entra ID presents a consent dialogue to the user upon sign-in. If the user consents to one or more scopes and obtains a token, the scopes-consented-to are encoded into the resulting access_token.
For the scopes requested by the application, see authentication.properties. These three scopes are requested by MSAL and given by Microsoft Entra ID by default.
More information
- Microsoft Authentication Library (MSAL) for Java
- MSAL Java Reference Documentation
- Microsoft identity platform (Microsoft Entra ID for developers)
- Quickstart: Register an application with the Microsoft identity platform
- Understanding Microsoft Entra ID application consent experiences
- Understand user and admin consent
- MSAL code samples
Feedback
Coming soon: Throughout 2024 we will be phasing out GitHub Issues as the feedback mechanism for content and replacing it with a new feedback system. For more information see: https://aka.ms/ContentUserFeedback.
Submit and view feedback for